How to manage Cases assigned to a Client. Track case history, status, charges, events, and payments.
How to use the Console to run admin tools, manage advanced integrations, and view audit logs.
How to manage Contacts and assign to Clients. Contacts are phone numbers or email addresses.
How to manage Clients such as defendants, victims, witnesses, and jurors.
How to create aggregated data dashboards and reports to track metrics in real-time.
How to manage in-person and virtual events. Send automated event reminders and web portals.
How to send messages automatically using Auto Messages and Flows.
How to send and receive multimedia files and fillable forms through messagers and portals.
How to use the General Settings page to configure each eCourtDate agency.
How to create physical and virtual locations. Link a location through messages and portals.
How to send and receive omnichannel messages through eCourtDate.
How to manage Payments and assign to Clients. Payments can be one-time or recurring.
How to create accessible self-service Web Portals and link to messages.
How to manage Users who are authorized to access eCourtDate. Create roles to assign permissions.
How to upload data to eCourtDate using flat files such as a CSV or Excel.
How to use Bulk Actions to quickly send a mass message, mass event, or bulk update clients.
How to Manage Virtual Check-ins
Last Updated 17 hours ago
Create a Web Portal to allow visitors to check in for virtual meetings.
How to Automatically Upload Files using SFTP
Last Updated 1 day ago
Automatically upload files to eCourtDate using Secure File Transfer Protocol
How to Disable Messages based on Status
Last Updated 1 day ago
Configure statuses to automatically disable outbound messages.
How to Auto Forward Inbound Messages
Last Updated 4 days ago
Auto-forward inbound texts from authorized users to quickly notify client groups.
How to Assign Users via Bulk Actions
Last Updated 4 days ago
Assigning Users via Bulk Action allows you to efficiently assign users to specific clients in one go, streamlines user management, and saves time and effort.
How to Verify an Email Domain
Last Updated 2 weeks ago
Verify an email domain to send authenticated outbound emails.

How to Configure Email Gateways
Last Updated 3 weeks ago
Configure Email Gateways to route outbound emails through your Email Server.

How to Create Events for Clients
Last Updated 1 month ago
Create an in-person or virtual event for a client. Assign a Flow to automatically notify the client about the event.
How to Add Contact Information for a Client
Last Updated 1 month ago
Learn How to Add Client's Contact Information to Streamline Your Communication Process on eCourtDate.
How to Manually Add a New Client
Last Updated 1 month ago
Add New Clients Manually To Improve Communication and Client Management on eCourtDate.
How to Create Redirect Links
Last Updated 5 months ago
Create redirect links to maintain control over links that are shared in messages and other client-facing resources. Maintain your agency's credibility by always using your official domain. Automatically create links to redirect visitors to external sites.
How to Switch the Send Mode
Last Updated 5 months ago
Simulate Mode allows users to test scheduling outbound messages without sending the message to the end recipient. Switch to Live Mode if you want messages to be delivered to the end recipient.

How to Complete Carrier Registration
Last Updated 5 months ago
How to register your entity and campaigns with US-based carriers. Carrier registration as a government entity ensures high deliverability and sending rates.

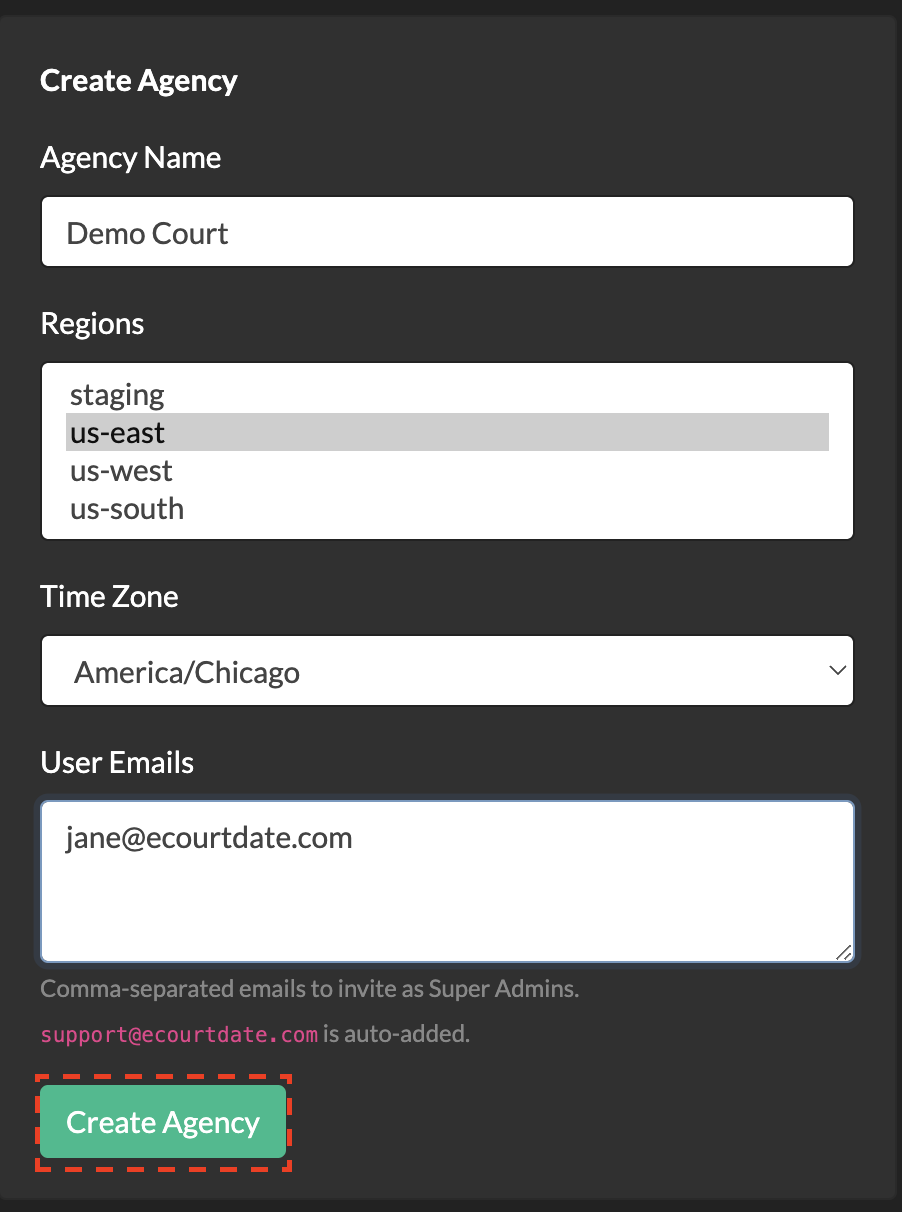
How to Create New Agencies
Last Updated 5 months ago
Create multiple agencies to use eCourtDate for different use cases, user groups, departments, and/or locations. eCourtDate's multi-agency design allows you to isolate each agency for a specific need.
How to Create a One-off Payment Request for a client
Last Updated 5 months ago
Use eCourtDate’s Payment Reminder to Quickly Send One-off Payment Requests and Notify Clients of Their Payment Obligations.
How to Setup a Pay Link
Last Updated 5 months ago
Create a pay link and quickly start accepting payments online with an accessible and multilingual portal.

How to Manage Cases
Last Updated 5 months ago
Learn how to manage cases in eCourtDate. Create case-based workflows, organize clients based on cases, and send messages associated to dynamic case types and statuses.
How to Manage Agency Emails
Last Updated 5 months ago
Agency Emails are the email addresses used to send and receive multilingual email messages. At least one configured Agency Email is required for each agency to be able to send and receive emails.

How to Forward Inbound Messages by Assigned User
Last Updated 5 months ago
The Forward Inbound Messages by Assigned User Allows eCourtDate Users to Forward Incoming Messages to the Assigned User automatically.
How to Manage Agency Phone Numbers
Last Updated 6 months ago
How to manage agency phone numbers. Use a local, toll-free, or short code number to send and receive multilingual texts (SMS/MMS) and calls.

How to Manage Judges
Last Updated 6 months ago
Manage and assign Judges to events, cases, warrants, and payments. Create reports and dashboards to track real-time metrics by assigned Judge.

How to Track Geolocation on Portal Visits
Last Updated 6 months ago
Track geolocation and device data when visitors access portal links. Ensure clients are in authorized locations and increase message delivery validation.

How to Send a Gift Card
Last Updated 6 months ago
Instantly purchase gift cards from leading retailers and marketplaces. Send gift card redemption details to any recipient.

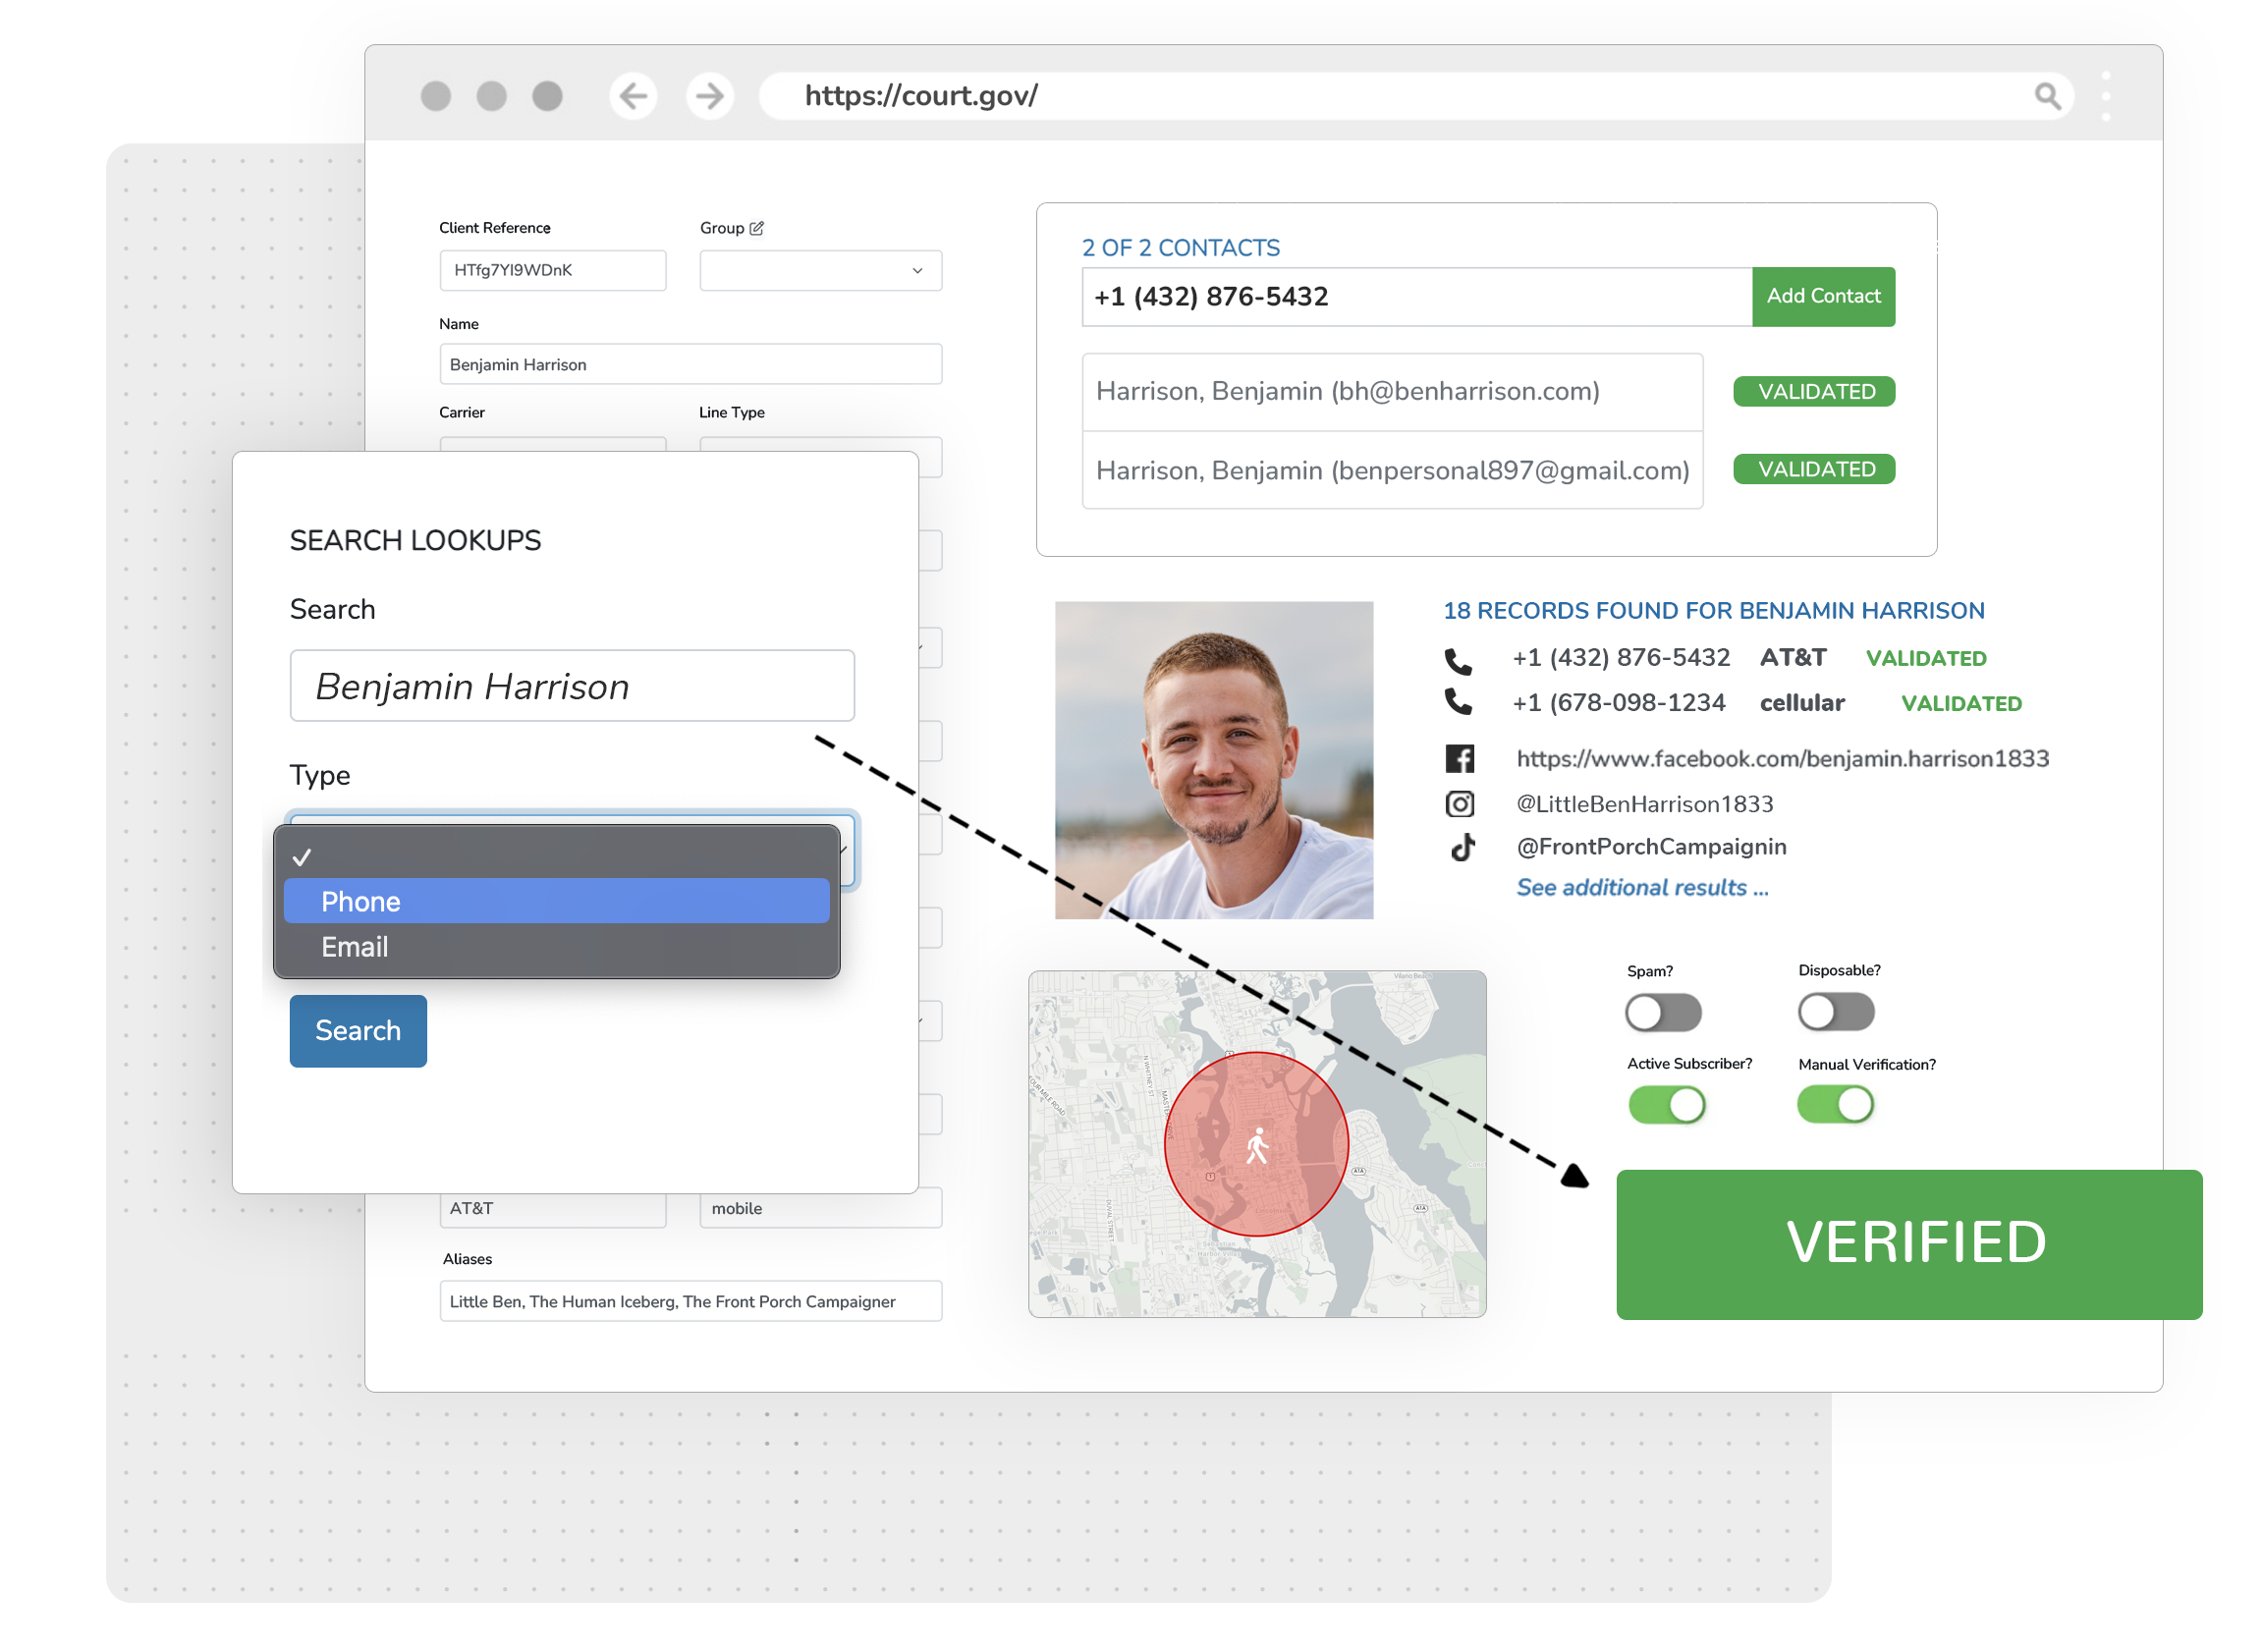
How to Run Reverse Lookups
Last Updated 6 months ago
Lookup details on any given phone number or email address. Validate your contact lists, improve message deliverability, and improve verification for self-enrollees.
How to Switch Your Current Agency
Last Updated 6 months ago
Learn How to Switch Your Current Agency If You Have More Than One Assigned to Your User Profile.

How to Create a User
Last Updated 6 months ago
Adding new users to the eCourtDate platform is a straightforward process that can be completed in a few simple steps
How to Restore Clients via Bulk Actions
Last Updated 6 months ago
Restoring via Bulk Actions empowers eCourtDate users to efficiently restore multiple clients from the trash, simplifying client management tasks, ensuring data integrity, and facilitating quick recovery for improved client organization.
How to Set Up Addresses for Clients
Last Updated 6 months ago
eCourtDate Ensures Accurate Client Address Management, Improving Communication Through Precise Location Information.
Roles and Permissions
Last Updated 6 months ago
Restrict User Access Based on Configurable Roles and Permissions
