Agency Settings
How to Set Up a New Agency
6 min read
Updated Feb 15, 2026
Setting up a new eCourtDate agency configures your isolated tenant with the essential settings, users, and workflows needed to begin operations in staging or production.
Setting up a new eCourtDate agency configures your isolated tenant with the essential settings, users, and workflows needed to begin operations in staging or production.
Overview
- Each eCourtDate agency is an isolated tenant with its own data, settings, and users
- The setup process walks you through configuring agency details, onboarding preferences, and a comprehensive checklist of required settings
- Administrators use the Agency Setup wizard to establish initial configuration quickly
- After setup, your agency will have default settings for messaging, portals, automations, and more
- eCourtDate offers two environments: Staging (sandbox for testing, no live messages) and Production (live messaging with multiple regions)
Prerequisites
- You must have a new eCourtDate agency ready to configure (see How to Create a New Agency)
- You must be an administrator user in the agency
- You should know your agency's contact information (phone, email, website, address, timezone)
How-To Steps
Step 1: Access the Agency Setup
- Log in to staging.ecourtdate.com for testing or app.ecourtdate.com for production
- From the Dashboard, scroll down to the bottom of the page
- Click Agency Setup
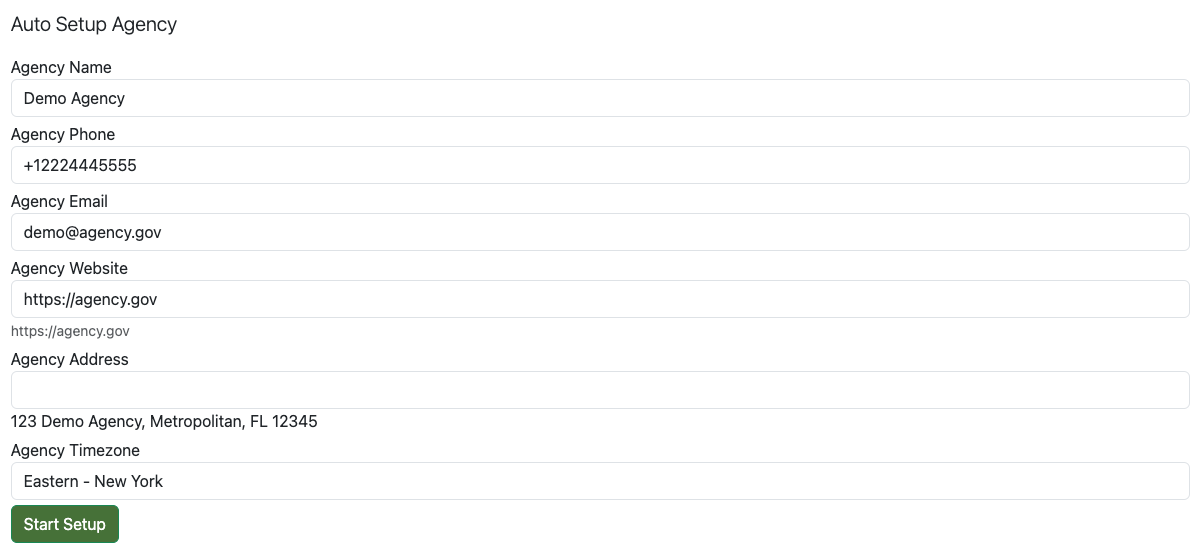
Step 2: Complete the Agency Information
- Fill in or review the following fields:
- Agency Name
- Agency Phone
- Agency Email
- Agency Website
- Agency Address
- Agency Timezone
- Click the Start Setup button
- Check your email for a confirmation once the setup is complete (you can continue with other steps in the meantime)
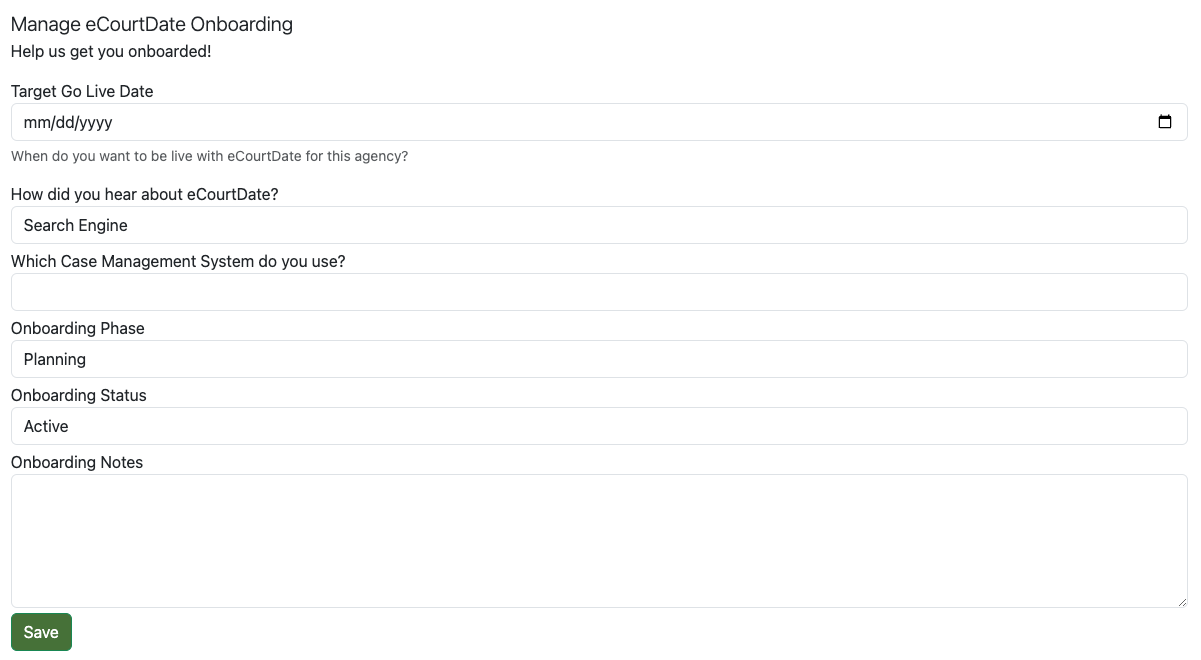
Step 3: Customize Your Onboarding
- Click the Onboarding tab
- Fill in or review the following fields:
- Target Go Live Date
- Referral Source
- Case Management System
- Project Management Phase
- Onboarding Notes
- Click Save to save any changes
Step 4: Configure Primary Contact and Default Settings
Before proceeding to the checklist, review the default settings created during Auto Setup.
- Go to Admin > Settings > General.
- Verify or update the Primary Contact information:
- Primary Contact Name: The main point of contact for your agency.
- Primary Contact Email: The email address for system notifications and correspondence.
- Primary Contact Phone: The phone number for urgent communications.
- Configure the following default settings:
- Default Language: Select the primary language for your agency's communications (for example, English, Spanish, or Vietnamese).
- Default Timezone: Confirm or change the timezone used for scheduling messages, events, and reports.
- Business Hours: Set your agency's operating hours. Messages and automations can be configured to respect these hours.
- Date Format: Choose your preferred date display format.
- Click Save to apply your changes.
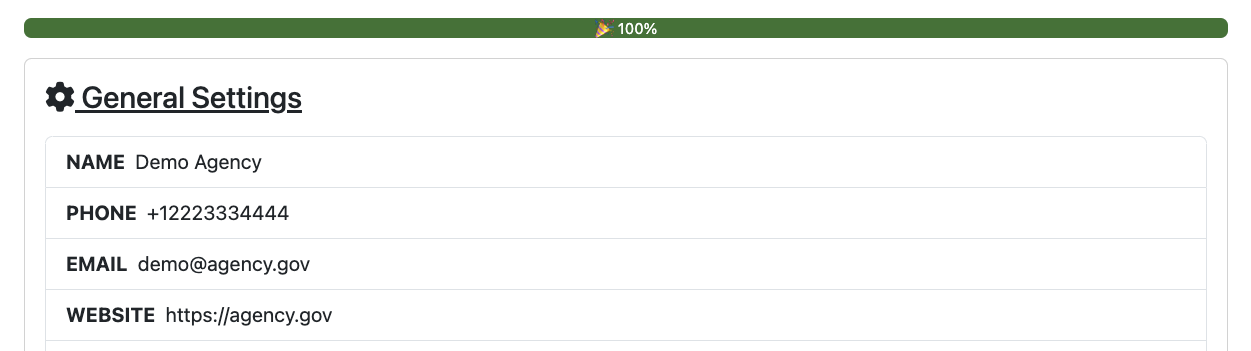
Step 5: Review the Agency Checklist
- Once you receive the setup complete email, click the Agency Checklist tab
- Review each item in the checklist. The Auto Setup creates default settings for each, but you can click through to customize:
- General Settings
- Send Mode
- Agency Phones
- Agency Emails
- Domains
- Users
- Roles
- Portals
- Statuses
- Flows
- Auto Messages
- Upload Templates (optional)
- Data Dashboards
- Reports
- Files
- Click through each checklist item to review and adjust settings as needed
Step 6: Complete Next Steps
- Invite your team by going to Admin > Users and filling in the Create User form
- Review the Billing tab and make any necessary changes
- Click the Carrier tab and complete the carrier registration form
- Once the checklist and carrier registration are complete, you can begin sending live messages
- Schedule an onboarding meeting with the eCourtDate team for additional guidance
What to Expect
After completing the Agency Setup wizard and checklist, your agency will have default configurations for messaging, automations, portals, and user roles. The Auto Setup provisions standard settings that work for most agencies. You can customize any setting at any time after the initial setup. The entire process typically takes 15 to 30 minutes, though carrier registration may require additional time for approval.
Best Practices
- Complete the setup in staging first to familiarize yourself with the process before configuring production
- Review every item in the Agency Checklist even if you plan to use the defaults, so you understand what has been configured
- Set up your Send Mode to simulated before inviting users, then switch to live only when you are ready
- Invite a small group of pilot users first to test workflows before rolling out to your full team
- Schedule an onboarding meeting with the eCourtDate team to get personalized guidance for your agency's use case
Frequently Asked Questions
Q: What is the difference between staging and production?
A: Staging is an isolated sandbox environment for testing and development that cannot send live messages. Production is the live environment where you can send real messages to clients. Use staging to test automations and integrations before going live.
Q: How long does the Auto Setup take to complete?
A: The Auto Setup typically completes within a few minutes. You will receive an email notification when it is finished. You can continue configuring other settings while waiting.
Q: Can I change settings after the initial setup?
A: Yes. All settings configured during setup can be modified at any time through Admin > Settings or the relevant section in the application.
Q: Do I need to complete carrier registration before sending messages?
A: Yes. Carrier registration is required for live outbound messaging in production. Click the Carrier tab in the setup process and complete the registration form.
Q: What if I need to set up multiple agencies with similar settings?
A: You can use the Console's copy settings feature to replicate configuration from one agency to another. See How to Copy Settings From One Agency to Another for details.
Troubleshooting
Issue: The Agency Setup option does not appear on the Dashboard
Symptoms: You scroll to the bottom of the Dashboard but do not see the Agency Setup link.
Solution:
- Verify you are logged in as an administrator user
- Check that the agency has not already been set up (the link may not appear for agencies that have completed setup)
- Try accessing the setup directly through Admin > Settings
Issue: You do not receive the setup complete email
Symptoms: You clicked Start Setup but the confirmation email has not arrived.
Solution:
- Check your spam or junk folder for the email
- Wait a few minutes, as provisioning can take time
- Refresh the Agency Setup page to check if the setup has completed
- If the issue persists, contact support by clicking the ticket button in the bottom right corner of the screen
Related Articles
Setting up a new eCourtDate agency configures your isolated tenant with the essential settings, users, and workflows needed to begin operations in staging or production.
### Overview
- Each eCourtDate agency is an isolated tenant with its own data, settings, and users
- The setup process walks you through configuring agency details, onboarding preferences, and a comprehensive checklist of required settings
- Administrators use the Agency Setup wizard to establish initial configuration quickly
- After setup, your agency will have default settings for messaging, portals, automations, and more
- eCourtDate offers two environments: **Staging** (sandbox for testing, no live messages) and **Production** (live messaging with multiple regions)
### Prerequisites
- You must have a new eCourtDate agency ready to configure (see [How to Create a New Agency](/how-to-create-a-new-agency))
- You must be an administrator user in the agency
- You should know your agency's contact information (phone, email, website, address, timezone)
### How-To Steps
#### Step 1: Access the Agency Setup
1. Log in to [staging.ecourtdate.com](https://staging.ecourtdate.com) for testing or [app.ecourtdate.com](https://app.ecourtdate.com) for production
2. From the **Dashboard**, scroll down to the bottom of the page
3. Click **Agency Setup**
#### Step 2: Complete the Agency Information
1. Fill in or review the following fields:
- **Agency Name**
- **Agency Phone**
- **Agency Email**
- **Agency Website**
- **Agency Address**
- **Agency Timezone**
2. Click the **Start Setup** button
3. Check your email for a confirmation once the setup is complete (you can continue with other steps in the meantime)

#### Step 3: Customize Your Onboarding
1. Click the **Onboarding** tab
2. Fill in or review the following fields:
- **Target Go Live Date**
- **Referral Source**
- **Case Management System**
- **Project Management Phase**
- **Onboarding Notes**
3. Click **Save** to save any changes

#### Step 4: Configure Primary Contact and Default Settings
Before proceeding to the checklist, review the default settings created during Auto Setup.
1. Go to **Admin** > **Settings** > **General**.
2. Verify or update the **Primary Contact** information:
- **Primary Contact Name**: The main point of contact for your agency.
- **Primary Contact Email**: The email address for system notifications and correspondence.
- **Primary Contact Phone**: The phone number for urgent communications.
3. Configure the following default settings:
- **Default Language**: Select the primary language for your agency's communications (for example, English, Spanish, or Vietnamese).
- **Default Timezone**: Confirm or change the timezone used for scheduling messages, events, and reports.
- **Business Hours**: Set your agency's operating hours. Messages and automations can be configured to respect these hours.
- **Date Format**: Choose your preferred date display format.
4. Click **Save** to apply your changes.
#### Step 5: Review the Agency Checklist
1. Once you receive the setup complete email, click the **Agency Checklist** tab
2. Review each item in the checklist. The Auto Setup creates default settings for each, but you can click through to customize:
- **General Settings**
- **Send Mode**
- **Agency Phones**
- **Agency Emails**
- **Domains**
- **Users**
- **Roles**
- **Portals**
- **Statuses**
- **Flows**
- **Auto Messages**
- **Upload Templates** (optional)
- **Data Dashboards**
- **Reports**
- **Files**
3. Click through each checklist item to review and adjust settings as needed

#### Step 6: Complete Next Steps
1. Invite your team by going to **Admin** > **Users** and filling in the **Create User** form
2. Review the **Billing** tab and make any necessary changes
3. Click the **Carrier** tab and complete the carrier registration form
4. Once the checklist and carrier registration are complete, you can begin sending live messages
5. [Schedule an onboarding meeting with the eCourtDate team](https://ecourtdate.com/schedule) for additional guidance
### What to Expect
After completing the Agency Setup wizard and checklist, your agency will have default configurations for messaging, automations, portals, and user roles. The Auto Setup provisions standard settings that work for most agencies. You can customize any setting at any time after the initial setup. The entire process typically takes 15 to 30 minutes, though carrier registration may require additional time for approval.
### Best Practices
- Complete the setup in staging first to familiarize yourself with the process before configuring production
- Review every item in the Agency Checklist even if you plan to use the defaults, so you understand what has been configured
- Set up your **Send Mode** to simulated before inviting users, then switch to live only when you are ready
- Invite a small group of pilot users first to test workflows before rolling out to your full team
- Schedule an onboarding meeting with the eCourtDate team to get personalized guidance for your agency's use case
### Frequently Asked Questions
**Q: What is the difference between staging and production?**
A: Staging is an isolated sandbox environment for testing and development that cannot send live messages. Production is the live environment where you can send real messages to clients. Use staging to test automations and integrations before going live.
**Q: How long does the Auto Setup take to complete?**
A: The Auto Setup typically completes within a few minutes. You will receive an email notification when it is finished. You can continue configuring other settings while waiting.
**Q: Can I change settings after the initial setup?**
A: Yes. All settings configured during setup can be modified at any time through **Admin** > **Settings** or the relevant section in the application.
**Q: Do I need to complete carrier registration before sending messages?**
A: Yes. Carrier registration is required for live outbound messaging in production. Click the **Carrier** tab in the setup process and complete the registration form.
**Q: What if I need to set up multiple agencies with similar settings?**
A: You can use the Console's copy settings feature to replicate configuration from one agency to another. See [How to Copy Settings From One Agency to Another](/how-to-copy-settings-from-one-agency-to-another) for details.
### Troubleshooting
**Issue:** The Agency Setup option does not appear on the Dashboard
**Symptoms:** You scroll to the bottom of the Dashboard but do not see the **Agency Setup** link.
**Solution:**
1. Verify you are logged in as an administrator user
2. Check that the agency has not already been set up (the link may not appear for agencies that have completed setup)
3. Try accessing the setup directly through **Admin** > **Settings**
**Issue:** You do not receive the setup complete email
**Symptoms:** You clicked **Start Setup** but the confirmation email has not arrived.
**Solution:**
1. Check your spam or junk folder for the email
2. Wait a few minutes, as provisioning can take time
3. Refresh the Agency Setup page to check if the setup has completed
4. If the issue persists, contact support by clicking the ticket button in the bottom right corner of the screen
### Related Articles
- [How to Create a New Agency](/how-to-create-a-new-agency)
- [How to Switch Agencies](/how-to-switch-agencies)
- [How to Copy Settings From One Agency to Another](/how-to-copy-settings-from-one-agency-to-another)
- [How to Manage Users](/how-to-manage-users)
- [Roles and Permissions](/roles-and-permissions)
- [How to Bulk Reset Agency Settings](/how-to-bulk-reset-agency-settings)