Agency Settings
How to Manage Agency Phone Numbers
9 min read
Updated Sep 6, 2026
Activate, port, and configure the local, toll-free, and short code phone numbers your agency uses to send and receive texts and calls.
Agency phone numbers are the local, toll-free, and short code numbers your agency uses to send and receive texts and calls in eCourtDate. The number you activate becomes the caller ID your clients see.
Overview
- What it is: The Agency Phones page, where you activate new numbers, port numbers you already own, and configure how each number handles inbound calls and texts
- Why it matters: Your agency needs at least one active number before it can send texts or place calls, and each number carries its own caller ID, forwarding rules, and business hours
- Who uses it: Agency administrators with access to Admin > Settings
- Expected outcomes: Your agency has one or more active numbers, one of them marked Primary, with inbound handling configured
Prerequisites
- Access to Admin > Settings and the Agency Phones tab
- A registered carrier campaign. Until one exists, the Agency Phones page shows the warning "A carrier campaign has not been found."
- For Port: the number you own and the authority to transfer it
- For Short Code: a short code purchased through the US Short Codes registry
How-To Steps
Step 1: Open the Agency Phones page
- Go to Admin > Settings.
- Click the Agency Phones tab.
- Review the table of existing numbers. It lists Name, Phone Number, Type, Primary, Record Calls, Outside Business, Campaign, and Gateway.
- Click Edit on a row to open that number.
Step 2: Activate a local phone number
Choose this option when you do not have an existing number to transfer.
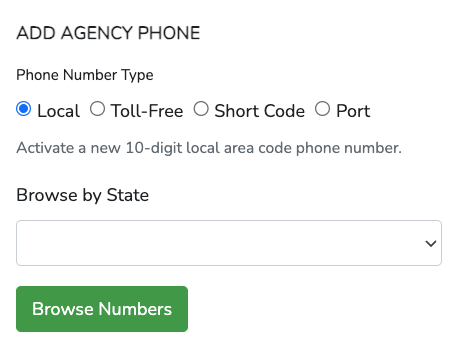
- Select Local under Phone Number Type in the Create Agency Phone form.
- Select a state in Filter Area Codes by State to narrow the list.
- Select an Area Code. Choosing an area code runs the search right away.
- Select a Carrier Campaign.
- Leave Gateway on its default, or select a specific gateway.
- Click Search.
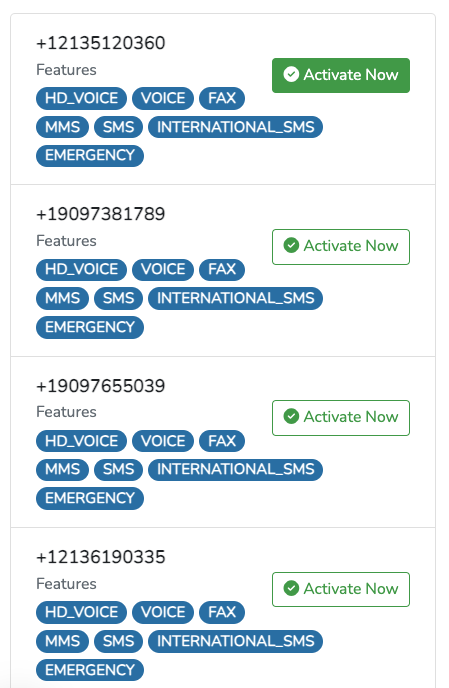
- Review the Gateway and Features listed under each result.
- Click ACTIVATE next to the number you want.
Step 3: Activate a toll-free phone number
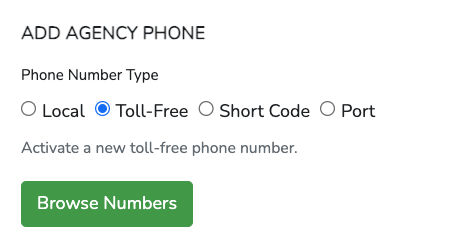
- Select Toll-Free under Phone Number Type.
- Click Search. The state, area code, and carrier campaign fields apply to local numbers only.
- Click ACTIVATE next to the number you want.
Step 4: Add a short code
Buy new short codes through the US Short Codes registry first. The Short Code Lookup button on the edit page opens the same registry.
- Select Short Code under Phone Number Type.
- Enter your code in Short Code.
- Click Create. eCourtDate opens the edit page for that short code.
- Click Download Authorization Form in the Short Code card.
- Enter your current aggregator in Migrate From (Current Aggregator).
- Select a Migration Date.
- Click Generate Form to download the transfer form as a PDF.
- Email the completed forms to help@ecourtdate.com.

Step 5: Port an existing phone number
- Select Port under Phone Number Type.
- Click Local Area Code LOA, Toll-Free LOA, or Short Code LOA to download the letter of authorization that matches your number.
- Enter the number in Phone Number.
- Click Create. eCourtDate opens the edit page.
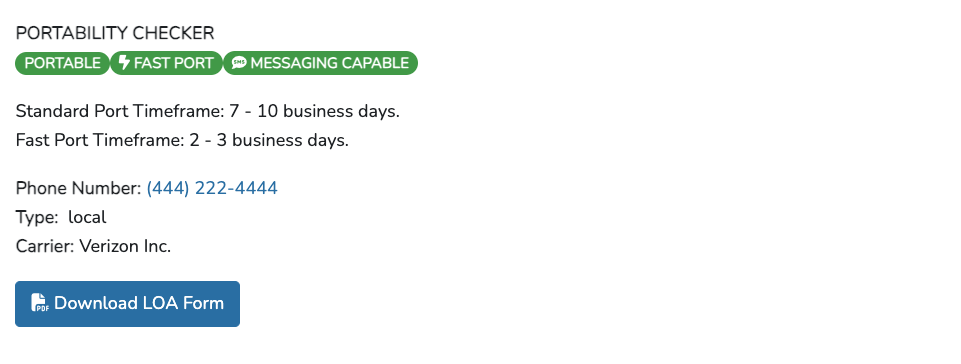
- Review the Portability Checker card, which runs on its own when the page loads. It shows PORTABLE or NOT PORTABLE, plus FAST PORT and MESSAGING CAPABLE badges, the current Carrier, and a Not Portable Reason when the number cannot move.
- Click LOA Form to download the letter of authorization. This button appears only when the number is portable.
- Email the completed letter of authorization to help@ecourtdate.com.
- Track progress in the Port Status card on the same page.
Letter of authorization forms:
Step 6: Set the primary phone number
- Open the number you want to use by default.
- Enter a Name. The name is used as the outbound Caller ID name.
- Check Primary.
- Click Save.
Flows and Bulk Actions each have an Agency Phone field that overrides the primary number for that flow or action.
Step 7: Set the Agency Phone merge tag
- Go to Admin > Settings.
- Find the Agency Phone field in the Agency Details section of General Settings.
- Select a number from the dropdown.
- Click Save.
The [AgencyPhone] merge tag then resolves to the number you selected.
Step 8: Configure inbound calls and texts
- Open the number you want to configure.
- Select a Call Voice for inbound and outbound calls.
- Adjust Voice Speed. 1.0 is normal, 0.5 is half speed, and 2.0 is double speed.
- Enter a message in Inbound Calls Auto Response under Inbound Settings.
- Click Play Audio under Preview to hear the synthesized response.
- Enter a message in Inbound Texts Auto Response, which answers any inbound text other than opt-in and opt-out replies.
- Enter a message in Enrollment Auto Response for phone numbers that enroll with an enroll keyword.
- Enter a message in Opt-Out Auto Response.
- Select a chatbot in Forward Inbound Texts to Chatbot if you want a chatbot to answer instead.
- Enter a destination in Auto Forward Inbound Calls.
- Enter comma-separated phones and emails in Auto Forward Inbound Texts.
- Click role names under Auto Forward Inbound Texts to Users by Role to toggle them on.
- Click group names under Auto Forward Inbound Texts to Clients by Group to toggle them on.
- Check Forward to Assigned Users to forward inbound texts from clients to that client's assigned users.
- Click Save.
Select a language from the dropdown next to Auto Translate, then click Auto Translate to translate Inbound Calls Auto Response, Inbound Texts Auto Response, and the after-hours Inbound Calls Response from your English text. Auto Translate stays disabled while the dropdown is set to English.
Step 9: Configure business hours handling
- Open the number.
- Check Outside of Business Hours in the left card. The Business Hours fields appear in the same card, and the Outside of Business Hours card fills in.
- Enter a From Time. It defaults to the From Time in the Business Hours section of General Settings.
- Enter a To Time. It defaults to the To Time in that same section.
- Select your Business Days.
- Enter after-hours messages in Inbound Calls Response and Inbound Texts Auto Response in the Outside of Business Hours card.
- Enter destinations in Auto-Forward Inbound Calls and Auto-Forward Inbound Texts.
- Click role names under Auto-Forward Inbound Texts by User Role to toggle them on.
- Check Forward to Assigned Users in the same card.
- Click Save.
What to Expect
Local and toll-free numbers activate as soon as you click ACTIVATE, and eCourtDate opens the new number's edit page. Short Code and Port entries create a record right away, then wait on paperwork. The Short Code card keeps the transfer form tools, and the Port Status card reports the port once it is under way. For a portable number, the Portability Checker lists a standard port timeframe of 7 to 10 business days and a fast port timeframe of 2 to 3 business days. Inbound responses, forwarding, and business hours take effect as soon as you click Save. The right column of the edit page lists messages sent from and received by that number.
The edit page shows a read-only e911 Status badge next to Gateway Status when your carrier reports one. There is no e911 address field in eCourtDate, so email help@ecourtdate.com with any e911 address request.
Best Practices
- Enter a Name for every number, because it is used as the outbound Caller ID name.
- Mark one number as Primary so outbound messages keep a consistent sender.
- Select a Carrier Campaign on the Create Agency Phone form, or in the Gateway Settings card afterward, so the number stays tied to a registered campaign.
- Read the Portability Checker card before you send a letter of authorization, so you know whether the number is portable and messaging capable.
- Use the language dropdown and Auto Translate in Inbound Settings to cover every language your clients use.
Frequently Asked Questions
Q: Which number sends my outbound messages?
A: The number with Primary checked. Flows and Bulk Actions each have an Agency Phone field that overrides it for that record.
Q: Can I change a phone number after it is activated?
A: No. The Phone Number field on the edit page is disabled. You can still change Name, which sets the outbound Caller ID name.
Q: Can I edit the e911 address for a number?
A: No. The edit page shows a read-only e911 Status badge and nothing else for e911. Email help@ecourtdate.com with any e911 address request.
Q: How long does a port take?
A: When the Portability Checker reports the number as portable, it lists a standard port timeframe of 7 to 10 business days and a fast port timeframe of 2 to 3 business days.
Q: Where do I set separate after-hours responses?
A: Check Outside of Business Hours on the number's edit page. The Outside of Business Hours card then shows its own response and forwarding fields.
Q: How do I record calls on a number?
A: Check Record Calls on the number's edit page and click Save. The Record Calls column on the Agency Phones table shows which numbers have it turned on.
Troubleshooting
Issue: No numbers appear after a search
Symptoms: The results list under the Create Agency Phone form stays empty after you click Search.
Solution:
- Clear Area Code and select a different state in Filter Area Codes by State.
- Set Gateway back to its default, or try a different gateway.
- Select Toll-Free, which searches numbers that are not tied to an area code.
Issue: A carrier campaign warning appears on the Agency Phones page
Symptoms: The page shows "A carrier campaign has not been found."
Solution:
- Click Check your campaigns here in the warning to open the Carriers page.
- Register a campaign for your agency.
- Return to Agency Phones and select the campaign in Carrier Campaign.
Issue: Outbound messages come from the wrong number
Symptoms: Clients receive messages from a number you did not expect.
Solution:
- Check the Primary column on the Agency Phones table.
- Open the flow or bulk action and check its Agency Phone field.
- Confirm the number you expect is not archived or trashed.
Issue: The after-hours fields are missing
Symptoms: The lower card on the edit page reads "Outside of Business Hours Disabled".
Solution:
- Open the number.
- Check Outside of Business Hours in the left card. The card fills in as soon as the box is checked.
- Set your From Time, To Time, and Business Days, then click Save.
Related Articles
Agency phone numbers are the local, toll-free, and short code numbers your agency uses to send and receive texts and calls in eCourtDate. The number you activate becomes the caller ID your clients see.
### Overview
- **What it is:** The **Agency Phones** page, where you activate new numbers, port numbers you already own, and configure how each number handles inbound calls and texts
- **Why it matters:** Your agency needs at least one active number before it can send texts or place calls, and each number carries its own caller ID, forwarding rules, and business hours
- **Who uses it:** Agency administrators with access to **Admin** > **Settings**
- **Expected outcomes:** Your agency has one or more active numbers, one of them marked **Primary**, with inbound handling configured
### Prerequisites
- Access to **Admin** > **Settings** and the **Agency Phones** tab
- A registered carrier campaign. Until one exists, the **Agency Phones** page shows the warning "A carrier campaign has not been found."
- For **Port**: the number you own and the authority to transfer it
- For **Short Code**: a short code purchased through the US Short Codes registry
### How-To Steps
#### Step 1: Open the Agency Phones page
1. Go to **Admin** > **Settings**.
2. Click the **Agency Phones** tab.
3. Review the table of existing numbers. It lists **Name**, **Phone Number**, **Type**, **Primary**, **Record Calls**, **Outside Business**, **Campaign**, and **Gateway**.
4. Click **Edit** on a row to open that number.
#### Step 2: Activate a local phone number
Choose this option when you do not have an existing number to transfer.
1. Select **Local** under **Phone Number Type** in the **Create Agency Phone** form.
2. Select a state in **Filter Area Codes by State** to narrow the list.
3. Select an **Area Code**. Choosing an area code runs the search right away.
4. Select a **Carrier Campaign**.
5. Leave **Gateway** on its default, or select a specific gateway.
6. Click **Search**.
7. Review the **Gateway** and **Features** listed under each result.
8. Click **ACTIVATE** next to the number you want.


#### Step 3: Activate a toll-free phone number
1. Select **Toll-Free** under **Phone Number Type**.
2. Click **Search**. The state, area code, and carrier campaign fields apply to local numbers only.
3. Click **ACTIVATE** next to the number you want.

#### Step 4: Add a short code
Buy new short codes through the [US Short Codes](https://www.usshortcodes.com/find-short-code) registry first. The **Short Code Lookup** button on the edit page opens the same registry.
1. Select **Short Code** under **Phone Number Type**.
2. Enter your code in **Short Code**.
3. Click **Create**. eCourtDate opens the edit page for that short code.
4. Click **Download Authorization Form** in the **Short Code** card.
5. Enter your current aggregator in **Migrate From (Current Aggregator)**.
6. Select a **Migration Date**.
7. Click **Generate Form** to download the transfer form as a PDF.
8. Email the completed forms to help@ecourtdate.com.

#### Step 5: Port an existing phone number
1. Select **Port** under **Phone Number Type**.
2. Click **Local Area Code LOA**, **Toll-Free LOA**, or **Short Code LOA** to download the letter of authorization that matches your number.
3. Enter the number in **Phone Number**.
4. Click **Create**. eCourtDate opens the edit page.
5. Review the **Portability Checker** card, which runs on its own when the page loads. It shows **PORTABLE** or **NOT PORTABLE**, plus **FAST PORT** and **MESSAGING CAPABLE** badges, the current **Carrier**, and a **Not Portable Reason** when the number cannot move.
6. Click **LOA Form** to download the letter of authorization. This button appears only when the number is portable.
7. Email the completed letter of authorization to help@ecourtdate.com.
8. Track progress in the **Port Status** card on the same page.

Letter of authorization forms:
- [Local Area Code LOA](https://assets.ecourtdate.com/files/loa-form.pdf)
- [Toll-Free LOA](https://assets.ecourtdate.com/files/loa-form-toll-free.pdf)
- [Short Code LOA](https://assets.ecourtdate.com/files/shortcode-authorization.pdf)
#### Step 6: Set the primary phone number
1. Open the number you want to use by default.
2. Enter a **Name**. The name is used as the outbound Caller ID name.
3. Check **Primary**.
4. Click **Save**.
**Flows** and **Bulk Actions** each have an **Agency Phone** field that overrides the primary number for that flow or action.
#### Step 7: Set the Agency Phone merge tag
1. Go to **Admin** > **Settings**.
2. Find the **Agency Phone** field in the **Agency Details** section of **General Settings**.
3. Select a number from the dropdown.
4. Click **Save**.
The `[AgencyPhone]` merge tag then resolves to the number you selected.
#### Step 8: Configure inbound calls and texts
1. Open the number you want to configure.
2. Select a **Call Voice** for inbound and outbound calls.
3. Adjust **Voice Speed**. 1.0 is normal, 0.5 is half speed, and 2.0 is double speed.
4. Enter a message in **Inbound Calls Auto Response** under **Inbound Settings**.
5. Click **Play Audio** under **Preview** to hear the synthesized response.
6. Enter a message in **Inbound Texts Auto Response**, which answers any inbound text other than opt-in and opt-out replies.
7. Enter a message in **Enrollment Auto Response** for phone numbers that enroll with an enroll keyword.
8. Enter a message in **Opt-Out Auto Response**.
9. Select a chatbot in **Forward Inbound Texts to Chatbot** if you want a chatbot to answer instead.
10. Enter a destination in **Auto Forward Inbound Calls**.
11. Enter comma-separated phones and emails in **Auto Forward Inbound Texts**.
12. Click role names under **Auto Forward Inbound Texts to Users by Role** to toggle them on.
13. Click group names under **Auto Forward Inbound Texts to Clients by Group** to toggle them on.
14. Check **Forward to Assigned Users** to forward inbound texts from clients to that client's assigned users.
15. Click **Save**.
Select a language from the dropdown next to **Auto Translate**, then click **Auto Translate** to translate **Inbound Calls Auto Response**, **Inbound Texts Auto Response**, and the after-hours **Inbound Calls Response** from your English text. **Auto Translate** stays disabled while the dropdown is set to English.
#### Step 9: Configure business hours handling
1. Open the number.
2. Check **Outside of Business Hours** in the left card. The **Business Hours** fields appear in the same card, and the **Outside of Business Hours** card fills in.
3. Enter a **From Time**. It defaults to the **From Time** in the **Business Hours** section of **General Settings**.
4. Enter a **To Time**. It defaults to the **To Time** in that same section.
5. Select your **Business Days**.
6. Enter after-hours messages in **Inbound Calls Response** and **Inbound Texts Auto Response** in the **Outside of Business Hours** card.
7. Enter destinations in **Auto-Forward Inbound Calls** and **Auto-Forward Inbound Texts**.
8. Click role names under **Auto-Forward Inbound Texts by User Role** to toggle them on.
9. Check **Forward to Assigned Users** in the same card.
10. Click **Save**.
### What to Expect
Local and toll-free numbers activate as soon as you click **ACTIVATE**, and eCourtDate opens the new number's edit page. **Short Code** and **Port** entries create a record right away, then wait on paperwork. The **Short Code** card keeps the transfer form tools, and the **Port Status** card reports the port once it is under way. For a portable number, the **Portability Checker** lists a standard port timeframe of 7 to 10 business days and a fast port timeframe of 2 to 3 business days. Inbound responses, forwarding, and business hours take effect as soon as you click **Save**. The right column of the edit page lists messages sent from and received by that number.
The edit page shows a read-only **e911 Status** badge next to **Gateway Status** when your carrier reports one. There is no e911 address field in eCourtDate, so email help@ecourtdate.com with any e911 address request.
### Best Practices
- Enter a **Name** for every number, because it is used as the outbound Caller ID name.
- Mark one number as **Primary** so outbound messages keep a consistent sender.
- Select a **Carrier Campaign** on the **Create Agency Phone** form, or in the **Gateway Settings** card afterward, so the number stays tied to a registered campaign.
- Read the **Portability Checker** card before you send a letter of authorization, so you know whether the number is portable and messaging capable.
- Use the language dropdown and **Auto Translate** in **Inbound Settings** to cover every language your clients use.
### Frequently Asked Questions
**Q: Which number sends my outbound messages?**
A: The number with **Primary** checked. **Flows** and **Bulk Actions** each have an **Agency Phone** field that overrides it for that record.
**Q: Can I change a phone number after it is activated?**
A: No. The **Phone Number** field on the edit page is disabled. You can still change **Name**, which sets the outbound Caller ID name.
**Q: Can I edit the e911 address for a number?**
A: No. The edit page shows a read-only **e911 Status** badge and nothing else for e911. Email help@ecourtdate.com with any e911 address request.
**Q: How long does a port take?**
A: When the **Portability Checker** reports the number as portable, it lists a standard port timeframe of 7 to 10 business days and a fast port timeframe of 2 to 3 business days.
**Q: Where do I set separate after-hours responses?**
A: Check **Outside of Business Hours** on the number's edit page. The **Outside of Business Hours** card then shows its own response and forwarding fields.
**Q: How do I record calls on a number?**
A: Check **Record Calls** on the number's edit page and click **Save**. The **Record Calls** column on the **Agency Phones** table shows which numbers have it turned on.
### Troubleshooting
**Issue:** No numbers appear after a search
**Symptoms:** The results list under the **Create Agency Phone** form stays empty after you click **Search**.
**Solution:**
1. Clear **Area Code** and select a different state in **Filter Area Codes by State**.
2. Set **Gateway** back to its default, or try a different gateway.
3. Select **Toll-Free**, which searches numbers that are not tied to an area code.
**Issue:** A carrier campaign warning appears on the Agency Phones page
**Symptoms:** The page shows "A carrier campaign has not been found."
**Solution:**
1. Click **Check your campaigns here** in the warning to open the **Carriers** page.
2. Register a campaign for your agency.
3. Return to **Agency Phones** and select the campaign in **Carrier Campaign**.
**Issue:** Outbound messages come from the wrong number
**Symptoms:** Clients receive messages from a number you did not expect.
**Solution:**
1. Check the **Primary** column on the **Agency Phones** table.
2. Open the flow or bulk action and check its **Agency Phone** field.
3. Confirm the number you expect is not archived or trashed.
**Issue:** The after-hours fields are missing
**Symptoms:** The lower card on the edit page reads "Outside of Business Hours Disabled".
**Solution:**
1. Open the number.
2. Check **Outside of Business Hours** in the left card. The card fills in as soon as the box is checked.
3. Set your **From Time**, **To Time**, and **Business Days**, then click **Save**.
### Related Articles
- [How to Complete Carrier Registration](/how-to-complete-carrier-registration)
- [How to Configure Inbound Voice and Text Settings](/how-to-configure-inbound-voice-and-text-settings)
- [How to Configure Opt-in and Opt-out Compliance](/how-to-configure-opt-in-and-opt-out-compliance)
- [How to Create a Flow](/how-to-create-a-flow)
- [How to Send a Mass Message using Bulk Actions](/how-to-send-a-mass-message-using-bulk-actions)
- [How to Use Merge Tags](/how-to-use-merge-tags)
- [Texting Campaign Best Practices](/texting-campaign-best-practices)
- [How to Set Up a New Agency](/how-to-set-up-a-new-agency)