Agency Settings
How to Manage Agency Emails
9 min read
Updated Feb 15, 2026
Agency Emails are the email addresses your agency uses to send and receive multilingual email messages in eCourtDate. At least one configured Agency Email is required for your agency to send and recei...
Agency Emails are the email addresses your agency uses to send and receive multilingual email messages in eCourtDate. At least one configured Agency Email is required for your agency to send and receive emails.
Overview
Agency Emails in eCourtDate serve as the foundation for all email communication between your agency and your clients. Each Agency Email can be customized with its own templates, outbound settings, inbound forwarding rules, and verification status. Whether you need a single email for all communications or multiple emails for different departments or purposes, Agency Emails give you full control over how your agency sends and receives email.
- Configure email templates with custom headers, footers, and signatures for professional outbound messages.
- Set up inbound forwarding rules to route incoming emails to the right staff members.
- Use different Agency Emails across flows, auto messages, bulk actions, and one-off messages.
- Verify custom domain email addresses (e.g., clerk@court.gov) for branded communication.
Prerequisites
Before managing Agency Emails, ensure you have the following:
- Administrator or super admin access to your eCourtDate agency
- If using a custom domain email, access to the email inbox for verification purposes
- A plan for your email communication structure (single email vs. multiple departmental emails)
How-To Steps
Step 1: Navigate to Agency Emails
- Go to Admin > Settings in the top navigation.
- Click the Agency Emails tab.
Step 2: Create a New Agency Email
- In the Create Agency Email form, enter the email address you would like to use (or leave blank to use an auto-generated email).
- Click the Create button.
- You will be redirected to the edit page for the new Agency Email.
- If there is an error (such as the desired email address not being available), try again with a different email address.
Step 3: Edit an Agency Email
- On the Agency Emails page, click the email address you would like to edit.
- Configure the desired settings described below.
- Click Save to apply any changes.
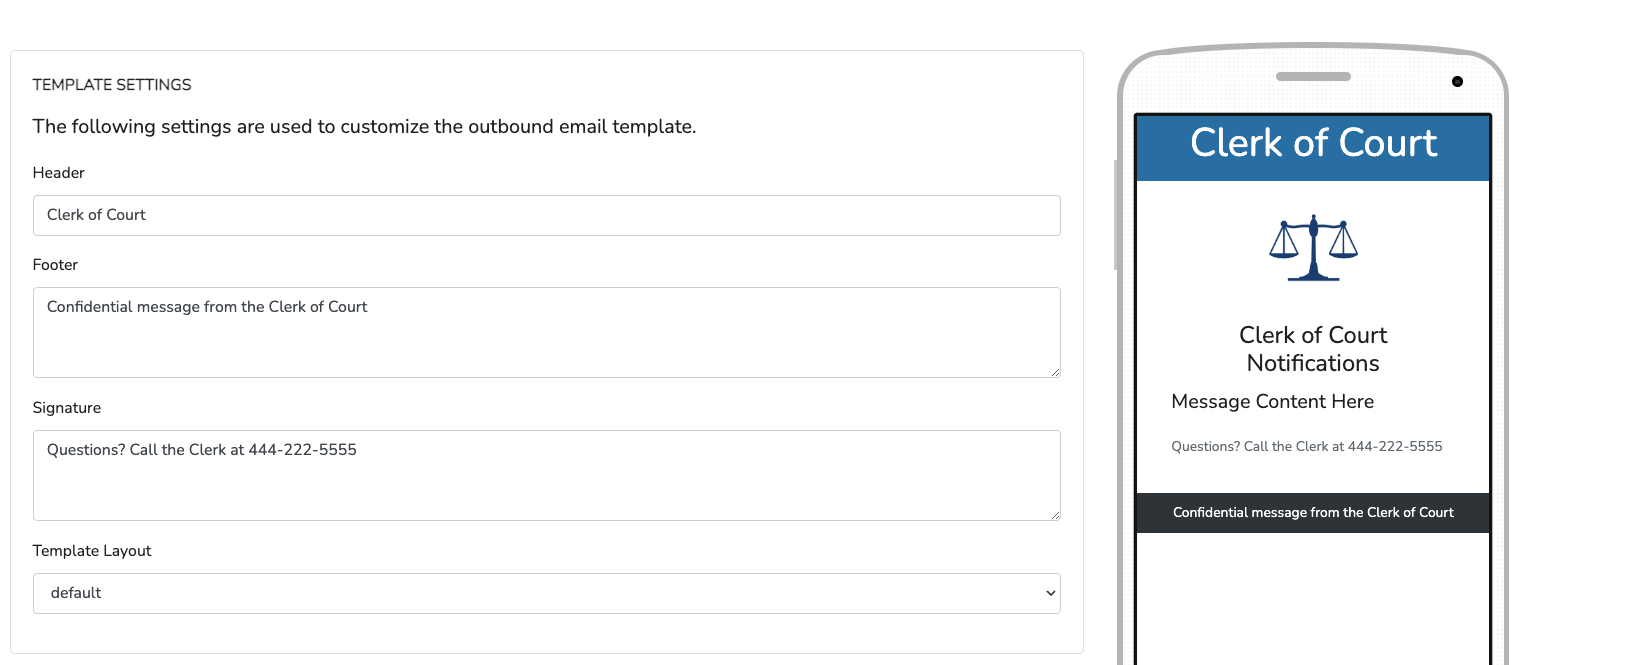
Template Settings
The following settings control the layout for outbound emails. Use the device preview to see how your outbound emails will look.
- Header: the header line displayed at the top of outbound emails
- Footer: the footer line(s) displayed at the bottom of outbound emails
- Signature: the signature block appended to outbound emails
- Template Layout: choose between the default minimalist template or a custom HTML template
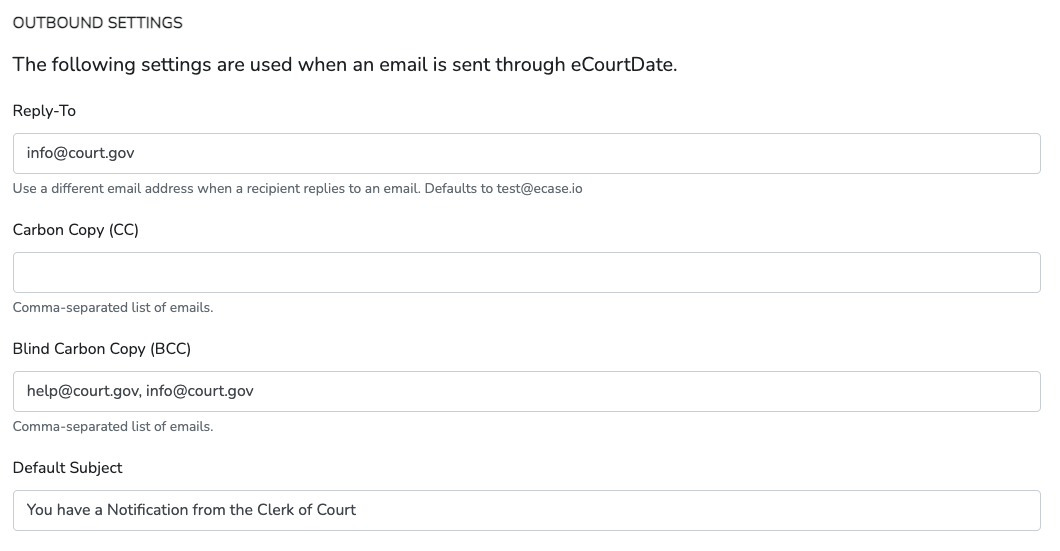
Outbound Settings
The following settings control outbound email options.
- Reply-To: enter an email address to customize where replies are sent (leave blank to use the default email address)
- Carbon Copy: enter an email address to add as a CC on outbound emails
- Blind Carbon Copy: enter an email address to add as a BCC on outbound emails
- Default Subject: enter a default subject line for outbound emails, used when no subject is specified
- Header: enter the header line used in outbound email templates
- Footer: enter the footer line(s) used in outbound email templates (e.g., "Message from [AgencyName]. Our address: [AgencyAddress]")
- Signature: enter the signature used in outbound email templates (e.g., "This is a confidential message from [AgencyName].")
- Template: select HTML to customize the outbound email template, or leave as default for a minimalist email template
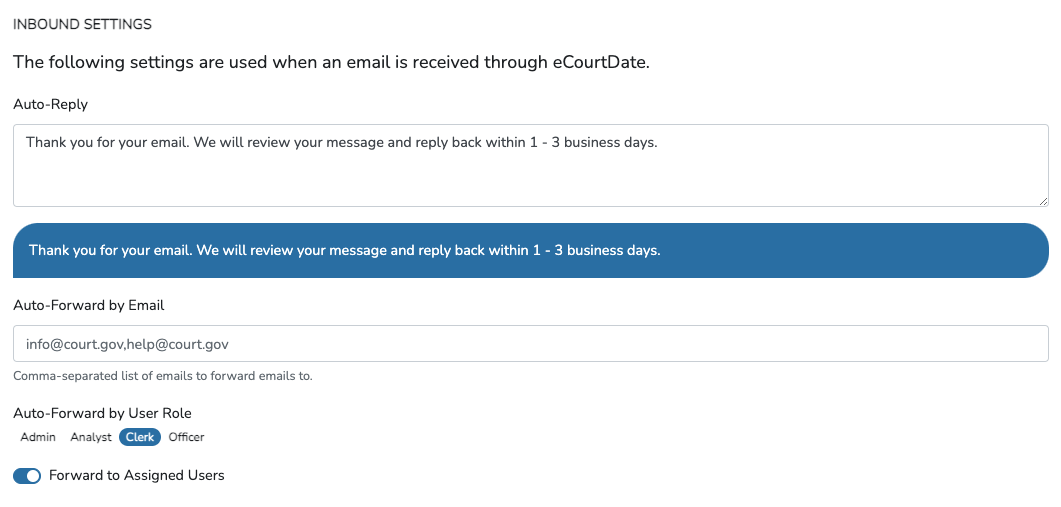
Inbound Settings
The following settings control what happens when an email is received.
- Auto-Forward Inbound Emails: enter a comma-separated list of email addresses to auto-forward inbound emails (e.g., amy@court.gov,stacy@court.gov)
- Auto-Forward Inbound Emails by User Role: select existing roles to auto-forward emails to any user with the assigned role
- Inbound Auto-Reply: enter a message sent automatically in response to inbound emails
- Forward to Assigned Users: enable this option to forward emails from known clients to their assigned users automatically
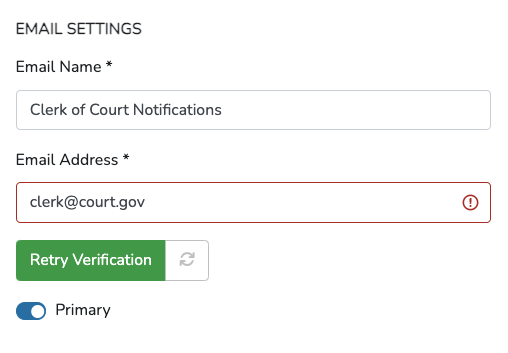
Step 4: Verify an Agency Email
You need to verify ownership to use an email address with your custom domain (e.g., clerk@court.gov).
- Create or edit the Agency Email you want to verify.
- If the email address is already verified, you will see a confirmation message: "Email is verified and ready to use." Skip the remaining steps.
- If the email address is not verified, click the Retry Verification button.
- Check your inbox for an email from AWS GovCloud requesting you to verify ownership of the address.
- Click the verification link in the email to complete the process.
- Return to the edit page and refresh the page to confirm verification.

Step 5: Use an Agency Email in Messages
If you only have one Agency Email configured, all outbound email messages will use that email automatically. Skip this step in that case.
Setting a Primary Agency Email
If you have multiple Agency Emails, enable the Primary toggle on the email you would like to use as the default. Any outbound email message will use the Primary Agency Email unless overridden through one of the options below.
Using an Agency Email in Flows
- Go to Admin > Messaging in the top navigation and click the Flows tab.
- Click the Flow you want to edit, or create a new one.
- Select the desired email in the Agency Email setting.
- Click Save to apply your changes.
Any newly created messages will use the configured Agency Email as the sender. If the Flow already has scheduled messages using a different email, click Tools > Sync Messages to regenerate related messages. This process may take a few minutes, and you will receive an email once it is complete.
Using an Agency Email in Auto Messages
- Go to Admin > Messaging in the top navigation and click the Auto Messages tab.
- Click the Auto Message you want to edit, or create a new one.
- Select the desired email in the Agency Email setting.
- Click Save to apply your changes.
Any newly created messages will use the configured Agency Email as the sender.
Using an Agency Email in Bulk Actions
- Click Bulk Actions in the top navigation.
- Create a new bulk action or edit one that has not yet run.
- Select the desired Agency Email.
- Click Save to apply your changes.
Using an Agency Email in Scheduled One-Off Messages
- Click Dashboard in the top navigation and locate the Scheduled Messages list.
- Use the Search field to filter messages, or click the Messages tab for more granular search options.
- Select the desired email in the From setting.
- Click Save to apply your changes.
Step 6: Configure Keyword-Based Multilingual Auto-Replies
Set up auto-replies that respond in the client's language based on keywords detected in inbound emails.
- Navigate to Admin > Settings > Agency Emails and click the email address you want to configure.
- In the Inbound Auto-Reply field, enter the default auto-reply message in English.
- Click Show Languages to display additional language fields.
- Enter translated auto-reply messages for each supported language.
- (Optional) Configure keyword-based rules to trigger specific replies. For example, set a keyword such as "payment" to trigger a payment-related auto-reply.
- Click Save to apply your changes.
When an inbound email arrives, the system detects the client's preferred language (based on their profile or browser language) and responds with the appropriate translation. If keyword rules are configured, the system matches the email content against your keywords and sends the most relevant response.
What to Expect
After configuring your Agency Emails, all outbound email messages will use the designated email address. Template changes (header, footer, signature) take effect immediately for new outbound messages. Verification of custom domain emails typically completes within minutes after clicking the verification link. If you change the Agency Email on a Flow, existing scheduled messages will not update until you run Sync Messages.
Best Practices
- Verify your custom domain email address as soon as you create it to avoid delays in sending.
- Use clear, recognizable email addresses that clients will trust (e.g., reminders@court.gov rather than a generic address).
- Configure inbound forwarding rules so incoming emails reach the appropriate staff without manual routing.
- Set up a professional footer and signature to ensure all outbound emails include your agency name and contact information.
- Review your Reply-To settings to make sure client replies go to a monitored inbox.
Frequently Asked Questions
Q: How many Agency Emails can I create?
A: There is no limit to the number of Agency Emails you can create. You can set up as many as your agency needs for different departments or purposes.
Q: What happens if I do not verify my custom domain email?
A: Unverified custom domain emails cannot be used to send outbound messages. You can still use auto-generated eCourtDate email addresses without verification.
Q: Can I use different Agency Emails for different flows or auto messages?
A: Yes. Each flow, auto message, bulk action, and one-off message can be configured to use a specific Agency Email, overriding the primary email.
Q: Will changing the primary Agency Email affect existing scheduled messages?
A: No. Existing scheduled messages retain their original sender email. Only new messages will use the updated primary email. To update existing messages in a flow, use Tools > Sync Messages.
Troubleshooting
Issue: Custom domain email is not sending messages.
Symptoms: Outbound emails fail to deliver, or you see a warning about unverified email.
Solution:
- Go to Admin > Settings > Agency Emails and click the email address.
- Check for the "Email is verified and ready to use" confirmation message.
- If not verified, click Retry Verification and complete the verification process through the email link from AWS GovCloud.
Issue: Inbound emails are not being forwarded to staff.
Symptoms: Staff members are not receiving forwarded emails from clients.
Solution:
- Go to Admin > Settings > Agency Emails and click the email address.
- Verify that the Auto-Forward Inbound Emails field contains the correct email addresses.
- Check the Auto-Forward Inbound Emails by User Role setting to ensure the correct roles are selected.
- Click Save to apply any changes.
Related Articles
Agency Emails are the email addresses your agency uses to send and receive multilingual email messages in eCourtDate. At least one configured Agency Email is required for your agency to send and receive emails.
### Overview
Agency Emails in eCourtDate serve as the foundation for all email communication between your agency and your clients. Each Agency Email can be customized with its own templates, outbound settings, inbound forwarding rules, and verification status. Whether you need a single email for all communications or multiple emails for different departments or purposes, Agency Emails give you full control over how your agency sends and receives email.
- Configure email templates with custom headers, footers, and signatures for professional outbound messages.
- Set up inbound forwarding rules to route incoming emails to the right staff members.
- Use different Agency Emails across flows, auto messages, bulk actions, and one-off messages.
- Verify custom domain email addresses (e.g., clerk@court.gov) for branded communication.
### Prerequisites
Before managing Agency Emails, ensure you have the following:
- Administrator or super admin access to your eCourtDate agency
- If using a custom domain email, access to the email inbox for verification purposes
- A plan for your email communication structure (single email vs. multiple departmental emails)
### How-To Steps
#### Step 1: Navigate to Agency Emails
1. Go to **Admin** > **Settings** in the top navigation.
2. Click the **Agency Emails** tab.
#### Step 2: Create a New Agency Email
1. In the **Create Agency Email** form, enter the email address you would like to use (or leave blank to use an auto-generated email).
2. Click the **Create** button.
3. You will be redirected to the edit page for the new Agency Email.
4. If there is an error (such as the desired email address not being available), try again with a different email address.
#### Step 3: Edit an Agency Email
1. On the **Agency Emails** page, click the email address you would like to edit.
2. Configure the desired settings described below.
3. Click **Save** to apply any changes.
#### Template Settings
The following settings control the layout for outbound emails. Use the device preview to see how your outbound emails will look.
- **Header**: the header line displayed at the top of outbound emails
- **Footer**: the footer line(s) displayed at the bottom of outbound emails
- **Signature**: the signature block appended to outbound emails
- **Template Layout**: choose between the default minimalist template or a custom HTML template

#### Outbound Settings
The following settings control outbound email options.
- **Reply-To**: enter an email address to customize where replies are sent (leave blank to use the default email address)
- **Carbon Copy**: enter an email address to add as a CC on outbound emails
- **Blind Carbon Copy**: enter an email address to add as a BCC on outbound emails
- **Default Subject**: enter a default subject line for outbound emails, used when no subject is specified
- **Header**: enter the header line used in outbound email templates
- **Footer**: enter the footer line(s) used in outbound email templates (e.g., "Message from [AgencyName]. Our address: [AgencyAddress]")
- **Signature**: enter the signature used in outbound email templates (e.g., "This is a confidential message from [AgencyName].")
- **Template**: select **HTML** to customize the outbound email template, or leave as **default** for a minimalist email template

#### Inbound Settings
The following settings control what happens when an email is received.
- **Auto-Forward Inbound Emails**: enter a comma-separated list of email addresses to auto-forward inbound emails (e.g., amy@court.gov,stacy@court.gov)
- **Auto-Forward Inbound Emails by User Role**: select existing roles to auto-forward emails to any user with the assigned role
- **Inbound Auto-Reply**: enter a message sent automatically in response to inbound emails
- **Forward to Assigned Users**: enable this option to forward emails from known clients to their assigned users automatically

#### Step 4: Verify an Agency Email
You need to verify ownership to use an email address with your custom domain (e.g., clerk@court.gov).
1. Create or edit the Agency Email you want to verify.
2. If the email address is already verified, you will see a confirmation message: "Email is verified and ready to use." Skip the remaining steps.
3. If the email address is not verified, click the **Retry Verification** button.
4. Check your inbox for an email from AWS GovCloud requesting you to verify ownership of the address.
5. Click the verification link in the email to complete the process.
6. Return to the edit page and refresh the page to confirm verification.


#### Step 5: Use an Agency Email in Messages
If you only have one Agency Email configured, all outbound email messages will use that email automatically. Skip this step in that case.
#### Setting a Primary Agency Email
If you have multiple Agency Emails, enable the **Primary** toggle on the email you would like to use as the default. Any outbound email message will use the Primary Agency Email unless overridden through one of the options below.
#### Using an Agency Email in Flows
1. Go to **Admin** > **Messaging** in the top navigation and click the **Flows** tab.
2. Click the **Flow** you want to edit, or create a new one.
3. Select the desired email in the **Agency Email** setting.
4. Click **Save** to apply your changes.
Any newly created messages will use the configured Agency Email as the sender. If the Flow already has scheduled messages using a different email, click **Tools** > **Sync Messages** to regenerate related messages. This process may take a few minutes, and you will receive an email once it is complete.
#### Using an Agency Email in Auto Messages
1. Go to **Admin** > **Messaging** in the top navigation and click the **Auto Messages** tab.
2. Click the **Auto Message** you want to edit, or create a new one.
3. Select the desired email in the **Agency Email** setting.
4. Click **Save** to apply your changes.
Any newly created messages will use the configured Agency Email as the sender.
#### Using an Agency Email in Bulk Actions
1. Click **Bulk Actions** in the top navigation.
2. Create a new bulk action or edit one that has not yet run.
3. Select the desired Agency Email.
4. Click **Save** to apply your changes.
#### Using an Agency Email in Scheduled One-Off Messages
1. Click **Dashboard** in the top navigation and locate the **Scheduled Messages** list.
2. Use the **Search** field to filter messages, or click the **Messages** tab for more granular search options.
3. Select the desired email in the **From** setting.
4. Click **Save** to apply your changes.
#### Step 6: Configure Keyword-Based Multilingual Auto-Replies
Set up auto-replies that respond in the client's language based on keywords detected in inbound emails.
1. Navigate to **Admin** > **Settings** > **Agency Emails** and click the email address you want to configure.
2. In the **Inbound Auto-Reply** field, enter the default auto-reply message in English.
3. Click **Show Languages** to display additional language fields.
4. Enter translated auto-reply messages for each supported language.
5. (Optional) Configure keyword-based rules to trigger specific replies. For example, set a keyword such as "payment" to trigger a payment-related auto-reply.
6. Click **Save** to apply your changes.
When an inbound email arrives, the system detects the client's preferred language (based on their profile or browser language) and responds with the appropriate translation. If keyword rules are configured, the system matches the email content against your keywords and sends the most relevant response.
### What to Expect
After configuring your Agency Emails, all outbound email messages will use the designated email address. Template changes (header, footer, signature) take effect immediately for new outbound messages. Verification of custom domain emails typically completes within minutes after clicking the verification link. If you change the Agency Email on a Flow, existing scheduled messages will not update until you run **Sync Messages**.
### Best Practices
- Verify your custom domain email address as soon as you create it to avoid delays in sending.
- Use clear, recognizable email addresses that clients will trust (e.g., reminders@court.gov rather than a generic address).
- Configure inbound forwarding rules so incoming emails reach the appropriate staff without manual routing.
- Set up a professional footer and signature to ensure all outbound emails include your agency name and contact information.
- Review your Reply-To settings to make sure client replies go to a monitored inbox.
### Frequently Asked Questions
**Q: How many Agency Emails can I create?**
A: There is no limit to the number of Agency Emails you can create. You can set up as many as your agency needs for different departments or purposes.
**Q: What happens if I do not verify my custom domain email?**
A: Unverified custom domain emails cannot be used to send outbound messages. You can still use auto-generated eCourtDate email addresses without verification.
**Q: Can I use different Agency Emails for different flows or auto messages?**
A: Yes. Each flow, auto message, bulk action, and one-off message can be configured to use a specific Agency Email, overriding the primary email.
**Q: Will changing the primary Agency Email affect existing scheduled messages?**
A: No. Existing scheduled messages retain their original sender email. Only new messages will use the updated primary email. To update existing messages in a flow, use **Tools** > **Sync Messages**.
### Troubleshooting
**Issue:** Custom domain email is not sending messages.
**Symptoms:** Outbound emails fail to deliver, or you see a warning about unverified email.
**Solution:**
1. Go to **Admin** > **Settings** > **Agency Emails** and click the email address.
2. Check for the "Email is verified and ready to use" confirmation message.
3. If not verified, click **Retry Verification** and complete the verification process through the email link from AWS GovCloud.
**Issue:** Inbound emails are not being forwarded to staff.
**Symptoms:** Staff members are not receiving forwarded emails from clients.
**Solution:**
1. Go to **Admin** > **Settings** > **Agency Emails** and click the email address.
2. Verify that the **Auto-Forward Inbound Emails** field contains the correct email addresses.
3. Check the **Auto-Forward Inbound Emails by User Role** setting to ensure the correct roles are selected.
4. Click **Save** to apply any changes.
### Related Articles
- [How to Configure Agency Email Settings](/how-to-configure-agency-email-settings)
- [How to Create an Auto Message](/how-to-create-an-auto-message)
- [How to Create a Flow](/how-to-create-a-flow)
- [How to Send a One-off Message](/how-to-send-a-one-off-message)
- [How to Create a Chatbot](/how-to-create-a-chatbot)
- [How to Use Merge Tags](/how-to-use-merge-tags)