One-off messages in eCourtDate let you send a single email, text, or voice message to a specific client, contact, or any phone number or email address directly from the platform.
One-off messages in eCourtDate let you send a single email, text, or voice message to a specific client, contact, or any phone number or email address directly from the platform.
Overview
- What it is: A feature for sending individual messages to one or more recipients via email, text (SMS/MMS), voice call, or push notification
- Why it matters: One-off messages allow staff to communicate directly with clients outside of automated flows, for time-sensitive updates, follow-ups, or custom communications
- Who uses it: Agency staff with messaging permissions who need to send individual messages to clients or contacts
- Expected outcomes: Your message is delivered to the recipient's phone or email, with the option to schedule delivery, attach files, and use merge tags for personalization
Prerequisites
- A role with Create Messages and Create Contacts permissions
- At least one active agency phone number (for text and voice messages)
- The recipient must have at least one valid contact (phone number or email) that is not opted out of receiving messages, or you must have the phone number or email address to enter manually
- For client-based messages: the client must already exist in eCourtDate, or you can enter a phone number or email directly from the Dashboard
How-To Steps
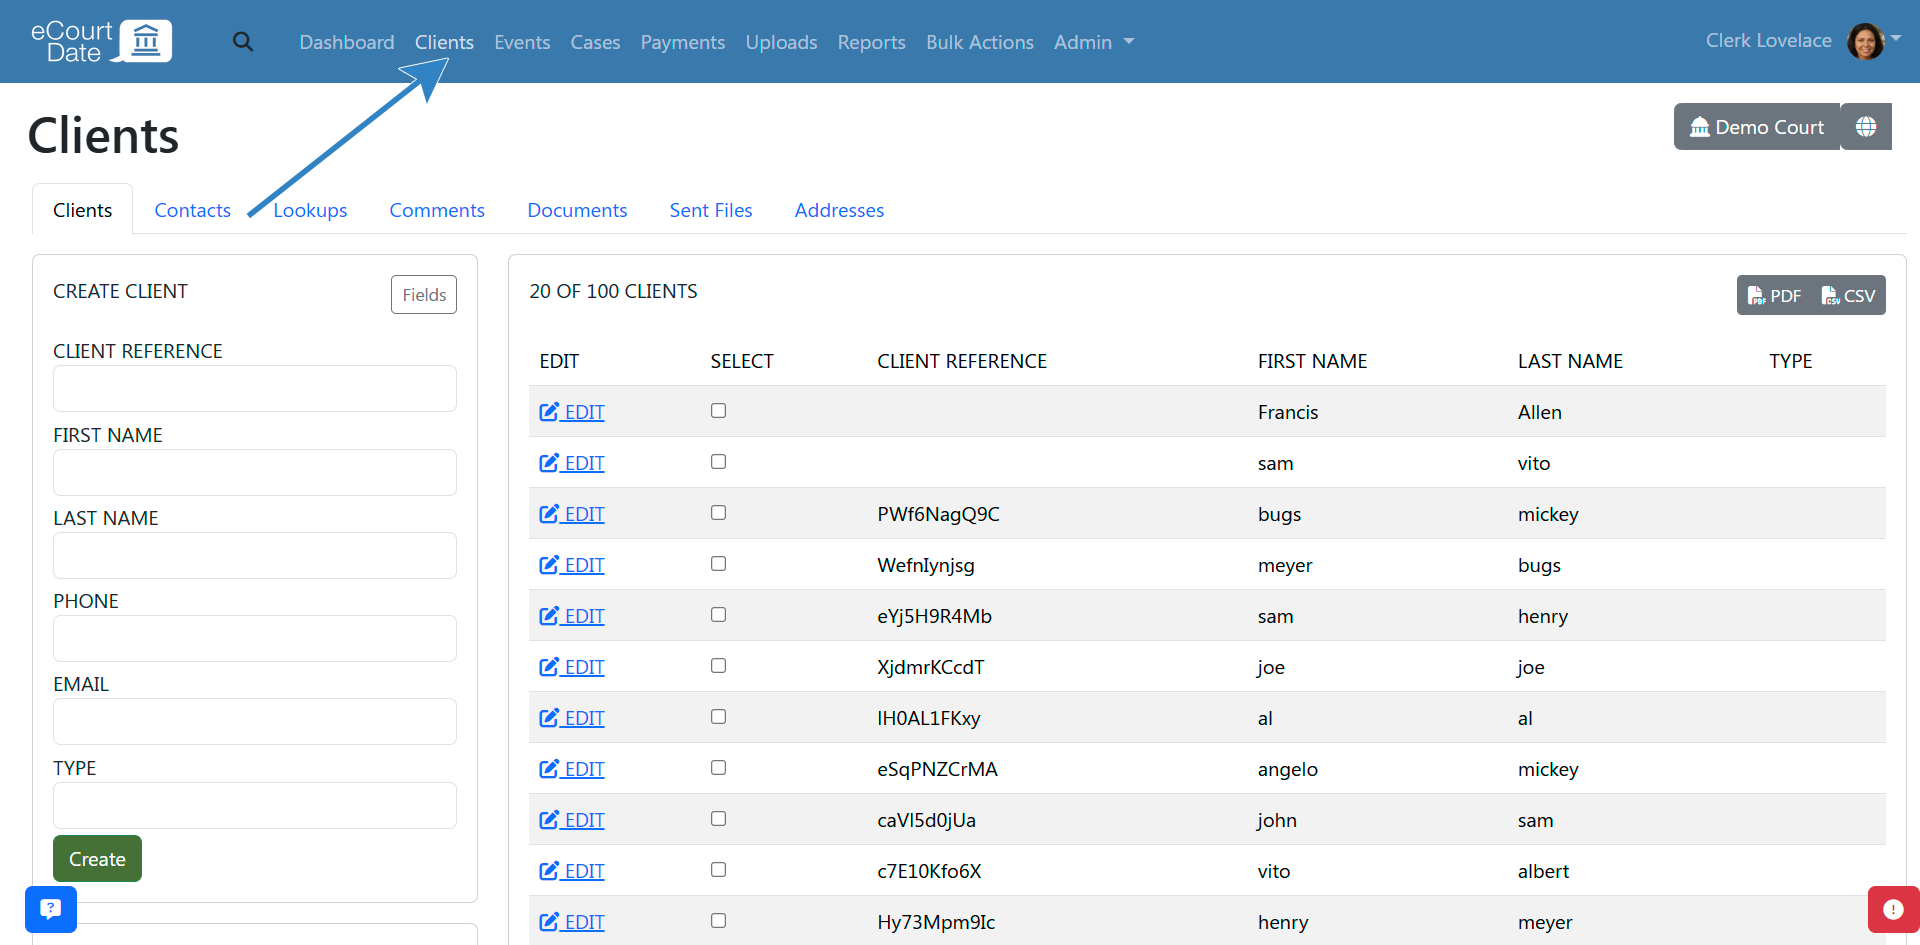
Step 1: Send a One-off Message to a Client
- Use the search bar in the top left corner to find the client, or click Clients in the top navigation and search from there
- Click the Edit button to open the client's profile
- Verify that the client has at least one valid contact that is not opted out of receiving messages. The list of contacts appears in the top right corner of the client's profile
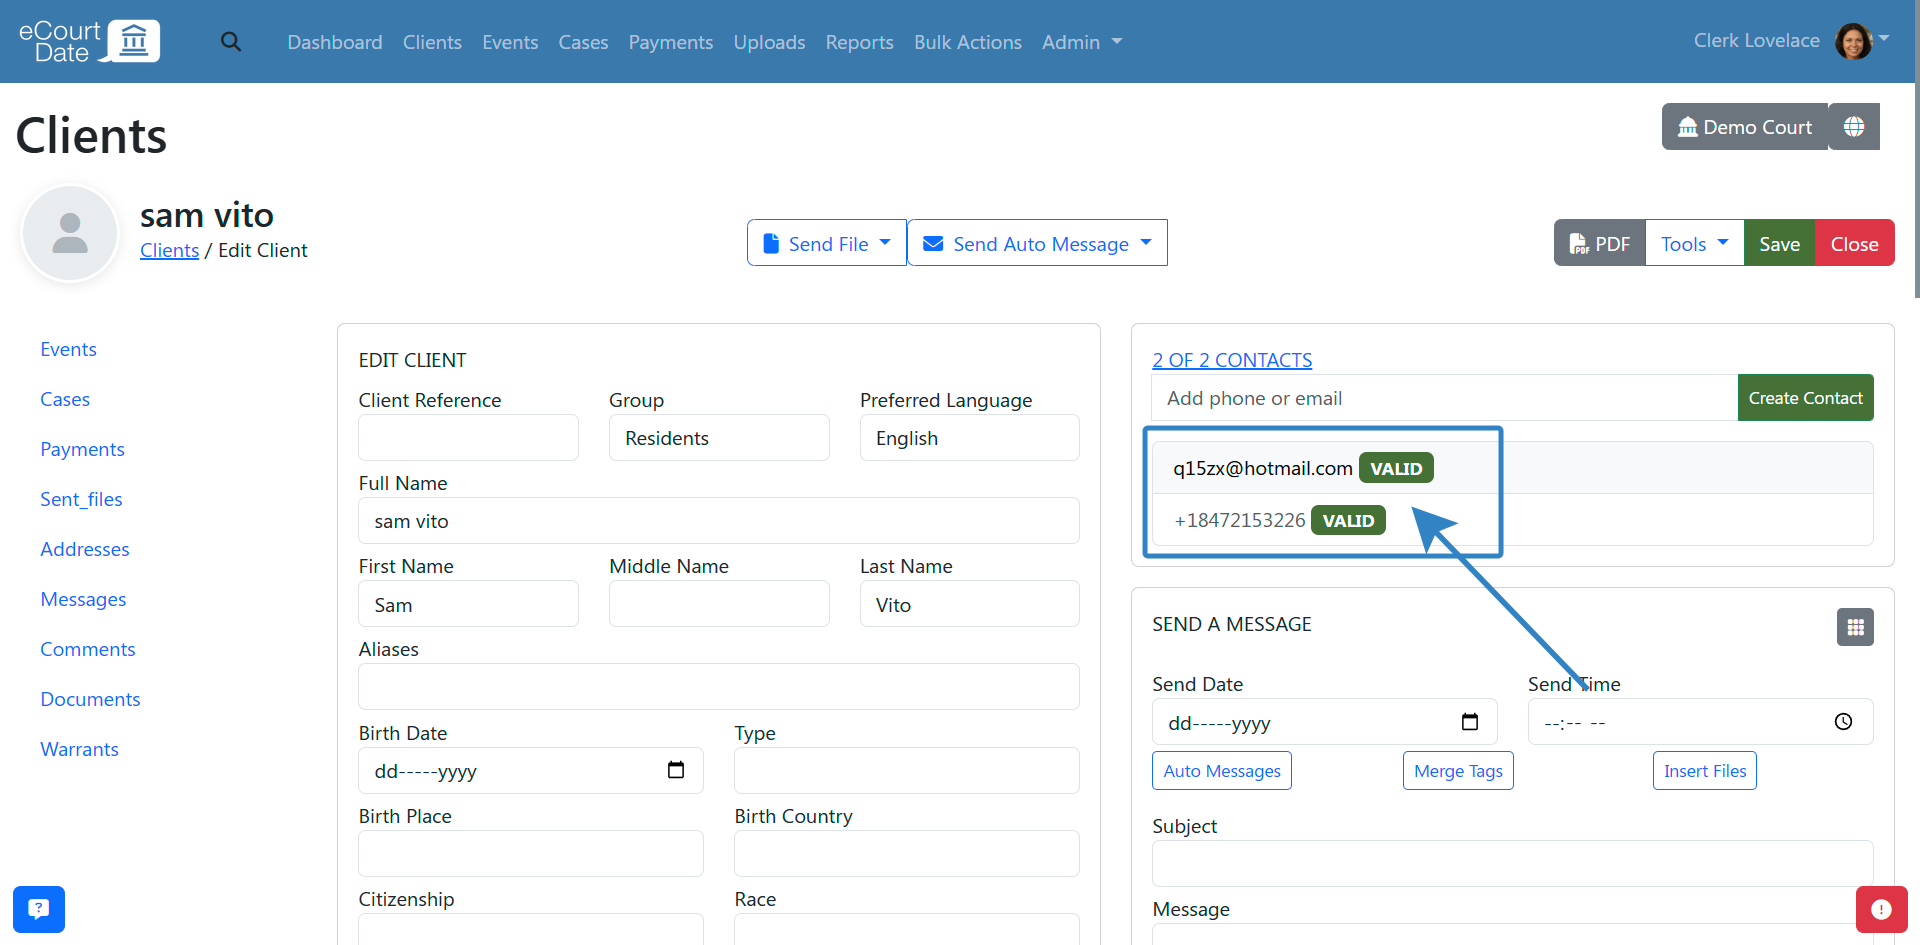
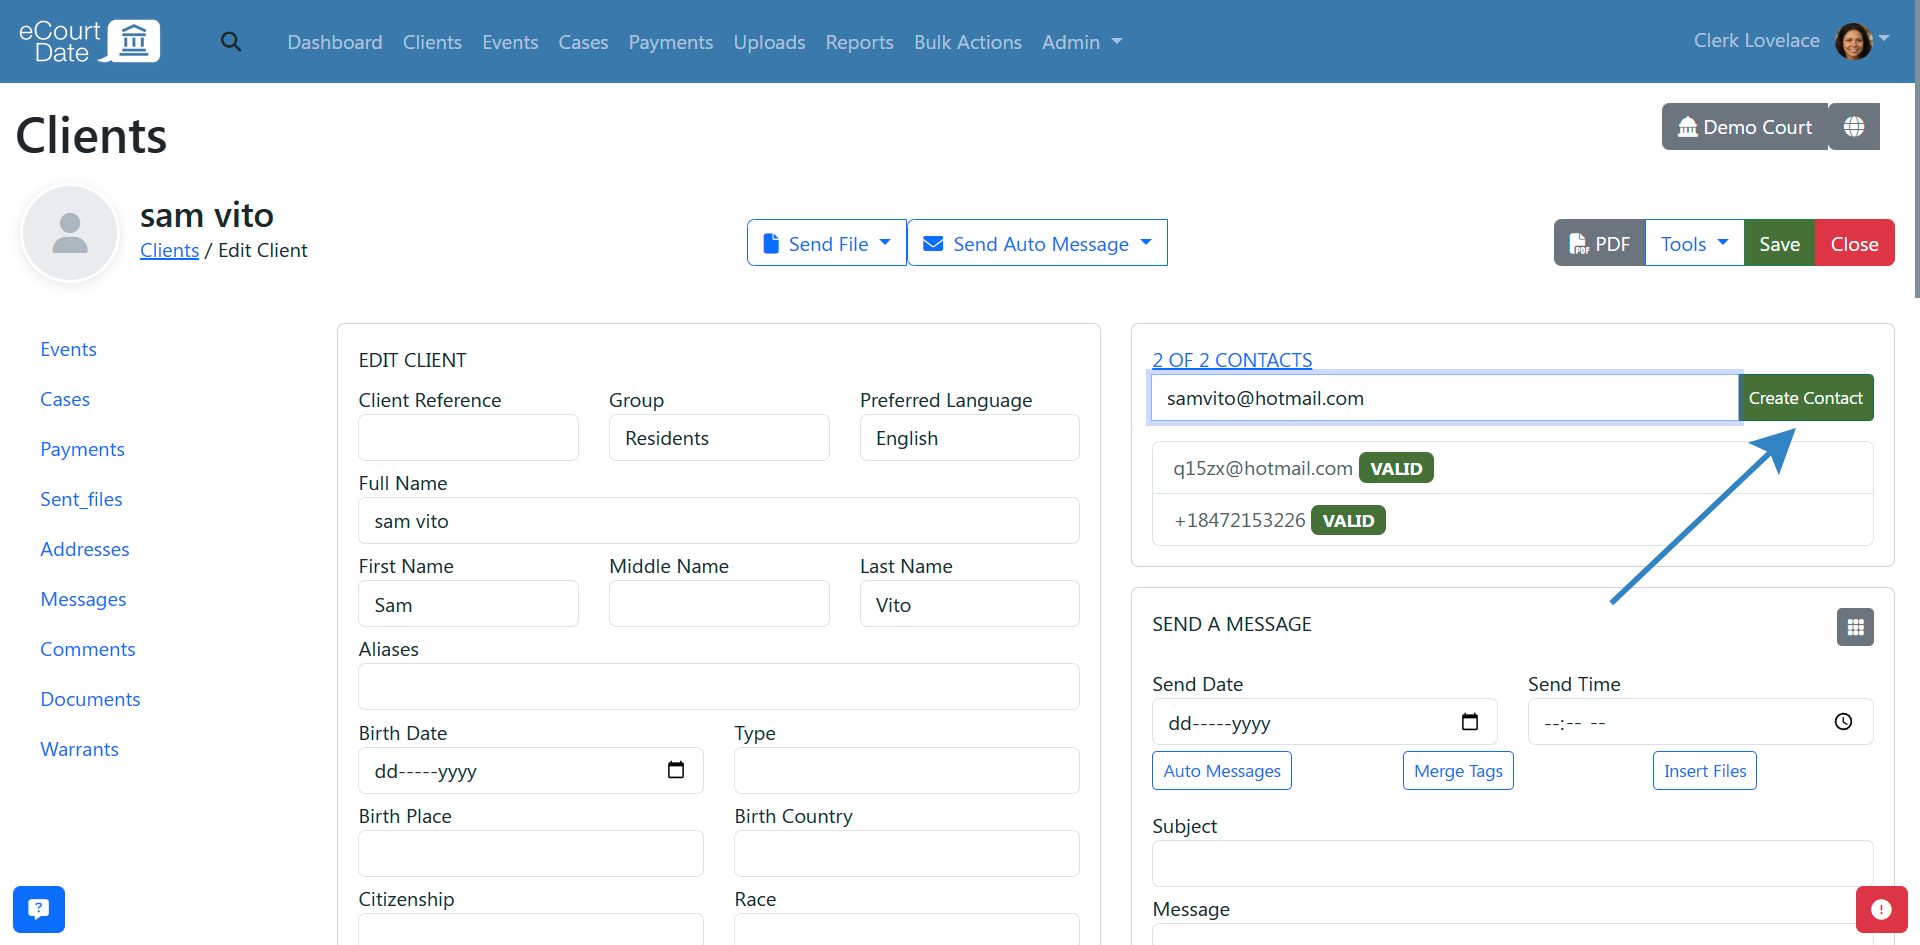
- If no contact exists, fill in the Create Contact form and click Create
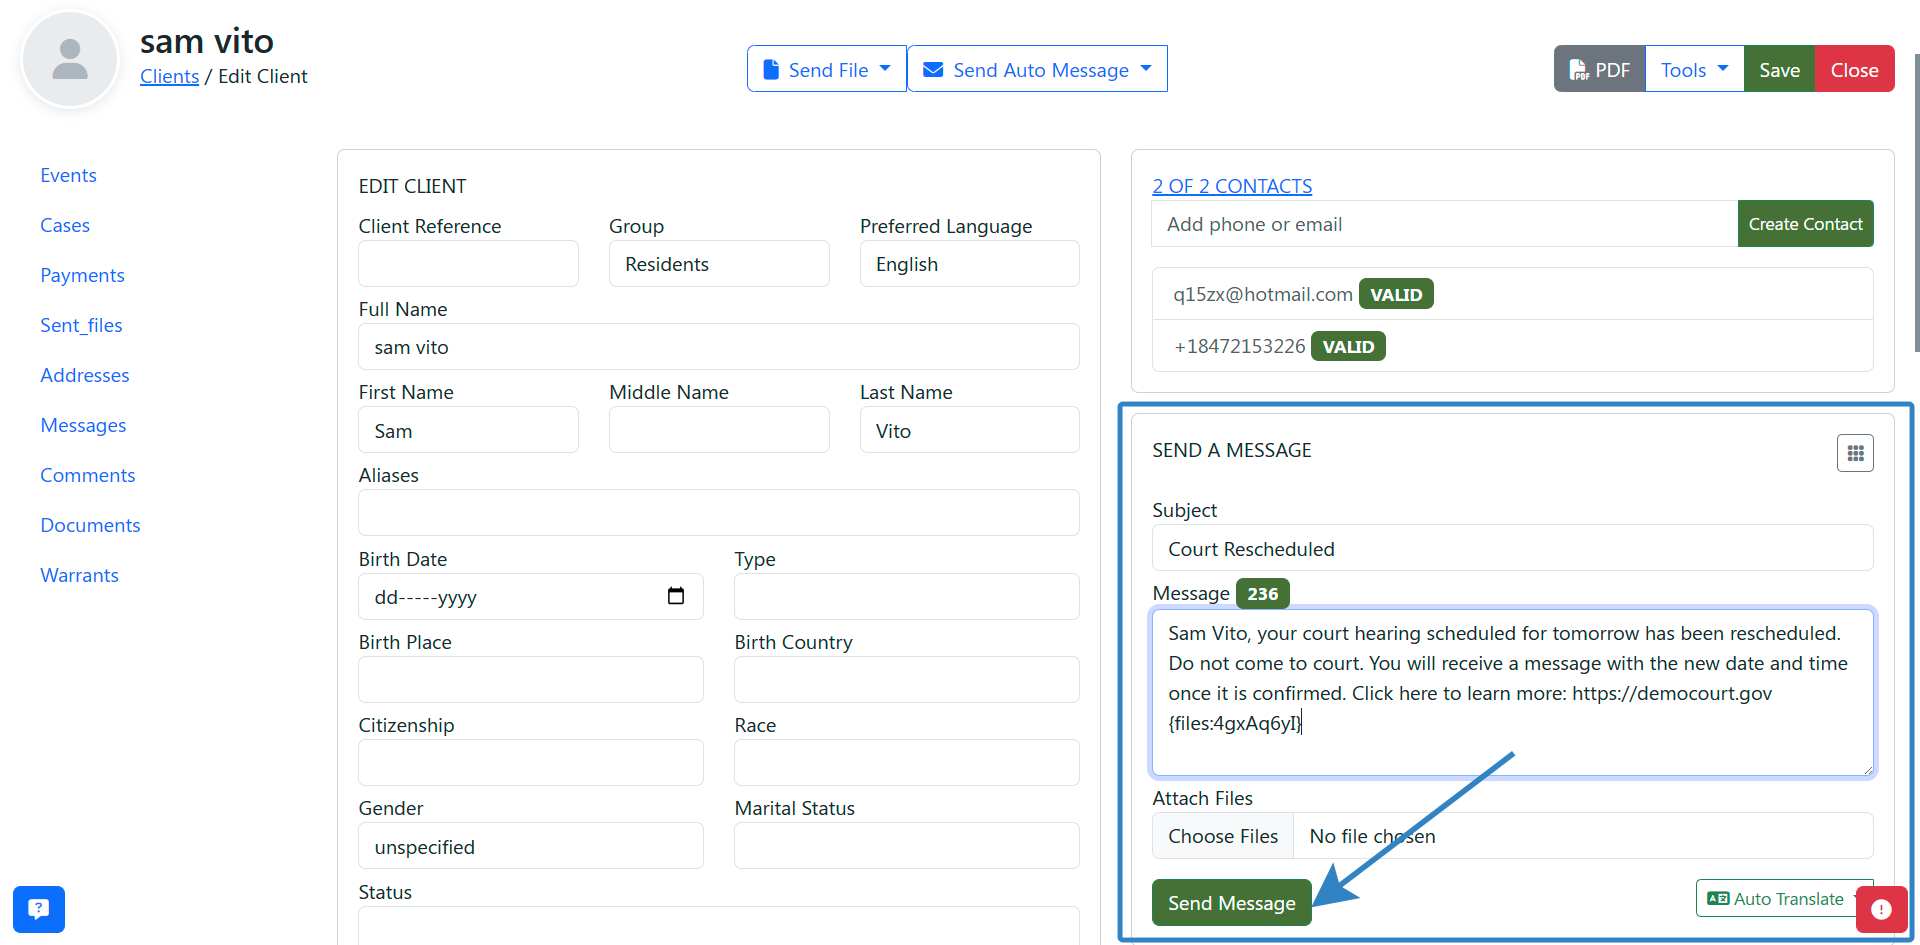
- Scroll to the Send a Message section below the contact list

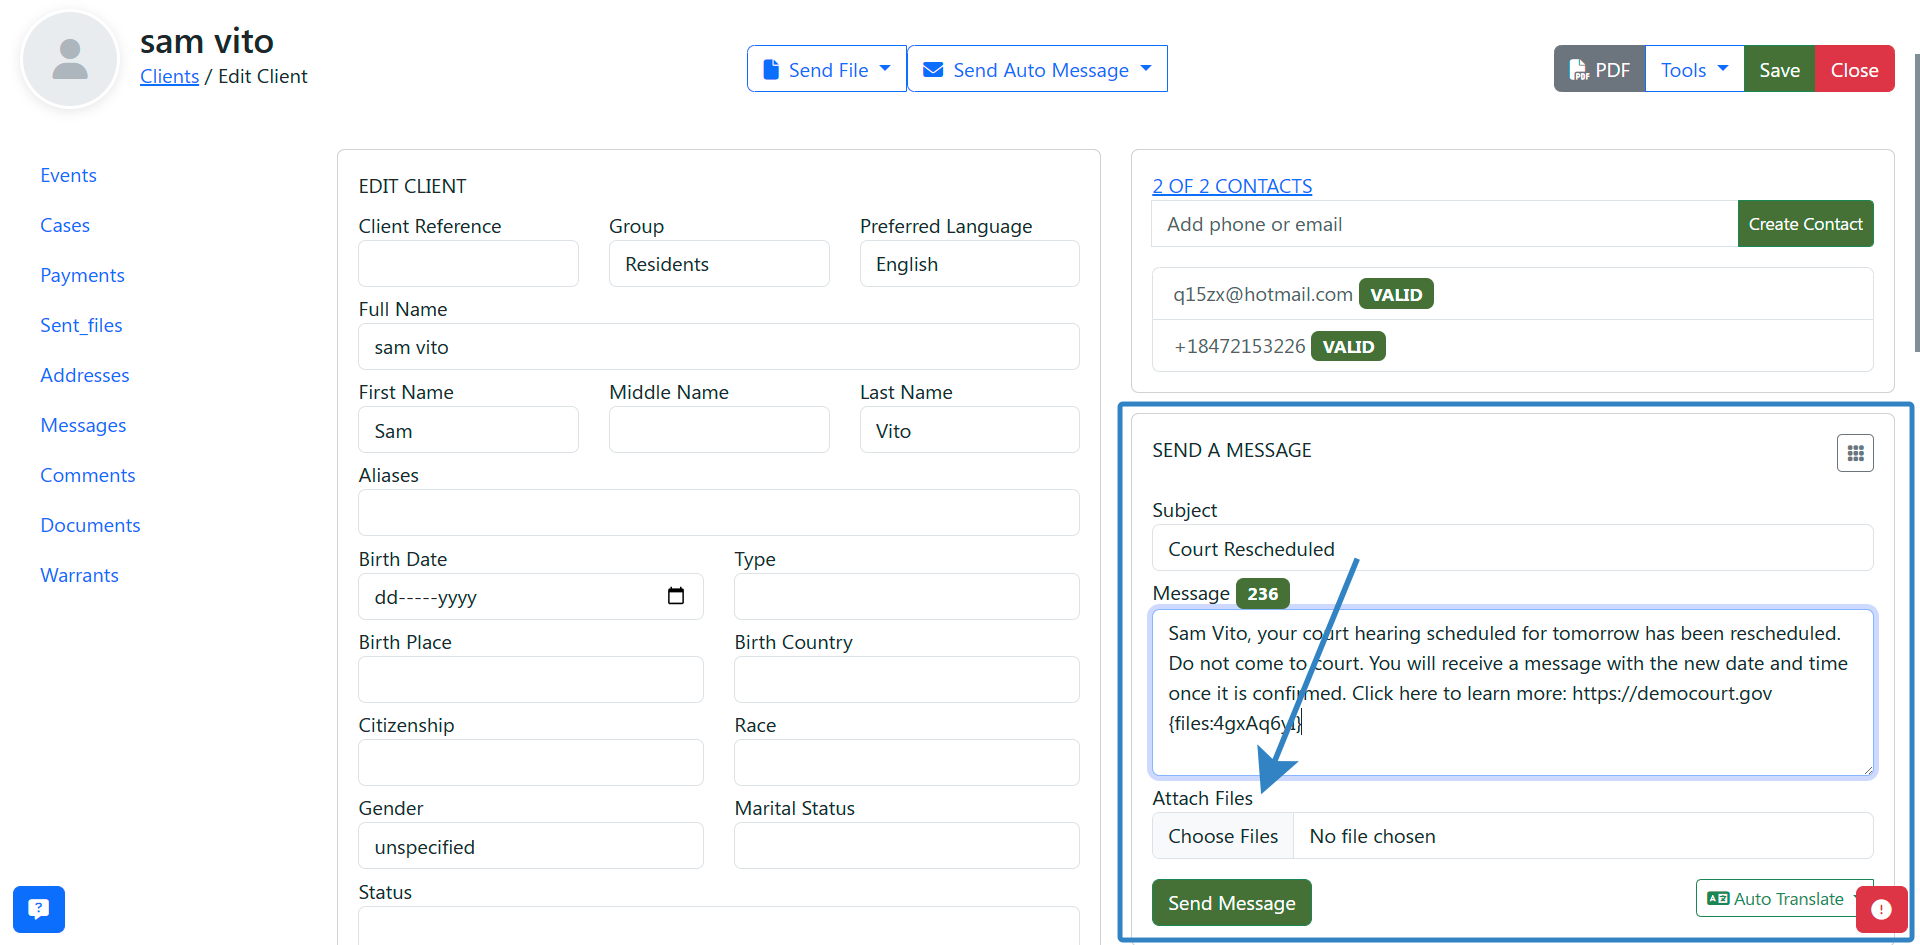
- Enter a Subject and Message. Both fields support merge tags
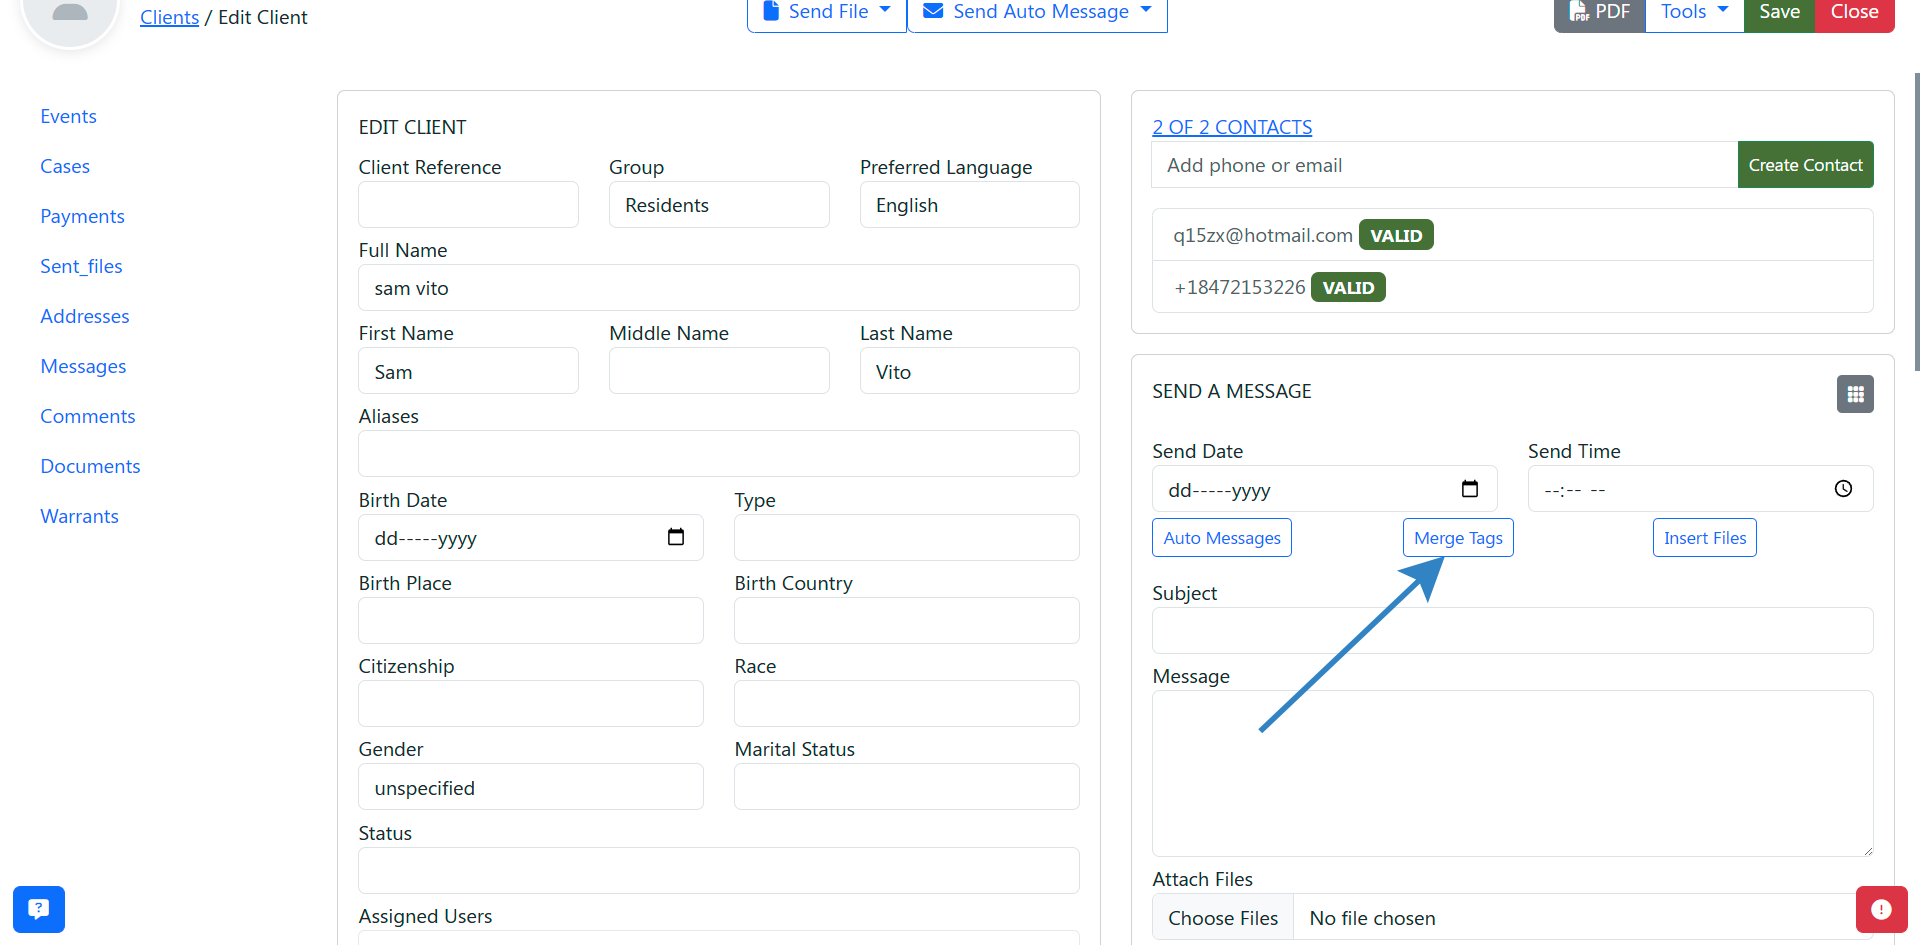
- (Optional) Click the Attach Files field to attach up to 5 files
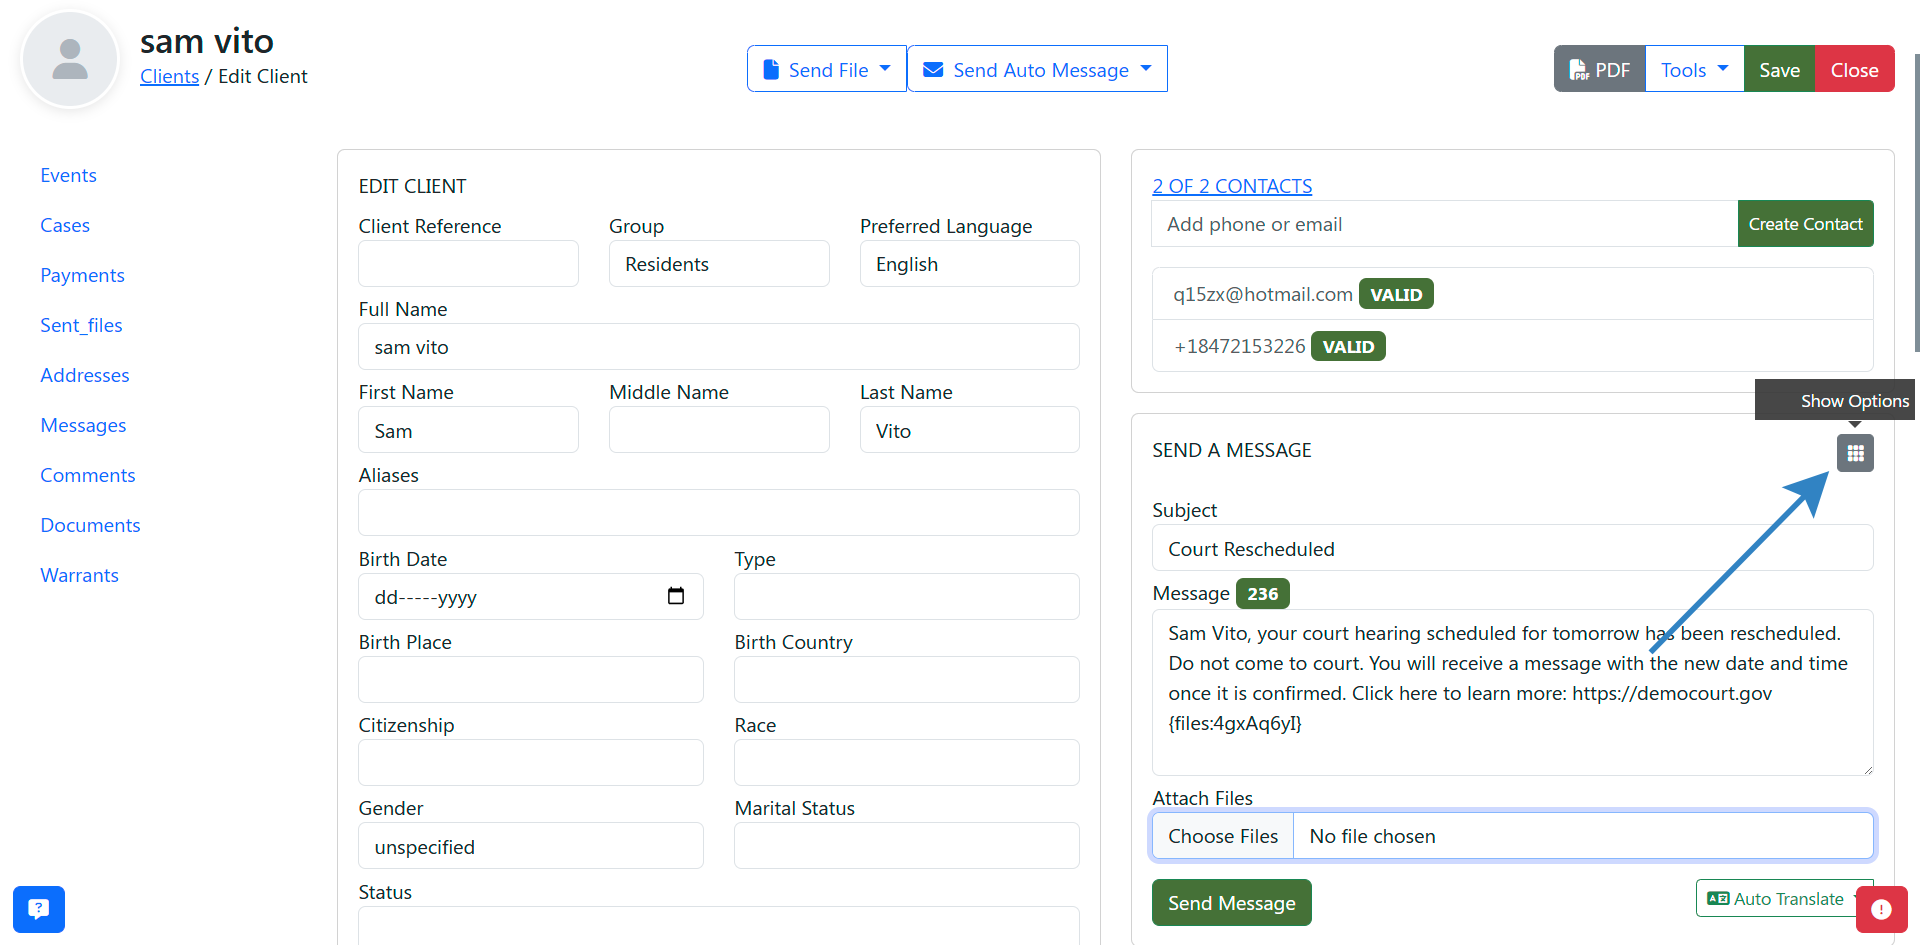
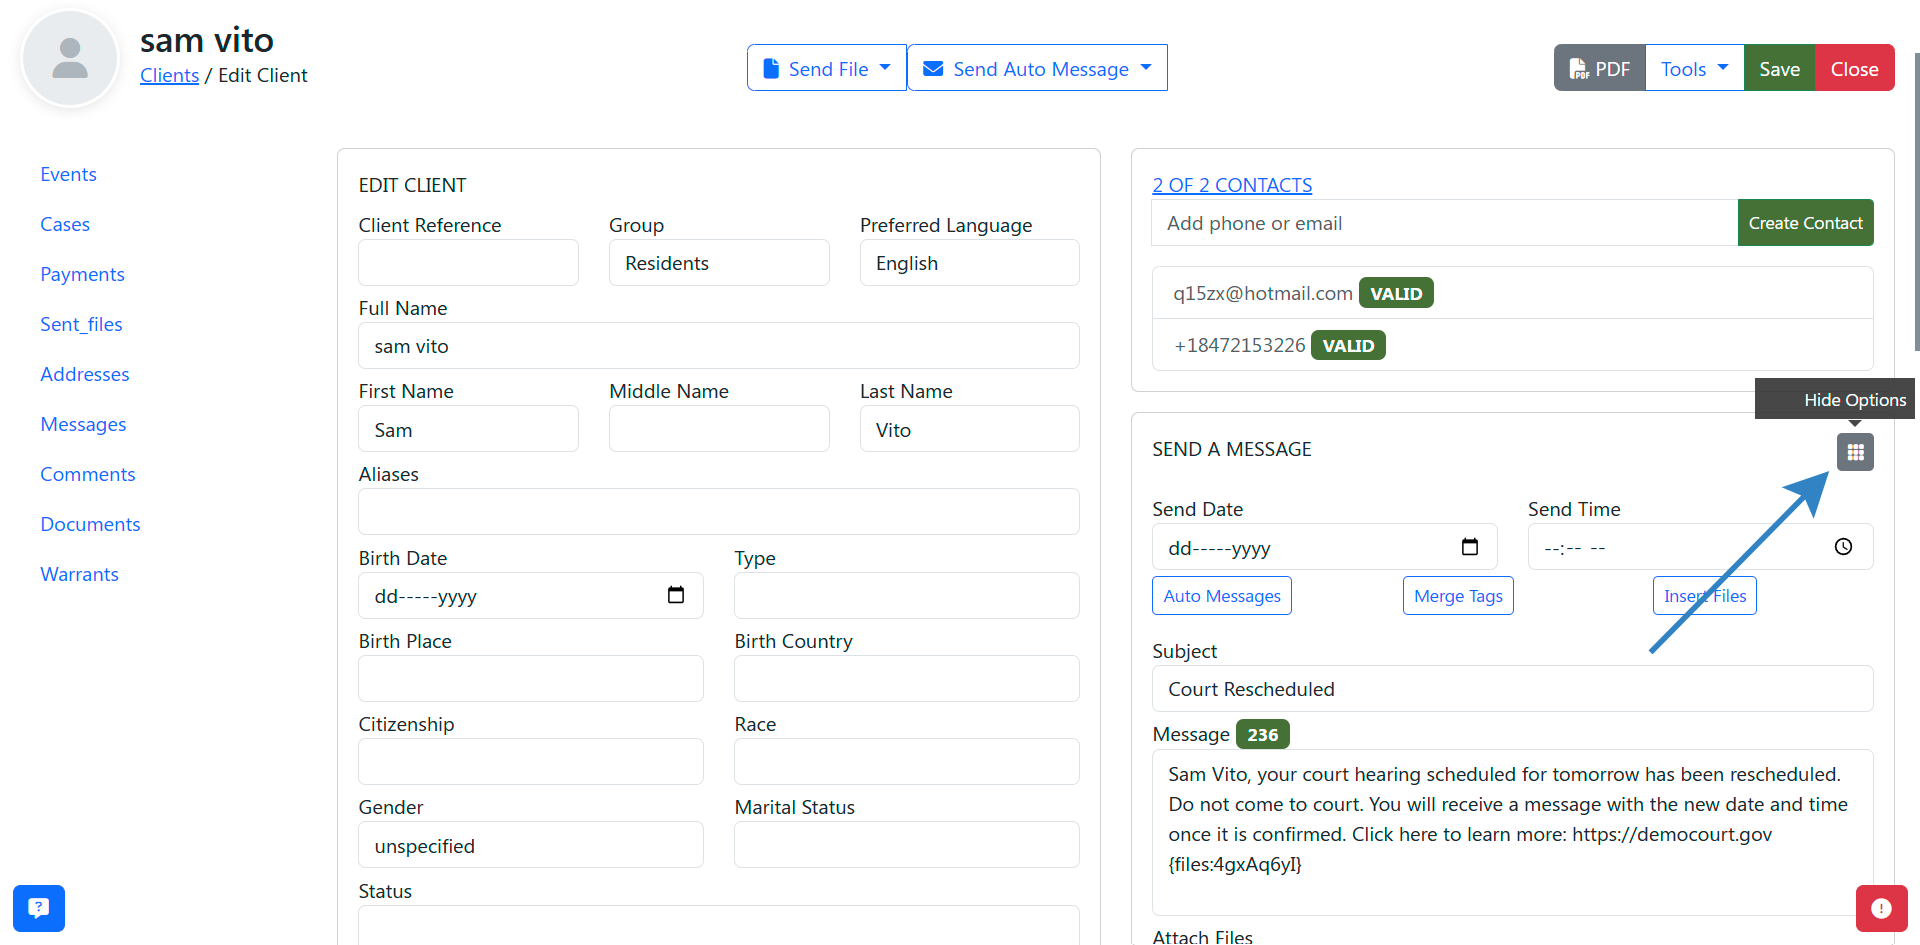
- (Optional) Click the Dialpad icon to access additional options such as scheduling the message for a later time
- Click Send to send the message
Step 2: Send a One-off Message to a Specific Contact
If you want to message a single contact rather than all of a client's contacts:
- Search for the client using the search bar and open their profile

- Under the Contacts section, click the specific contact you want to message
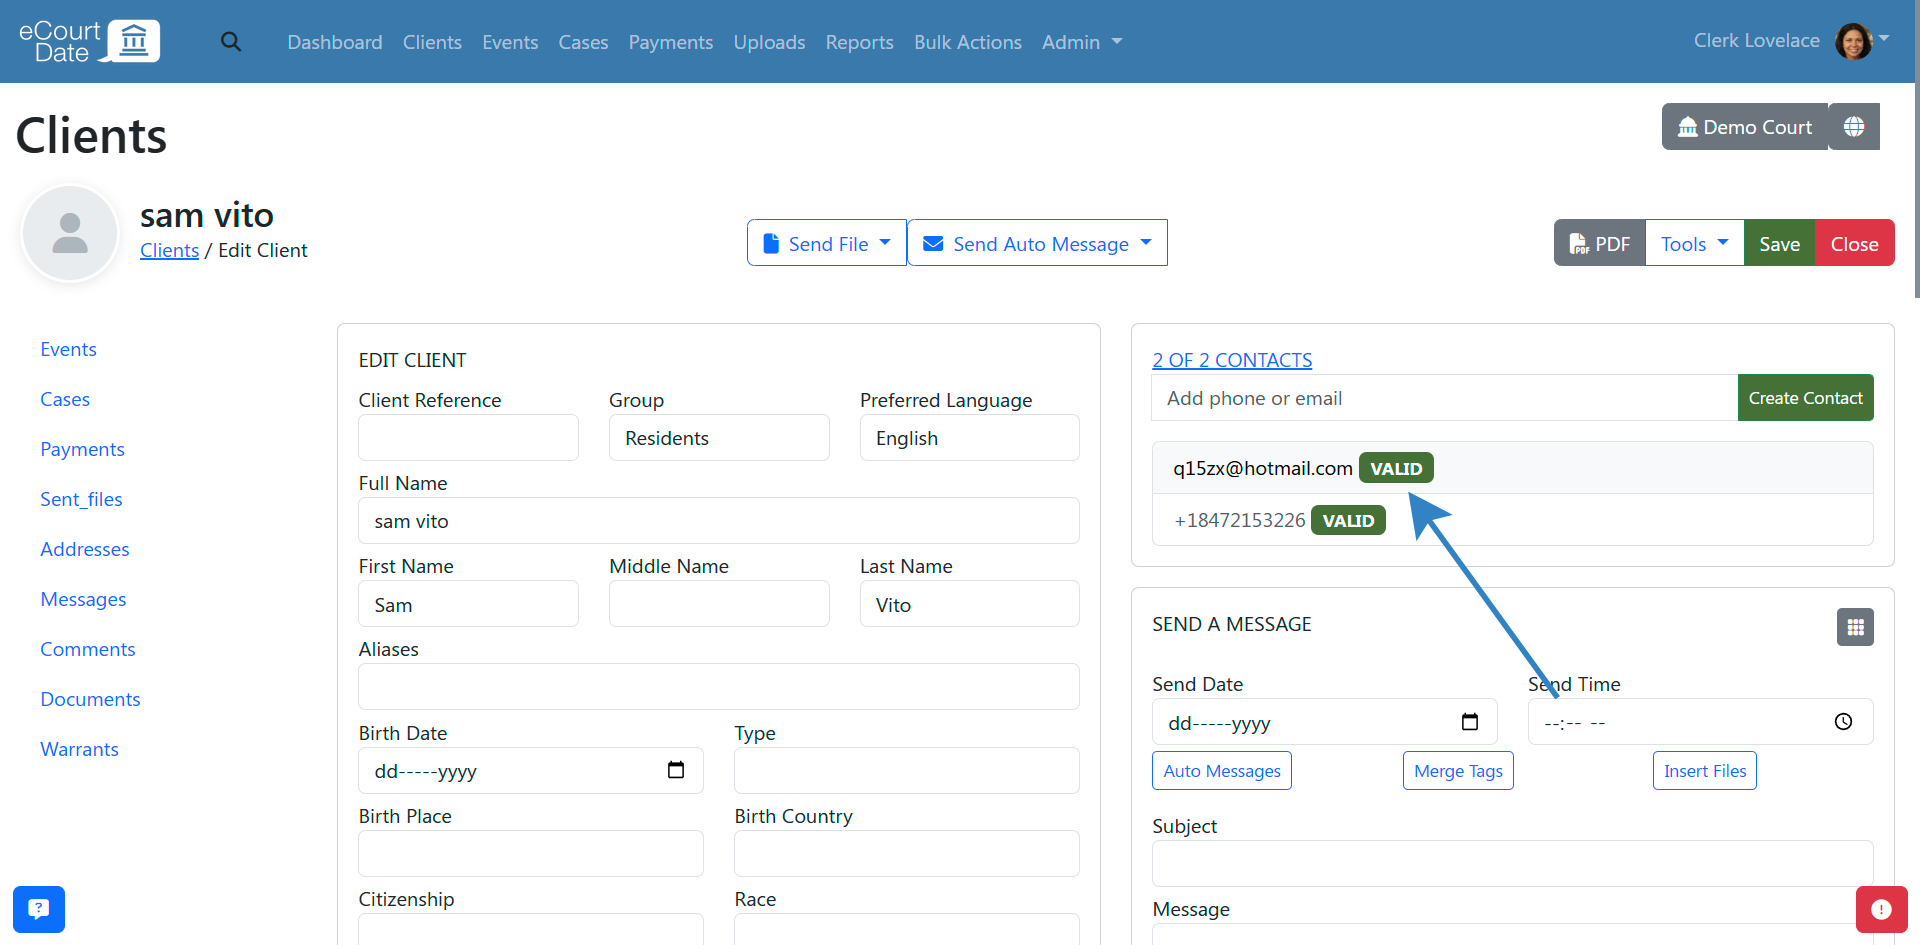
- Fill in the Subject and Message fields. Both fields support merge tags
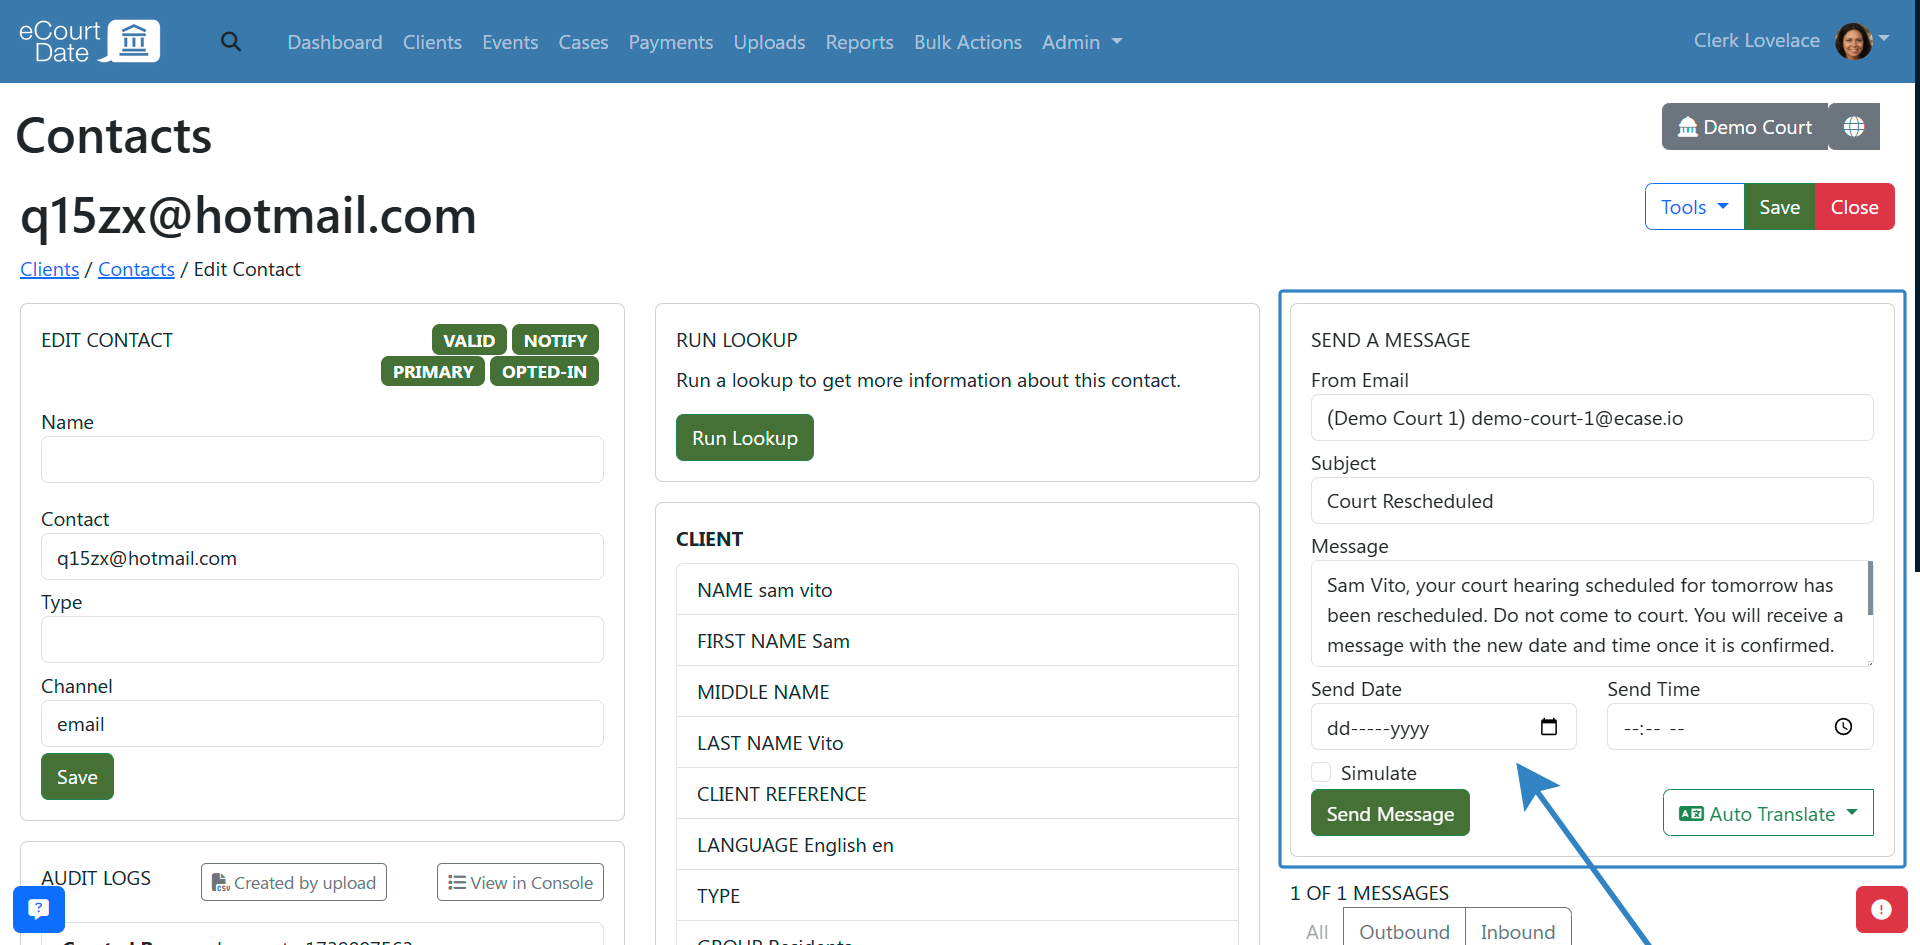
- Click Send to send the message
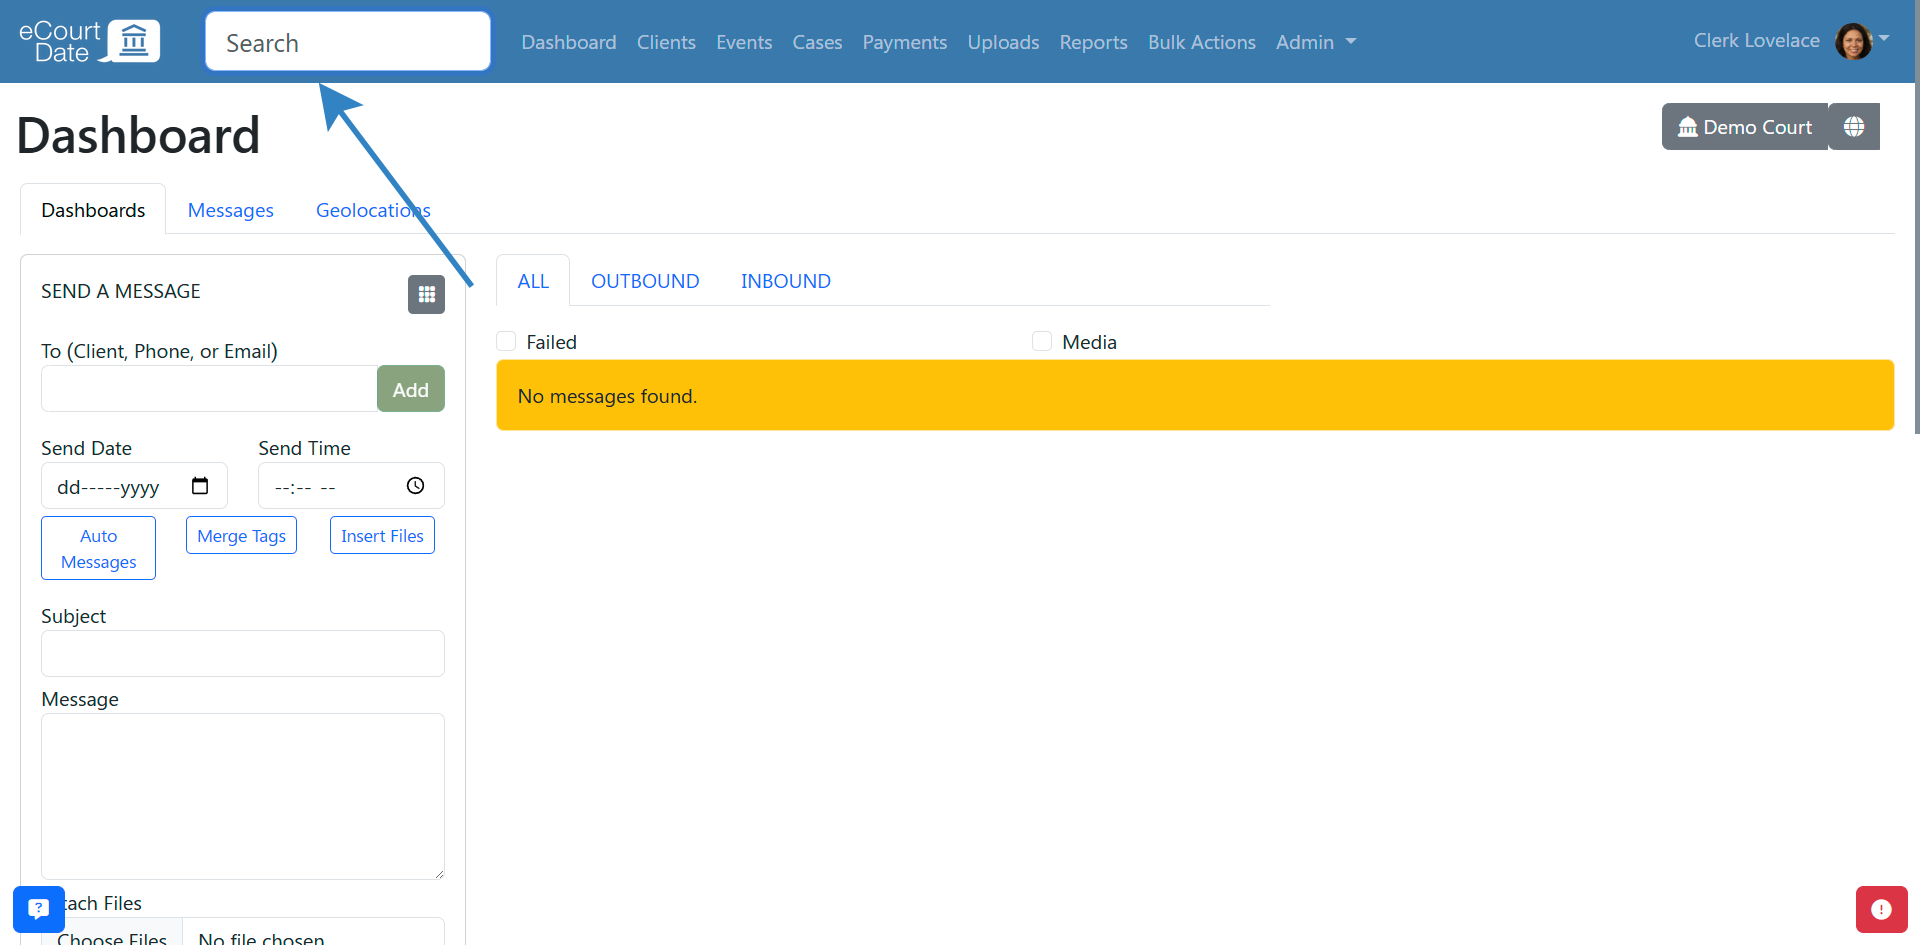
Step 3: Send a One-off Message to Any Phone or Email
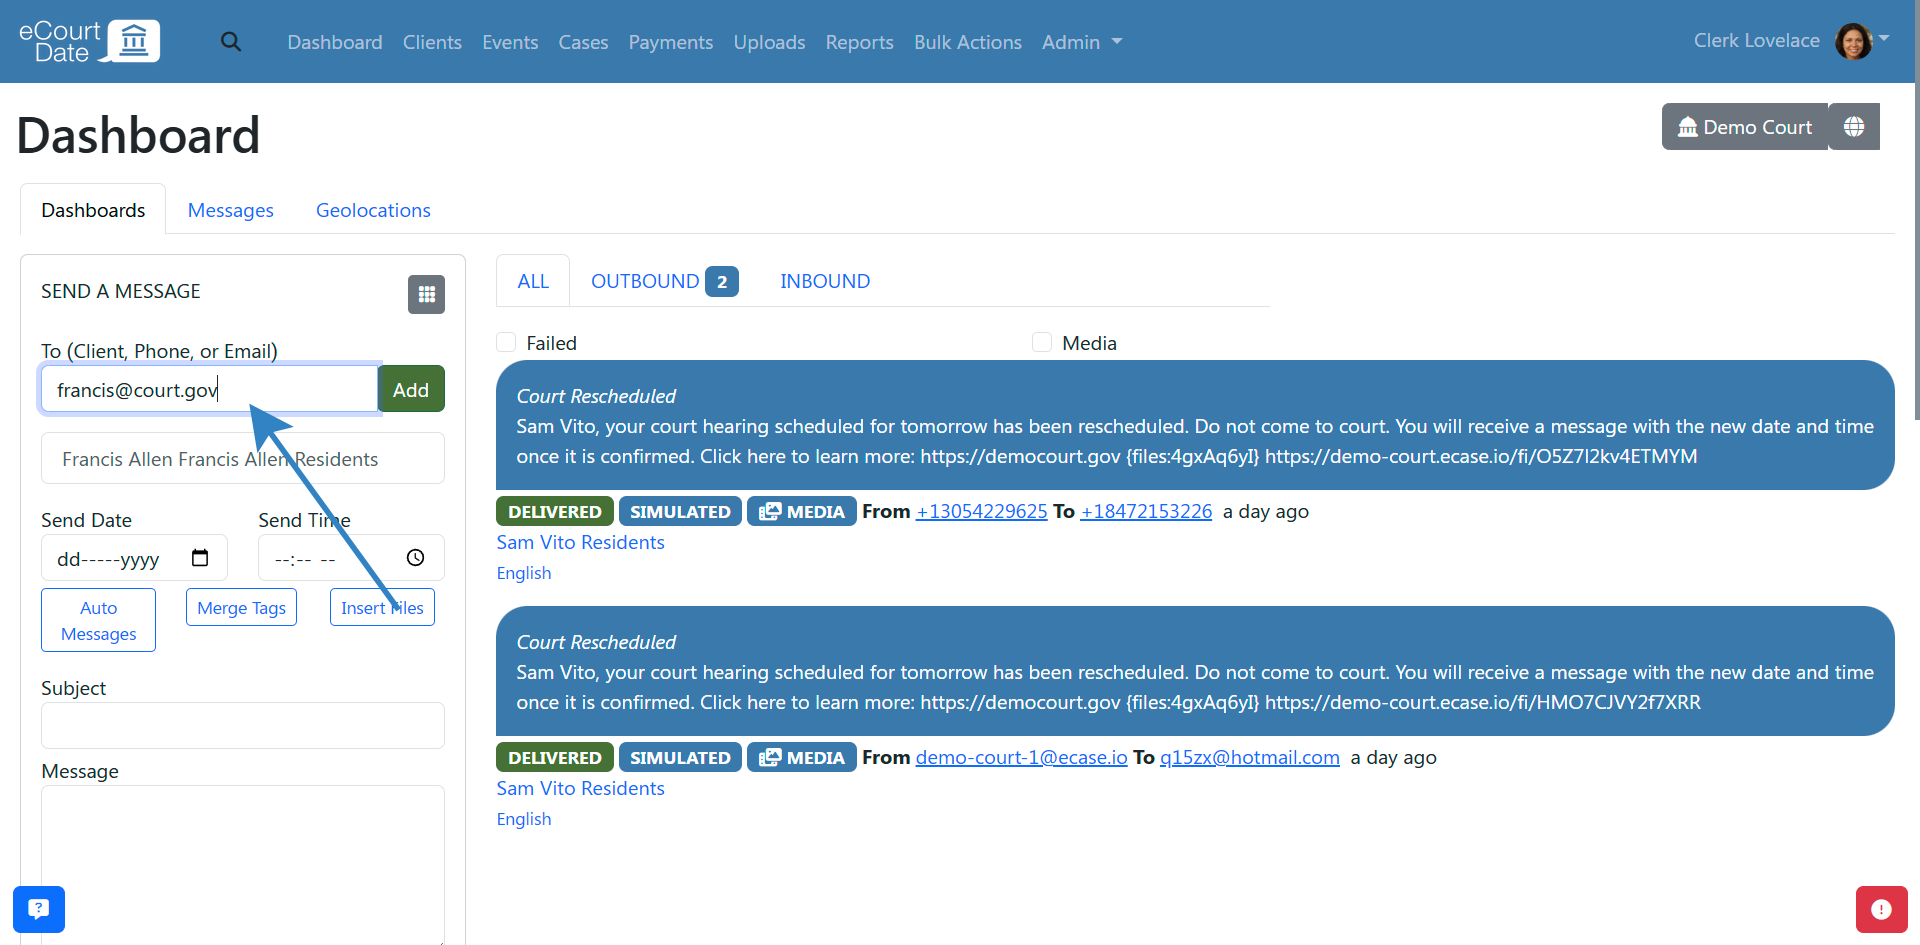
If the recipient is not already in eCourtDate, you can send a message directly from the Dashboard.
- Click Dashboard in the top navigation
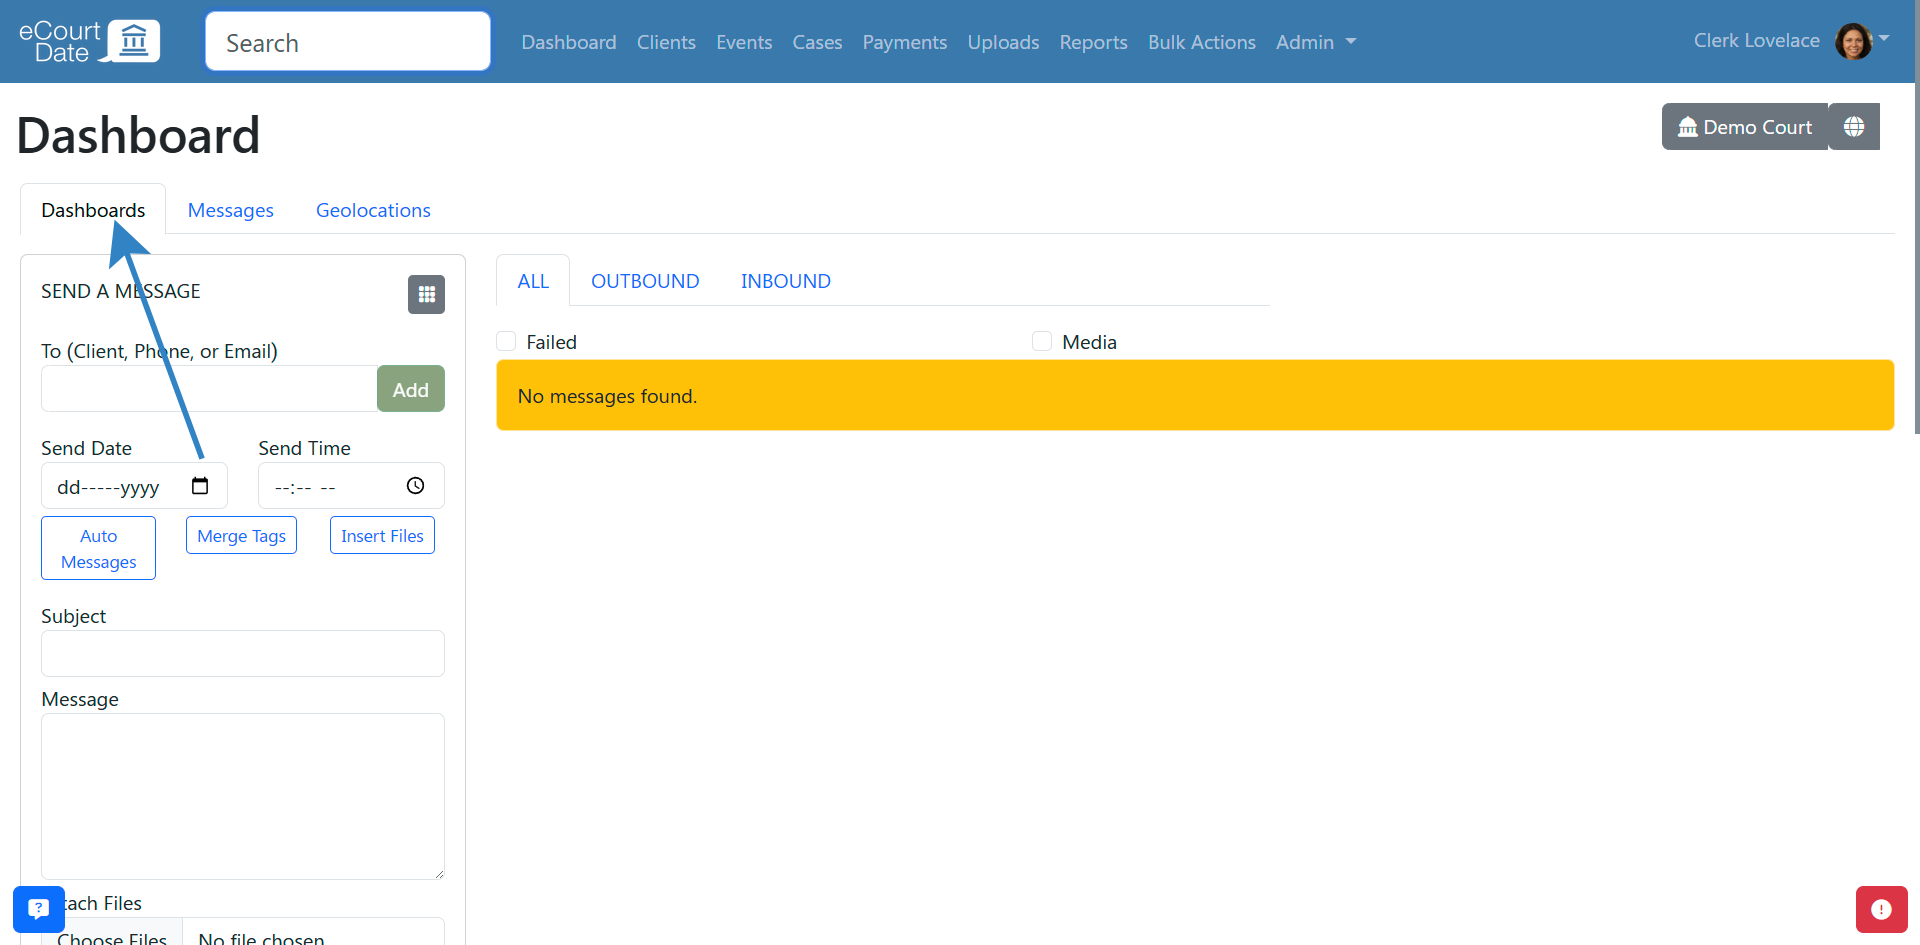
- In the Send a Message section, enter a phone number or email address in the (Client, Phone, or Email) field and click Add
- (Optional) If you search for an existing client, the client will appear in the search results. Click the client to add them, and all of their valid, opted-in contacts will receive the message
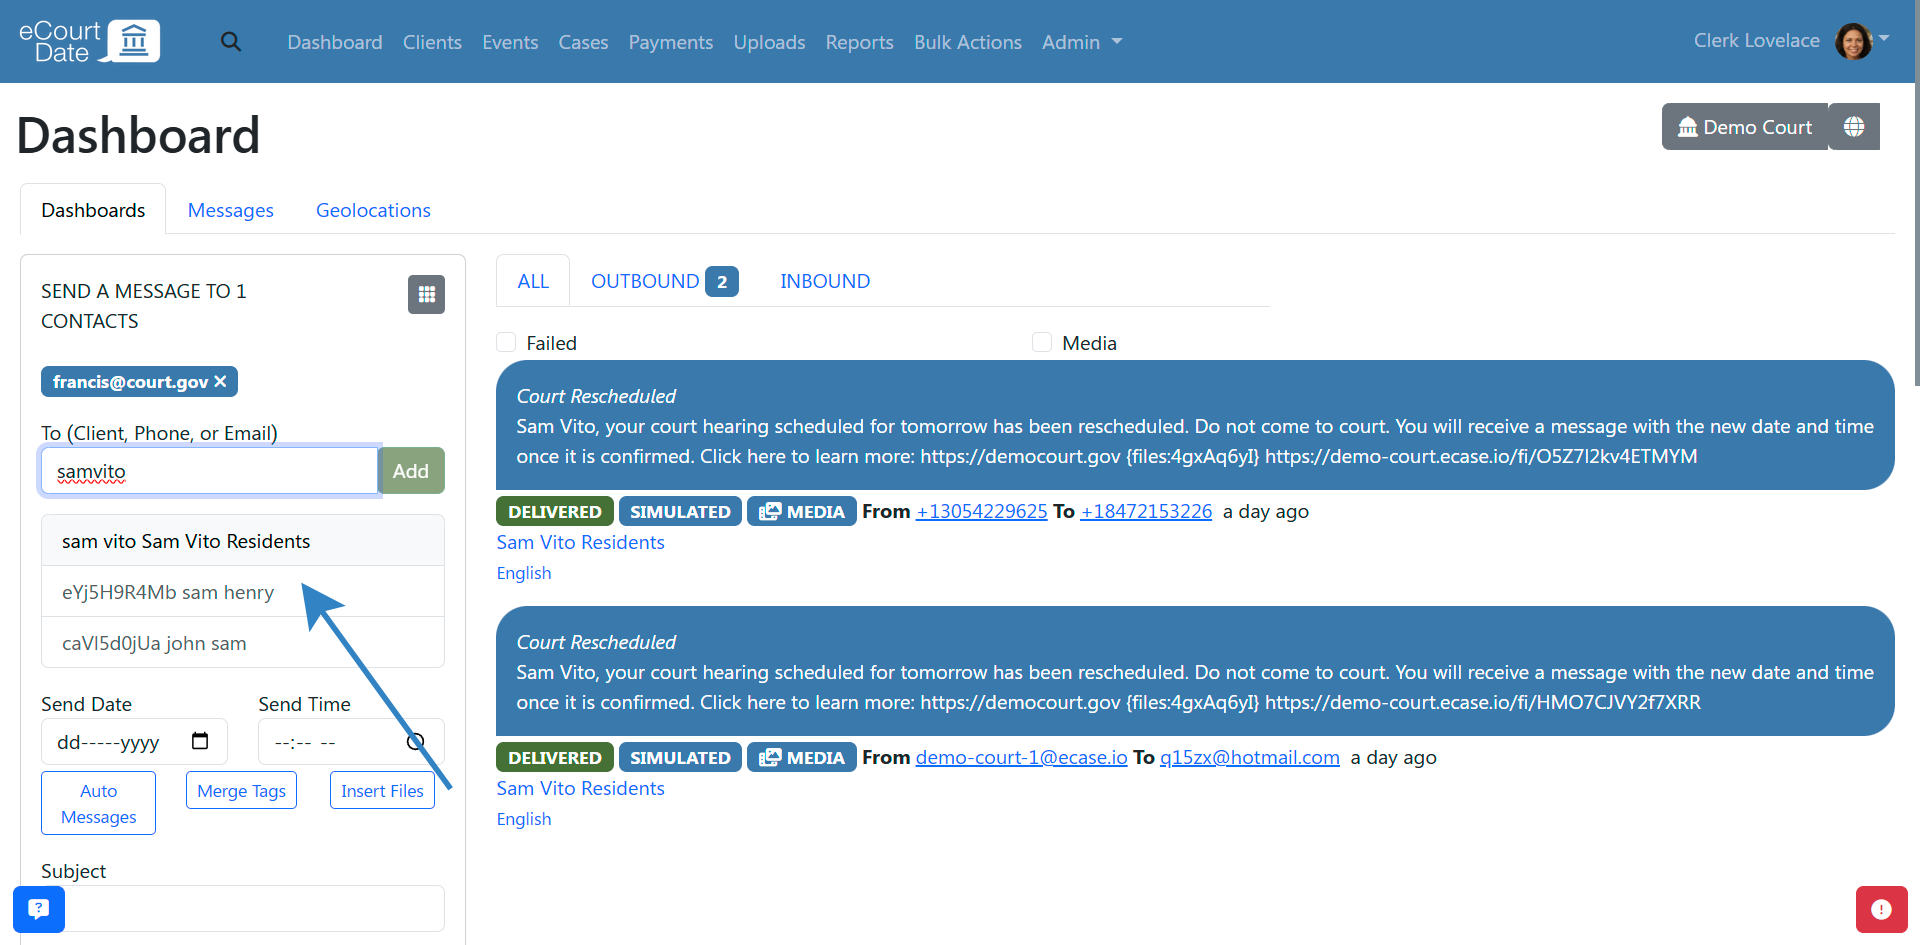
- (Optional) Add additional phone numbers or email addresses by repeating the process
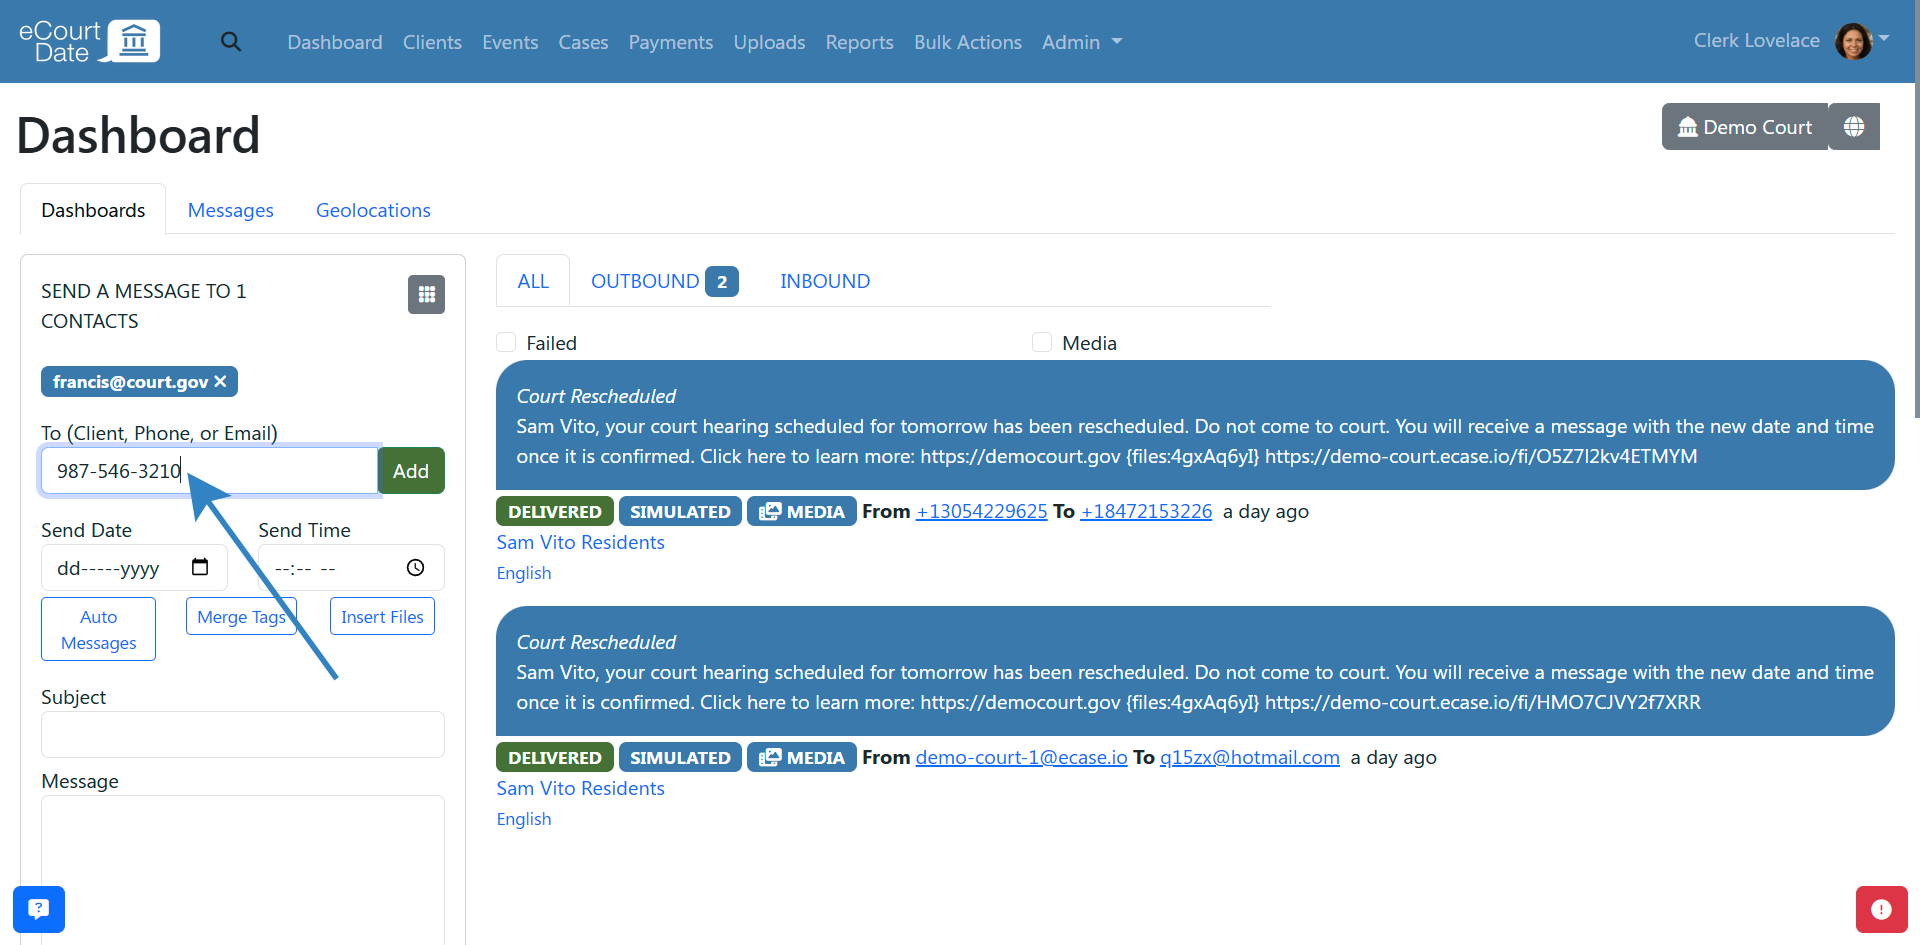
- Verify the list of recipients appears above the field

- Enter a Subject and Message. Both fields support merge tags (client-specific merge tags will not be available for manually entered phone numbers or emails)
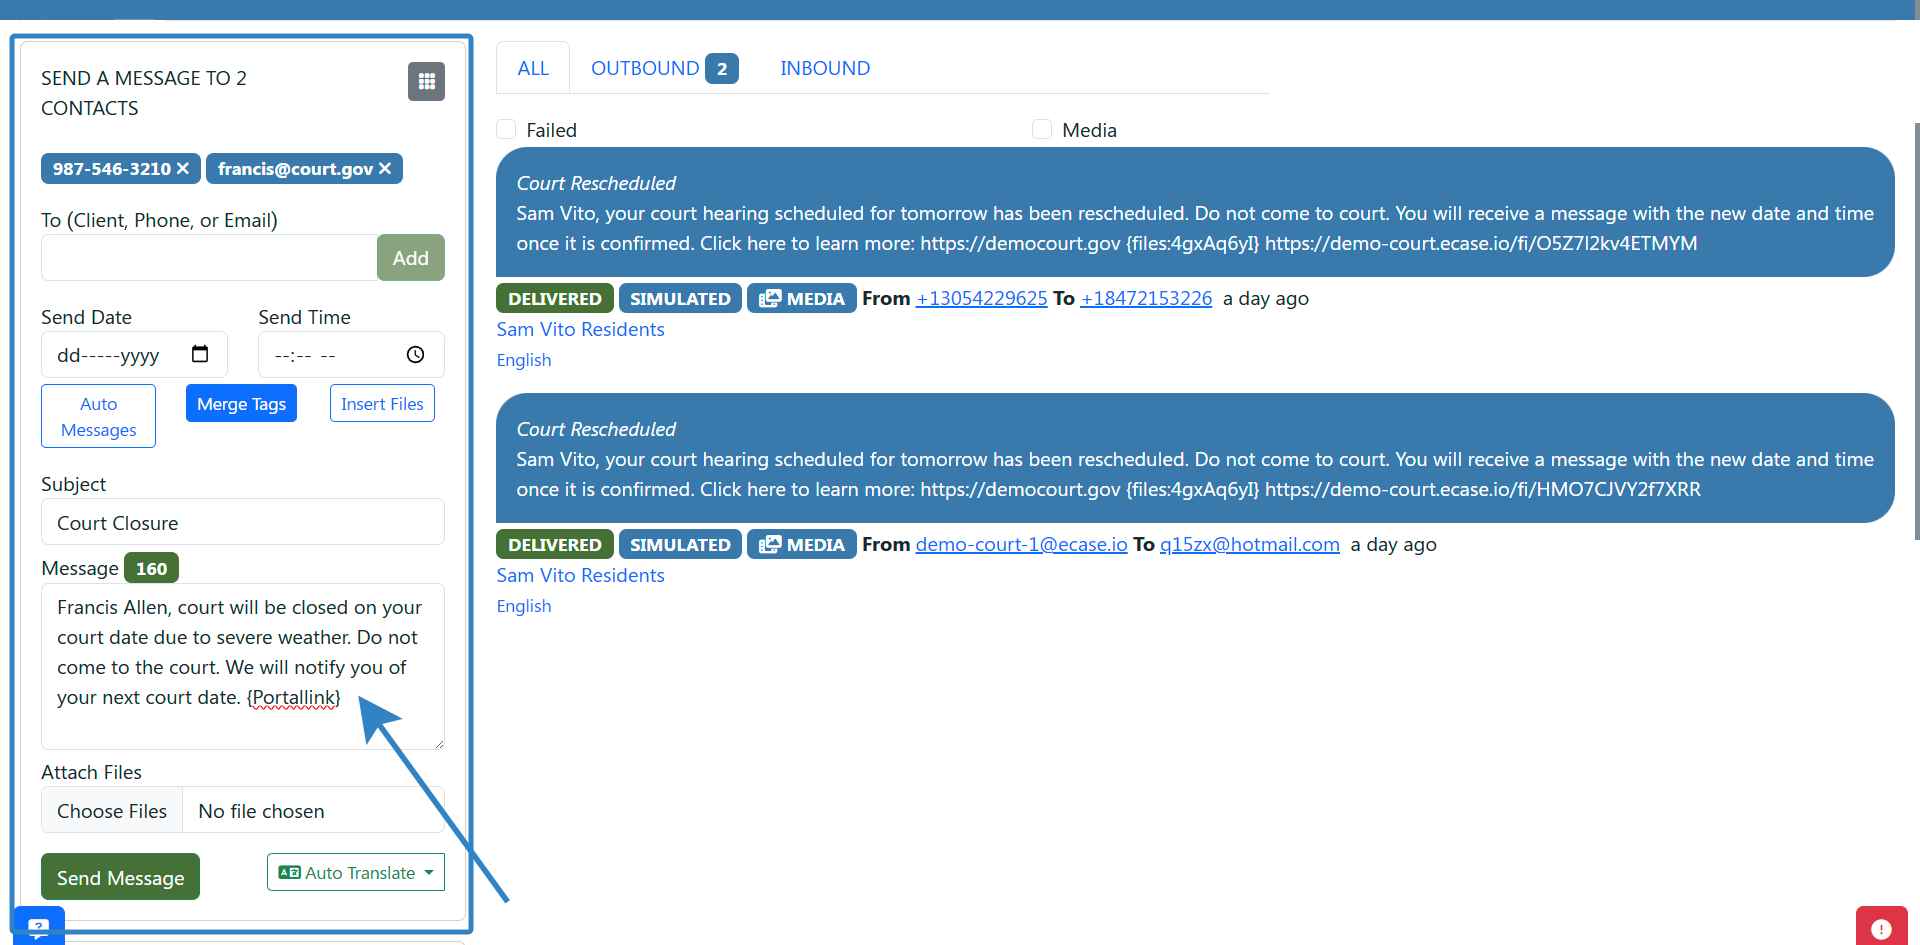
- (Optional) Click Attach Files to attach up to 5 files

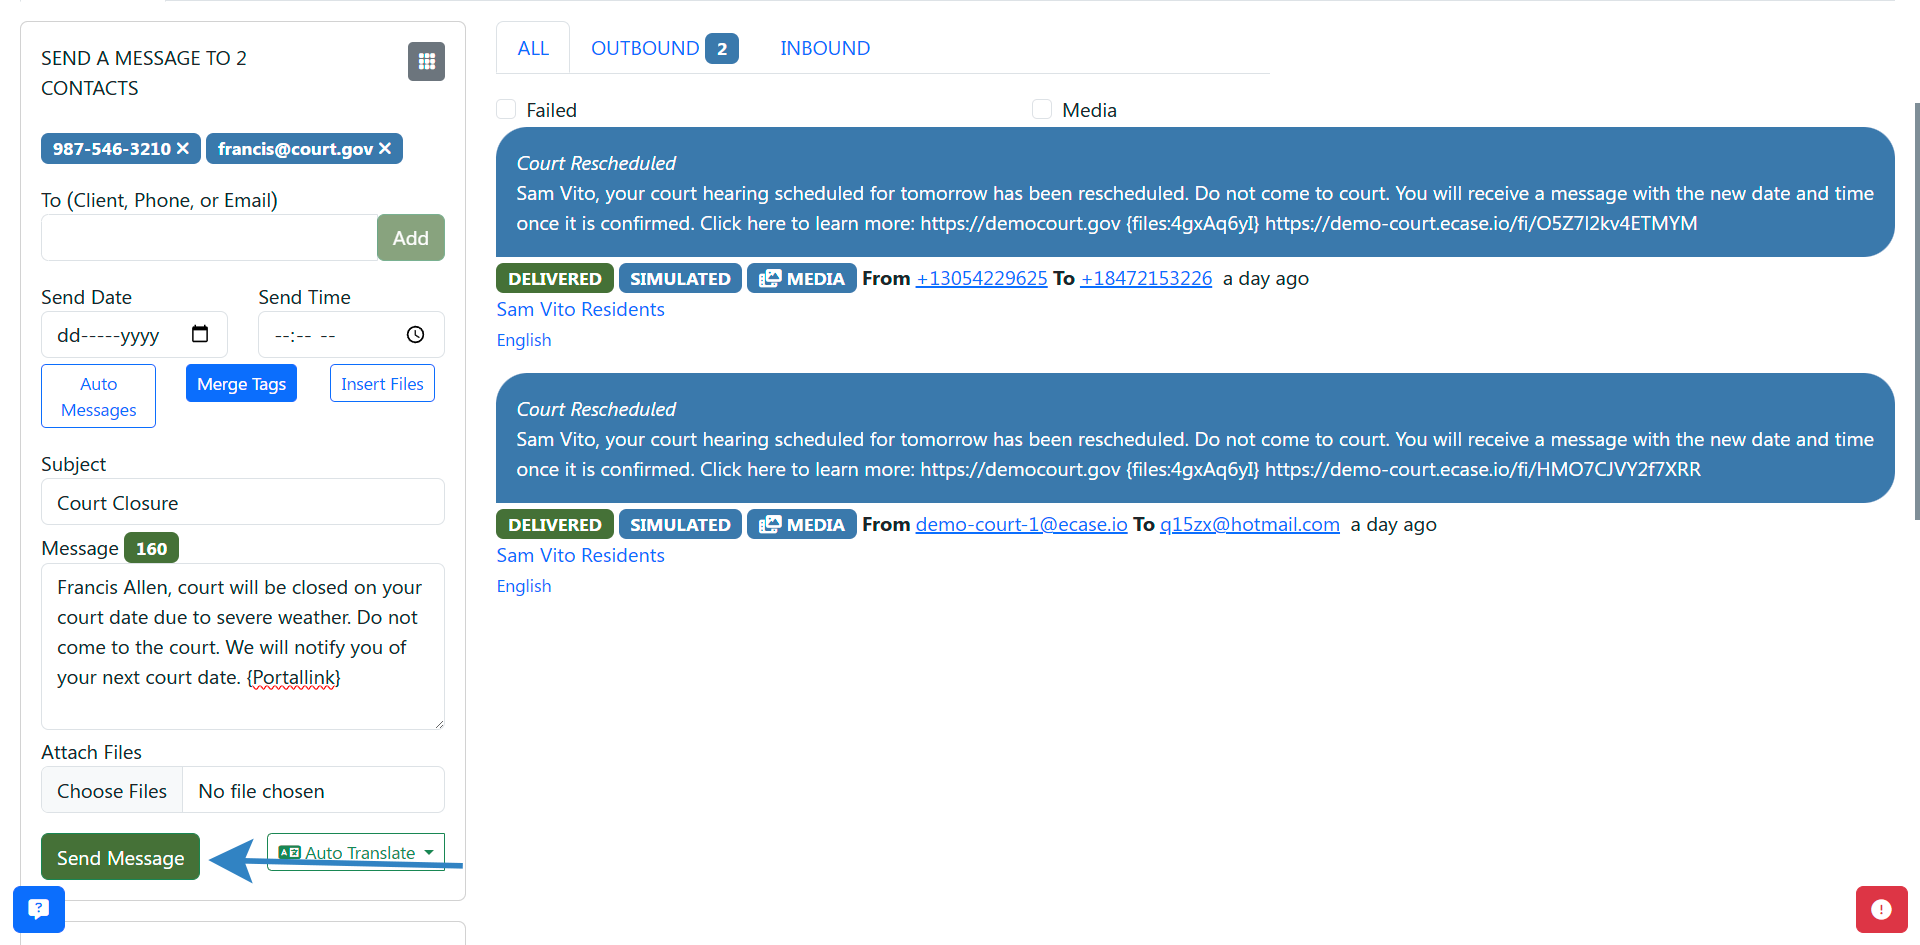
- (Optional) Click the Dialpad icon to schedule the message for a later time
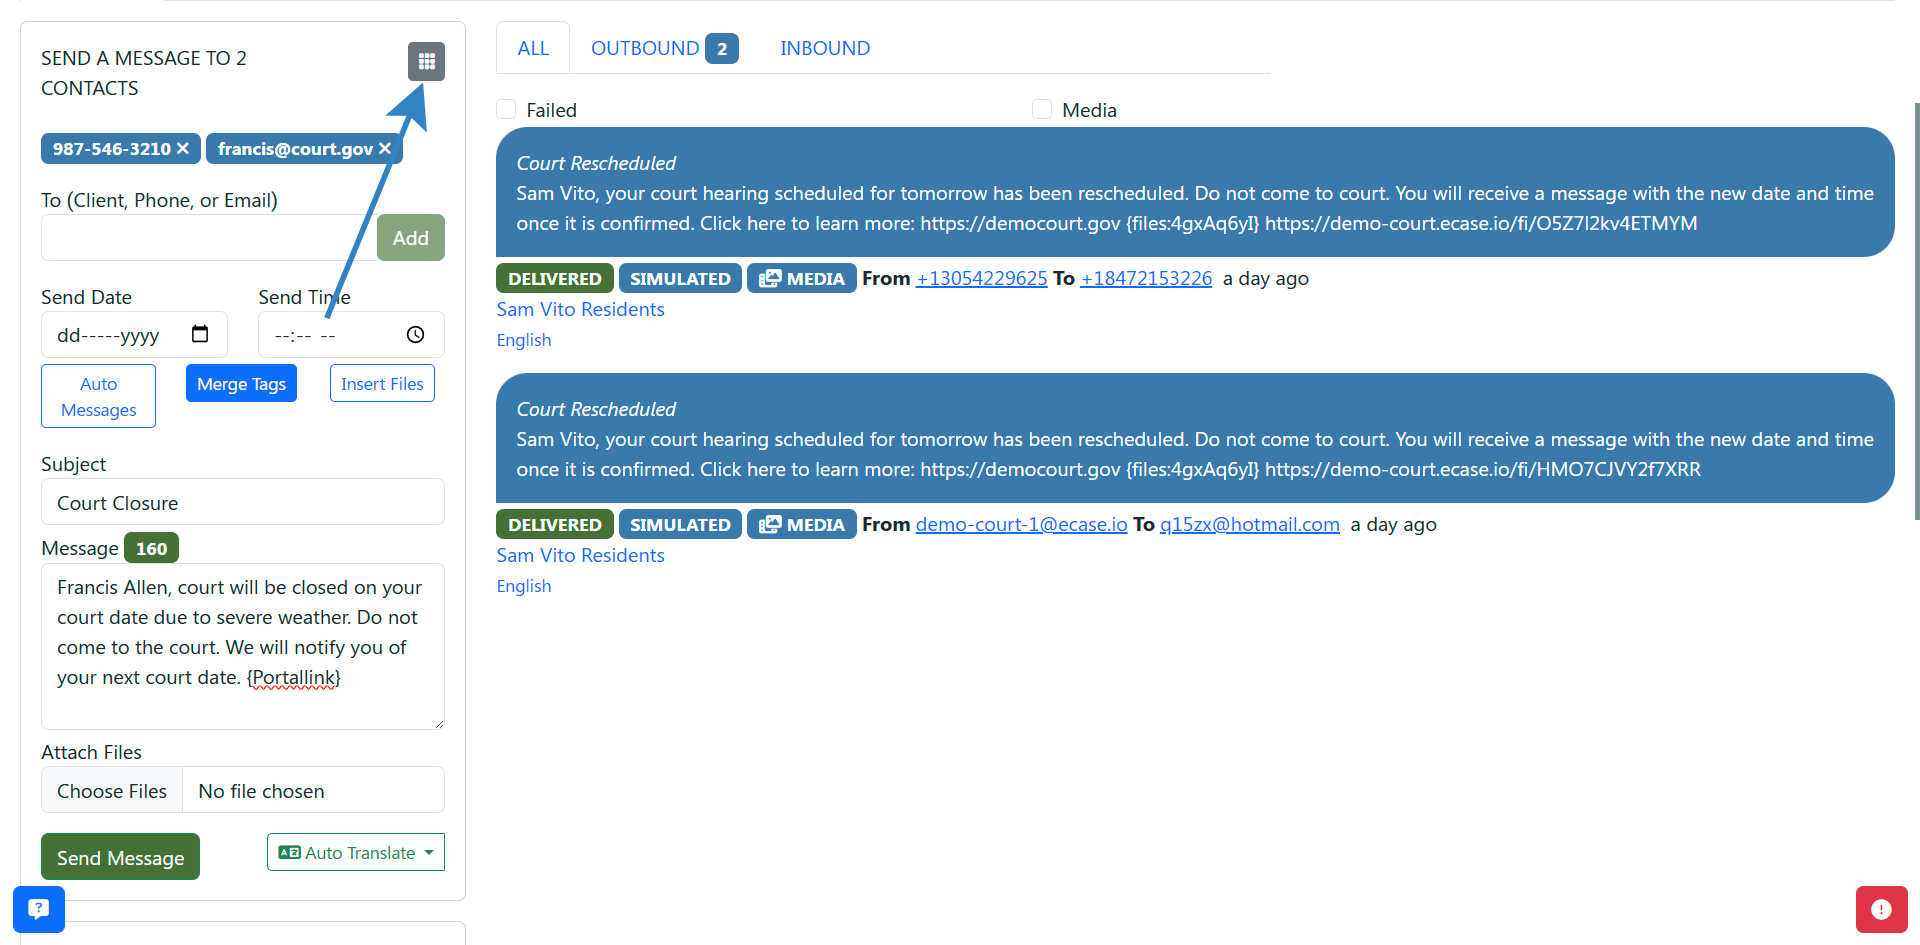
- Click Send to send the message
What to Expect
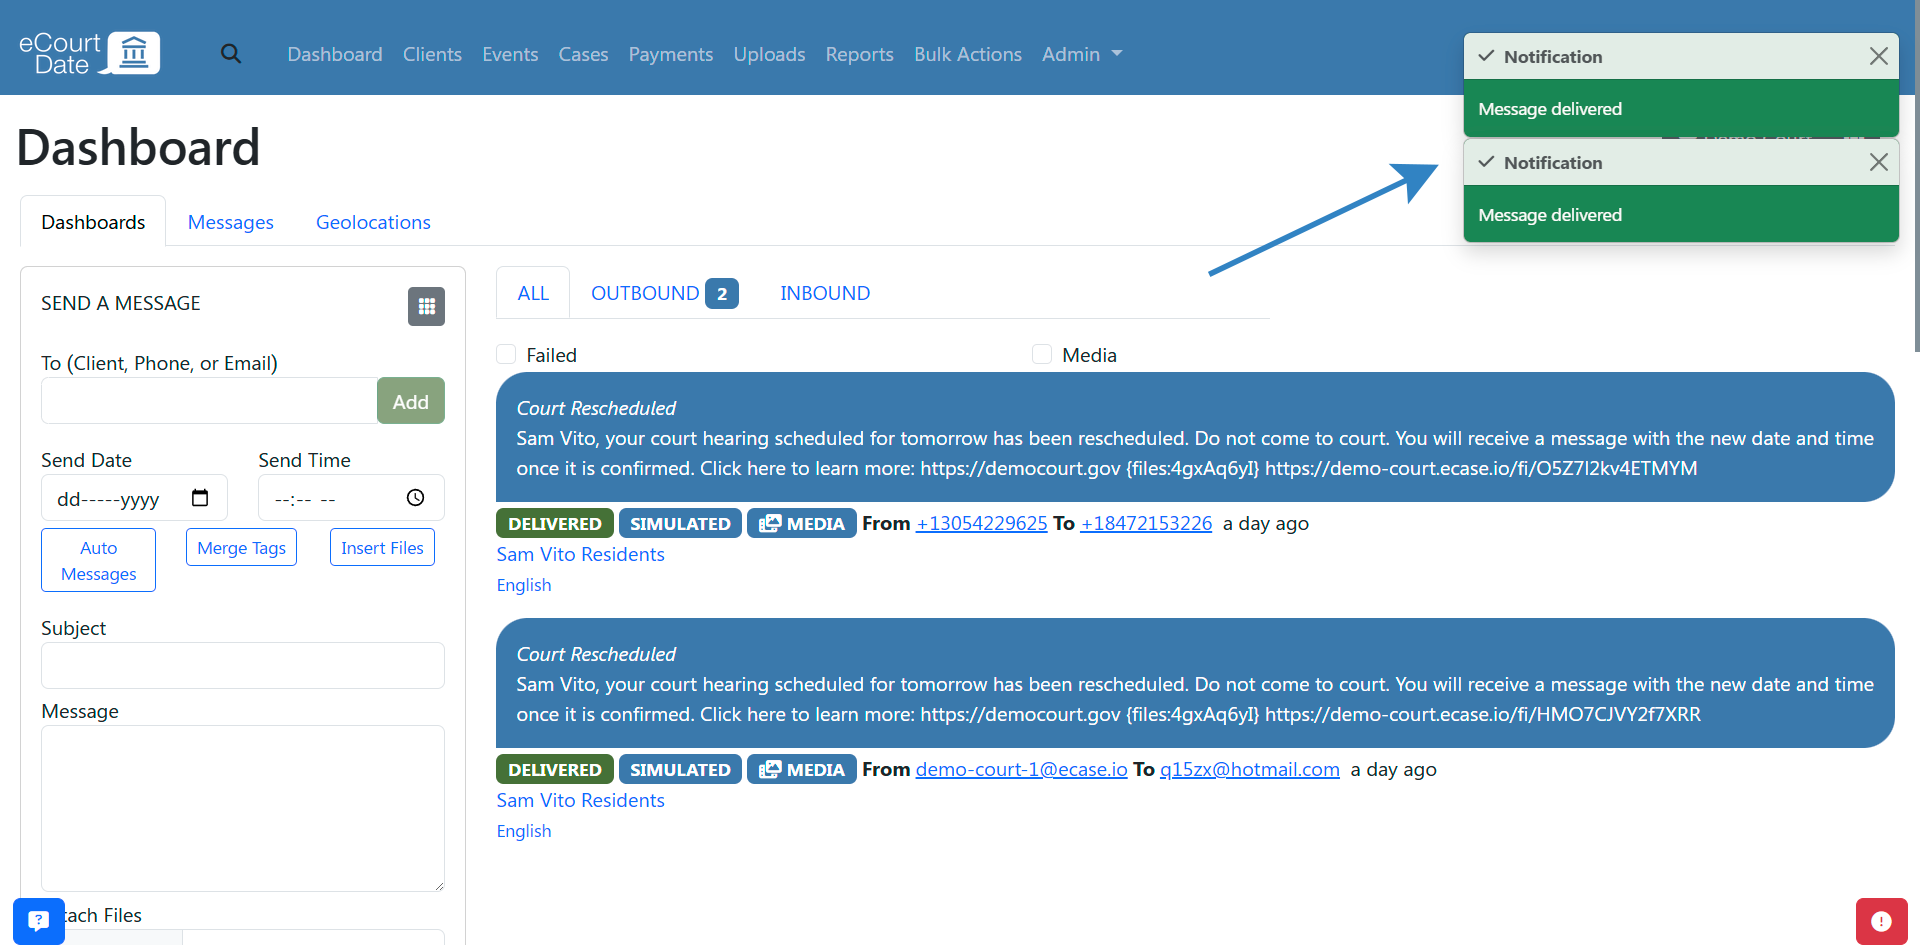
By default, one-off messages are delayed 5 minutes from the creation time to allow for review. Depending on your agency settings or whether you scheduled the message, it may be sent immediately or at a later date and time.
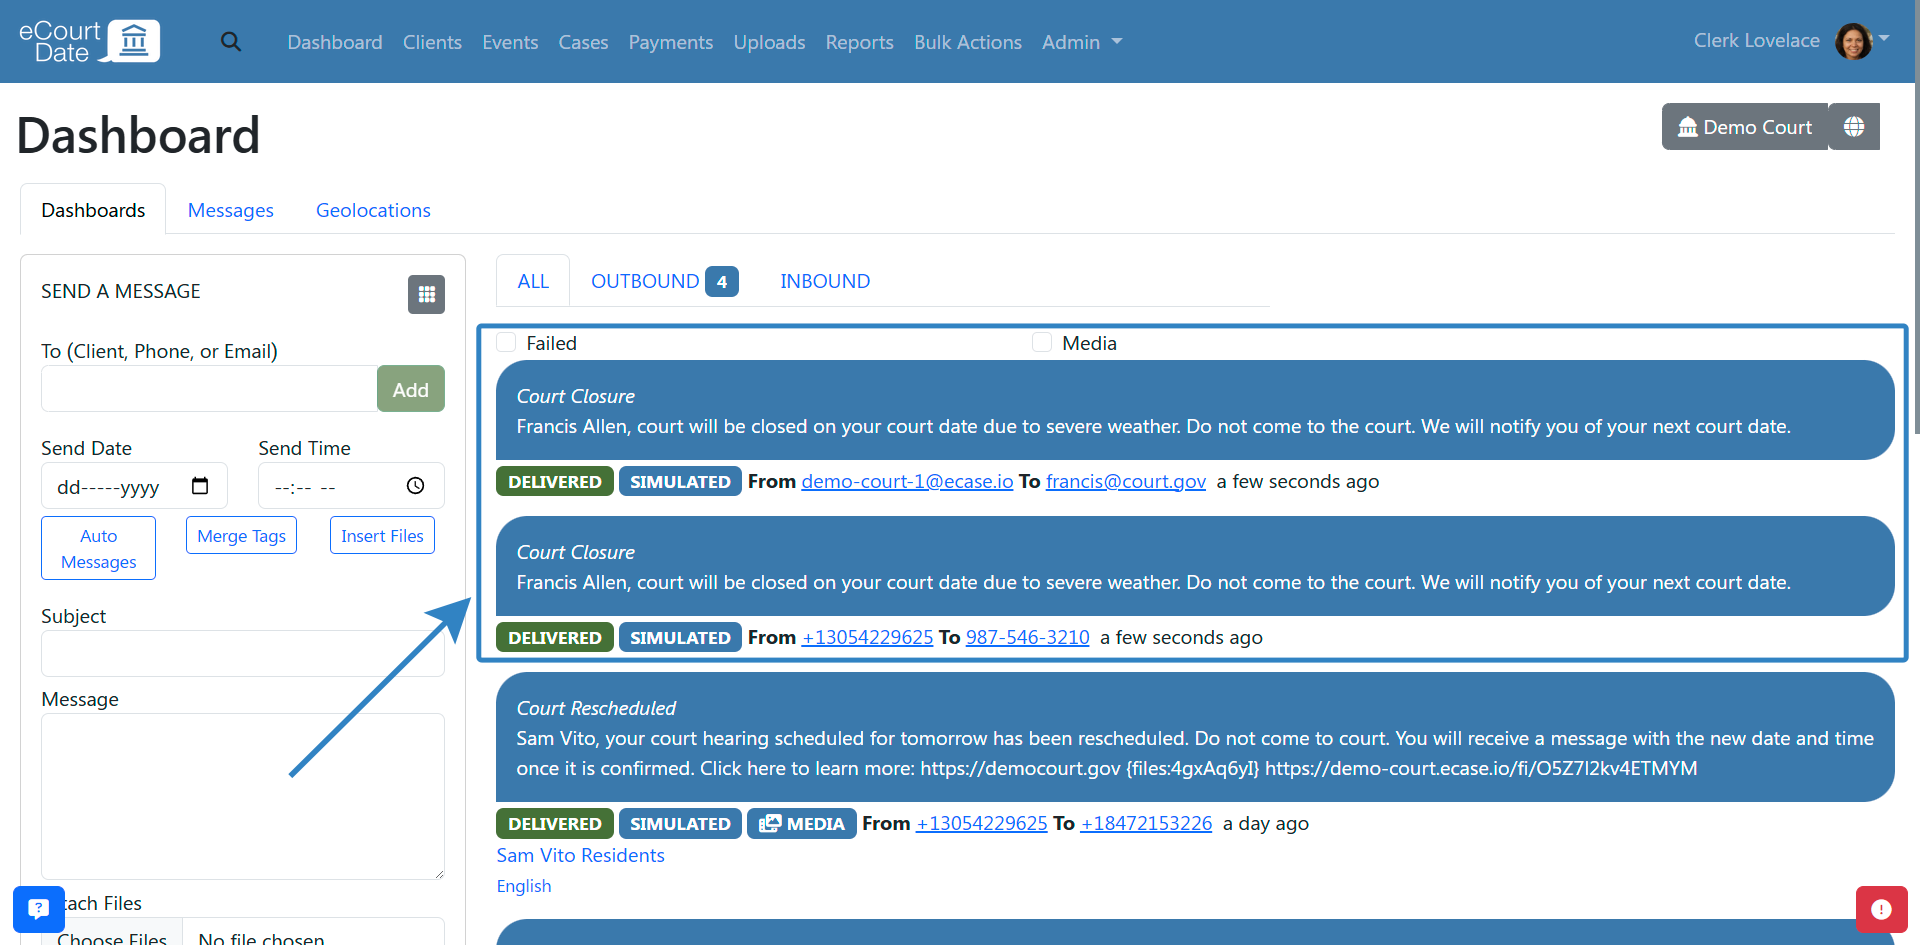
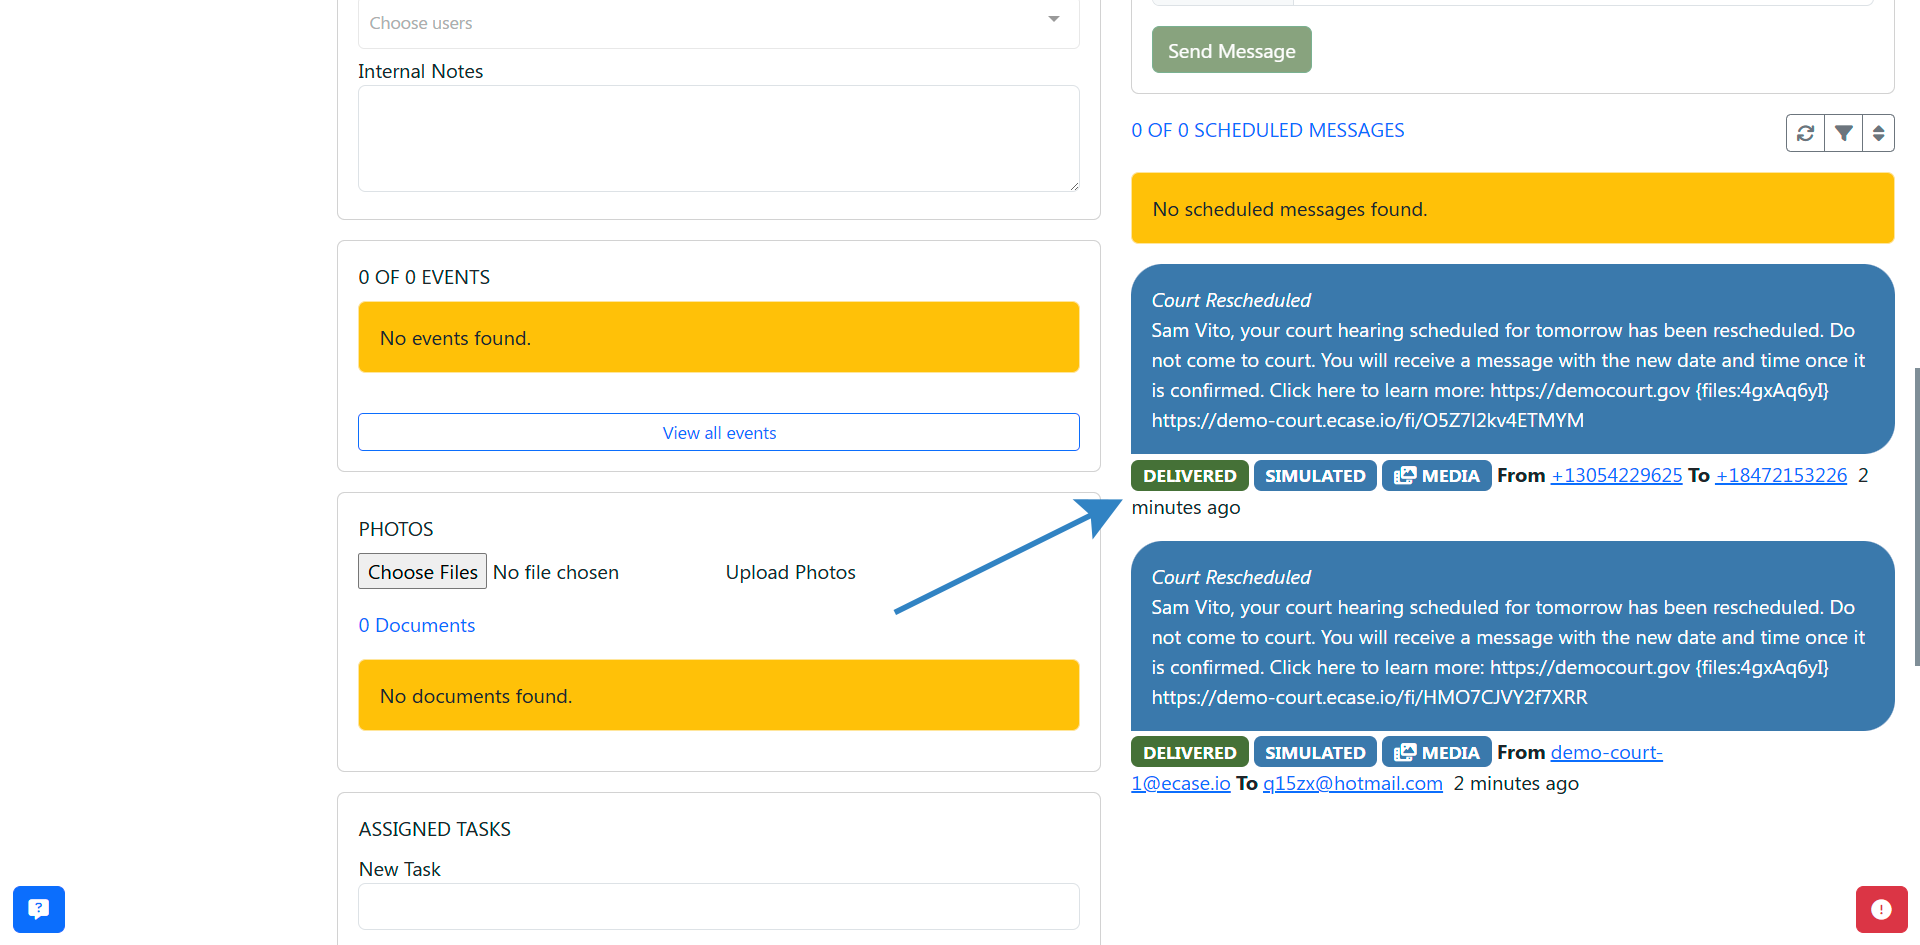
- Scheduled messages appear in the Scheduled Messages section below the Send a Message form
- Sent messages appear in the Sent Messages section (on a client profile) or the Sent and Received Messages section (on the Dashboard)
- One message is created per valid, opted-in contact. For example, if a client has two phone numbers and one email address, three messages are created
- To refresh the message feed, click the Refresh button above the Scheduled Messages section
Best Practices
- Always verify that the recipient has opted in to receive messages before sending
- Use merge tags to personalize your messages (for example,
[ClientFirstName] or [EventDate])
- Review scheduled messages before they are sent. You can cancel a scheduled message before its send time
- Use the Dialpad options to schedule messages for appropriate times rather than sending late at night or on weekends
- When messaging from the Dashboard, double-check phone numbers and email addresses for accuracy before clicking Send
Frequently Asked Questions
Q: Can I send a message to multiple recipients at once from the Dashboard?
A: Yes. In the Send a Message section on the Dashboard, you can add multiple phone numbers, email addresses, or clients. Each recipient receives their own message.
Q: What happens if a contact is opted out?
A: The system will not send a message to any contact that has opted out. Only valid, opted-in contacts receive the message.
Q: Can I cancel a scheduled message?
A: Yes. If a message is scheduled for a later time, you can find it in the Scheduled Messages section and cancel it before the scheduled send time.
Q: Why is my message delayed by 5 minutes?
A: By default, one-off messages are delayed 5 minutes from creation to allow you time to review or cancel the message. This delay can be adjusted in your agency settings.
Q: Are merge tags available when sending to a phone number or email not linked to a client?
A: General merge tags (such as [AgencyName] or [AgencyPhone]) are available. Client-specific merge tags (such as [ClientFirstName]) will not populate because there is no associated client record.
Troubleshooting
Issue: The "Send a Message" section does not appear on a client's profile
Symptoms: You can see the client's details but there is no messaging form.
Solution:
- Verify the client has at least one contact. If not, create a contact using the Create Contact form
- Confirm your role has Create Messages and Create Contacts permissions
- Ensure at least one agency phone number is active (go to Admin > Settings > Agency Phones)
Issue: Message was sent but the recipient did not receive it
Symptoms: The message appears in Sent Messages but the recipient reports not receiving it.
Solution:
- Check the message status in the sent messages list for any delivery errors
- Verify the contact's phone number or email address is correct and valid
- Confirm the contact is not opted out of receiving messages
- Check that your agency phone number is active and properly configured
- If the issue persists, contact support by clicking the ticket button in the bottom right corner of the screen
Related Articles
One-off messages in eCourtDate let you send a single email, text, or voice message to a specific client, contact, or any phone number or email address directly from the platform.
### Overview
- **What it is:** A feature for sending individual messages to one or more recipients via email, text (SMS/MMS), voice call, or push notification
- **Why it matters:** One-off messages allow staff to communicate directly with clients outside of automated flows, for time-sensitive updates, follow-ups, or custom communications
- **Who uses it:** Agency staff with messaging permissions who need to send individual messages to clients or contacts
- **Expected outcomes:** Your message is delivered to the recipient's phone or email, with the option to schedule delivery, attach files, and use merge tags for personalization
### Prerequisites
- A role with **Create Messages** and **Create Contacts** permissions
- At least one active agency phone number (for text and voice messages)
- The recipient must have at least one valid contact (phone number or email) that is not opted out of receiving messages, or you must have the phone number or email address to enter manually
- For client-based messages: the client must already exist in eCourtDate, or you can enter a phone number or email directly from the **Dashboard**
### How-To Steps
#### Step 1: Send a One-off Message to a Client
1. Use the search bar in the top left corner to find the client, or click **Clients** in the top navigation and search from there

2. Click the **Edit** button to open the client's profile

3. Verify that the client has at least one valid contact that is not opted out of receiving messages. The list of contacts appears in the top right corner of the client's profile

4. If no contact exists, fill in the **Create Contact** form and click **Create**

5. Scroll to the **Send a Message** section below the contact list

6. Enter a **Subject** and **Message**. Both fields support merge tags

7. (Optional) Click the **Attach Files** field to attach up to 5 files

8. (Optional) Click the **Dialpad** icon to access additional options such as scheduling the message for a later time


9. Click **Send** to send the message

#### Step 2: Send a One-off Message to a Specific Contact
If you want to message a single contact rather than all of a client's contacts:
1. Search for the client using the search bar and open their profile

2. Under the **Contacts** section, click the specific contact you want to message

3. Fill in the **Subject** and **Message** fields. Both fields support merge tags

4. Click **Send** to send the message
#### Step 3: Send a One-off Message to Any Phone or Email
If the recipient is not already in eCourtDate, you can send a message directly from the **Dashboard**.
1. Click **Dashboard** in the top navigation

2. In the **Send a Message** section, enter a phone number or email address in the **(Client, Phone, or Email)** field and click **Add**

3. (Optional) If you search for an existing client, the client will appear in the search results. Click the client to add them, and all of their valid, opted-in contacts will receive the message

4. (Optional) Add additional phone numbers or email addresses by repeating the process

5. Verify the list of recipients appears above the field

6. Enter a **Subject** and **Message**. Both fields support merge tags (client-specific merge tags will not be available for manually entered phone numbers or emails)

7. (Optional) Click **Attach Files** to attach up to 5 files

8. (Optional) Click the **Dialpad** icon to schedule the message for a later time

9. Click **Send** to send the message

### What to Expect
By default, one-off messages are delayed 5 minutes from the creation time to allow for review. Depending on your agency settings or whether you scheduled the message, it may be sent immediately or at a later date and time.

- Scheduled messages appear in the **Scheduled Messages** section below the **Send a Message** form
- Sent messages appear in the **Sent Messages** section (on a client profile) or the **Sent and Received Messages** section (on the Dashboard)
- One message is created per valid, opted-in contact. For example, if a client has two phone numbers and one email address, three messages are created
- To refresh the message feed, click the **Refresh** button above the **Scheduled Messages** section


### Best Practices
- Always verify that the recipient has opted in to receive messages before sending
- Use merge tags to personalize your messages (for example, `[ClientFirstName]` or `[EventDate]`)
- Review scheduled messages before they are sent. You can cancel a scheduled message before its send time
- Use the **Dialpad** options to schedule messages for appropriate times rather than sending late at night or on weekends
- When messaging from the Dashboard, double-check phone numbers and email addresses for accuracy before clicking **Send**
### Frequently Asked Questions
**Q: Can I send a message to multiple recipients at once from the Dashboard?**
A: Yes. In the **Send a Message** section on the **Dashboard**, you can add multiple phone numbers, email addresses, or clients. Each recipient receives their own message.
**Q: What happens if a contact is opted out?**
A: The system will not send a message to any contact that has opted out. Only valid, opted-in contacts receive the message.
**Q: Can I cancel a scheduled message?**
A: Yes. If a message is scheduled for a later time, you can find it in the **Scheduled Messages** section and cancel it before the scheduled send time.
**Q: Why is my message delayed by 5 minutes?**
A: By default, one-off messages are delayed 5 minutes from creation to allow you time to review or cancel the message. This delay can be adjusted in your agency settings.
**Q: Are merge tags available when sending to a phone number or email not linked to a client?**
A: General merge tags (such as `[AgencyName]` or `[AgencyPhone]`) are available. Client-specific merge tags (such as `[ClientFirstName]`) will not populate because there is no associated client record.
### Troubleshooting
**Issue:** The "Send a Message" section does not appear on a client's profile
**Symptoms:** You can see the client's details but there is no messaging form.
**Solution:**
1. Verify the client has at least one contact. If not, create a contact using the **Create Contact** form
2. Confirm your role has **Create Messages** and **Create Contacts** permissions
3. Ensure at least one agency phone number is active (go to **Admin** > **Settings** > **Agency Phones**)
**Issue:** Message was sent but the recipient did not receive it
**Symptoms:** The message appears in **Sent Messages** but the recipient reports not receiving it.
**Solution:**
1. Check the message status in the sent messages list for any delivery errors
2. Verify the contact's phone number or email address is correct and valid
3. Confirm the contact is not opted out of receiving messages
4. Check that your agency phone number is active and properly configured
5. If the issue persists, contact support by clicking the ticket button in the bottom right corner of the screen
### Related Articles
- [How to Send a Mass Message using Bulk Actions](/how-to-send-a-mass-message-using-bulk-actions)
- [How to Use Merge Tags](/how-to-use-merge-tags)
- [How to Create an Auto Message](/how-to-create-an-auto-message)
- [How to Manage Contacts](/how-to-manage-contacts)
- [How to Manage Agency Phone Numbers](/how-to-manage-agency-phone-numbers)
- [How to Configure Opt-in and Opt-out Compliance](/how-to-configure-opt-in-and-opt-out-compliance)