Flows let you automate a sequence of messages to clients, ensuring timely reminders and updates about events, payments, cases, and more without manual effort.
Flows let you automate a sequence of messages to clients, ensuring timely reminders and updates about events, payments, cases, and more without manual effort.
Overview
A flow is a reusable automation that sends a series of messages to clients based on triggers you define. Flows are ideal when you need to send multiple messages tied to a specific record type, such as a court hearing reminder three days before the event followed by a day-of confirmation.
- What it does: Sends automated, sequenced messages tied to events, payments, cases, files, forms, tasks, or warrants.
- Why it matters: Reduces manual outreach, ensures consistent communication, and keeps clients informed at every stage.
- Who uses it: Agency administrators and staff responsible for client communications.
- Expected outcome: Clients receive the right message at the right time, automatically.
Each flow applies to a single record type. For example, an event flow can trigger messages when the event is created, when its status changes, or relative to the event date.
Prerequisites
Before creating a flow, make sure you have:
- An active eCourtDate agency on staging or production
- Super admin access, or the Create Flows and Update Flows permissions
- At least one record type (events, payments, cases, etc.) that you want to automate messages for
- Message content prepared, including any translations if your agency supports multiple languages
How-To Steps
Import a Sample Flow
Importing a sample flow is the fastest way to get started.
- Click Admin > Messaging in the top navigation bar.
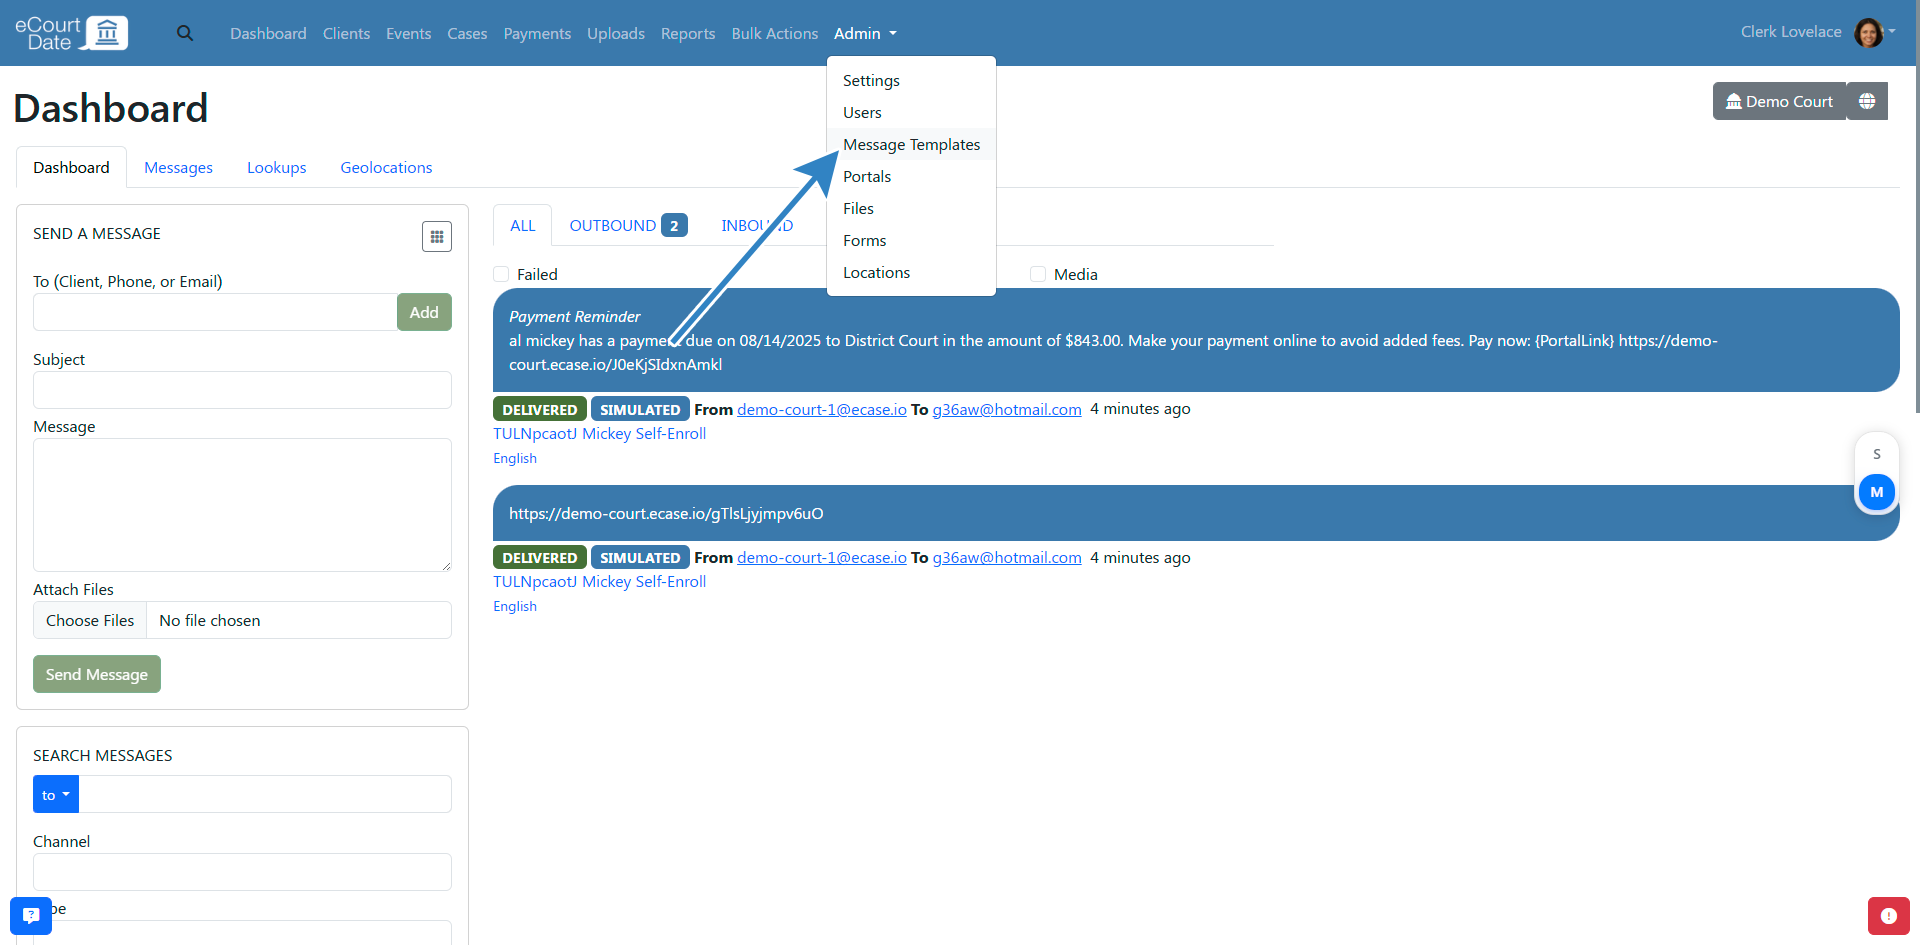
- Click the Sample Templates tab.
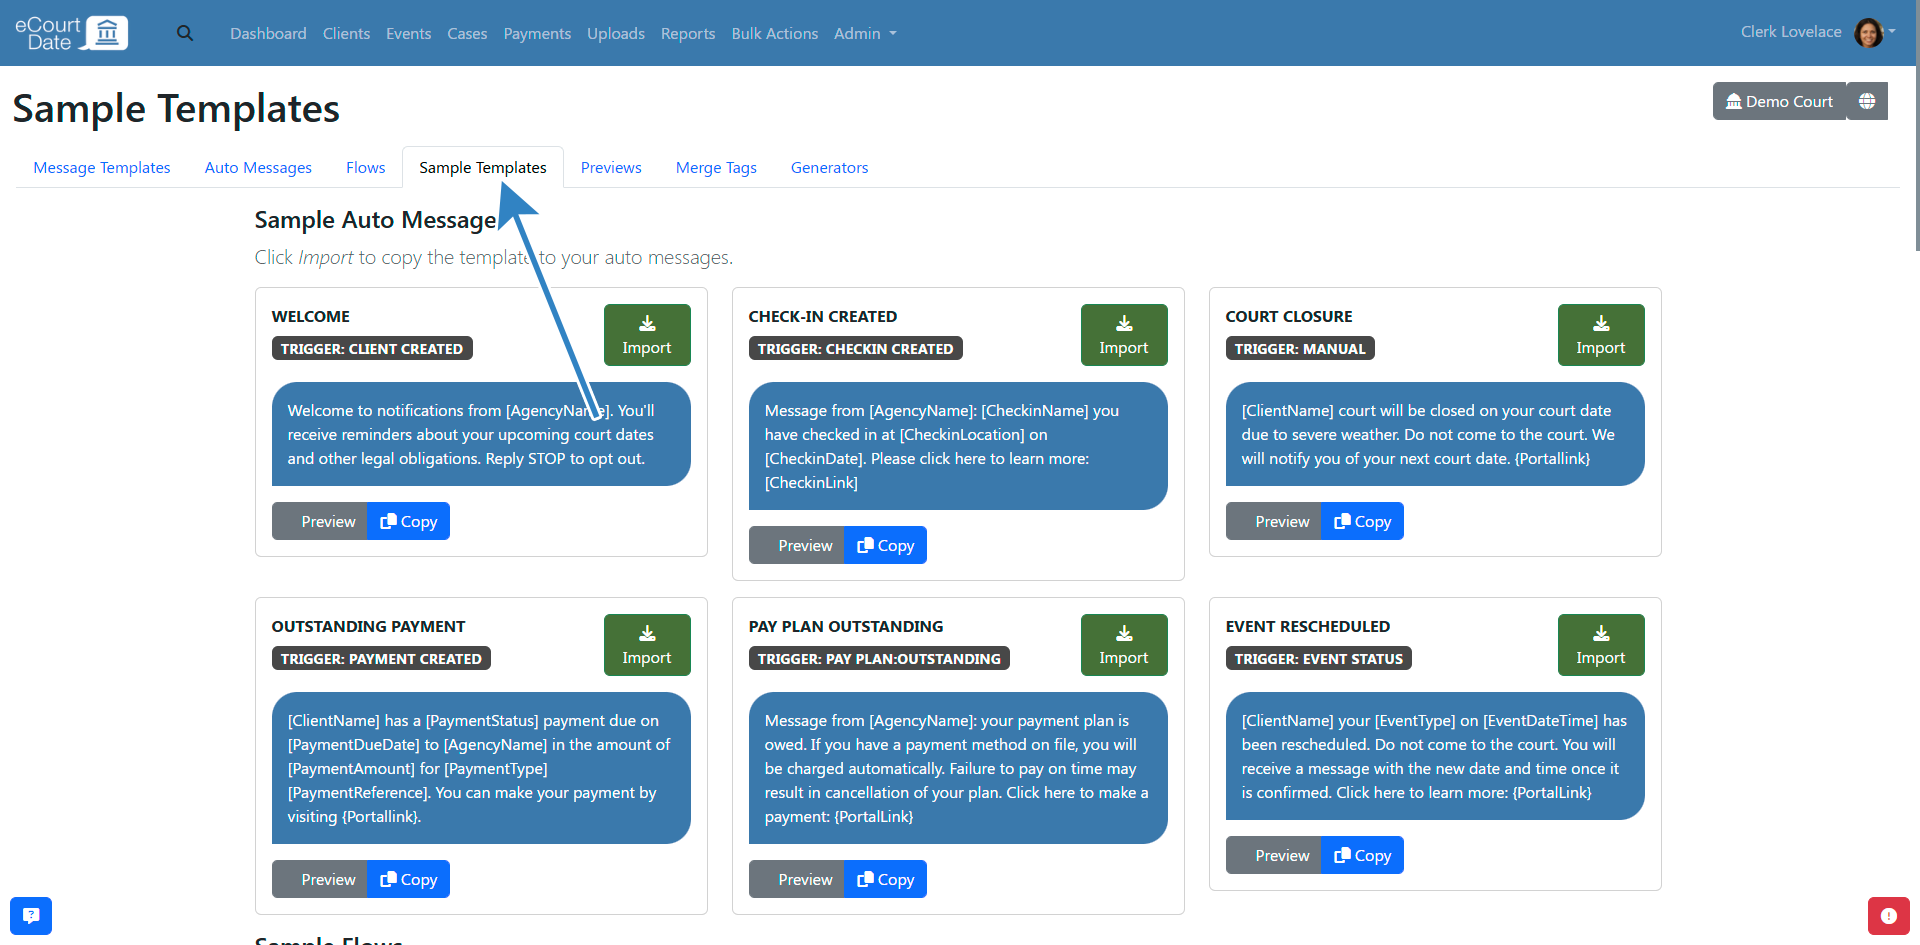
- Scroll down to the Flows section.
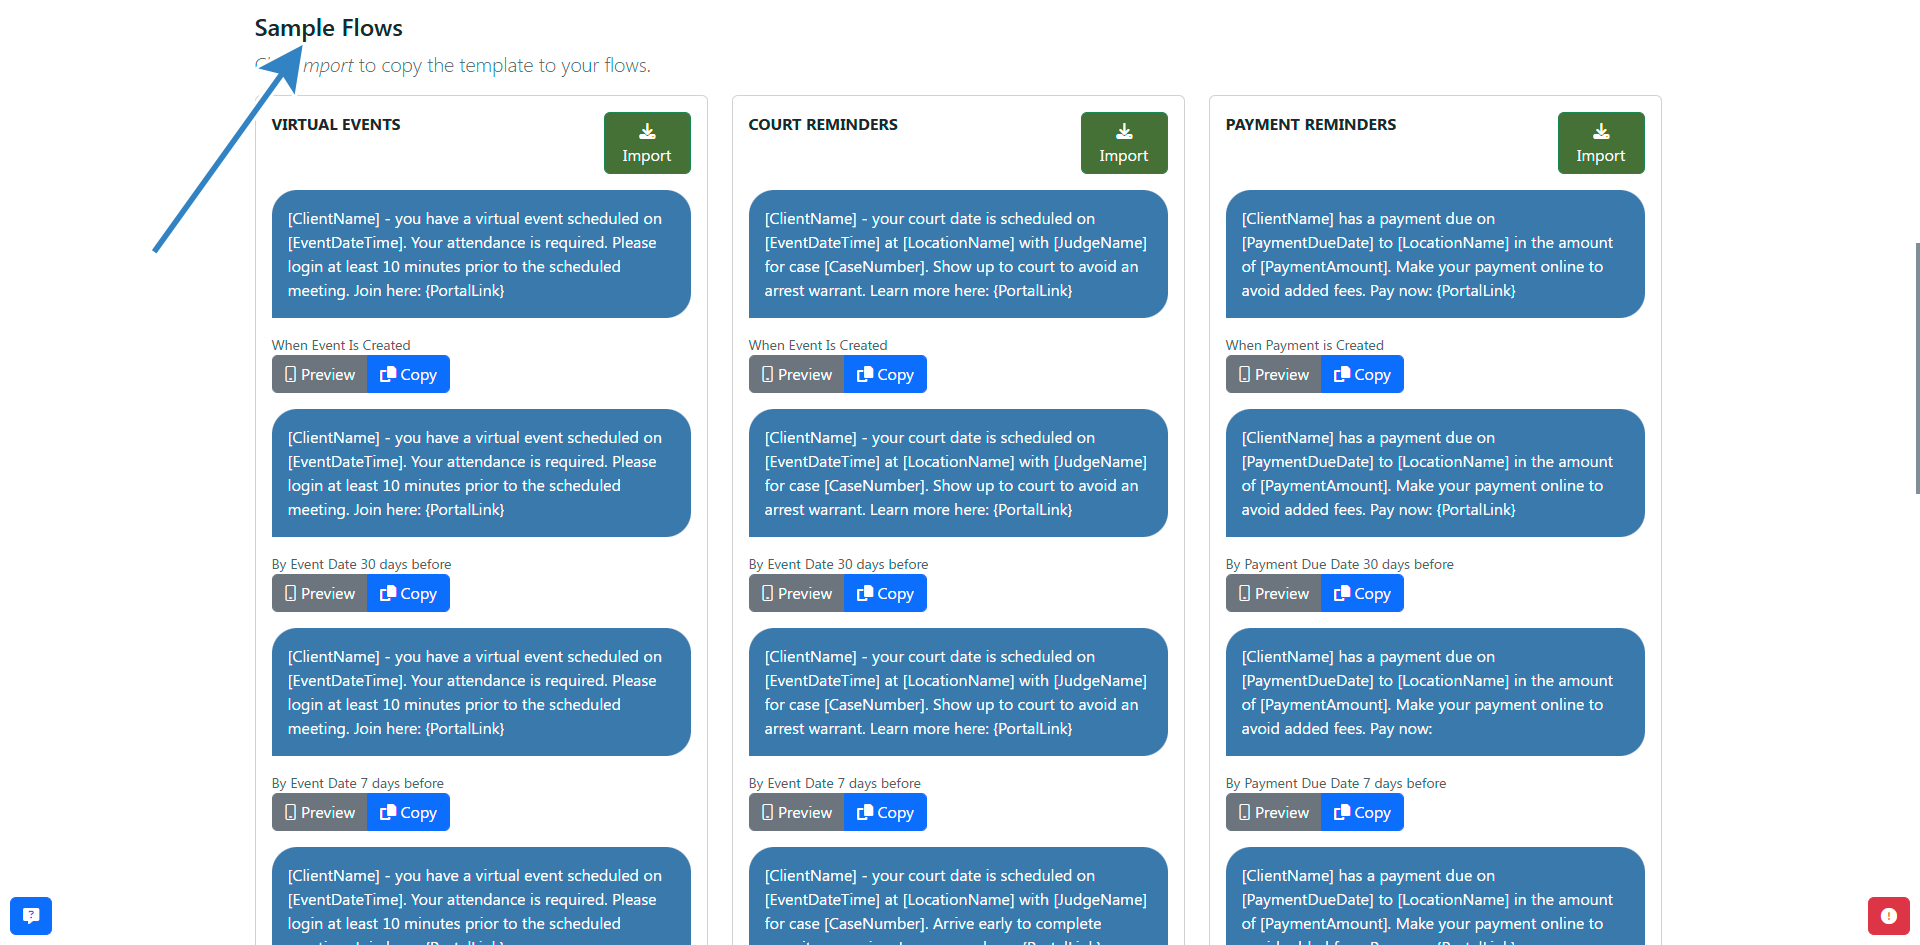
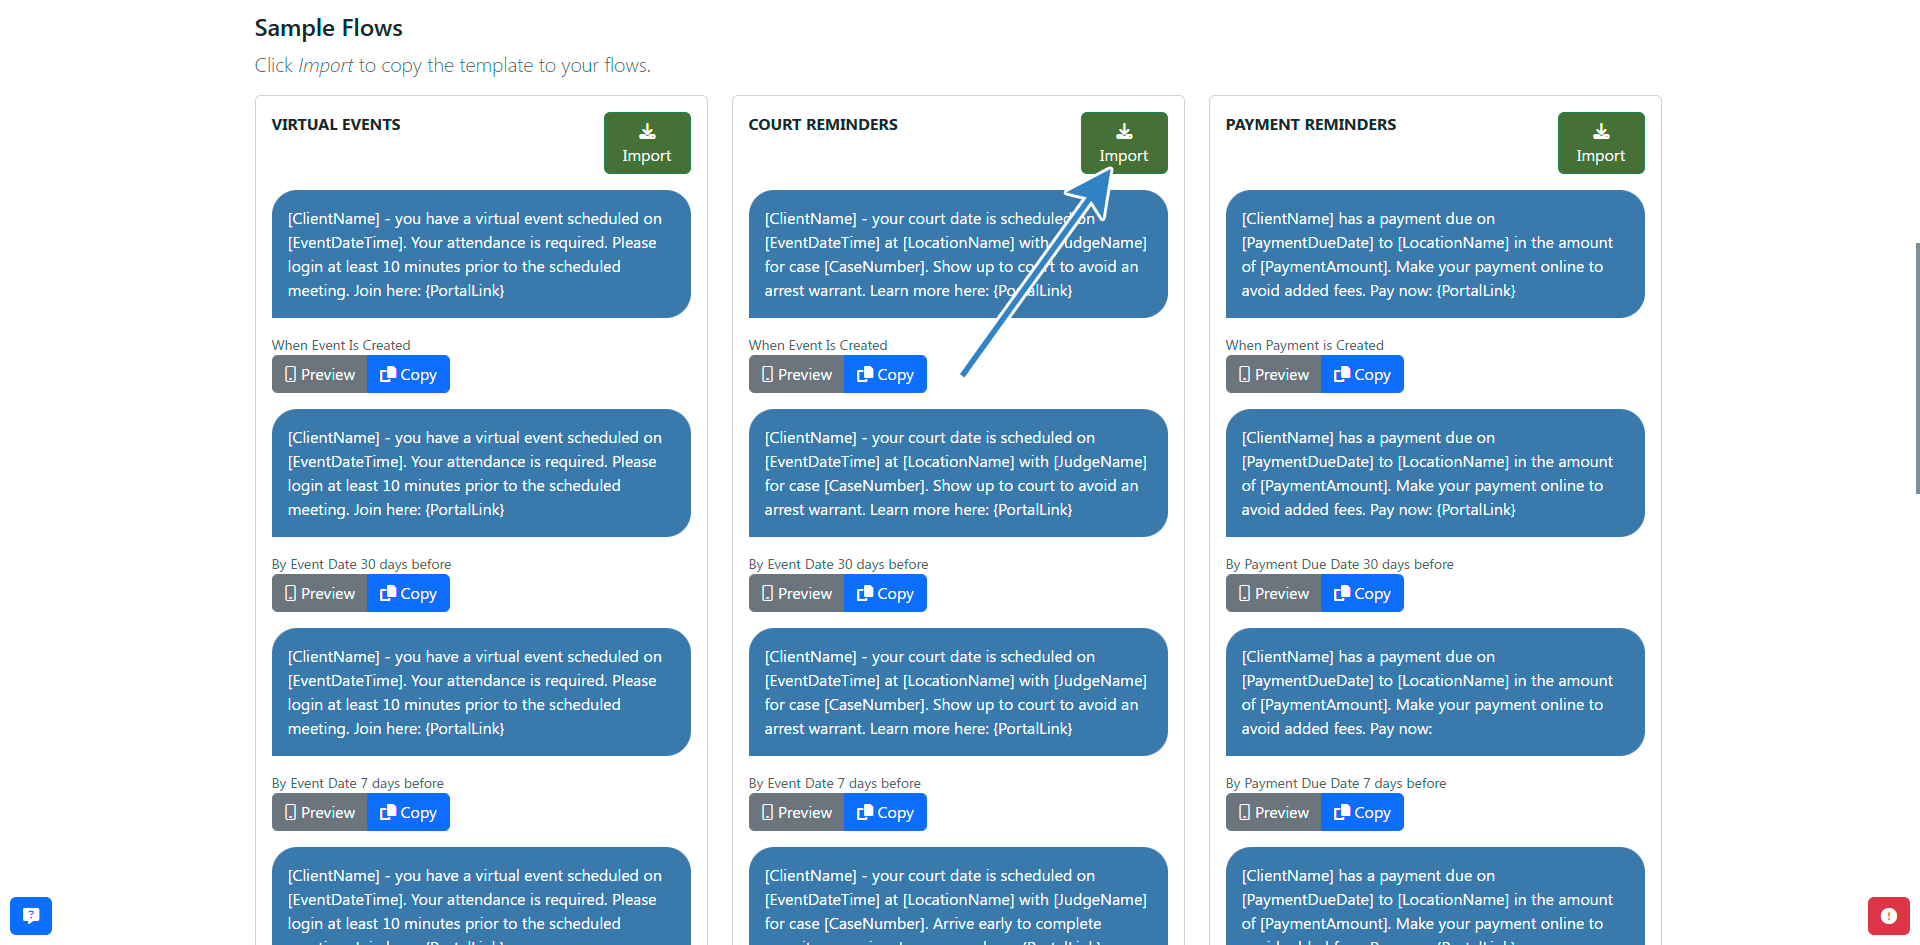
- Click the Import button for the sample flow you want to use.
- Review the newly created flow on the redirect page.
- Edit the flow to customize it for your agency or begin assigning it to records.
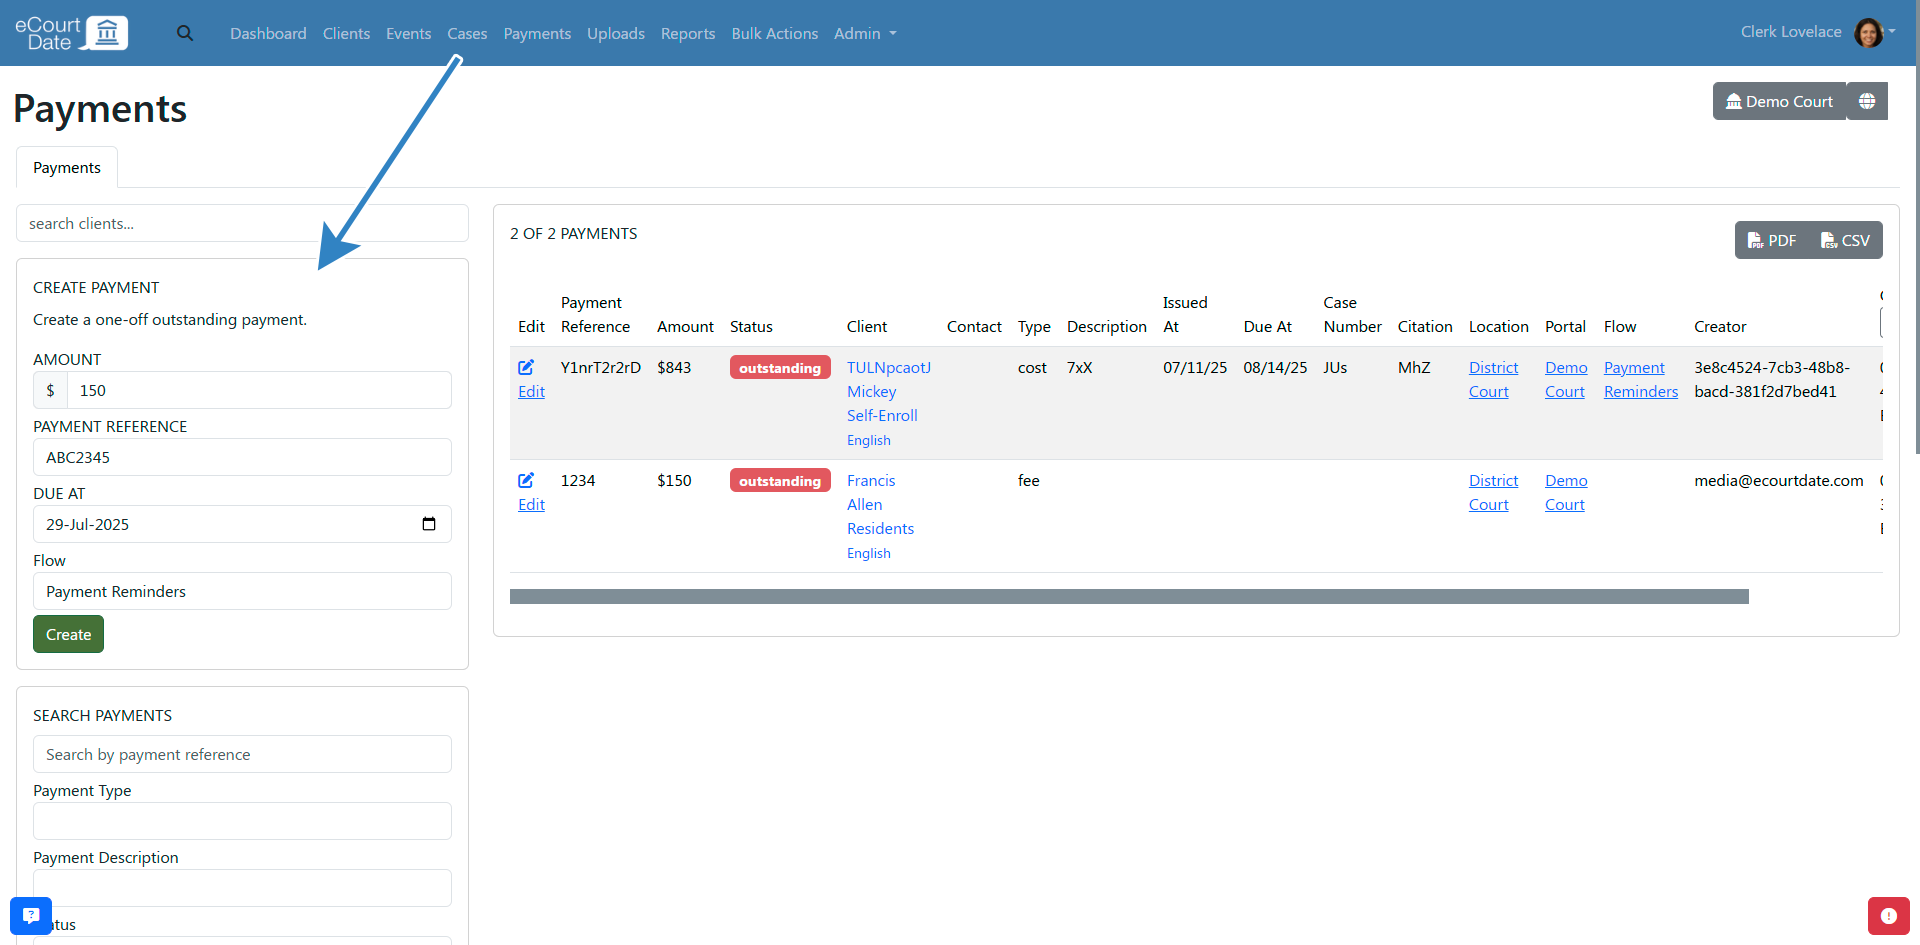
Create a Flow from Scratch
- Click Admin > Messaging in the top navigation bar.
- Click the Flows tab.
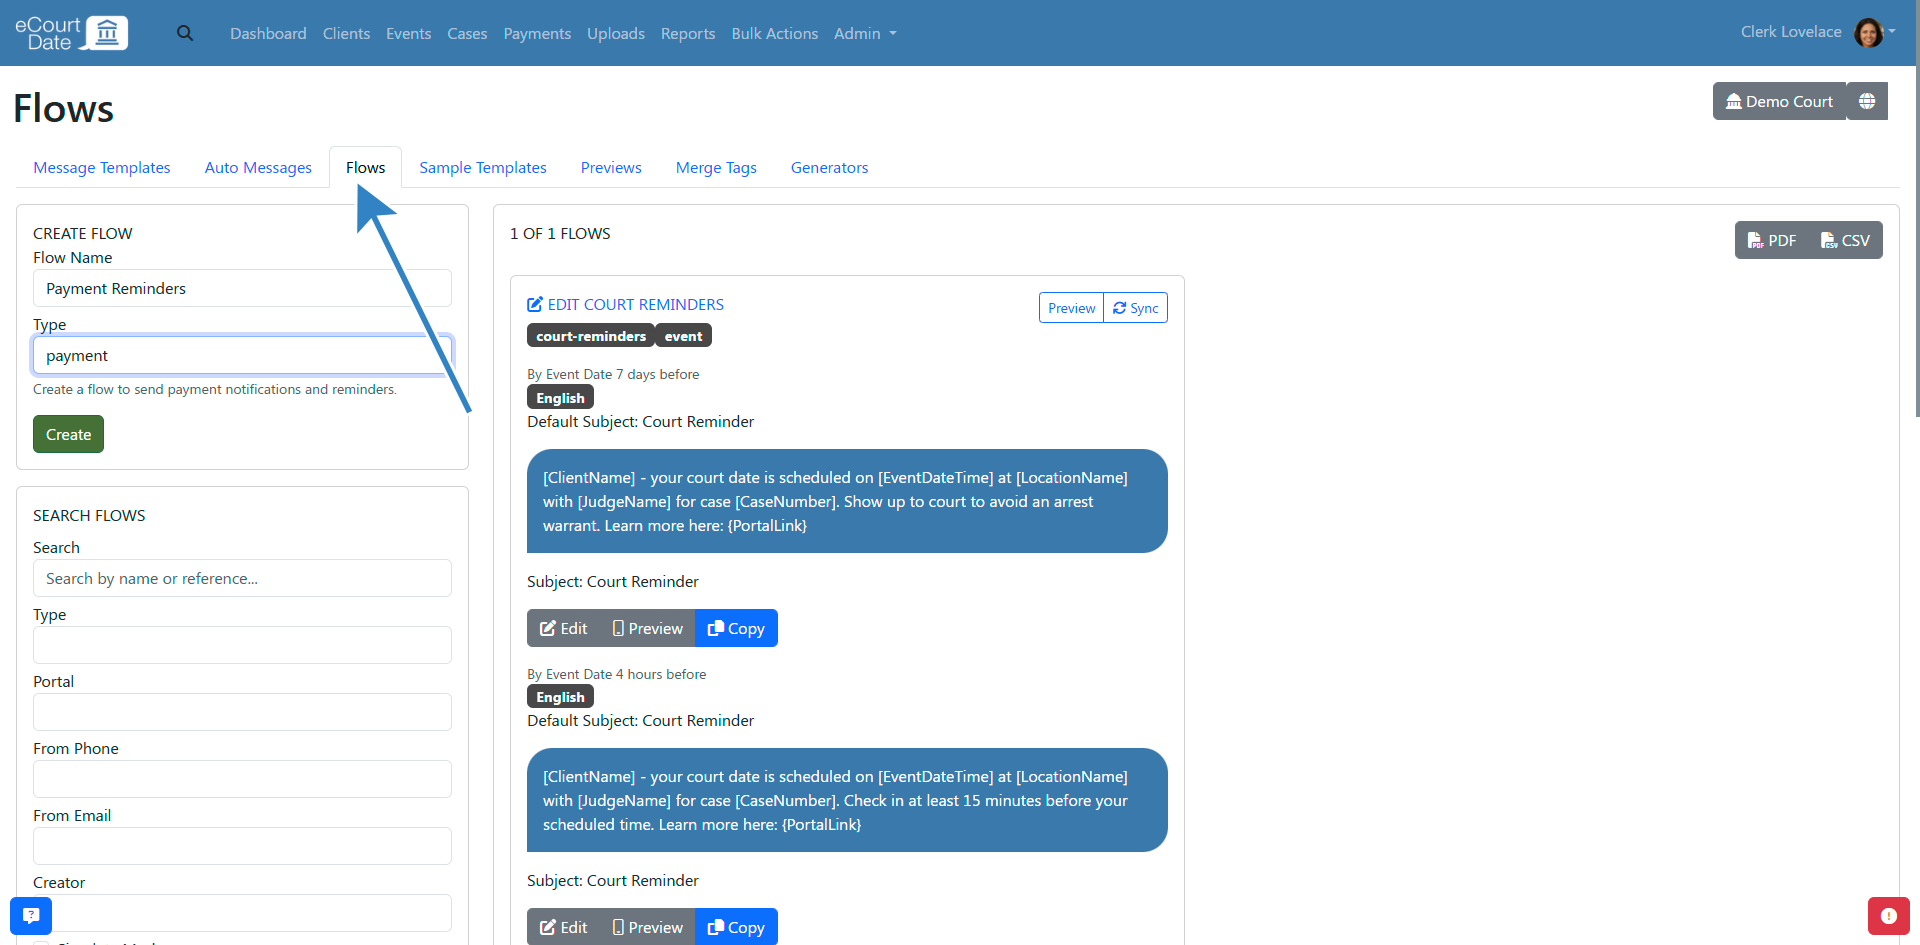
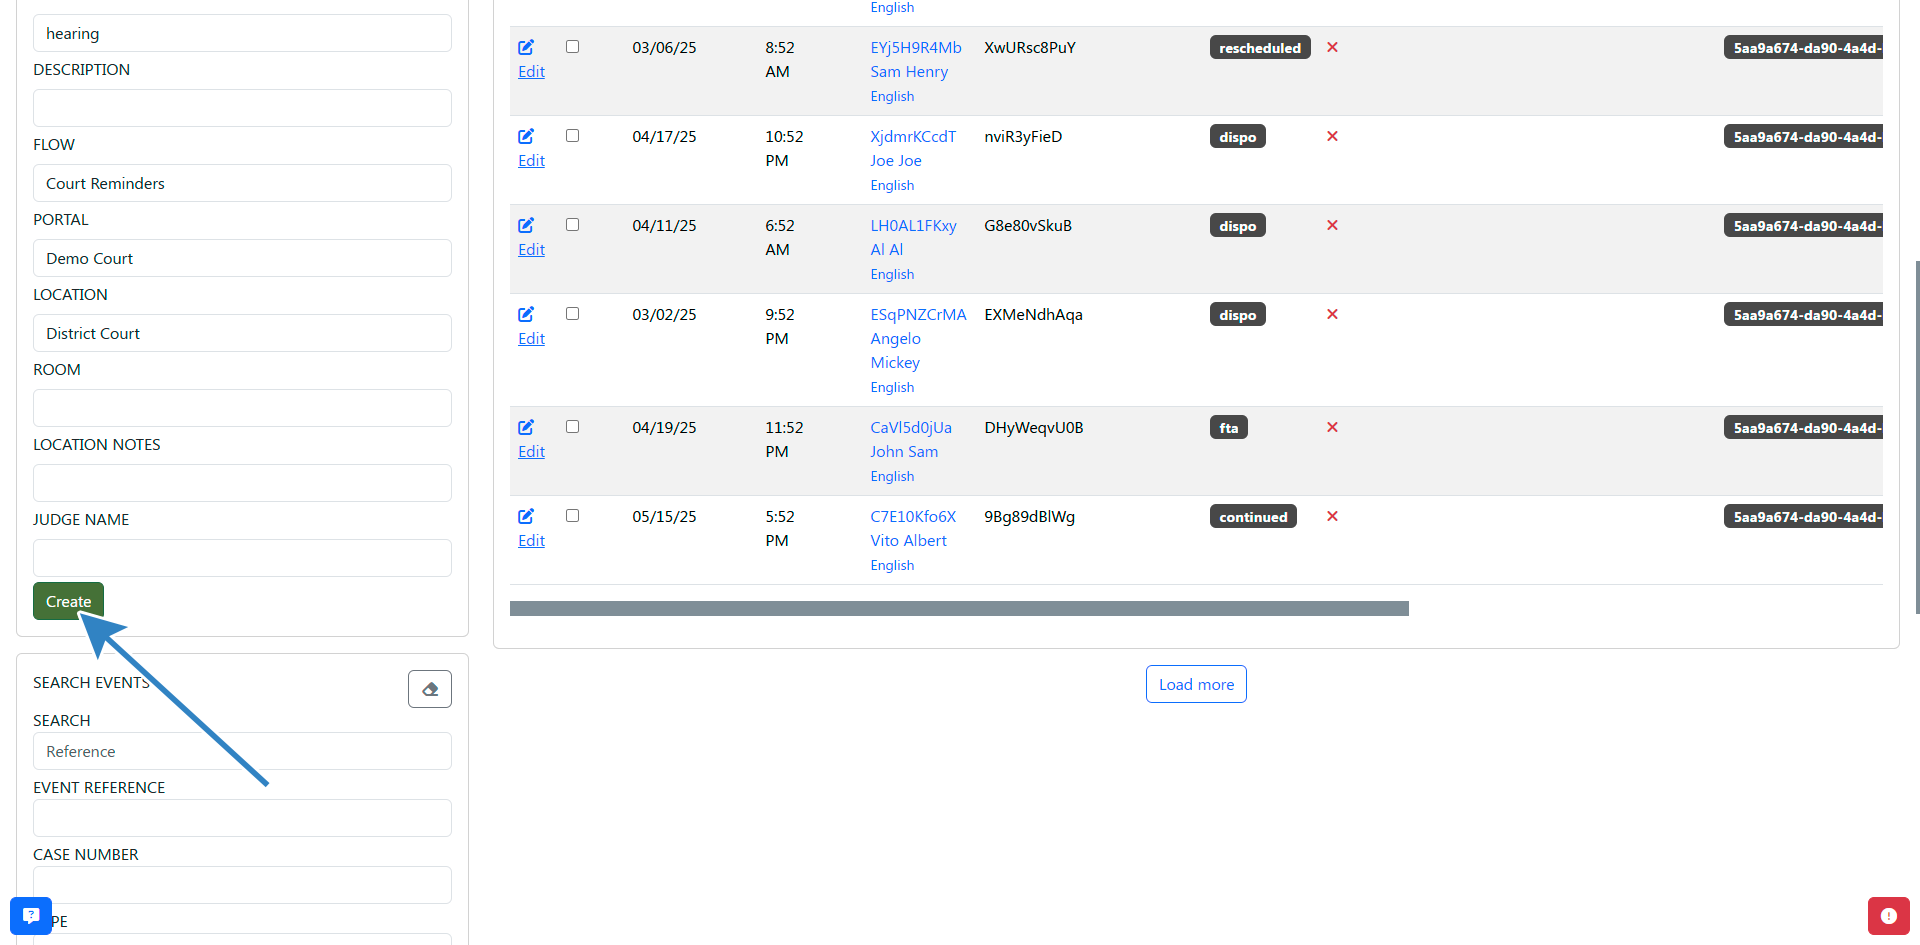
- Fill out the Create Flow form with a name, record type, and any other required fields.

- Click the Create button.
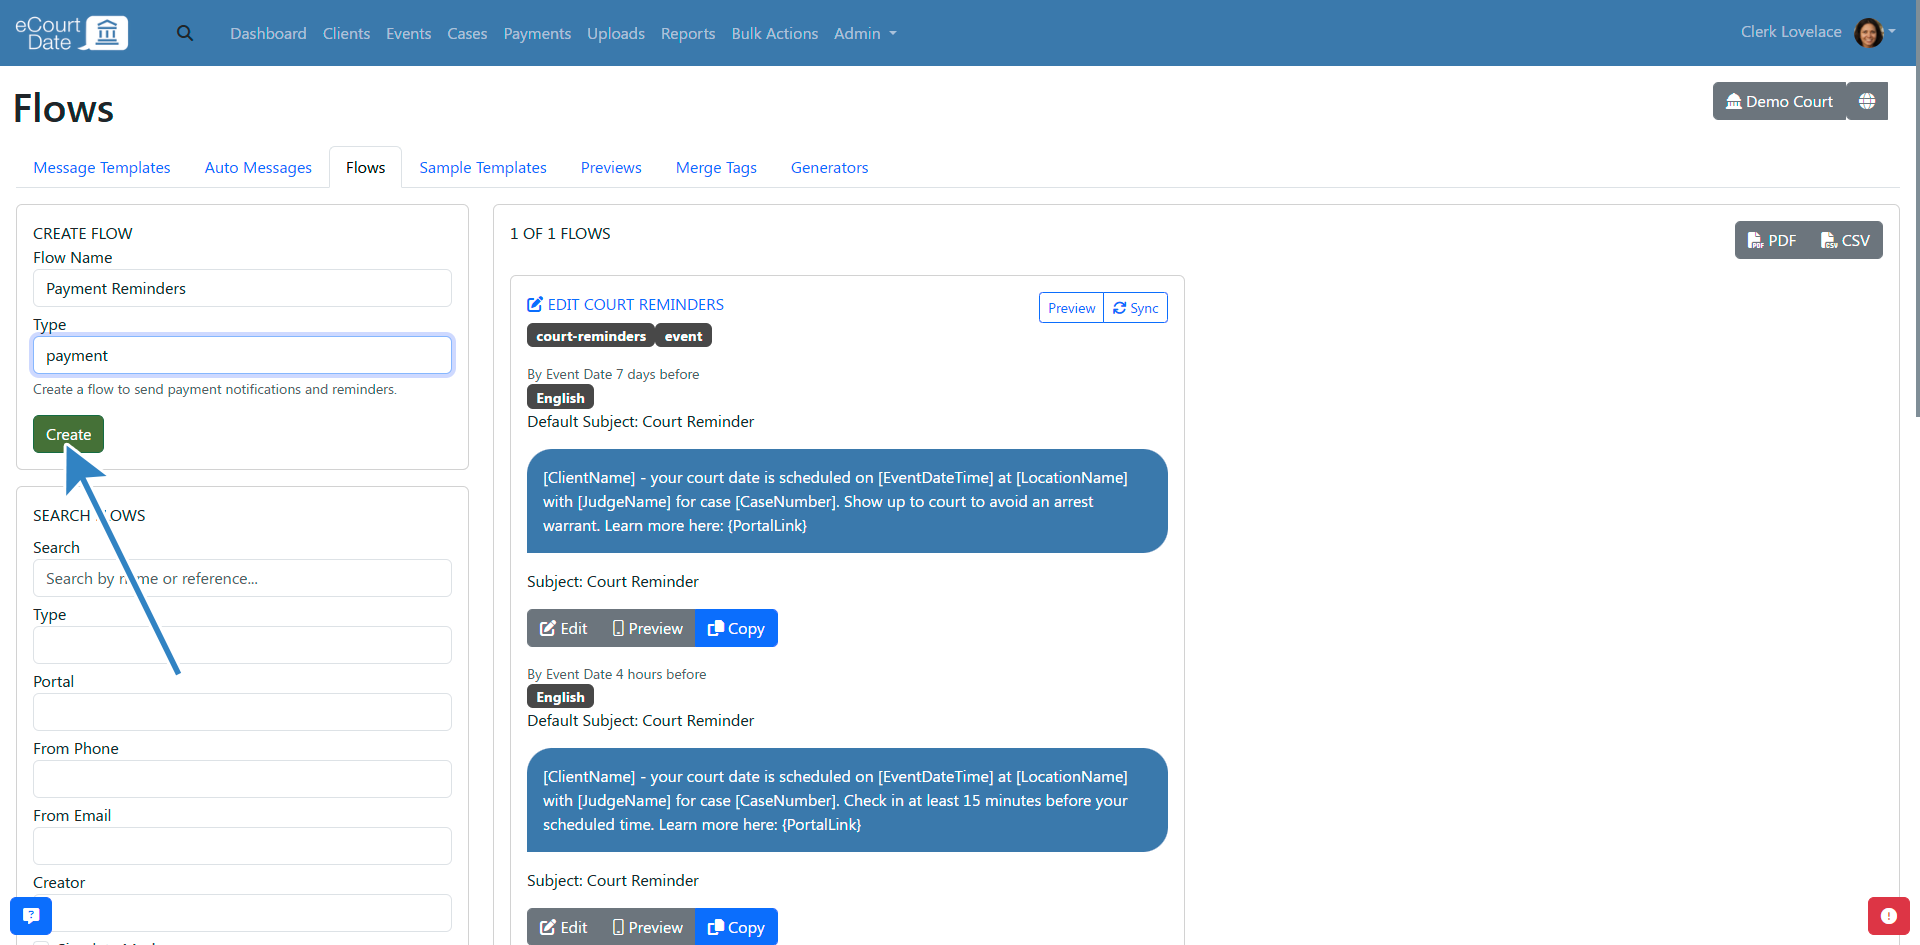
- Review the newly created flow on the redirect page.
- Follow the steps below to add messages to your flow.
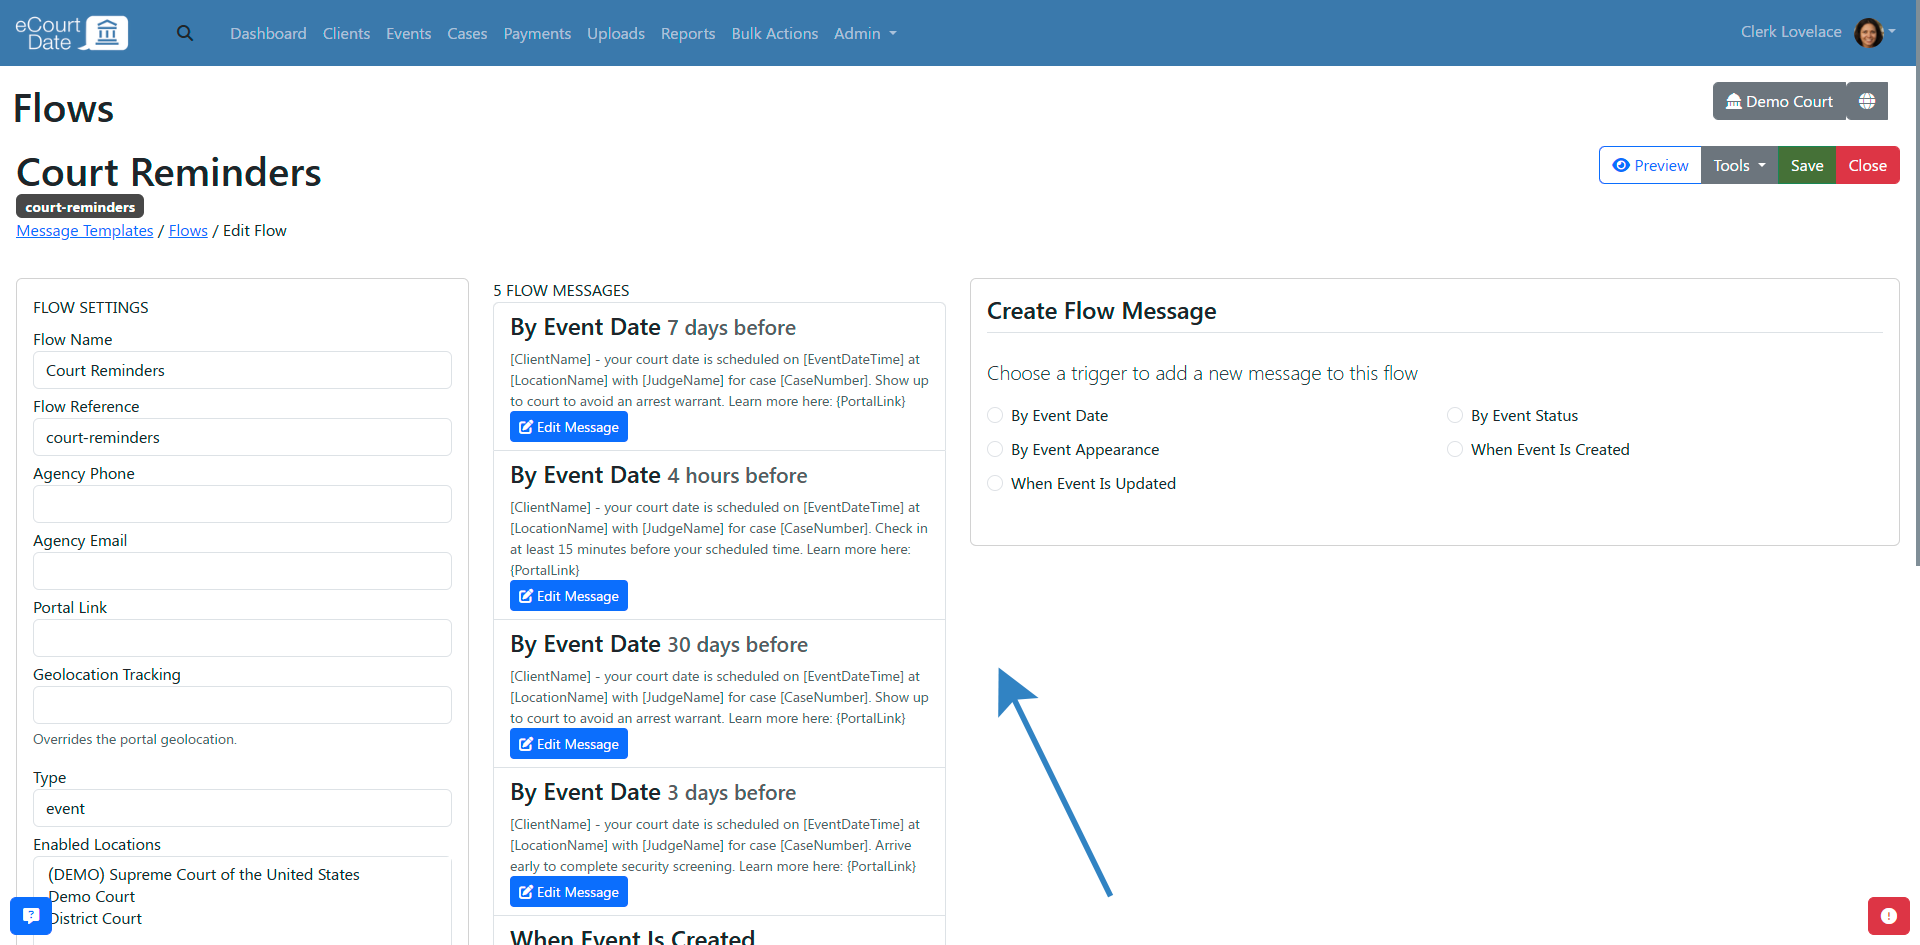
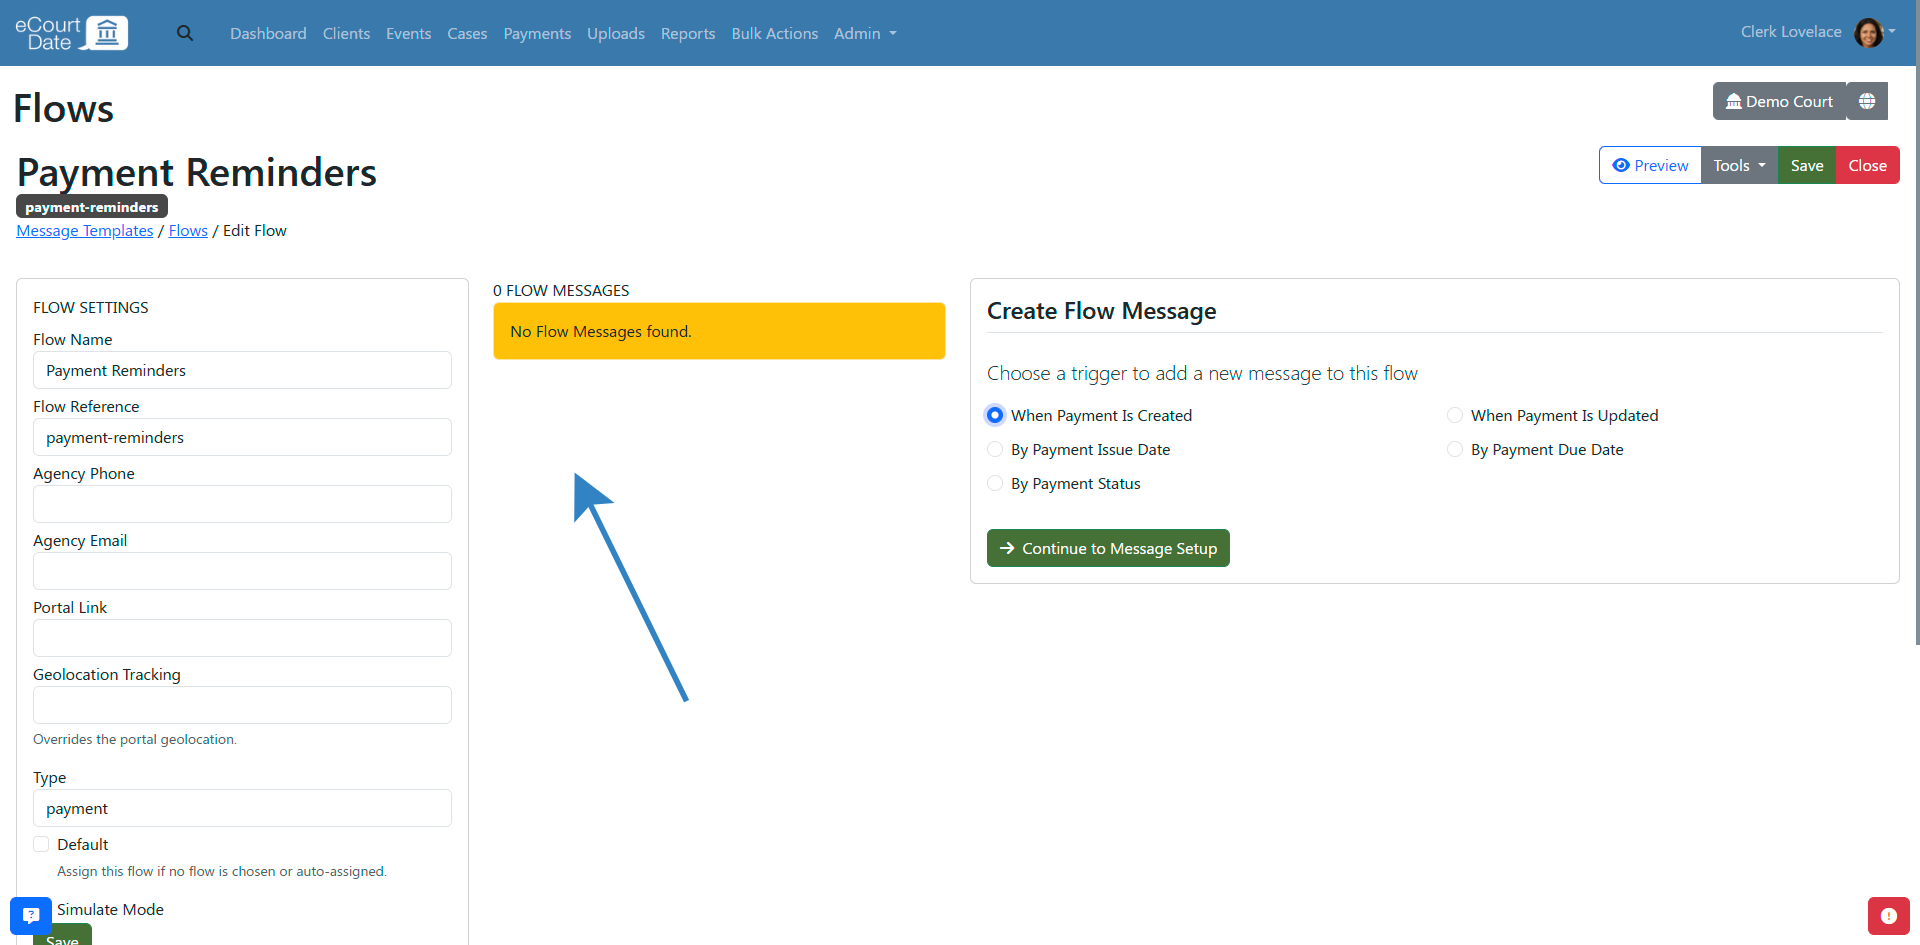
Create Messages for a Flow
- In the Create Flow Message section, select an option under Choose a Trigger.
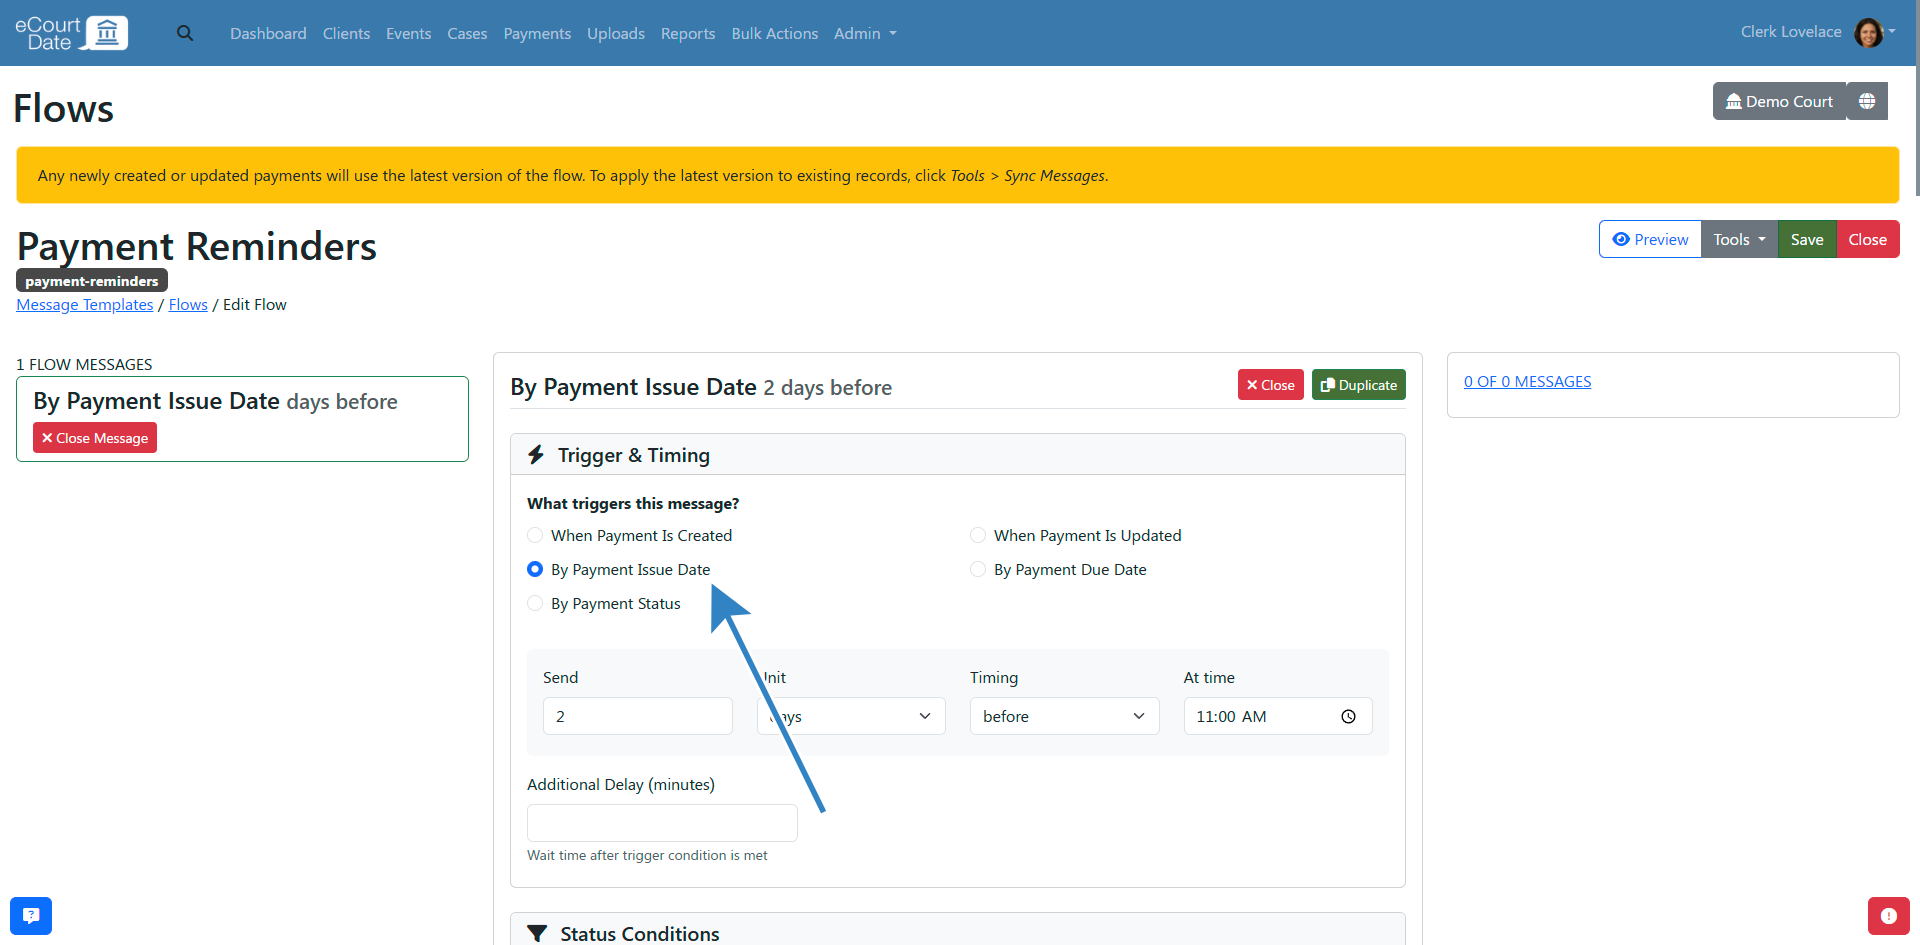
- Configure the trigger details. For example, to send a message 3 days before an event date, select By Event Date, set the Difference from Event Date to 3, the Unit to Days, and the Operation to Before.
- Select any Enabled Statuses if you only want the message sent for records with certain statuses.
- Enter the English Subject and English Message fields.
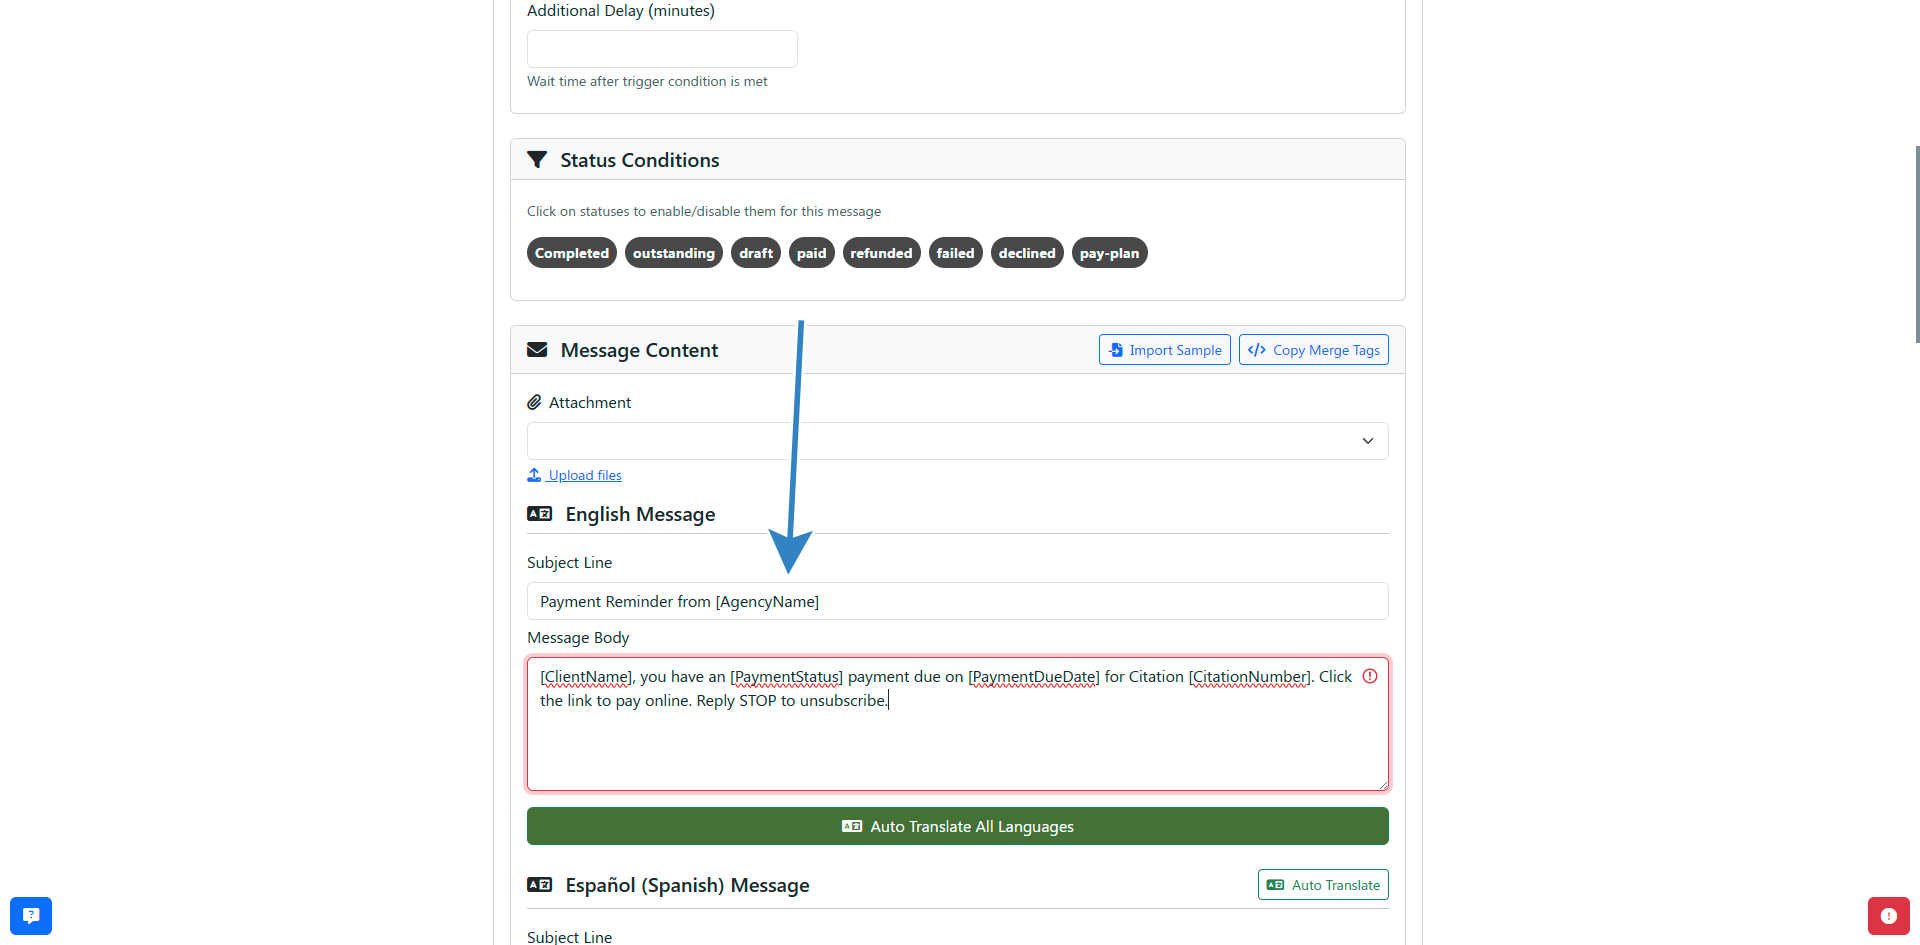
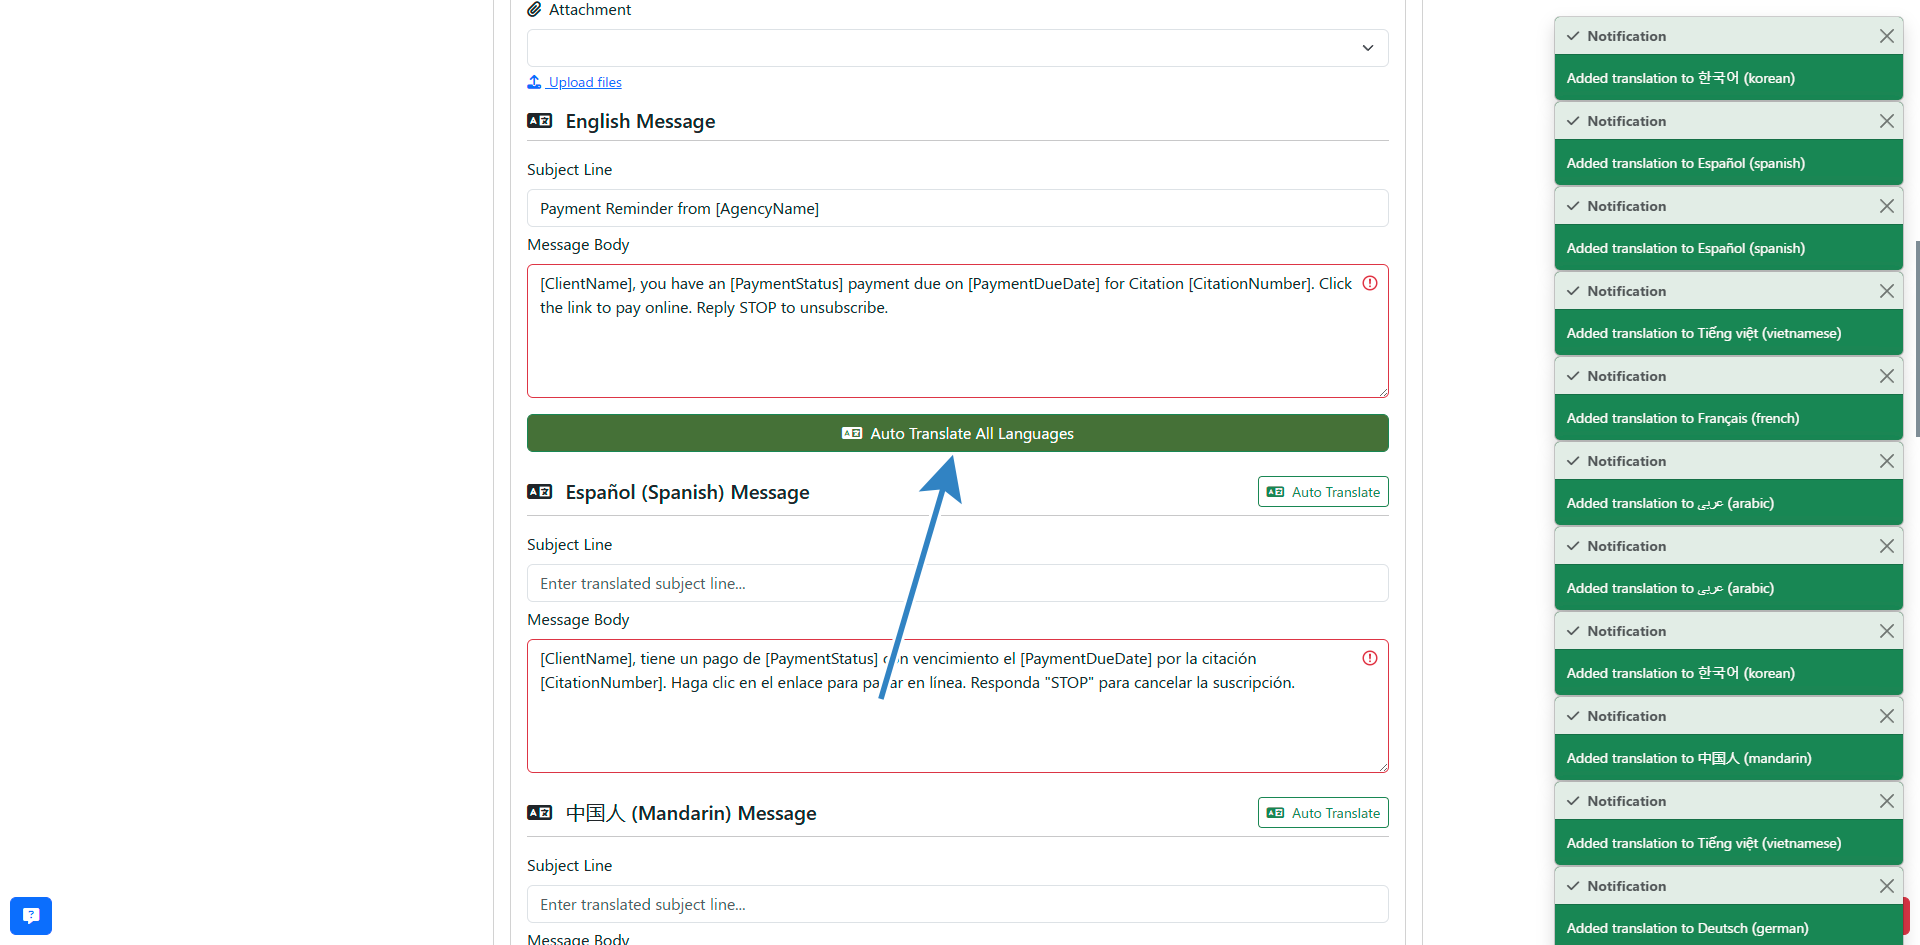
- (Optional) Fill in additional multilingual fields. Once you have an English message, click the Auto Translate button to translate to your agency's other enabled languages.
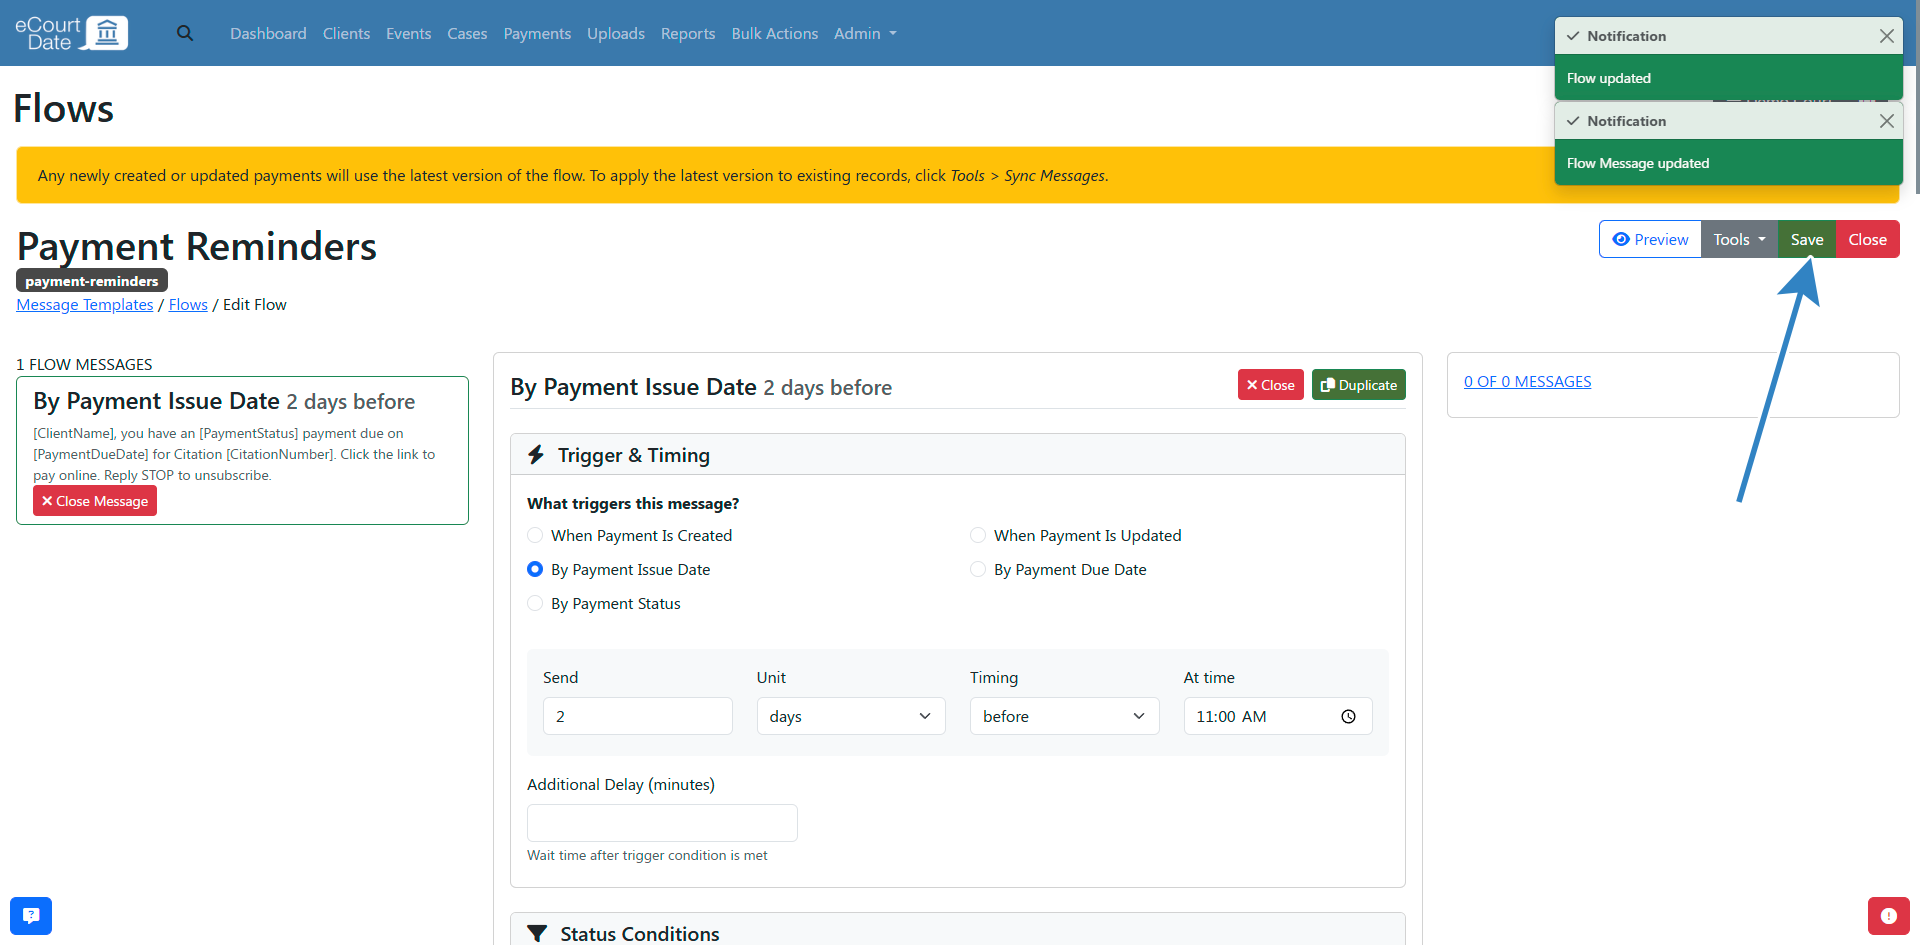
- Click the Save button to apply your changes.
Set a Default Flow
Enabling the Default option on a flow automatically assigns it to any new records of that type unless a different flow is specified.
- Click the Edit button for the flow you want to make default.

- Select the Default checkbox.
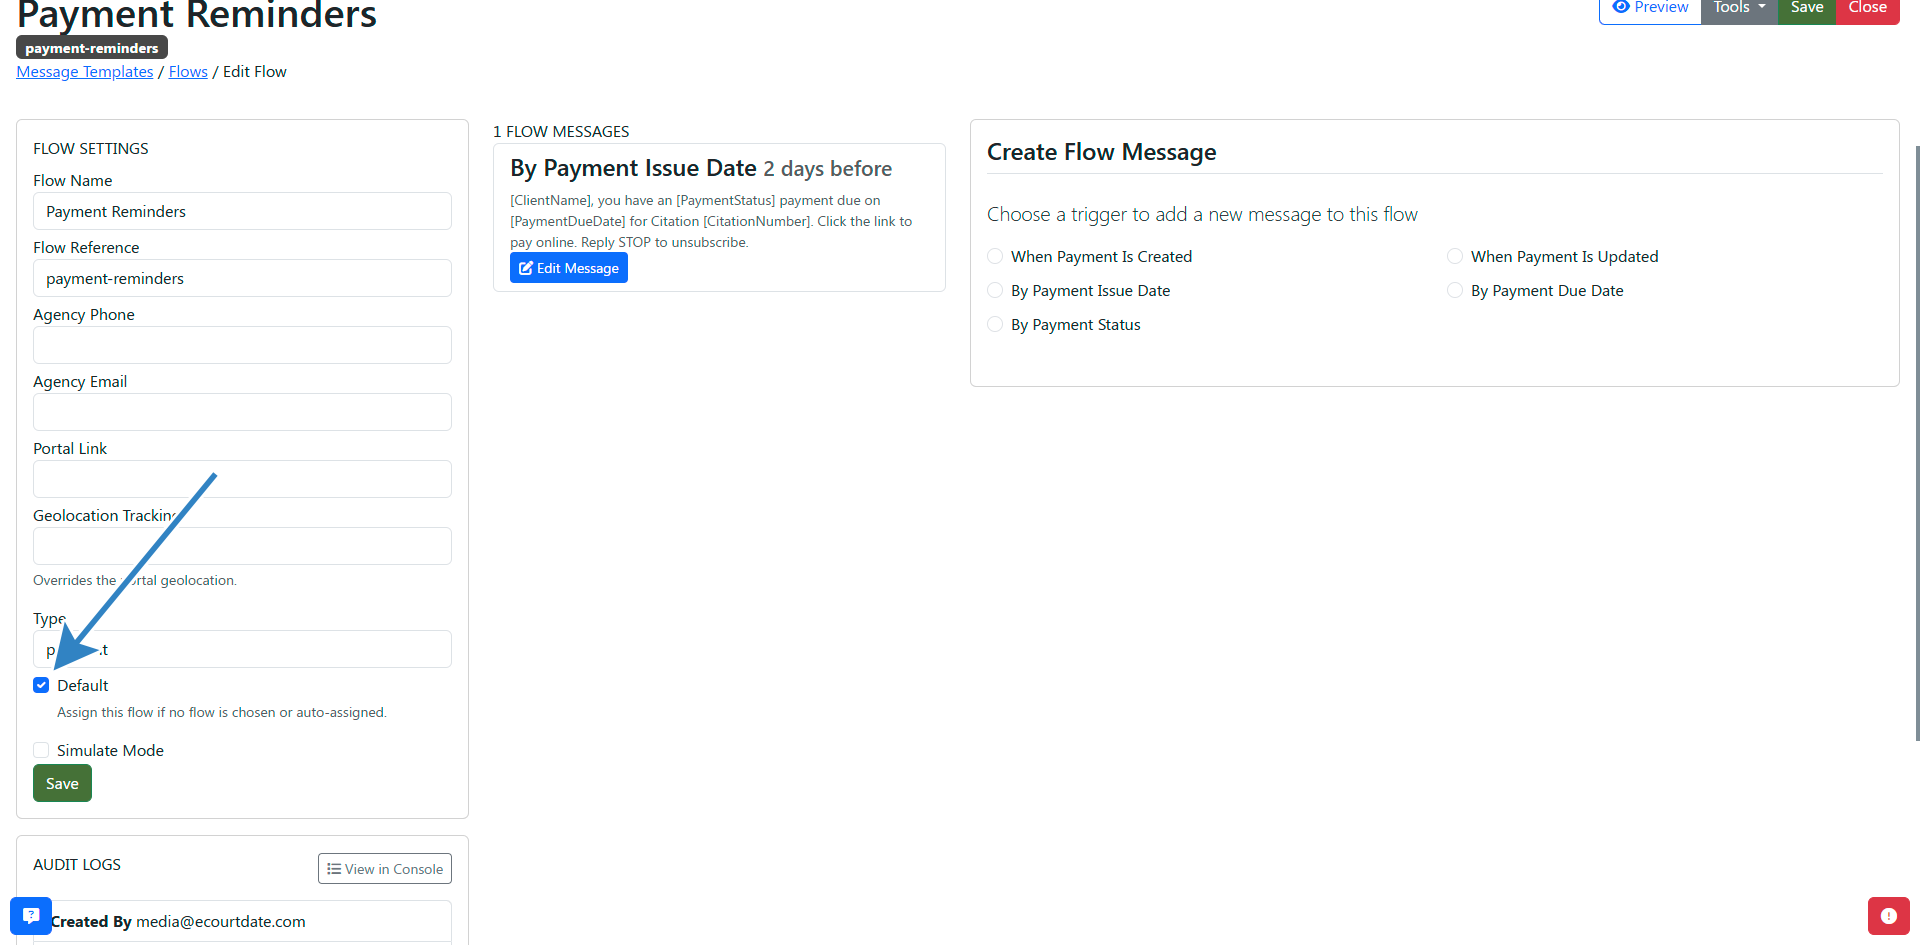
- Click the Save button.
All newly created records will be assigned to this flow unless they are assigned to a different flow.
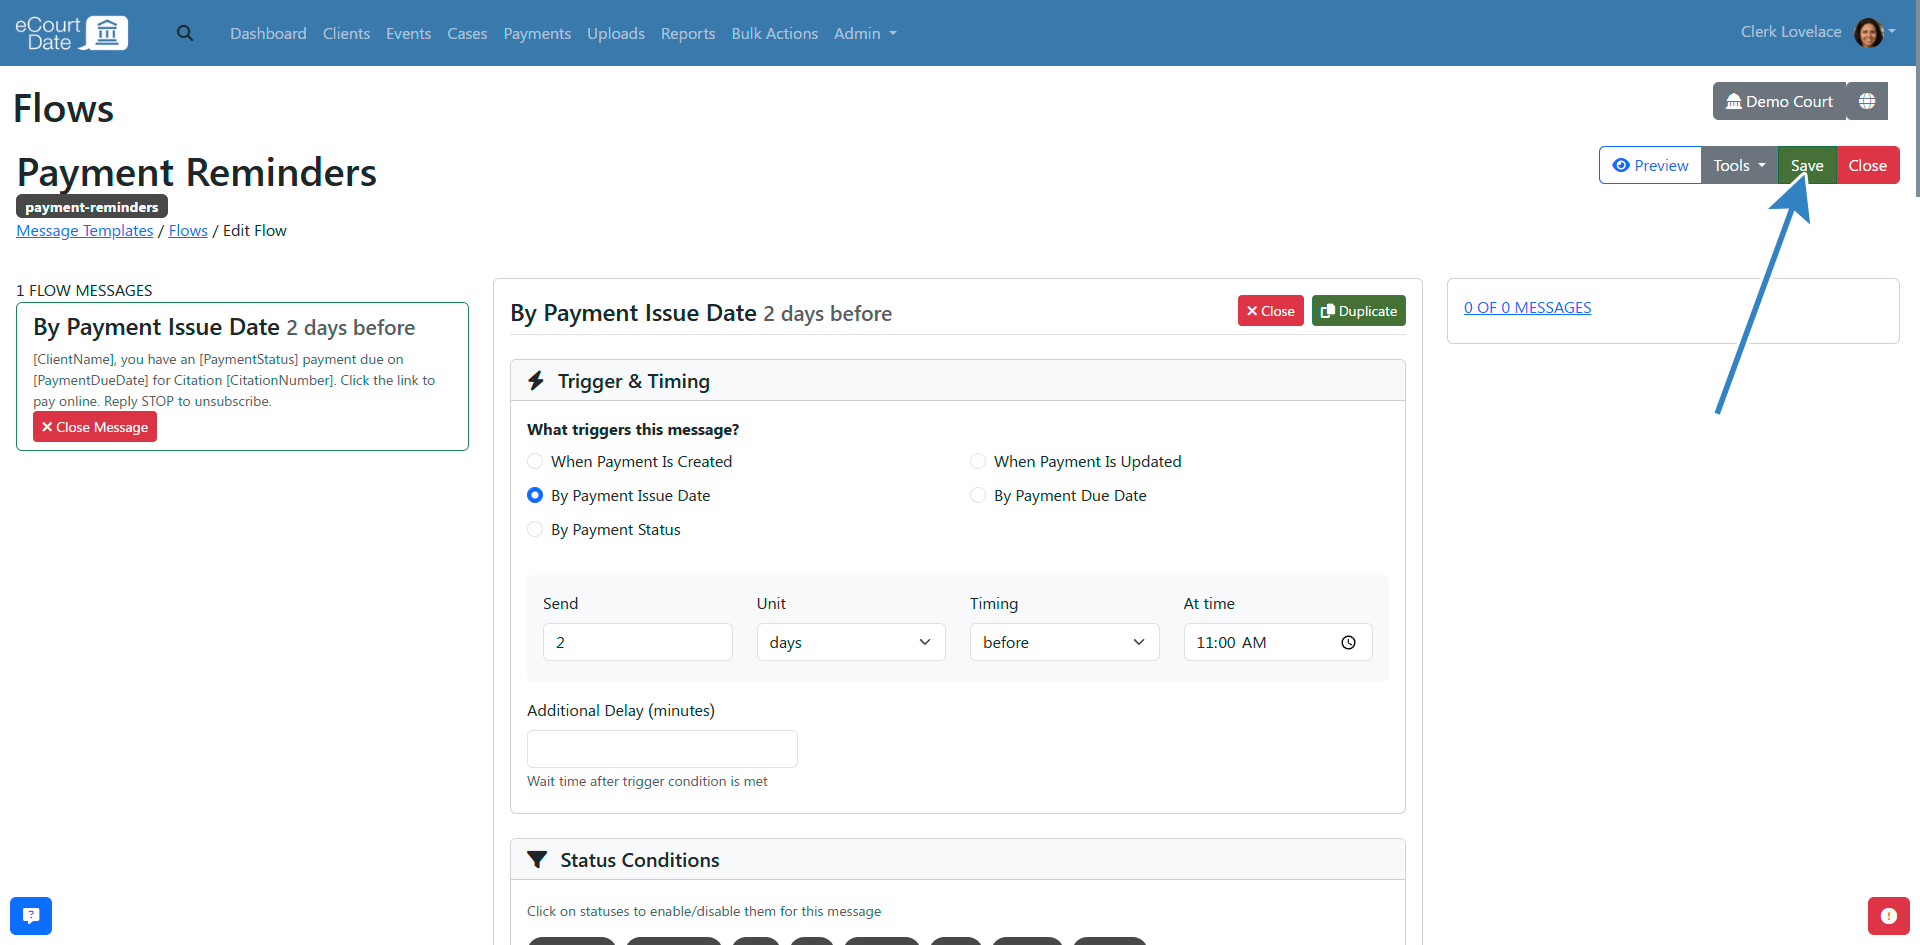
Update a Flow Already in Use
- Click the Edit button for the flow you want to update.
- Click the Edit Message button for the message you want to change.

- Make your changes to the message content.
- Click the Save button.
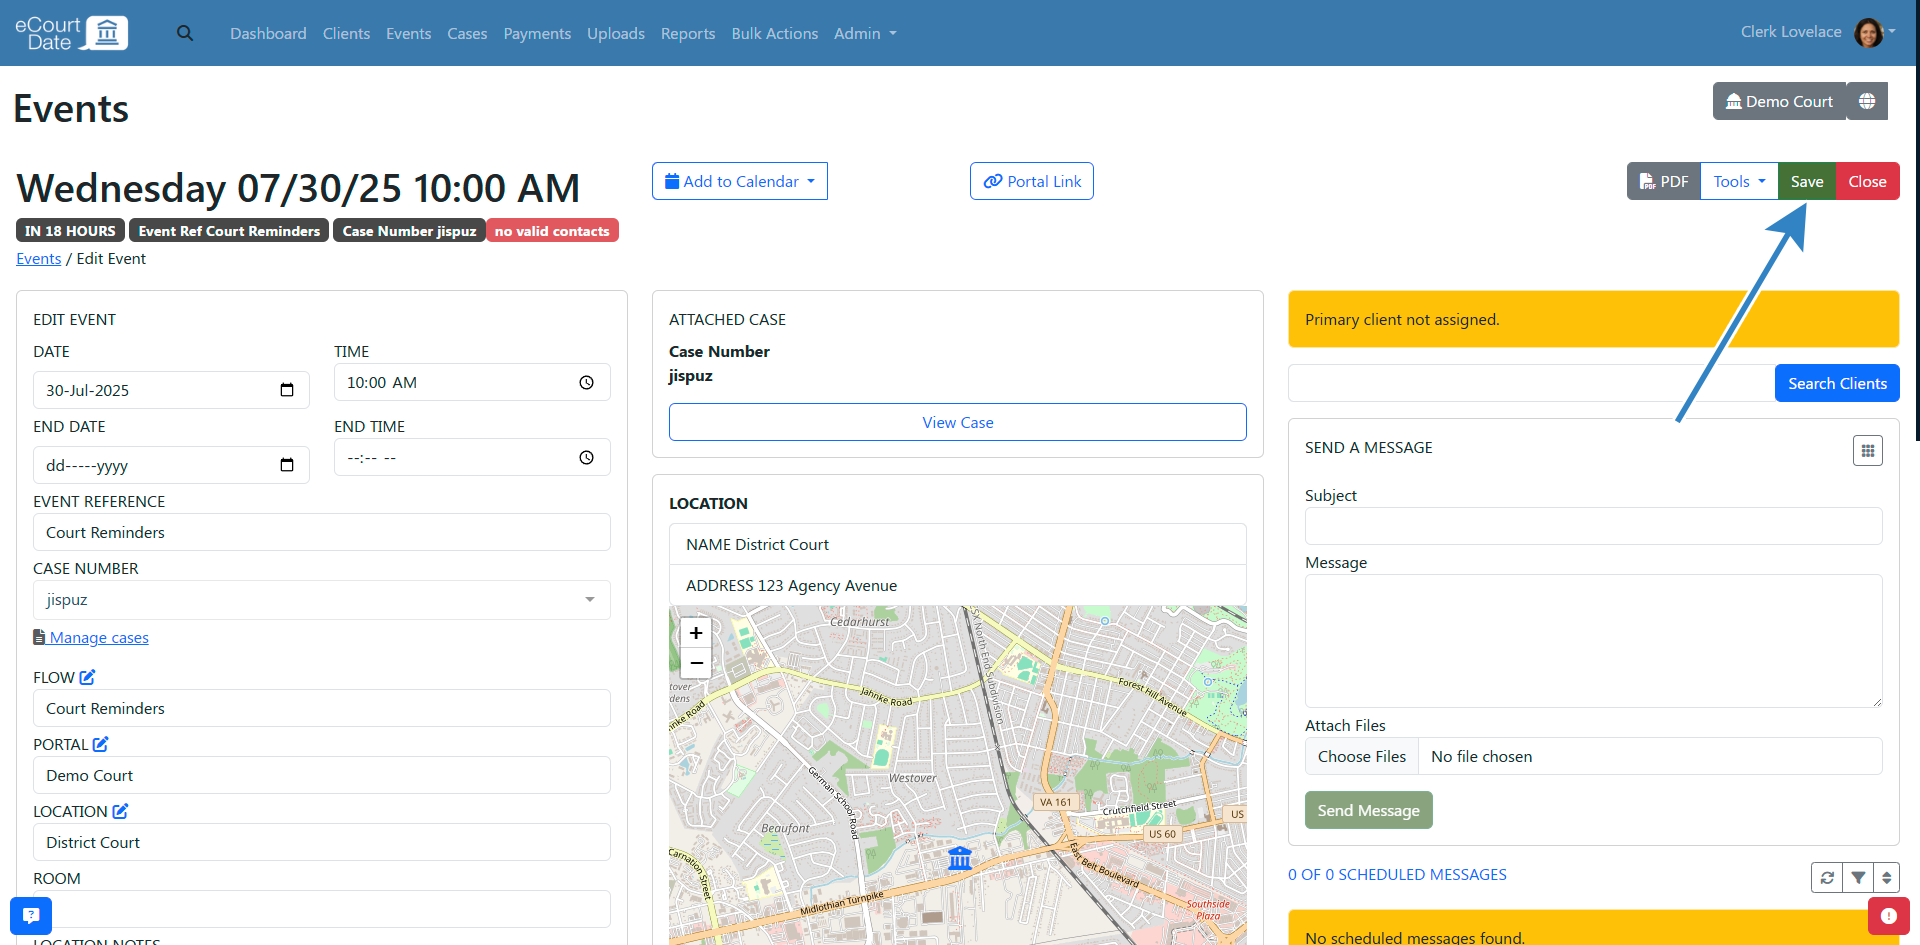
Records created or updated after the change will use the updated flow version. To apply changes to existing records, click Tools > Sync Messages.
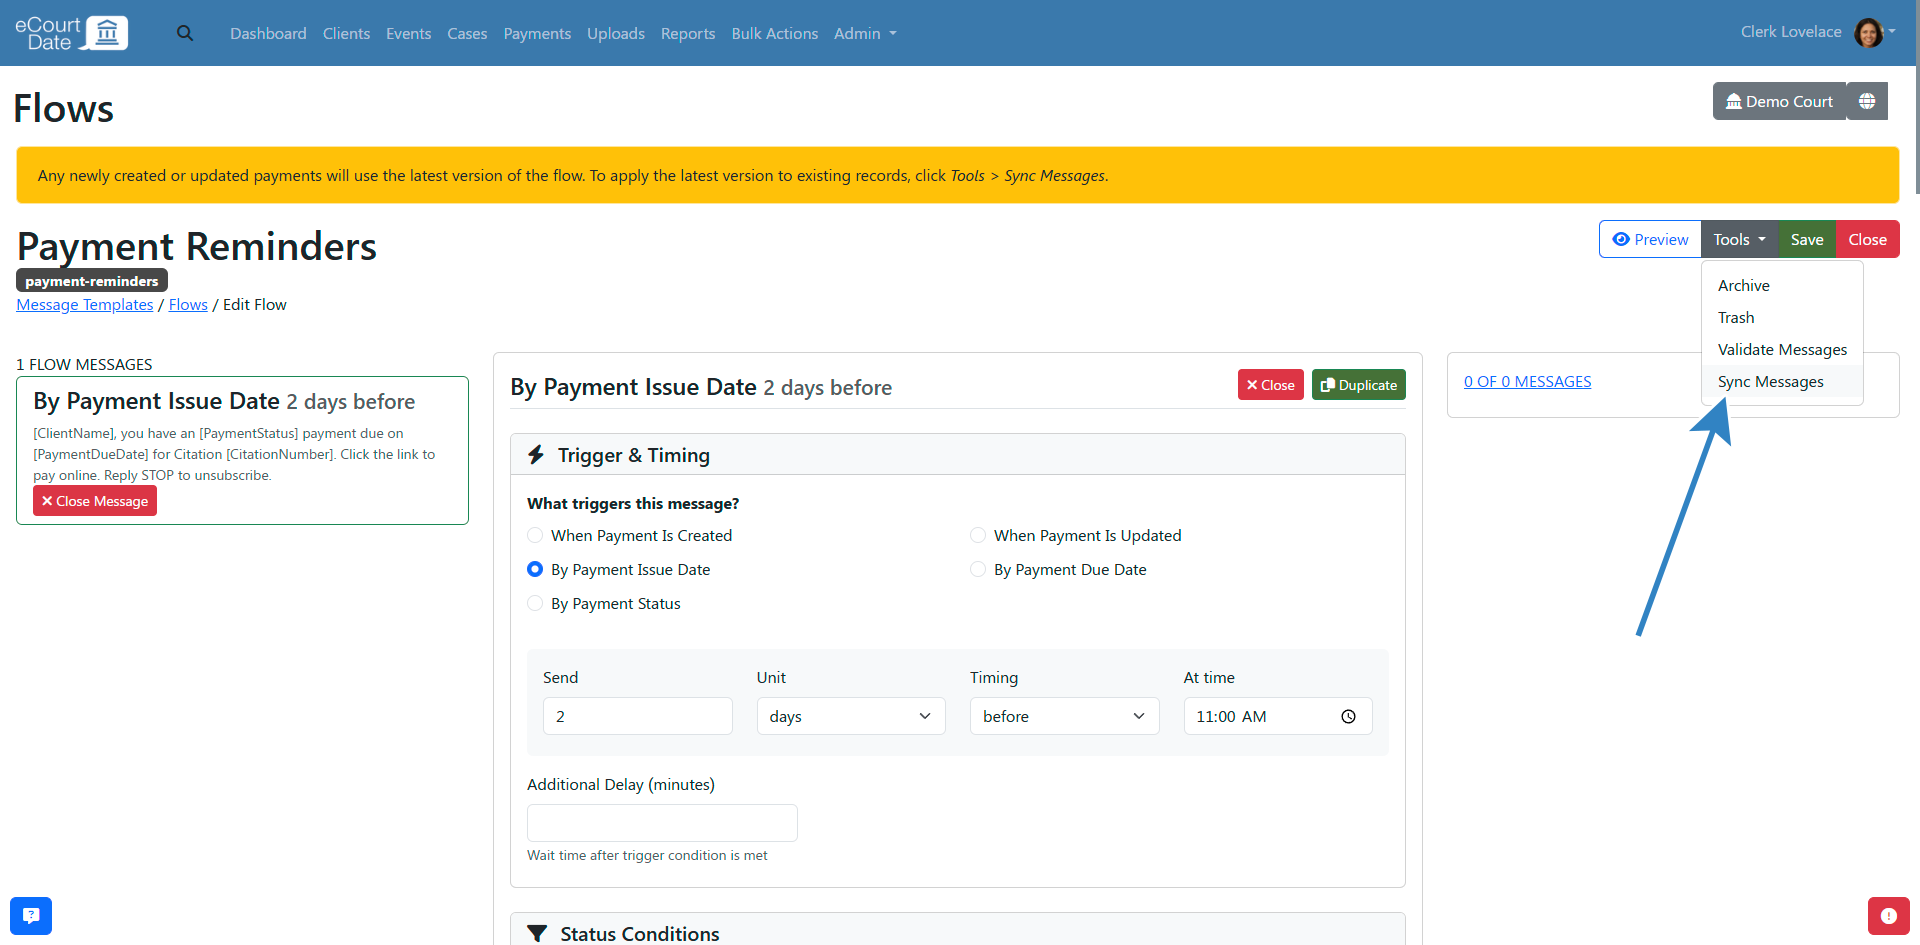
You can also sync messages for a single record by opening the record, clicking Tools, and selecting Sync Messages. This is recommended when testing new changes.
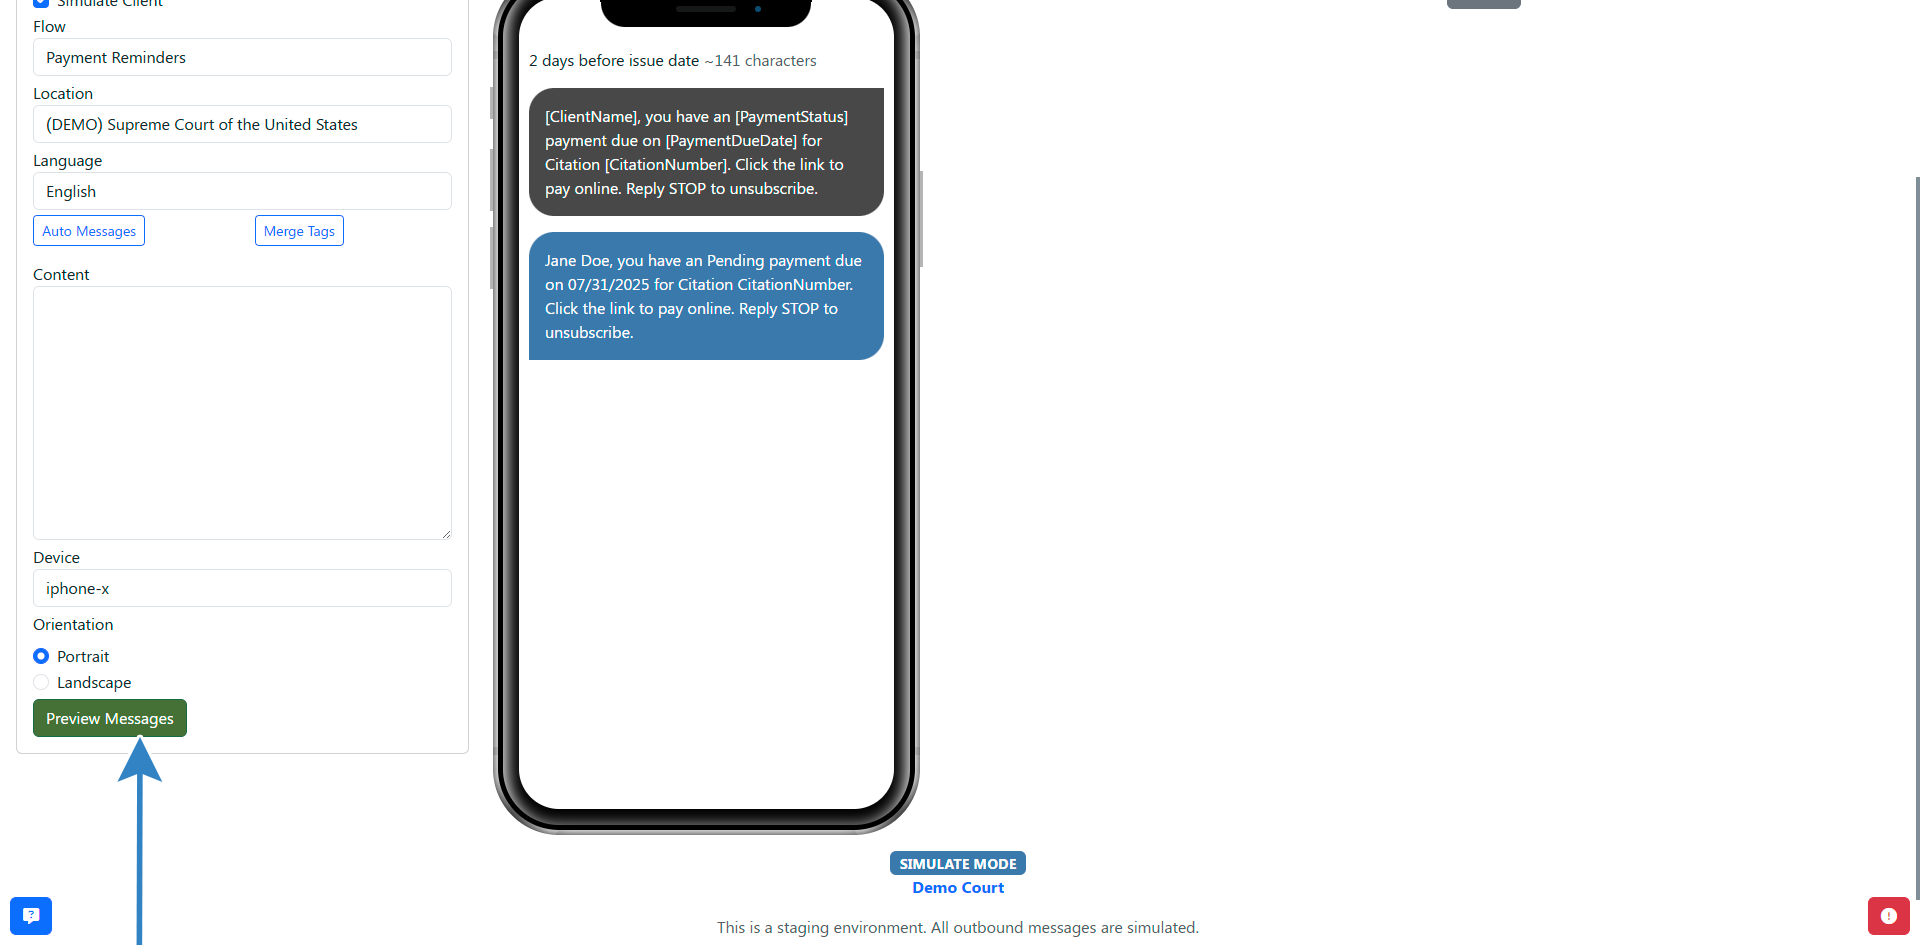
Preview a Flow
- Open the flow and click the Preview button.
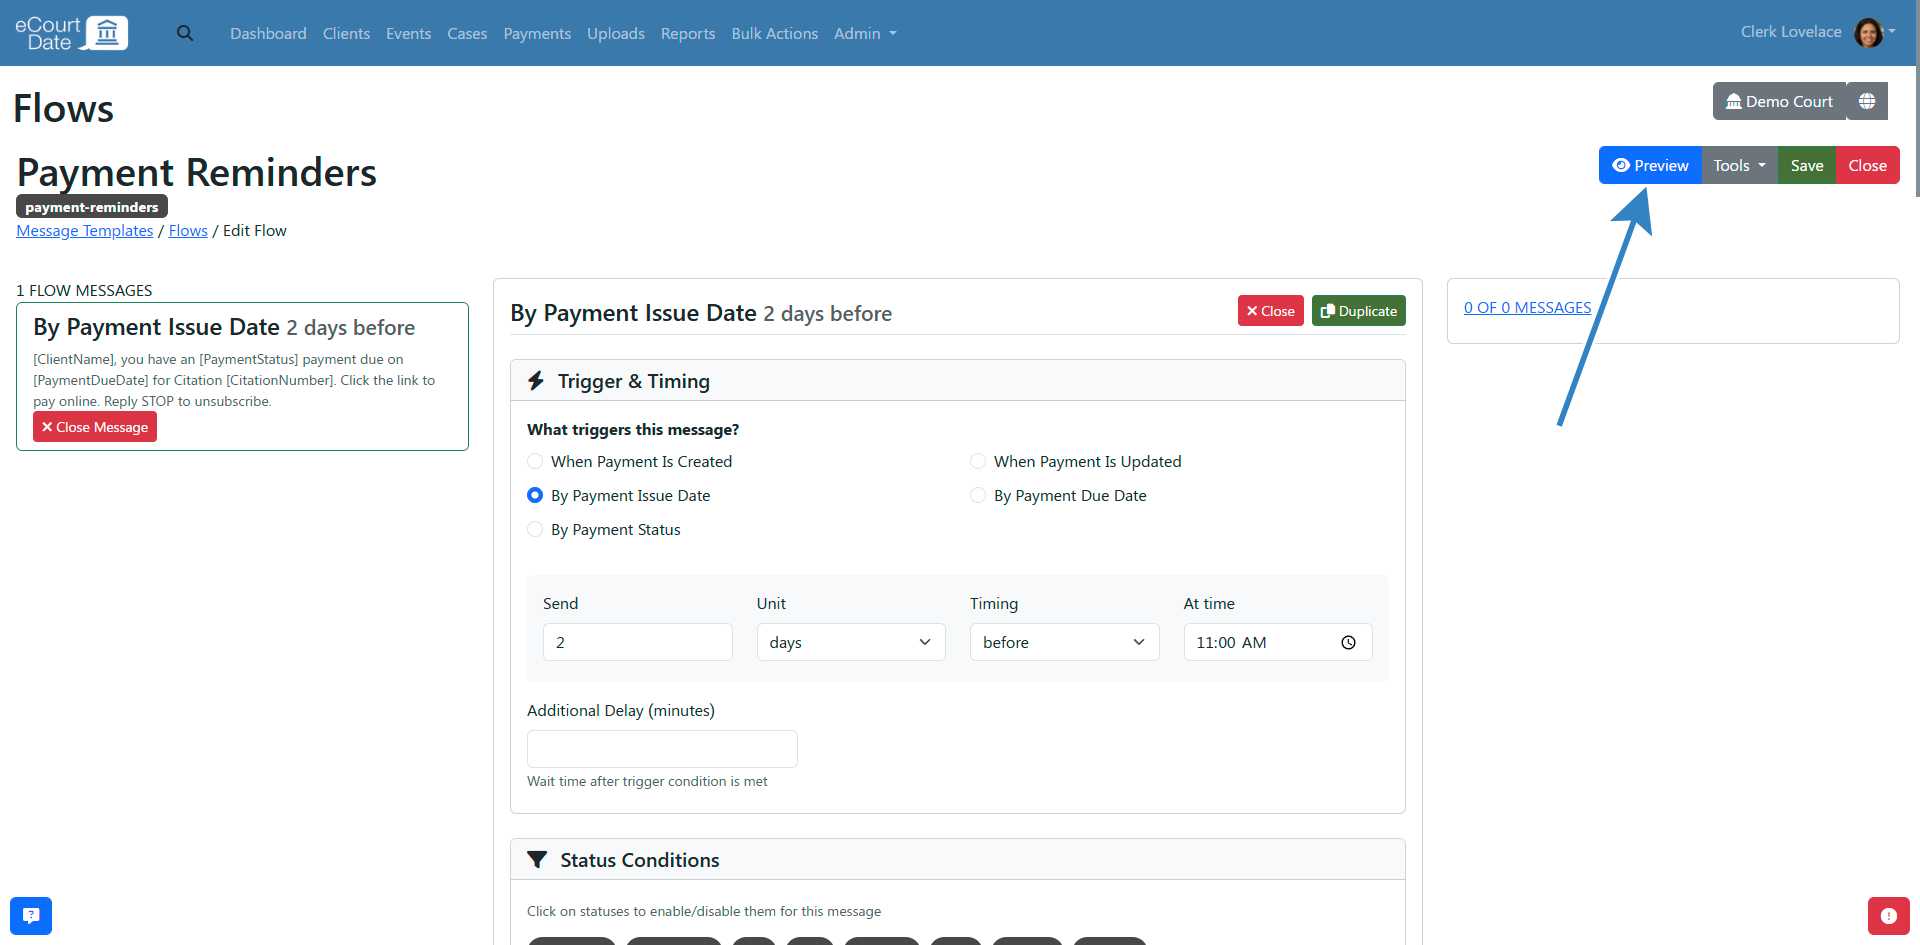
- Select the Simulate Client checkbox to see a preview with sample client data.
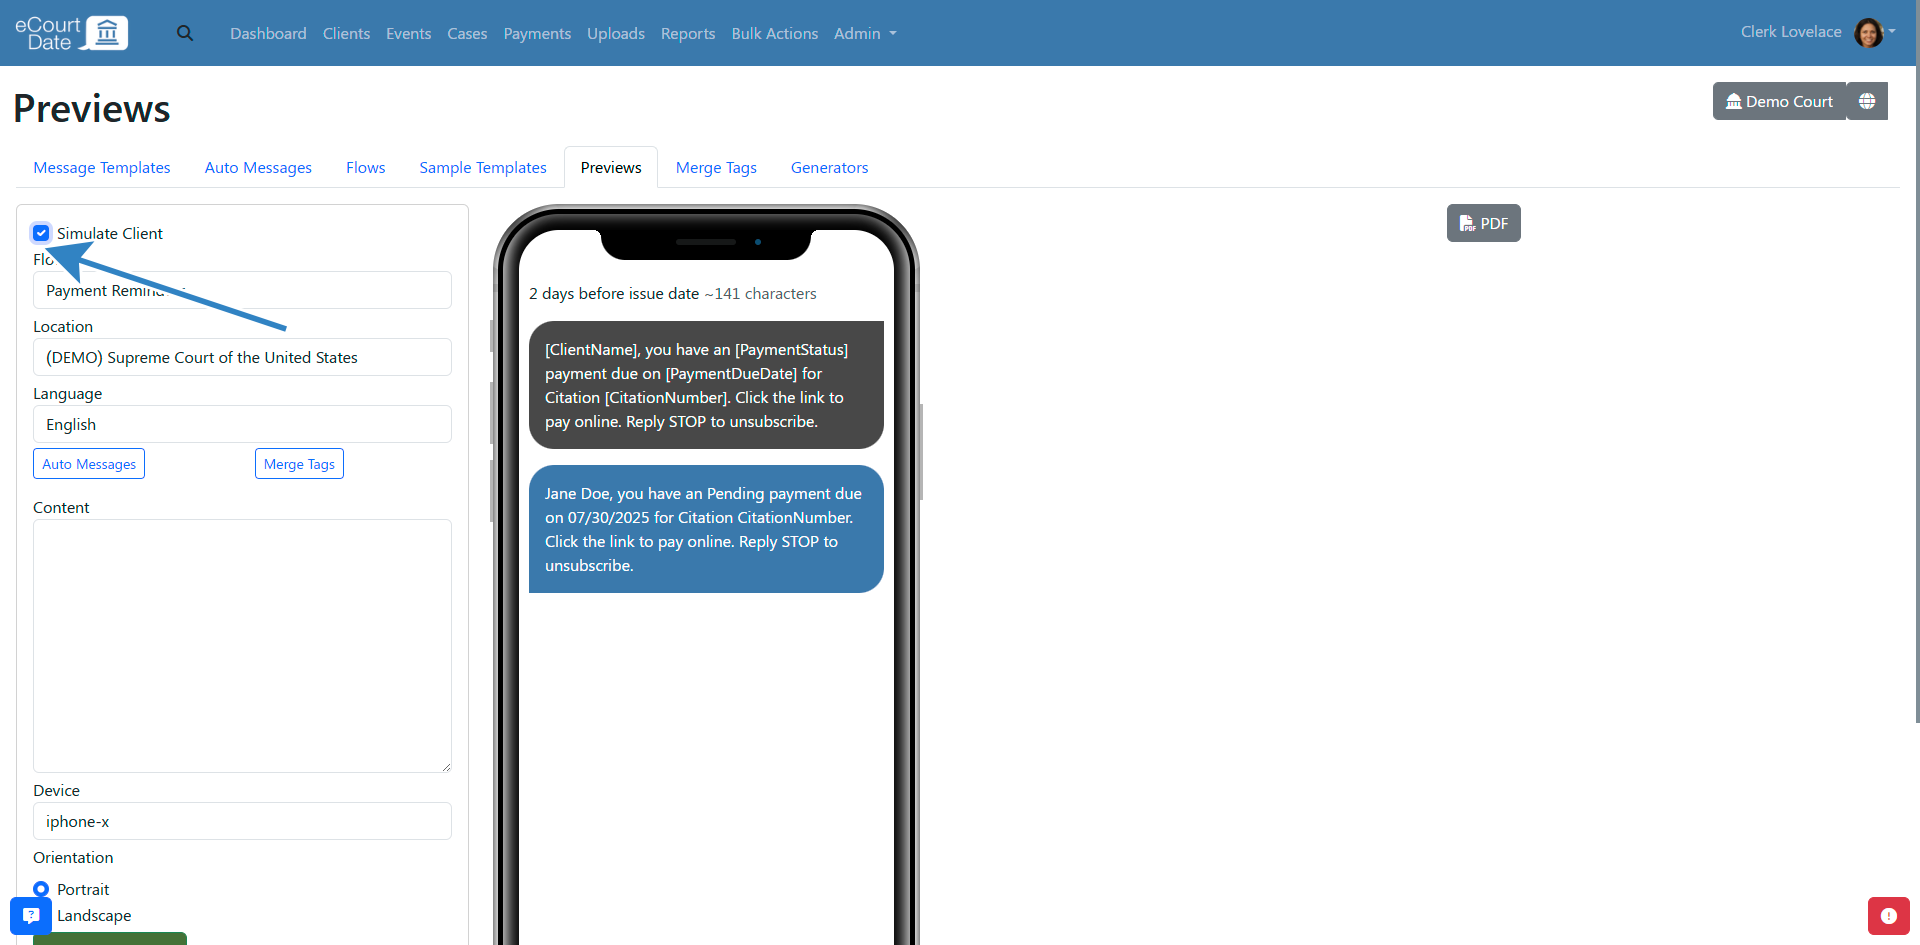
- Alternatively, use Search Clients to find and preview for a specific client.
- If the client has related records (events, payments), the preview will list them.
- Click the Preview button to view the rendered messages.
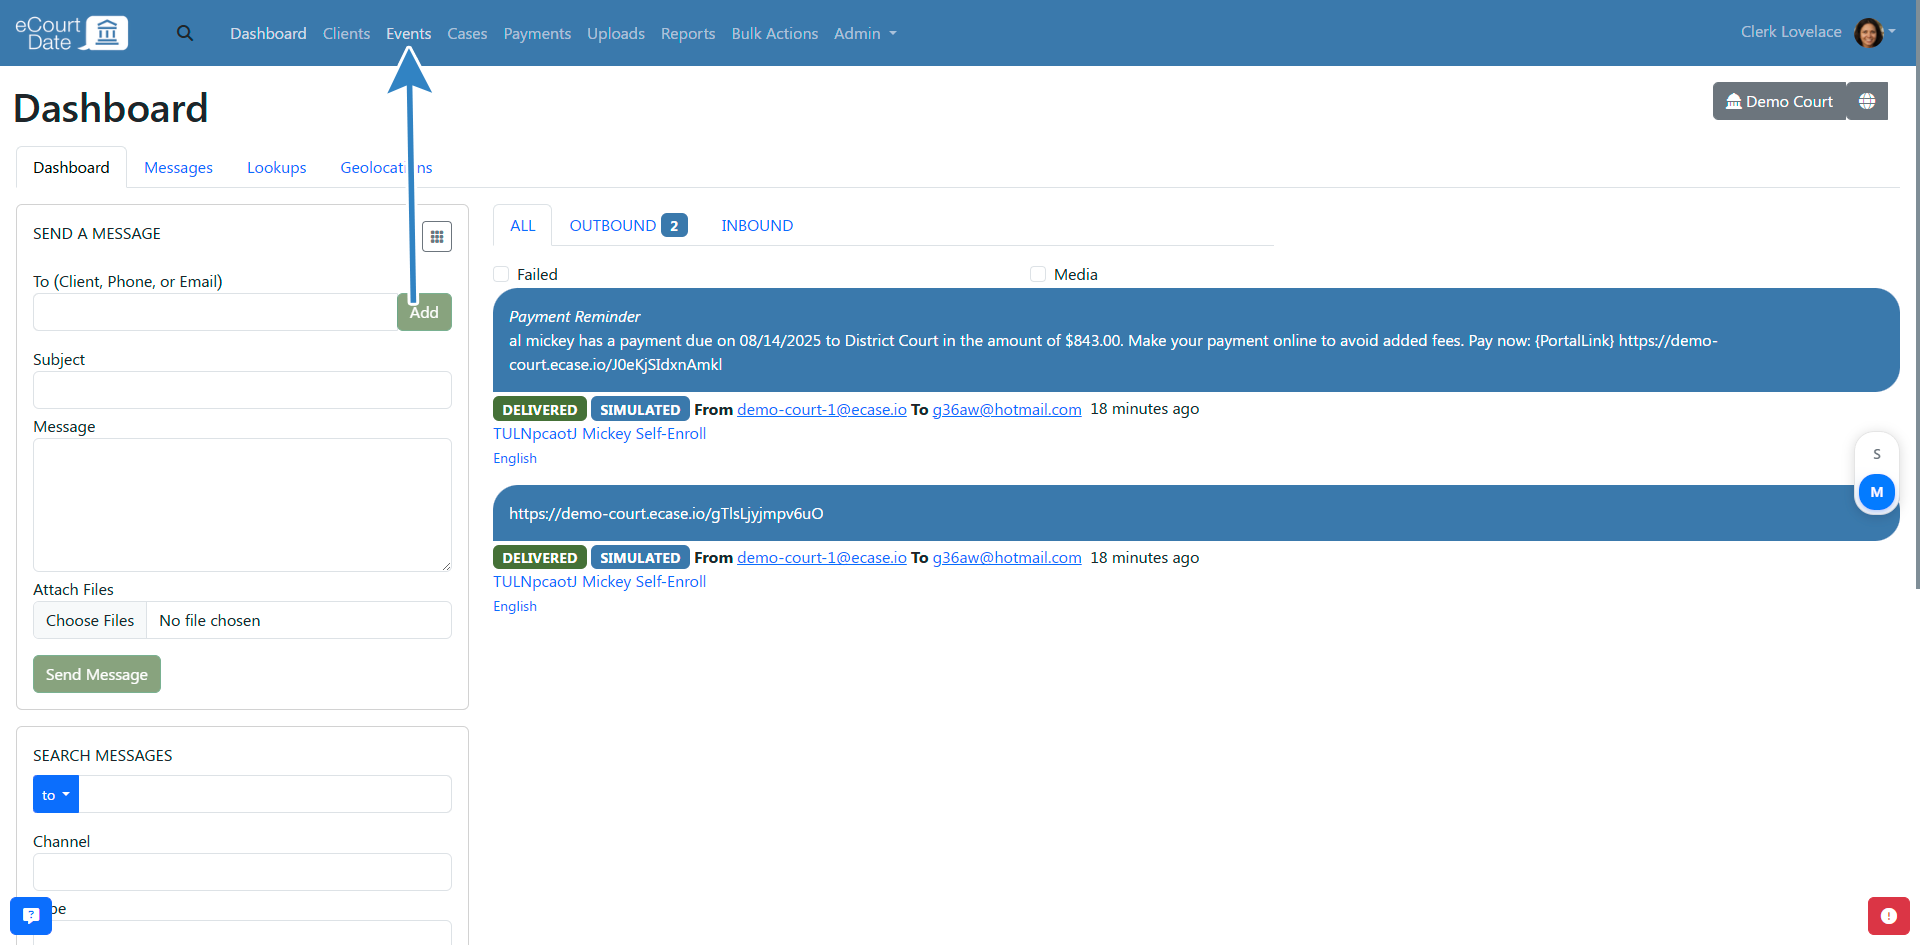
Enable Simulate Mode
Simulate mode creates messages without actually sending them, allowing you to test your flow safely.
- Open the flow for editing.
- Enable the Simulate Mode checkbox.
- Click the Save button.
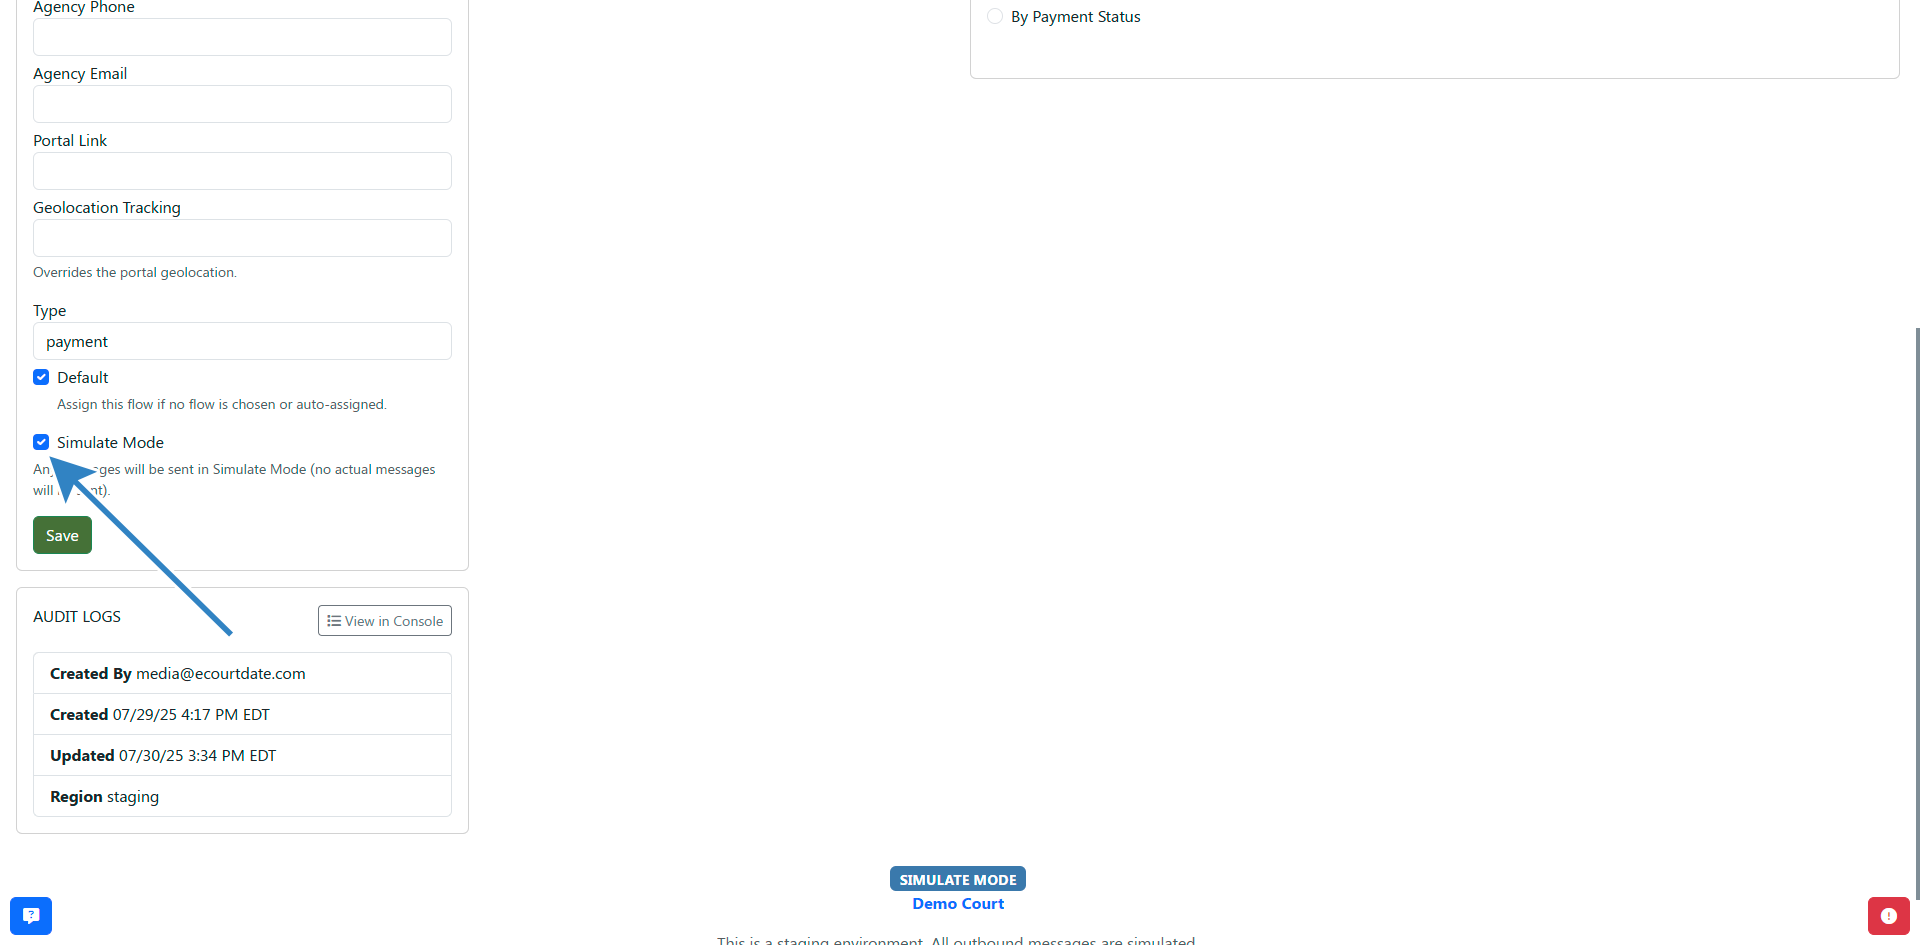
All messages assigned to this flow will be created in simulate mode and will not be delivered to clients.
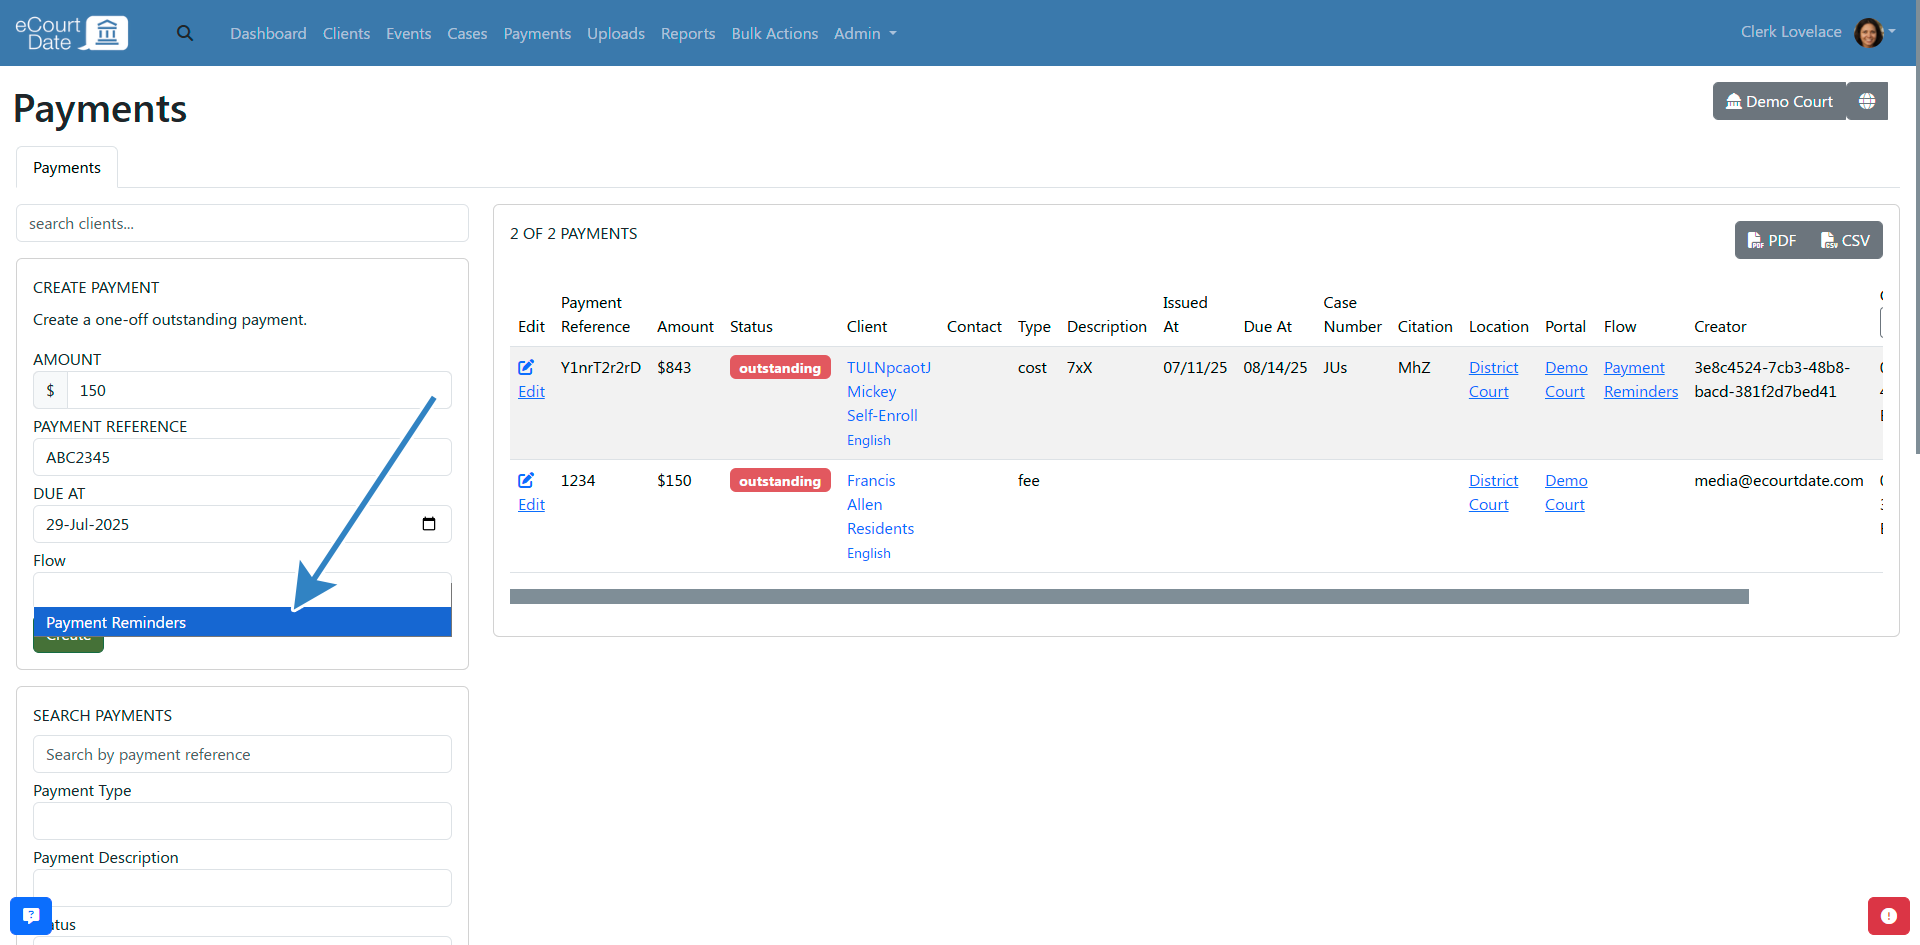
Assign a Flow Manually
Once you have created a flow, you can assign it directly when creating or editing a record.
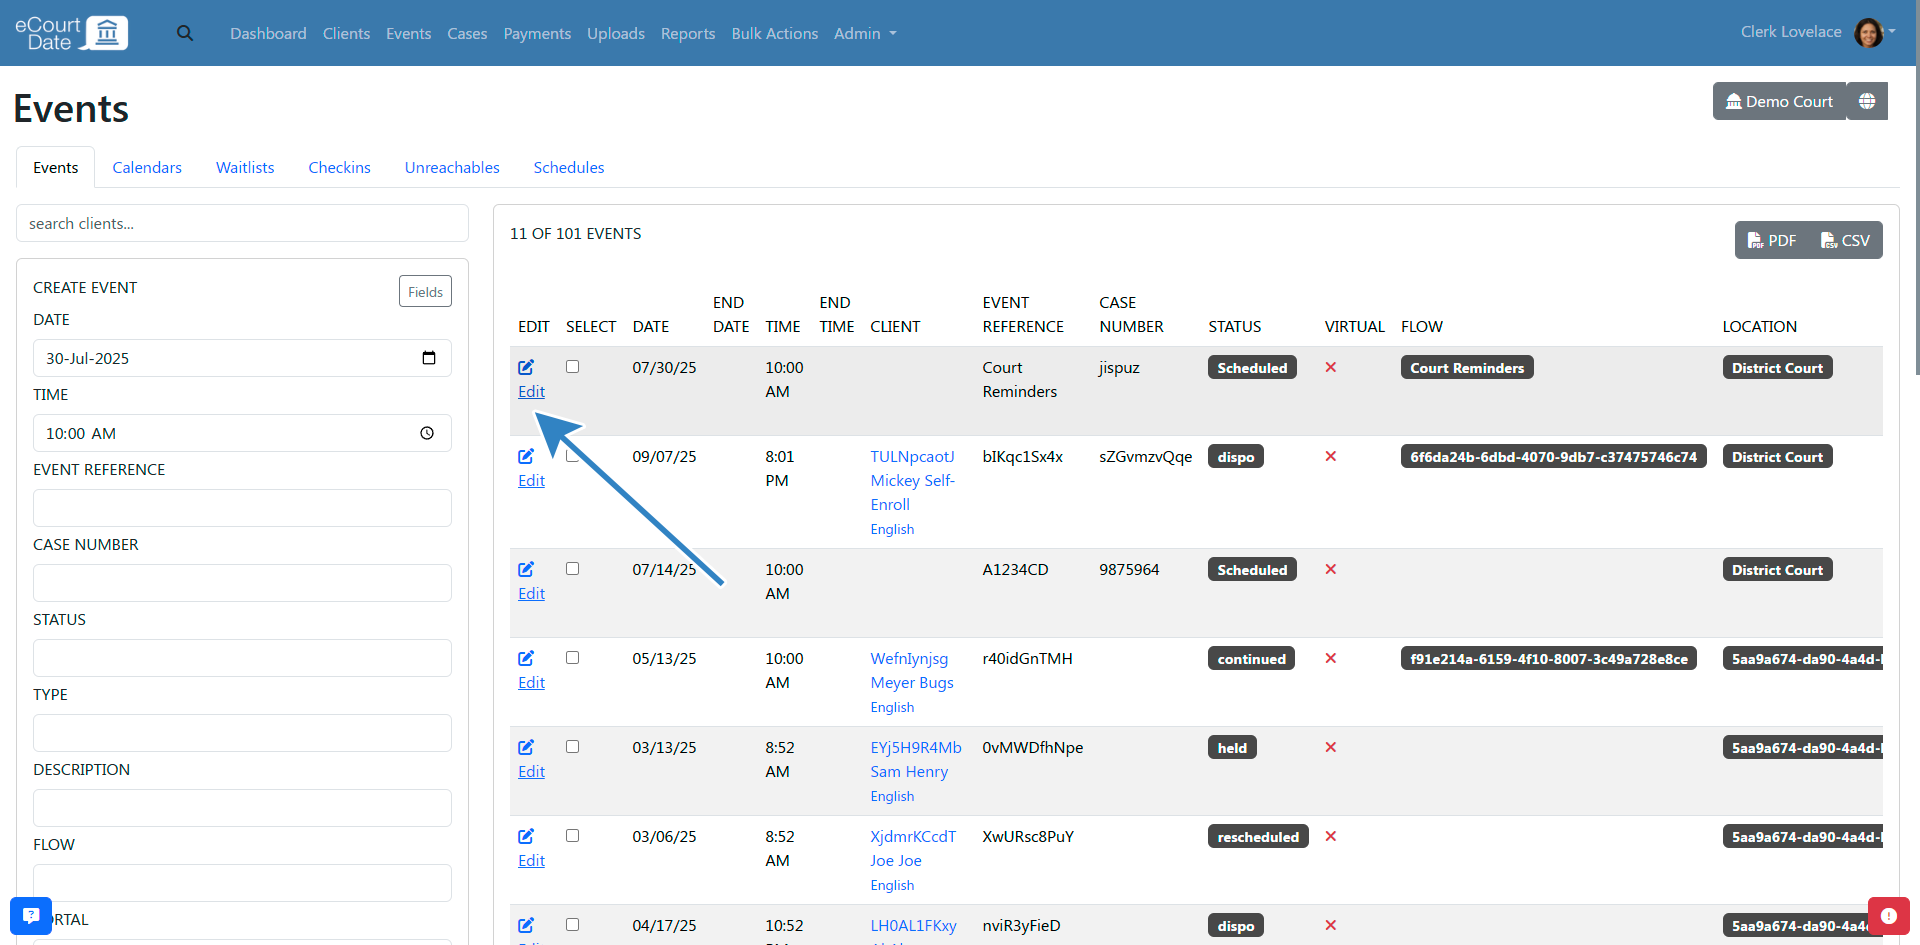
Events:
- Click Events in the top navigation bar.
- Fill in the Create Event form.

- Select the desired flow from the Flow dropdown.
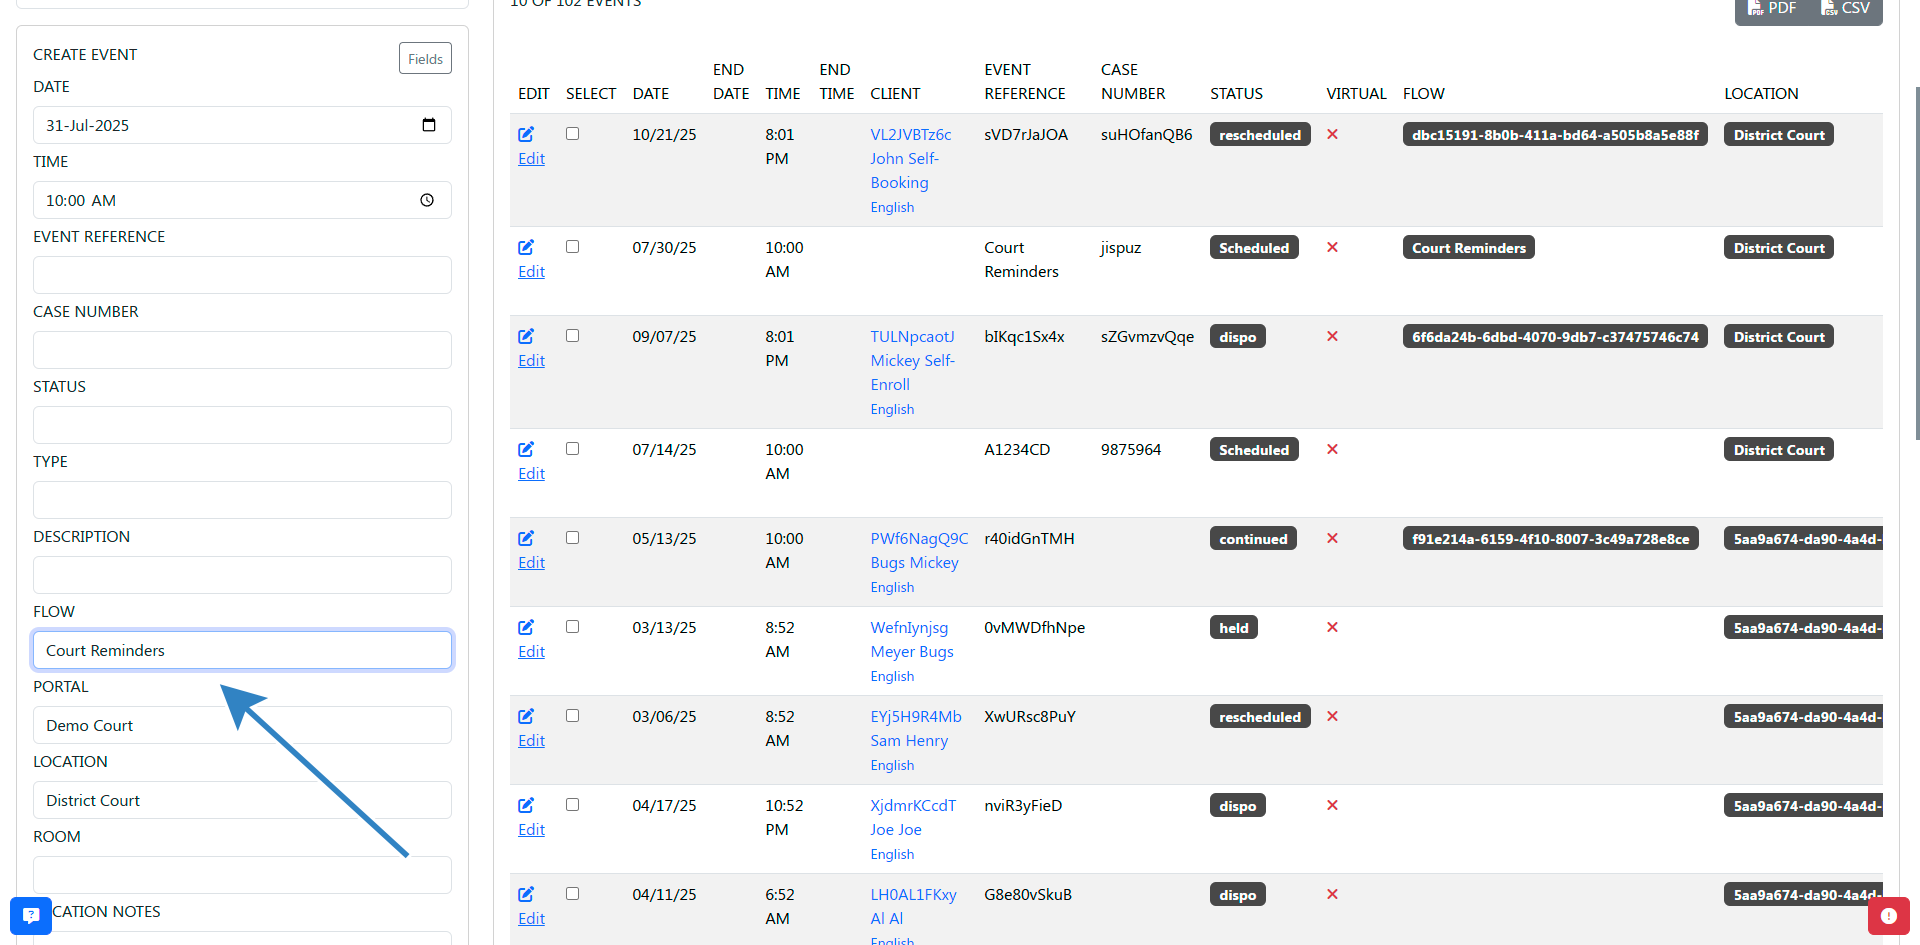
- Click the Create button.
- Click Edit to view the event with the flow assigned and messages synced.
- If you update the event and click Save, messages automatically resync based on the new information.
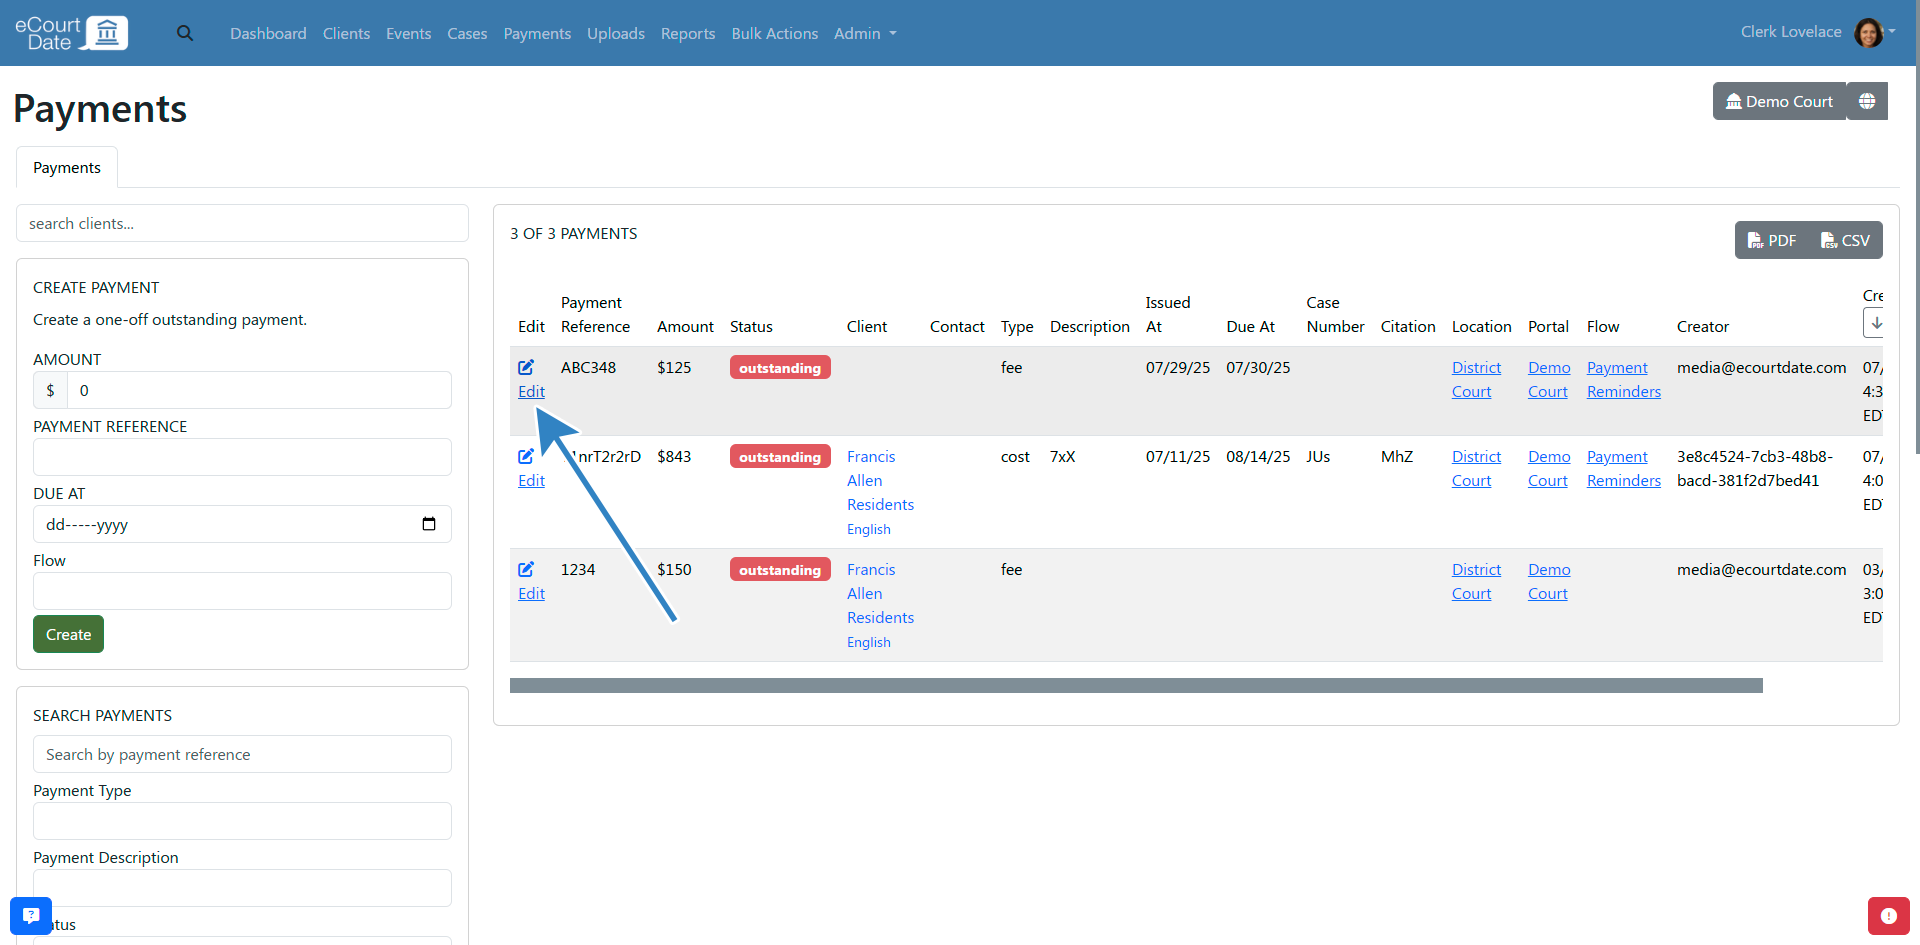
Payments:
- Click Payments in the top navigation bar.

- Fill in the Create Payment form.
- Select the desired flow from the Flow dropdown.
- Click the Create button.
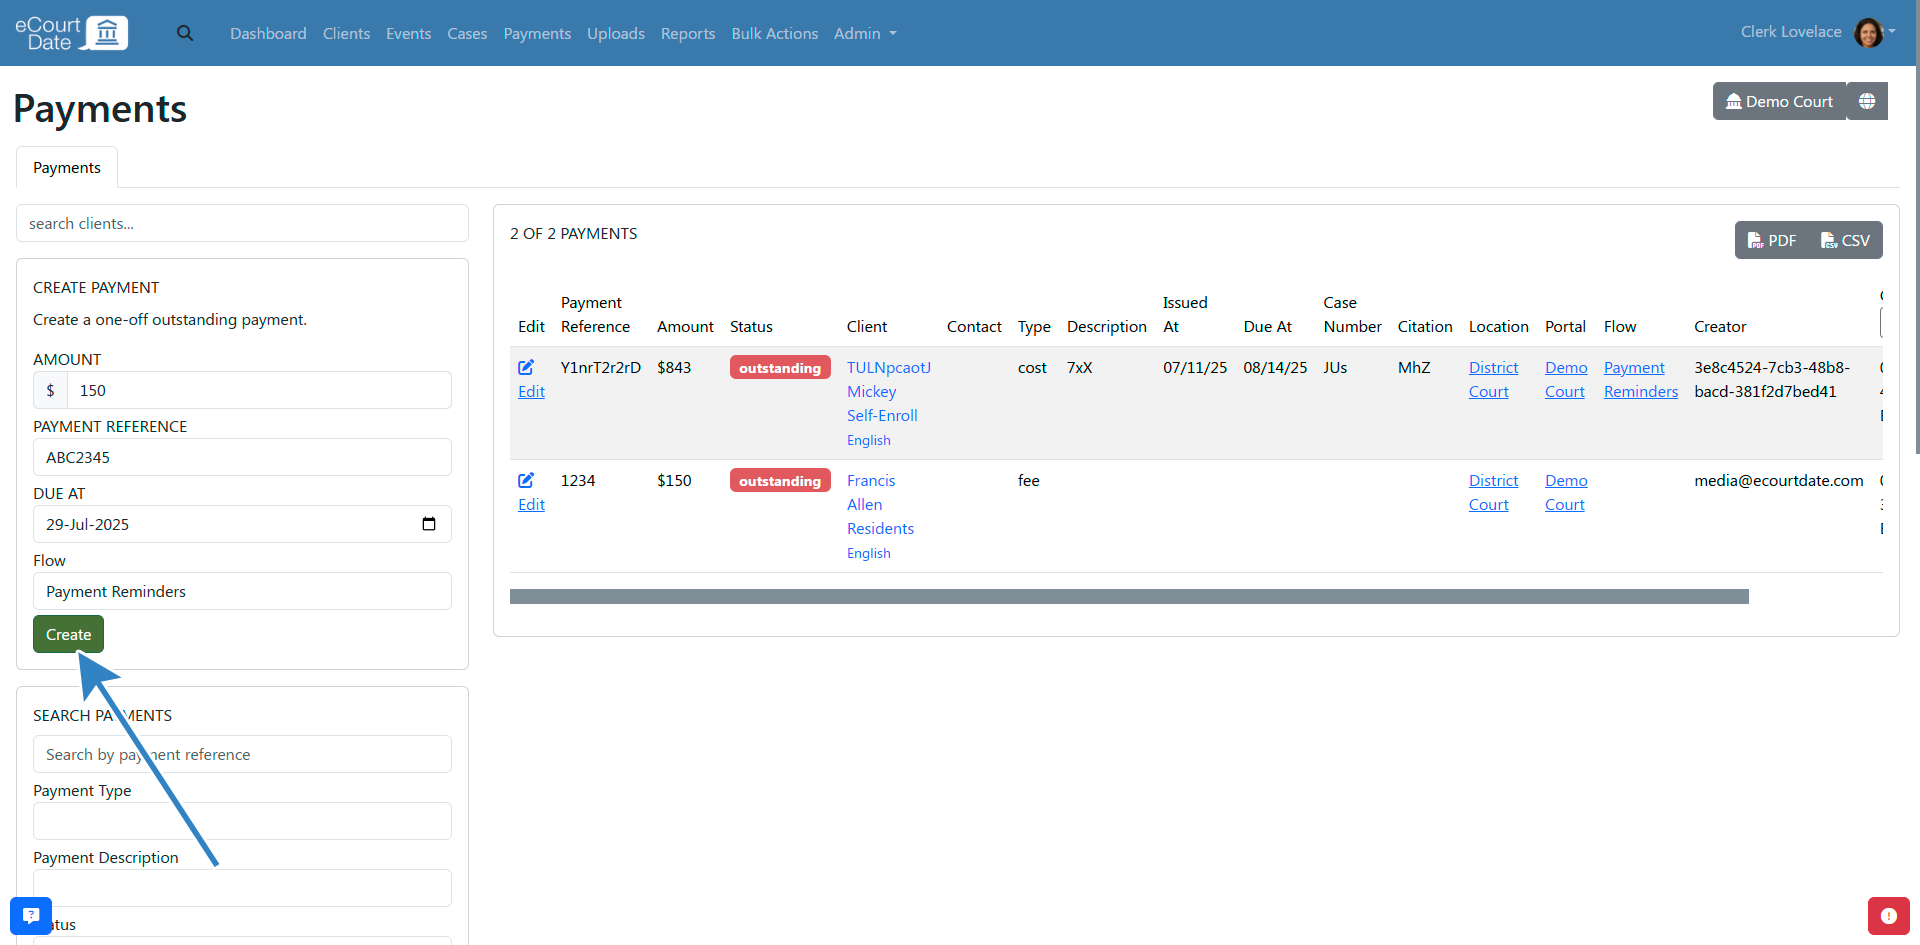
- Click Edit to view the payment with the flow assigned and messages synced.
- If you update the payment and click Save, messages automatically resync.
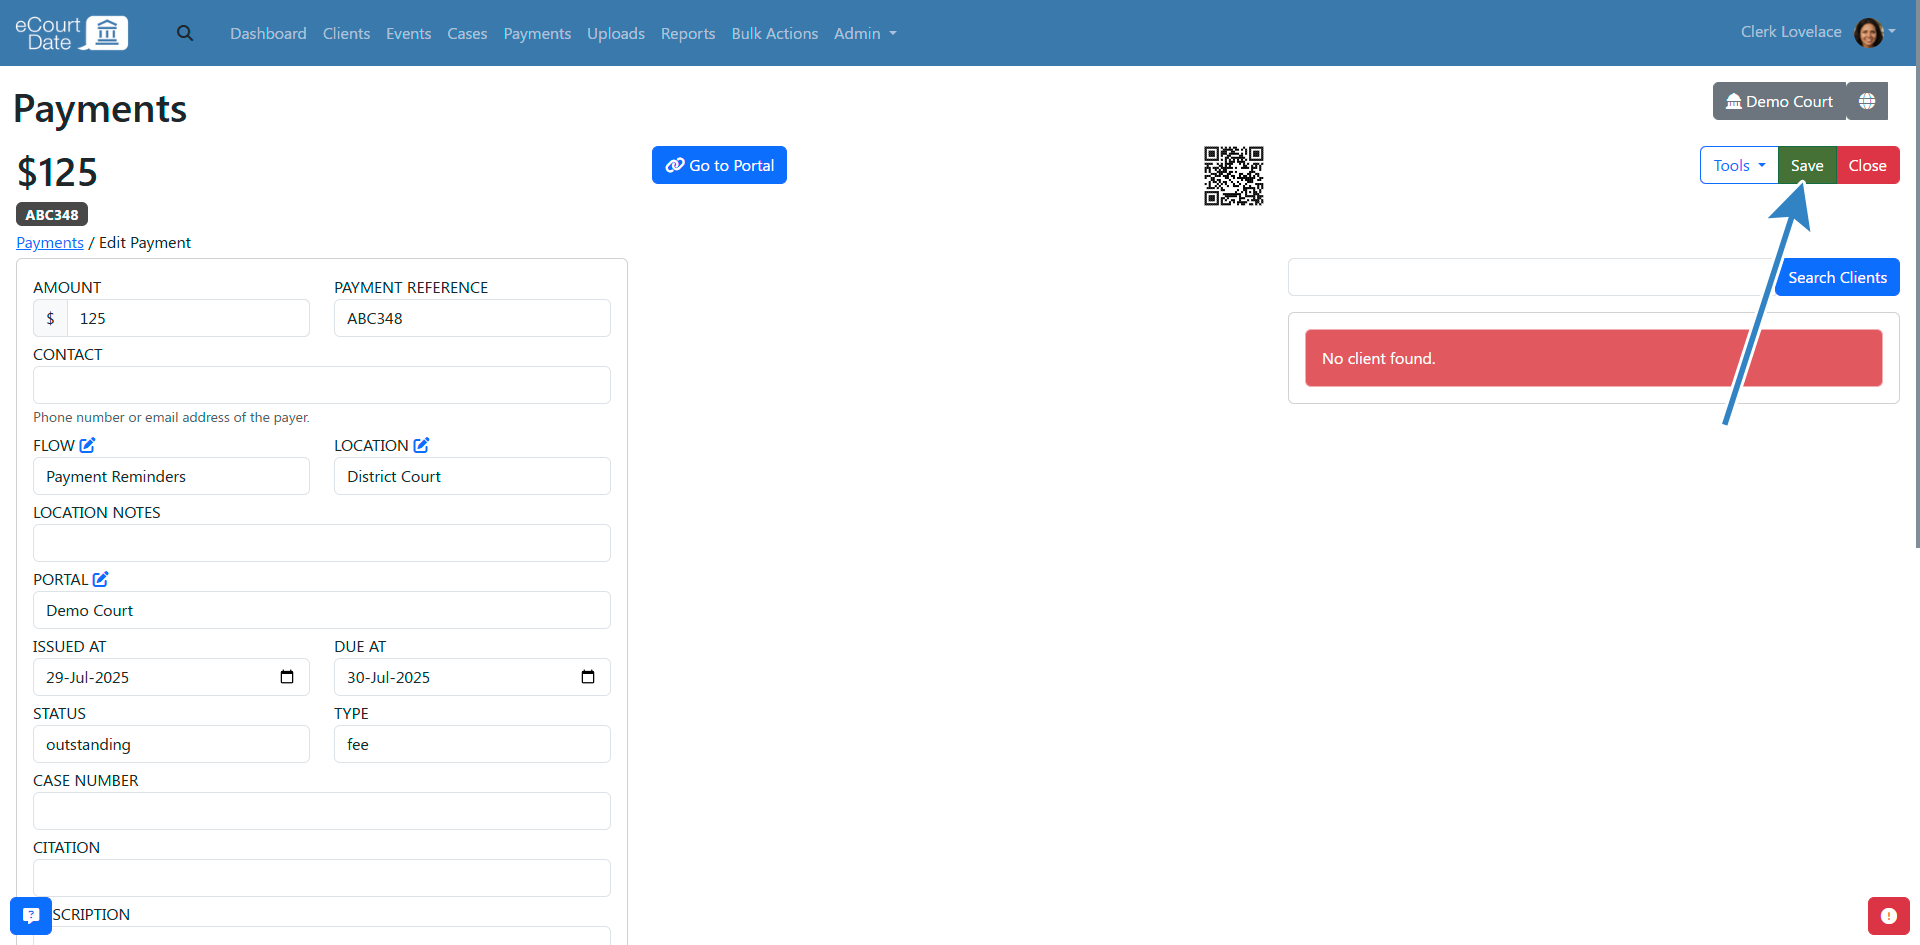
- (Optional) If you change the flow itself, click Tools > Sync Messages to update the record.

Warrants:
- Click Cases in the top navigation bar.

- Fill in the Create Warrant form.
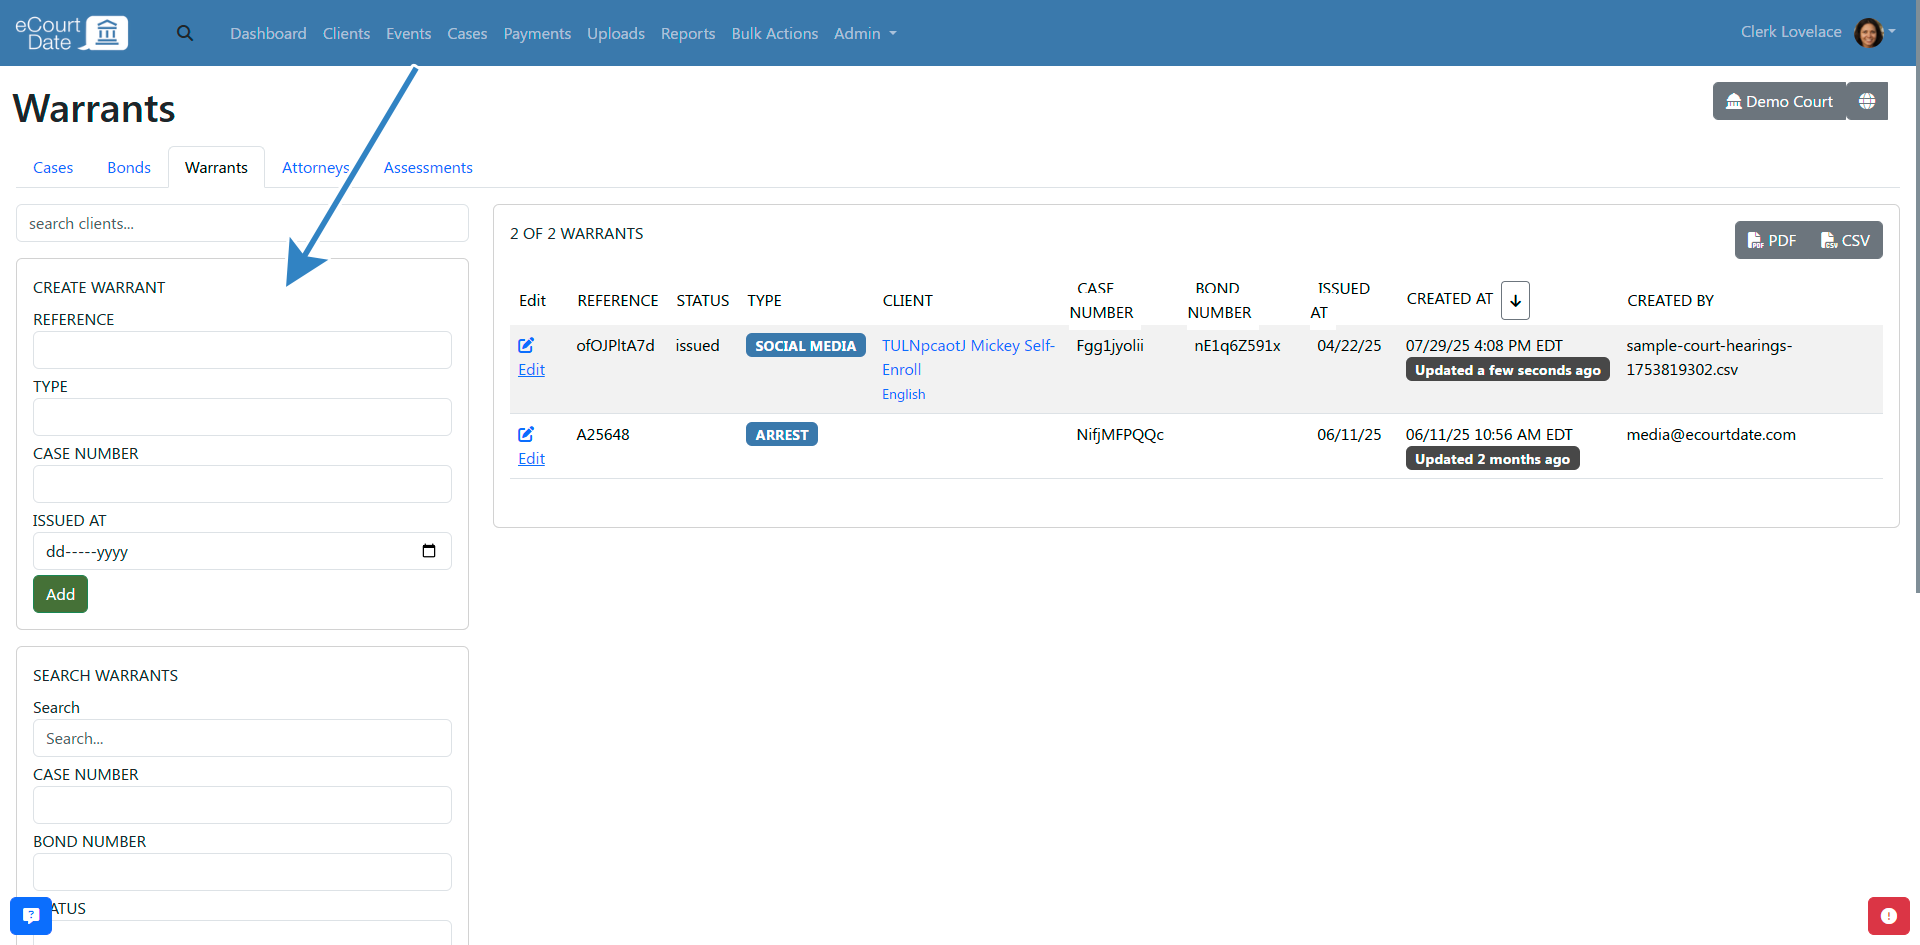
- Select the desired flow from the Flow dropdown.
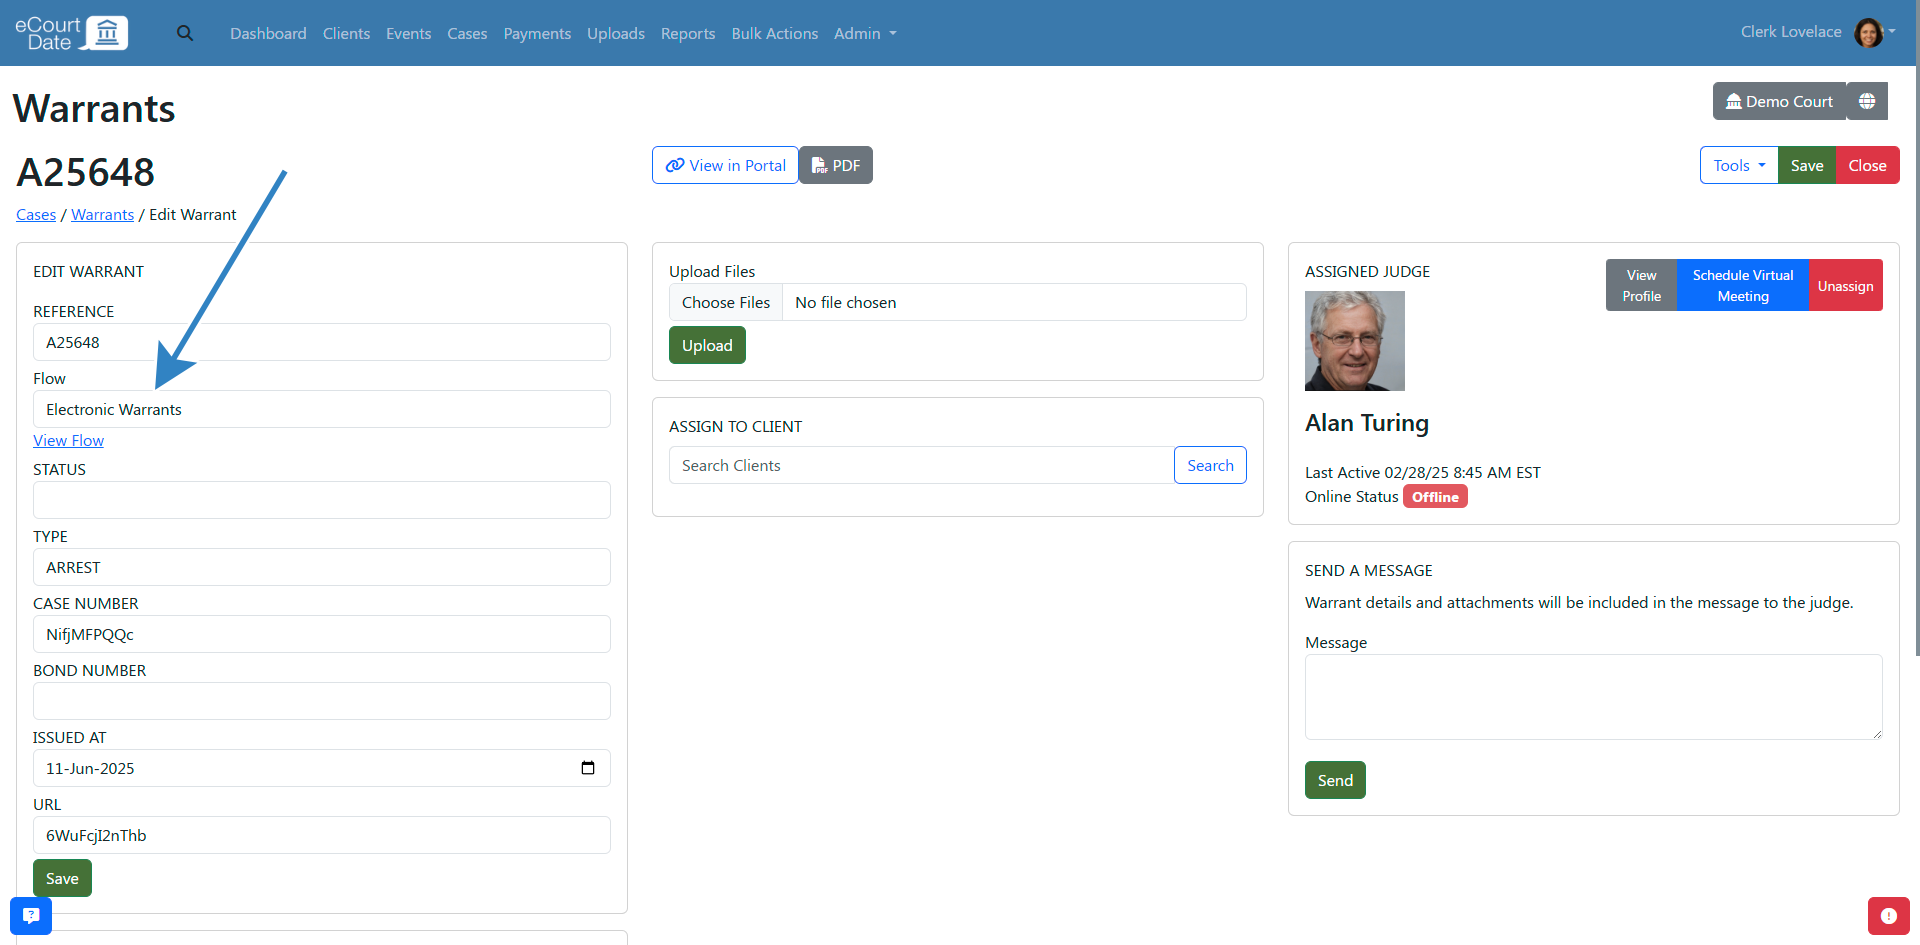
- Click the Create button.
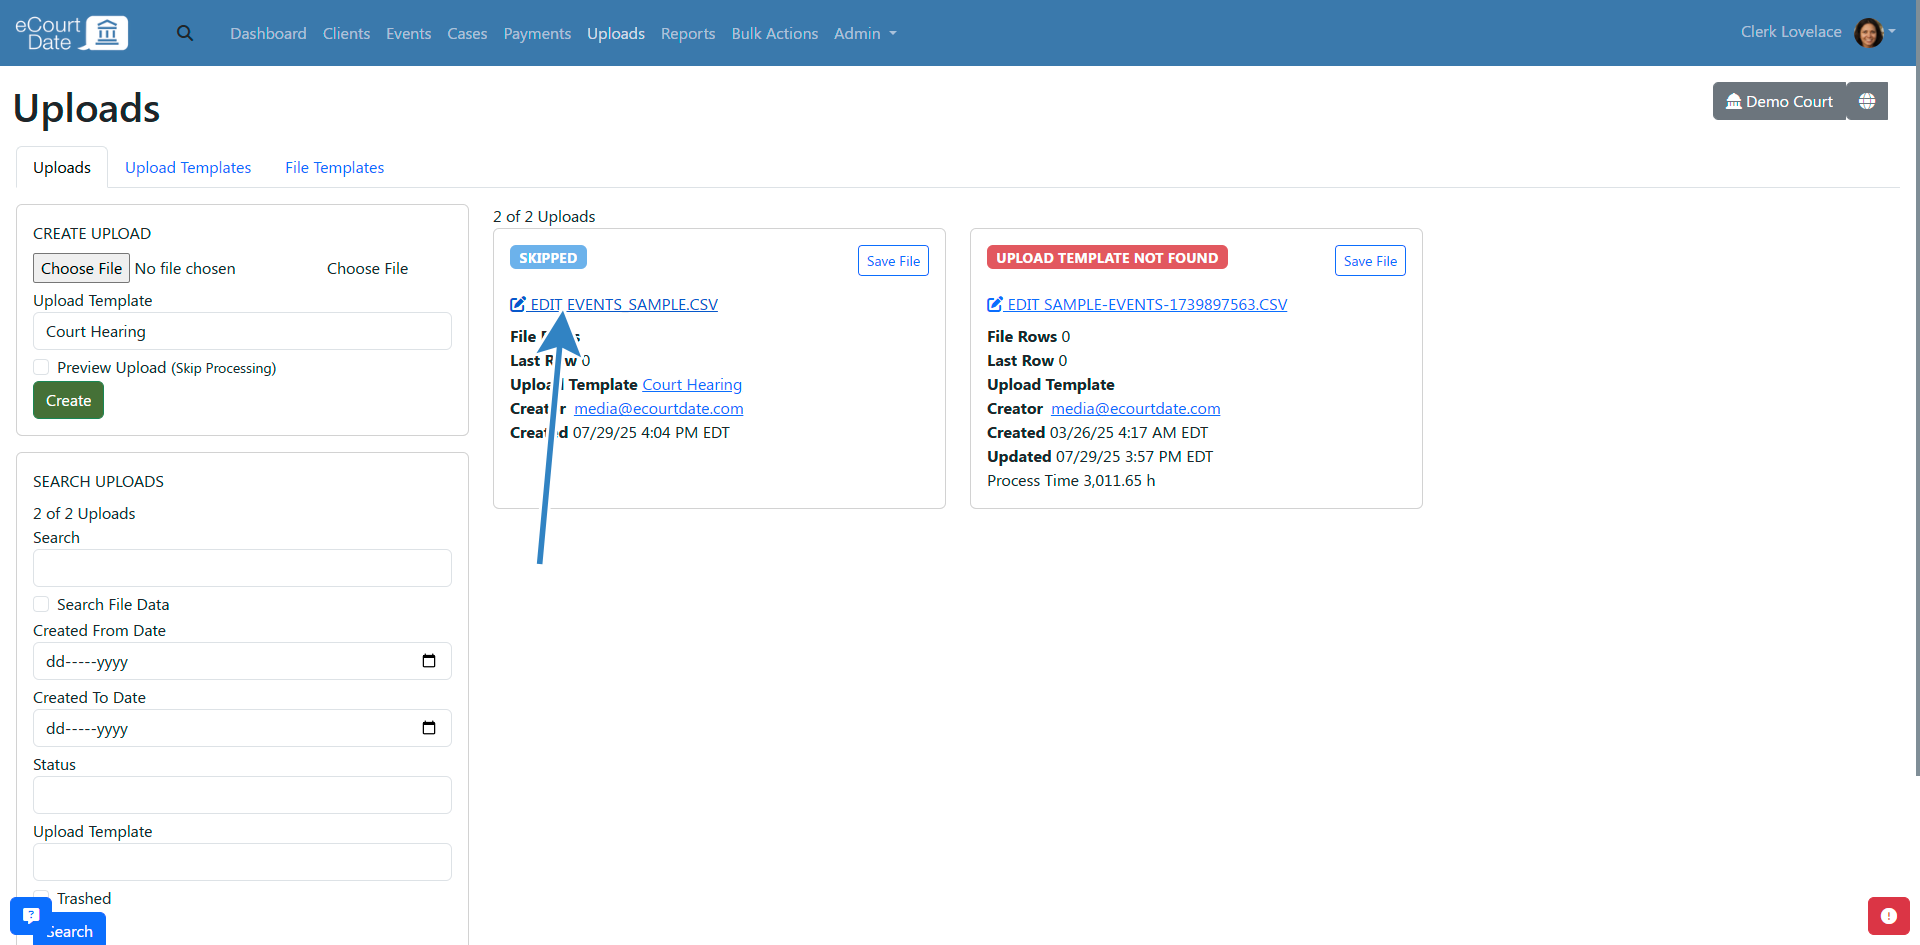
Assign a Flow through Uploads
You can also assign flows when importing records via file uploads. Make sure you have an upload template created before proceeding.
- Click Uploads in the top navigation bar.
- Click the Upload Templates tab.
- Click the Edit button for the upload template you want to configure.
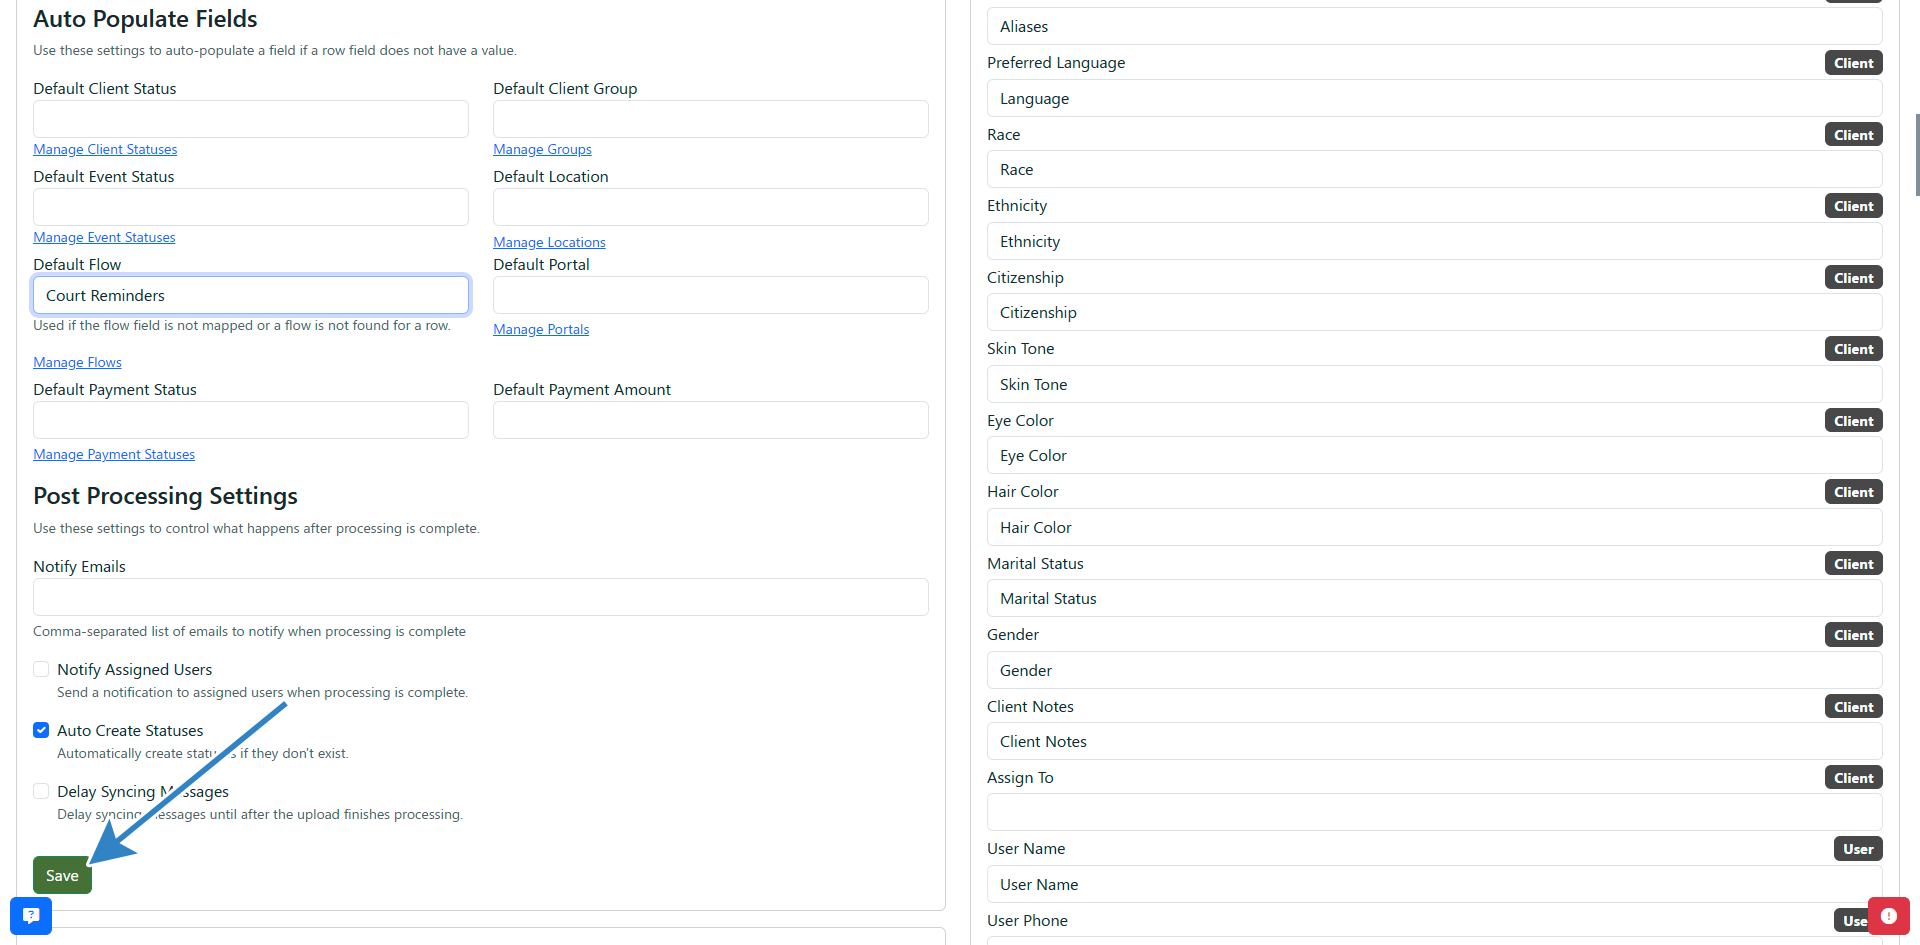
Option 1: Auto-assign a default flow. You do not need a flow column in your file.
- In the Auto Populate Fields section, set the Default Flow field to the flow you want.
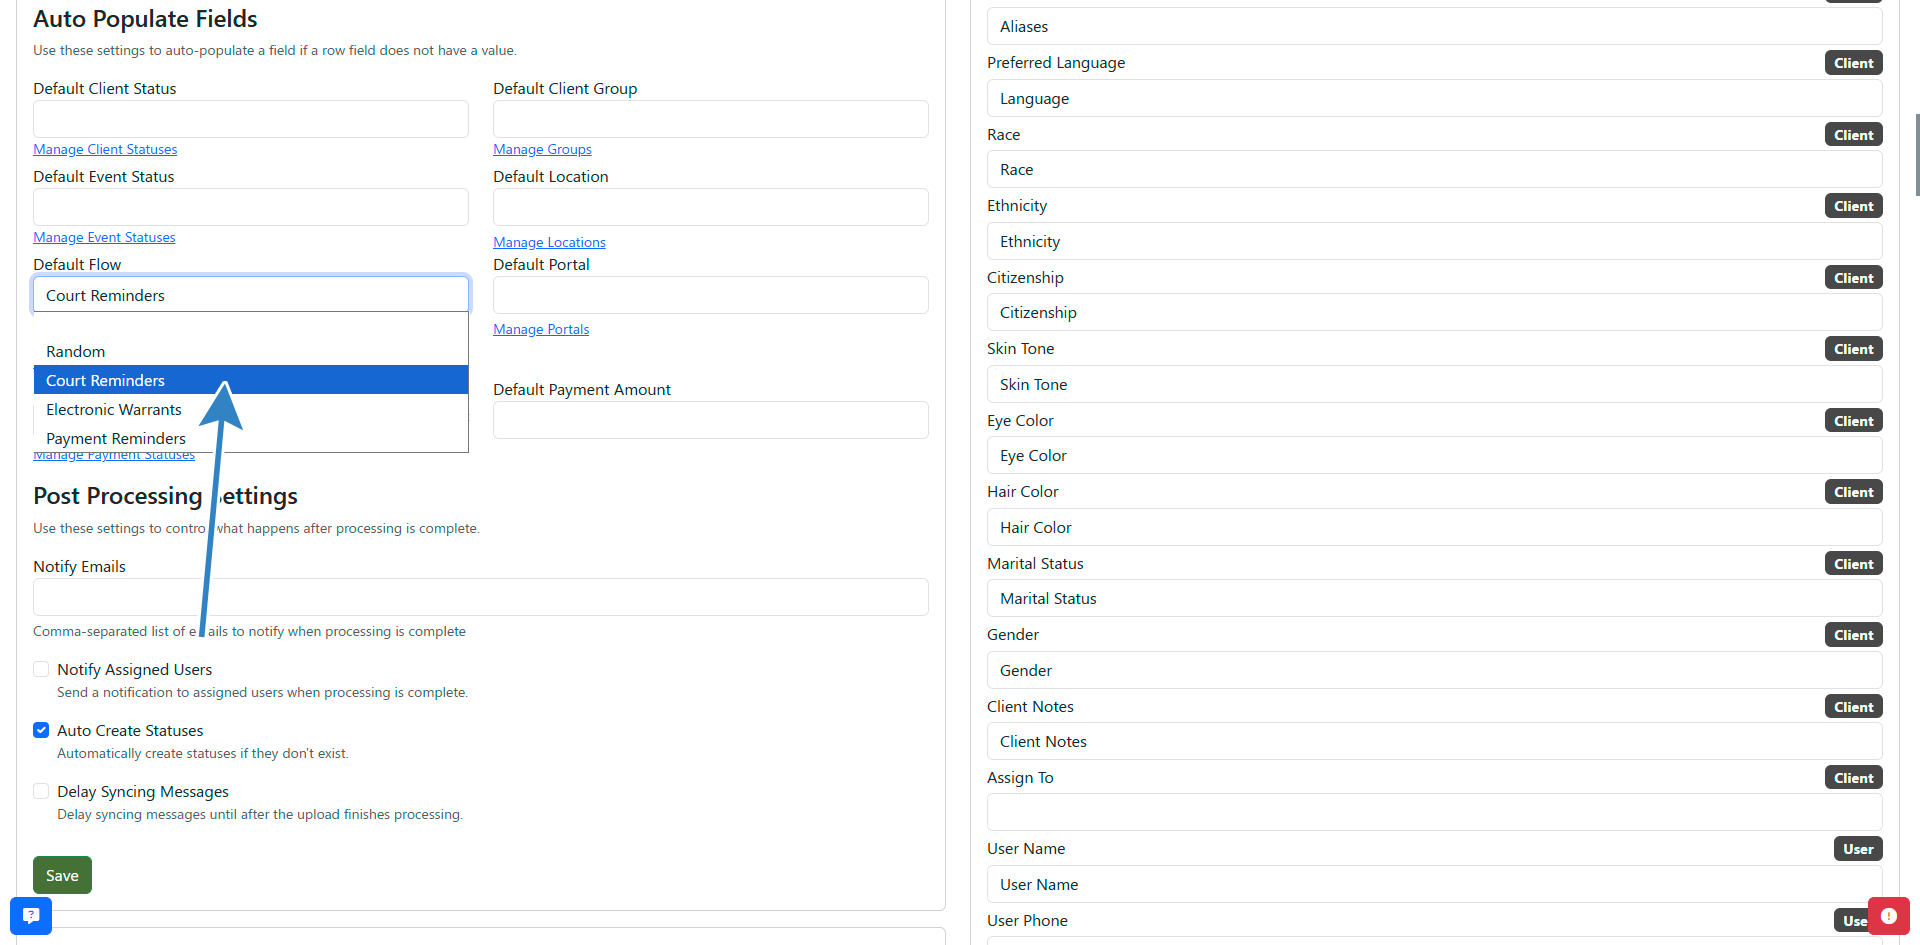
- Click Save.
Option 2: Map a flow column from your file. Each row in your file specifies which flow to use.
- In the Field Mapping section, type Flow in the Search Fields box to filter for flow fields.
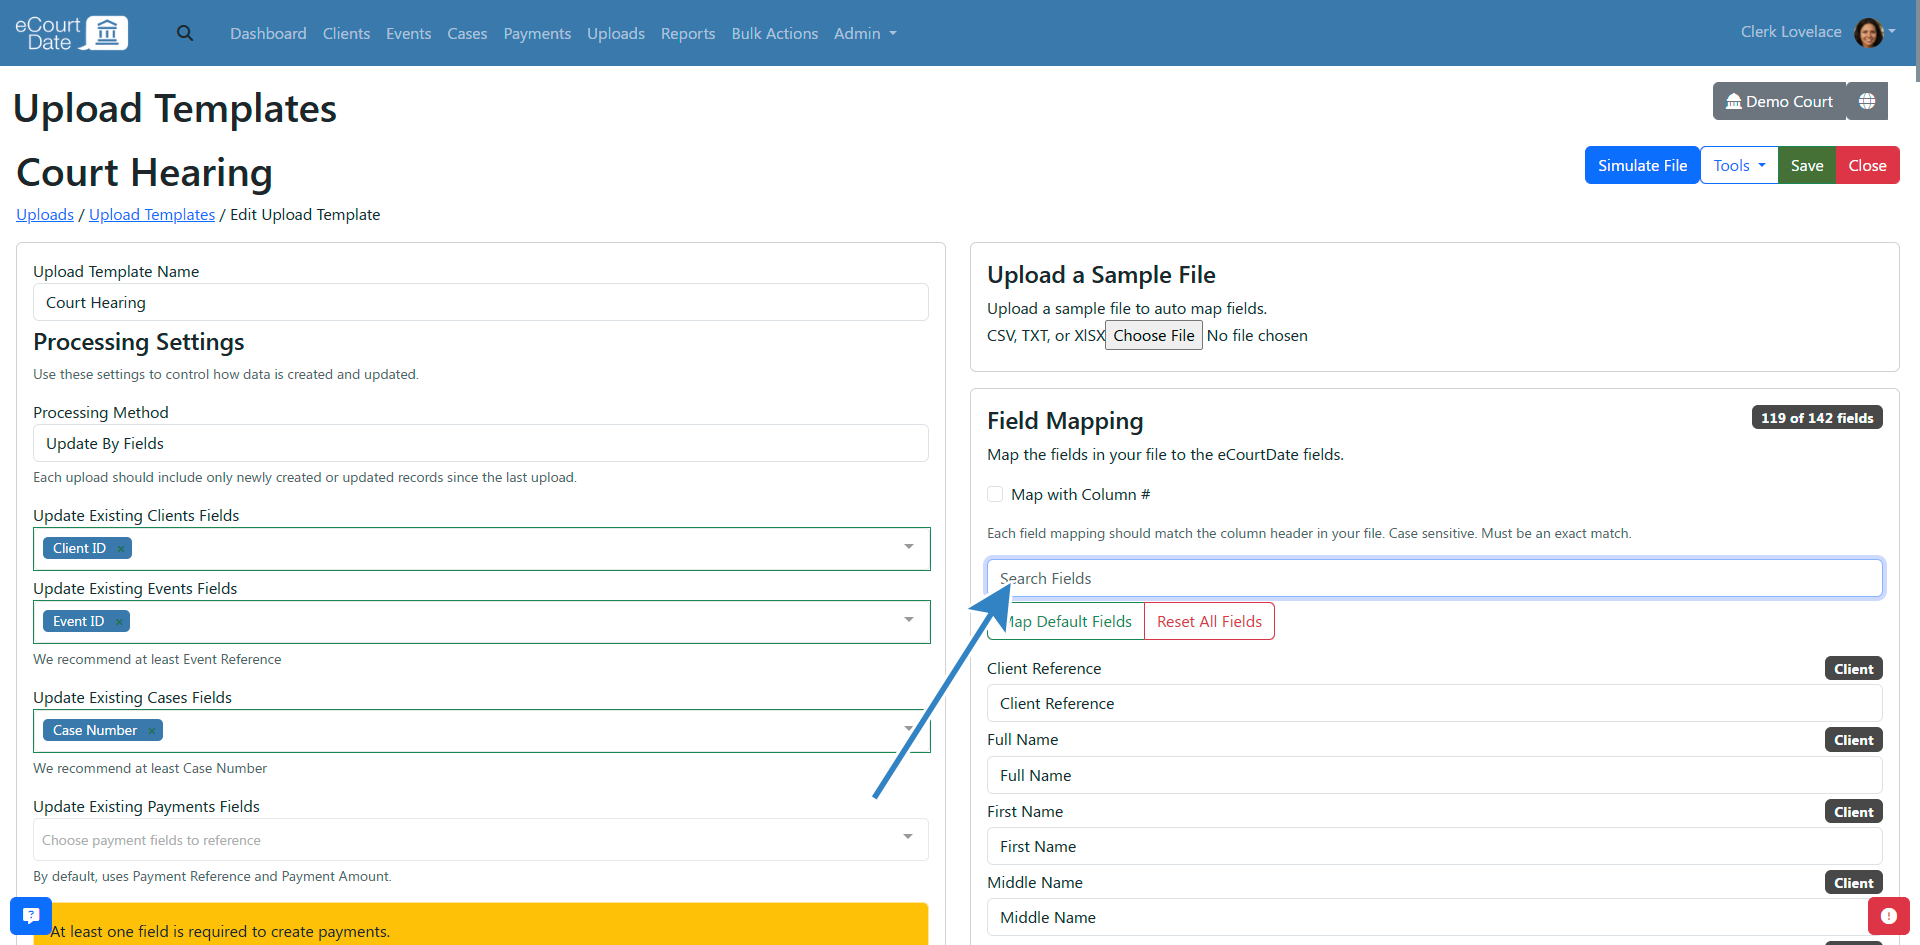
- Copy the column name from your file and paste it into the Flow field.
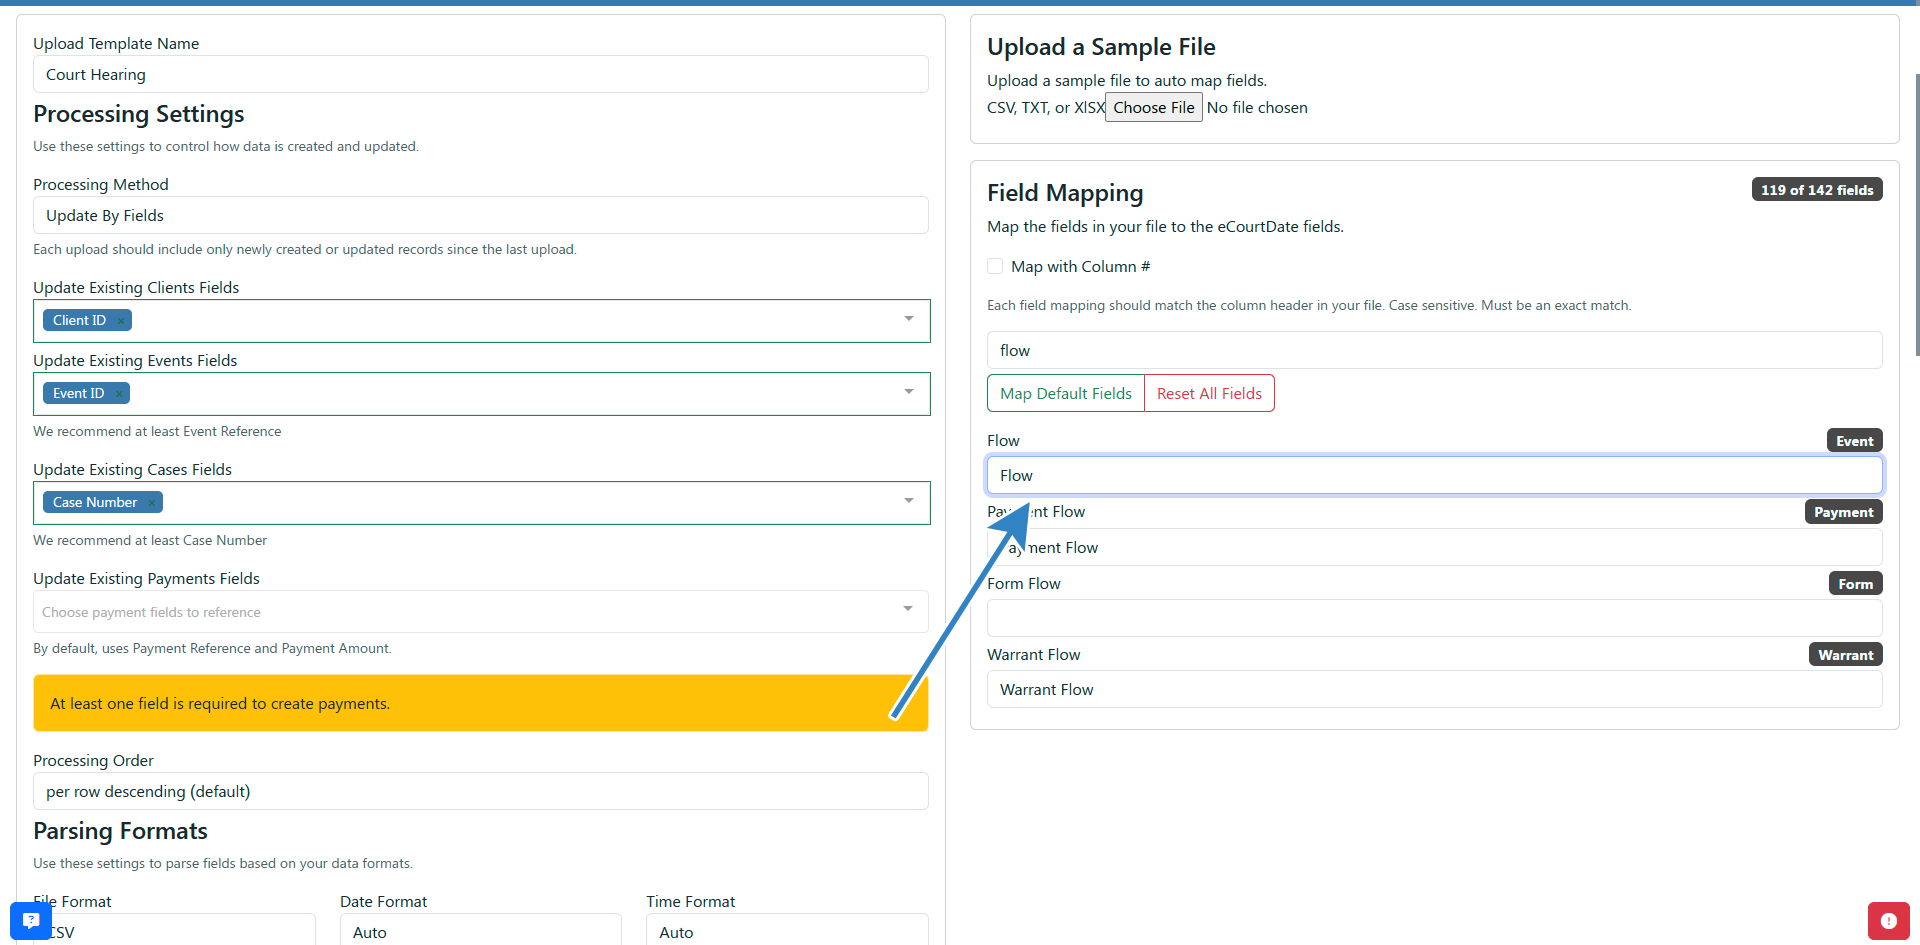
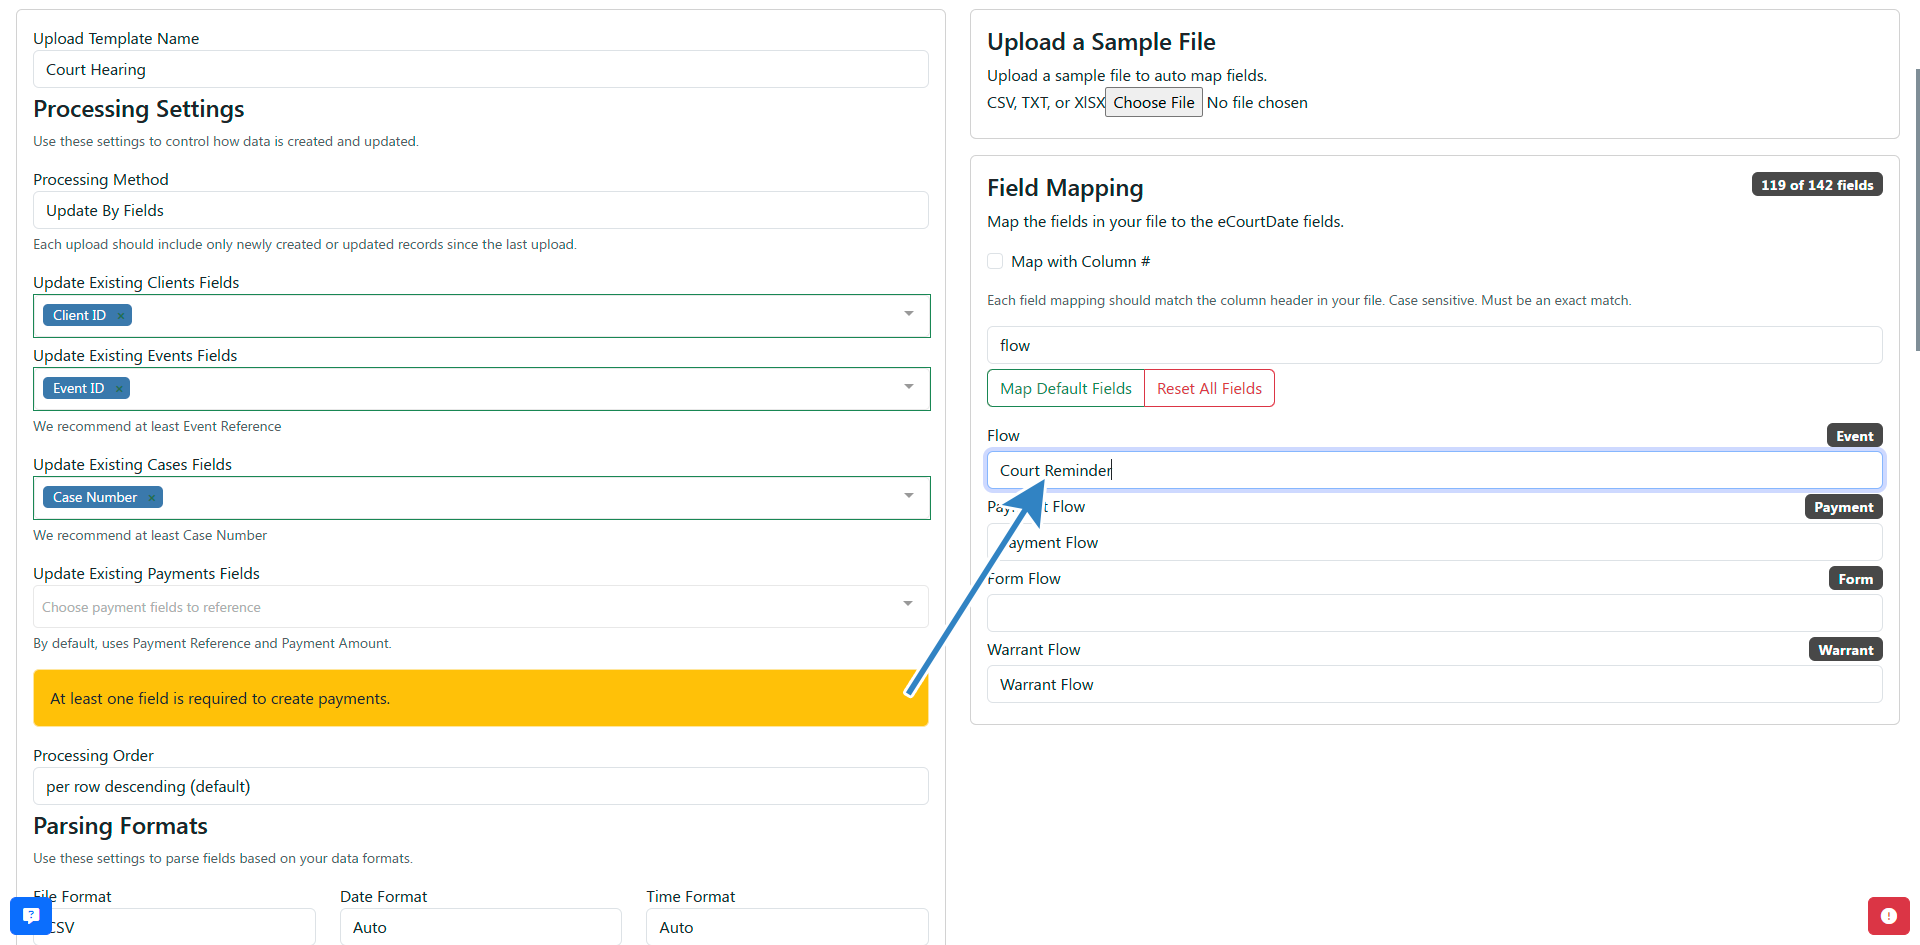
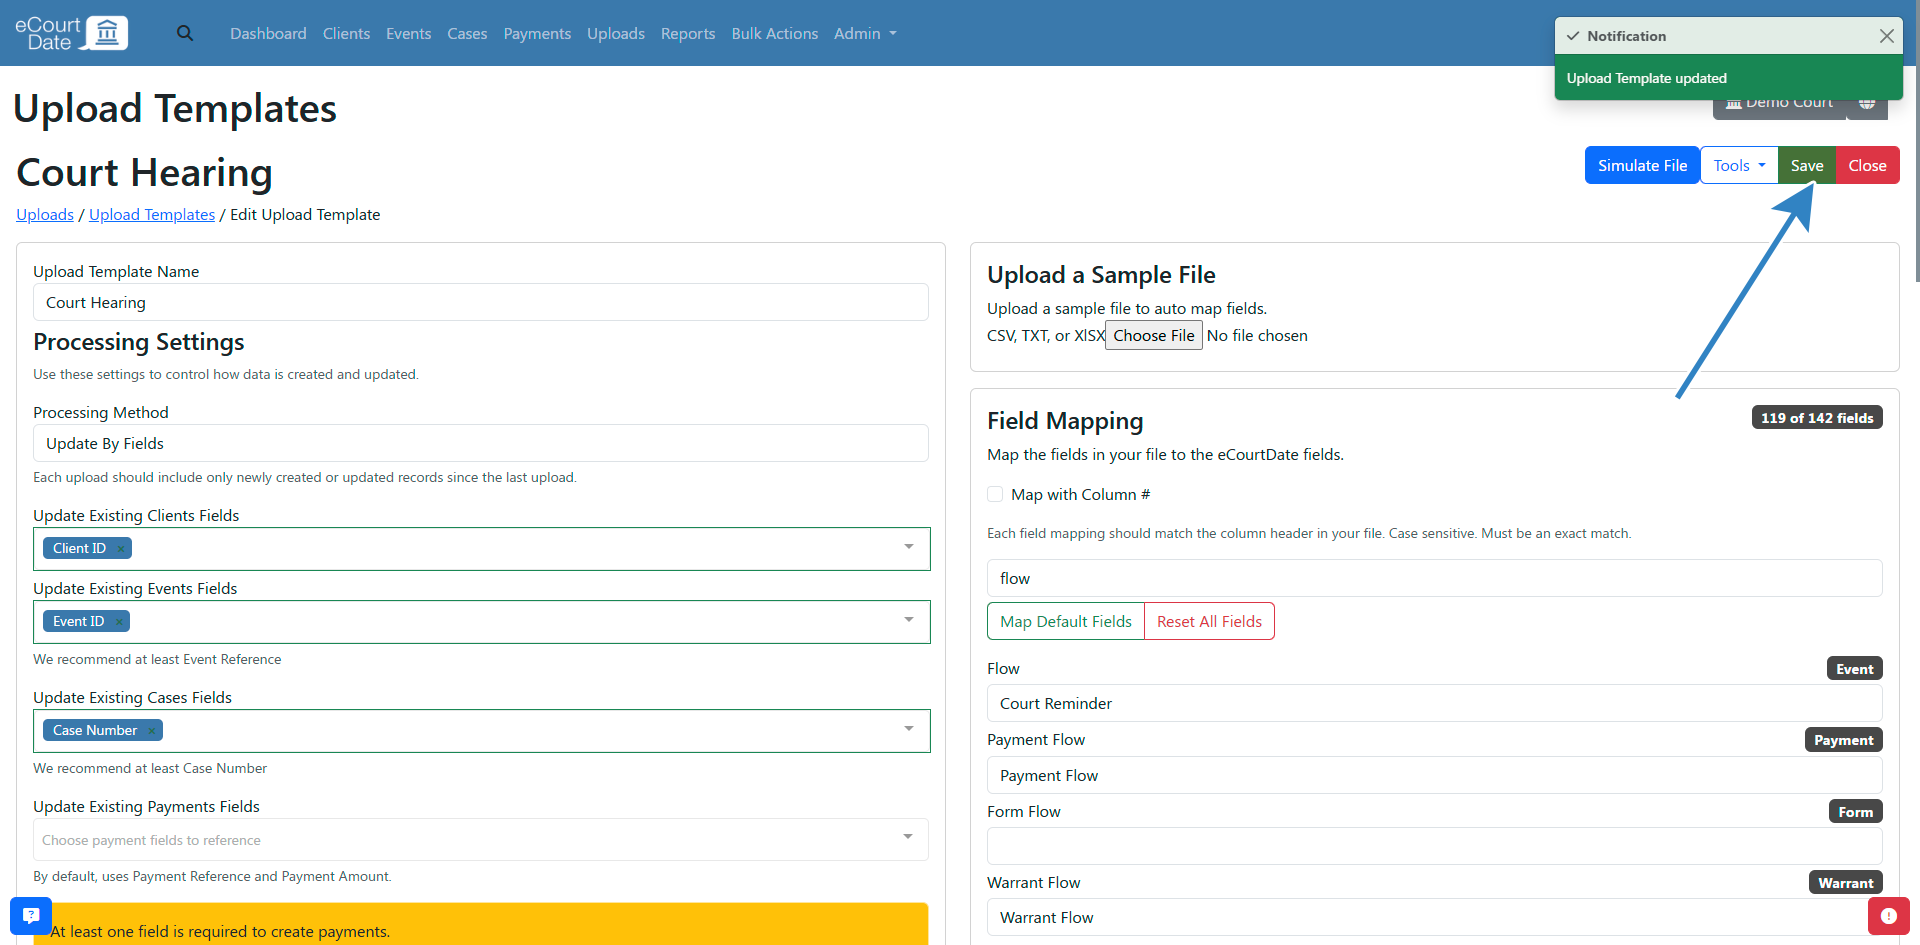
- Click Save.
The value in the flow column must match the Flow Reference or Flow Name field on the flow. For example, if your flow reference is "Court Hearing", each file row needs "Court Hearing" in the flow column. If no matching flow is found, the system uses the upload template's Default Flow setting (if configured), then falls back to the record type's default flow (if one exists).
What to Expect
After creating and assigning a flow, messages are automatically generated and scheduled based on the triggers you configured. When a record is created, updated, or reaches a trigger date, the corresponding message is queued for delivery. Changes to a flow take effect for newly created or updated records immediately. Use Sync Messages to apply changes to existing records.
Best Practices
- Start with a sample flow and customize it rather than building from scratch.
- Use Simulate Mode to test new flows before going live with real client messages.
- Keep flow names descriptive (e.g., "Court Hearing Reminders" or "Payment Due Notices") so your team can identify them quickly.
- Set a Default flow for each record type to ensure no records are left without automated messages.
- Preview messages with actual client data before enabling live delivery.
Frequently Asked Questions
Q: Can one flow apply to multiple record types (e.g., events and payments)?
A: No. Each flow is tied to a single record type. Create separate flows for events, payments, cases, and other record types.
Q: What happens if I update a flow that is already assigned to existing records?
A: New or updated records will automatically use the latest flow version. For existing records, click Tools > Sync Messages to apply the changes.
Q: How does Simulate Mode work?
A: When enabled, messages are created in the system but are not actually sent to clients. This lets you verify message content and timing without impacting real clients.
Q: Can I assign multiple flows to a single record?
A: No. Each record can only have one flow assigned at a time. If you need multiple message sequences, add all the messages to a single flow using different triggers.
Q: What is the Auto Translate feature?
A: After entering your English message, click Auto Translate to automatically generate translations for all languages enabled on your agency. You should review translations for accuracy before going live.
Troubleshooting
Issue: Messages are not being sent for a record with an assigned flow.
Symptoms: The record has a flow assigned but no messages appear on the record's detail page.
Solution:
- Open the record and click Tools > Sync Messages to force a resync.
- Verify the flow's triggers match the record's current status and dates.
- Check that Simulate Mode is not enabled on the flow.
- Confirm the client has a valid phone number or email address for the message channel.
Issue: Flow messages are not updating after editing the flow.
Symptoms: Existing records still show the old message content after you update the flow.
Solution:
- Open the flow and click Tools > Sync Messages to apply changes to all assigned records.
- Alternatively, open individual records and click Tools > Sync Messages to update them one at a time.
Issue: Uploaded records are not picking up the correct flow.
Symptoms: Records imported via file upload have no flow or the wrong flow assigned.
Solution:
- Verify that the flow column value in your file matches the Flow Reference or Flow Name exactly.
- Check the upload template's Default Flow setting if you are using auto-assign.
- Ensure the flow's record type matches the upload template's record type.
Important: If you continue to experience issues after following these troubleshooting steps, sign in to eCourtDate and create a ticket by clicking the ticket button in the bottom right corner of the screen.
Related Articles
Flows let you automate a sequence of messages to clients, ensuring timely reminders and updates about events, payments, cases, and more without manual effort.
### Overview
A flow is a reusable automation that sends a series of messages to clients based on triggers you define. Flows are ideal when you need to send multiple messages tied to a specific record type, such as a court hearing reminder three days before the event followed by a day-of confirmation.
- **What it does:** Sends automated, sequenced messages tied to events, payments, cases, files, forms, tasks, or warrants.
- **Why it matters:** Reduces manual outreach, ensures consistent communication, and keeps clients informed at every stage.
- **Who uses it:** Agency administrators and staff responsible for client communications.
- **Expected outcome:** Clients receive the right message at the right time, automatically.
Each flow applies to a single record type. For example, an event flow can trigger messages when the event is created, when its status changes, or relative to the event date.
### Prerequisites
Before creating a flow, make sure you have:
- An active eCourtDate agency on [staging](https://staging.ecourtdate.com) or [production](https://app.ecourtdate.com)
- Super admin access, or the **Create Flows** and **Update Flows** permissions
- At least one record type (events, payments, cases, etc.) that you want to automate messages for
- Message content prepared, including any translations if your agency supports multiple languages
### How-To Steps
#### Import a Sample Flow
Importing a sample flow is the fastest way to get started.
1. Click **Admin** > **Messaging** in the top navigation bar.

2. Click the **Sample Templates** tab.

3. Scroll down to the **Flows** section.

4. Click the **Import** button for the sample flow you want to use.

5. Review the newly created flow on the redirect page.

6. Edit the flow to customize it for your agency or begin assigning it to records.
#### Create a Flow from Scratch
1. Click **Admin** > **Messaging** in the top navigation bar.

2. Click the **Flows** tab.

3. Fill out the **Create Flow** form with a name, record type, and any other required fields.

4. Click the **Create** button.

5. Review the newly created flow on the redirect page.

6. Follow the steps below to add messages to your flow.
#### Create Messages for a Flow
1. In the **Create Flow Message** section, select an option under **Choose a Trigger**.

2. Configure the trigger details. For example, to send a message 3 days before an event date, select **By Event Date**, set the **Difference from Event Date** to **3**, the **Unit** to **Days**, and the **Operation** to **Before**.
3. Select any **Enabled Statuses** if you only want the message sent for records with certain statuses.
4. Enter the **English Subject** and **English Message** fields.

5. (Optional) Fill in additional multilingual fields. Once you have an English message, click the **Auto Translate** button to translate to your agency's other enabled languages.

6. Click the **Save** button to apply your changes.

#### Set a Default Flow
Enabling the **Default** option on a flow automatically assigns it to any new records of that type unless a different flow is specified.
1. Click the **Edit** button for the flow you want to make default.

2. Select the **Default** checkbox.

3. Click the **Save** button.

All newly created records will be assigned to this flow unless they are assigned to a different flow.
#### Update a Flow Already in Use
1. Click the **Edit** button for the flow you want to update.

2. Click the **Edit Message** button for the message you want to change.

3. Make your changes to the message content.
4. Click the **Save** button.

Records created or updated after the change will use the updated flow version. To apply changes to existing records, click **Tools** > **Sync Messages**.

You can also sync messages for a single record by opening the record, clicking **Tools**, and selecting **Sync Messages**. This is recommended when testing new changes.
#### Preview a Flow
1. Open the flow and click the **Preview** button.

2. Select the **Simulate Client** checkbox to see a preview with sample client data.

3. Alternatively, use **Search Clients** to find and preview for a specific client.
4. If the client has related records (events, payments), the preview will list them.
5. Click the **Preview** button to view the rendered messages.

#### Enable Simulate Mode
Simulate mode creates messages without actually sending them, allowing you to test your flow safely.
1. Open the flow for editing.
2. Enable the **Simulate Mode** checkbox.
3. Click the **Save** button.

All messages assigned to this flow will be created in simulate mode and will not be delivered to clients.
#### Assign a Flow Manually
Once you have created a flow, you can assign it directly when creating or editing a record.
**Events:**
1. Click **Events** in the top navigation bar.

2. Fill in the **Create Event** form.

3. Select the desired flow from the **Flow** dropdown.

4. Click the **Create** button.

5. Click **Edit** to view the event with the flow assigned and messages synced.

6. If you update the event and click **Save**, messages automatically resync based on the new information.

**Payments:**
1. Click **Payments** in the top navigation bar.

2. Fill in the **Create Payment** form.

3. Select the desired flow from the **Flow** dropdown.

4. Click the **Create** button.

5. Click **Edit** to view the payment with the flow assigned and messages synced.

6. If you update the payment and click **Save**, messages automatically resync.

7. (Optional) If you change the flow itself, click **Tools** > **Sync Messages** to update the record.

**Warrants:**
1. Click **Cases** in the top navigation bar.

2. Fill in the **Create Warrant** form.

3. Select the desired flow from the **Flow** dropdown.

4. Click the **Create** button.
#### Assign a Flow through Uploads
You can also assign flows when importing records via file uploads. Make sure you have an upload template created before proceeding.
1. Click **Uploads** in the top navigation bar.

2. Click the **Upload Templates** tab.
3. Click the **Edit** button for the upload template you want to configure.

**Option 1: Auto-assign a default flow.** You do not need a flow column in your file.
1. In the **Auto Populate Fields** section, set the **Default Flow** field to the flow you want.

2. Click **Save**.

**Option 2: Map a flow column from your file.** Each row in your file specifies which flow to use.
1. In the **Field Mapping** section, type **Flow** in the **Search Fields** box to filter for flow fields.

2. Copy the column name from your file and paste it into the **Flow** field.


3. Click **Save**.

The value in the flow column must match the **Flow Reference** or **Flow Name** field on the flow. For example, if your flow reference is "Court Hearing", each file row needs "Court Hearing" in the flow column. If no matching flow is found, the system uses the upload template's **Default Flow** setting (if configured), then falls back to the record type's default flow (if one exists).
### What to Expect
After creating and assigning a flow, messages are automatically generated and scheduled based on the triggers you configured. When a record is created, updated, or reaches a trigger date, the corresponding message is queued for delivery. Changes to a flow take effect for newly created or updated records immediately. Use **Sync Messages** to apply changes to existing records.
### Best Practices
- Start with a sample flow and customize it rather than building from scratch.
- Use **Simulate Mode** to test new flows before going live with real client messages.
- Keep flow names descriptive (e.g., "Court Hearing Reminders" or "Payment Due Notices") so your team can identify them quickly.
- Set a **Default** flow for each record type to ensure no records are left without automated messages.
- Preview messages with actual client data before enabling live delivery.
### Frequently Asked Questions
**Q: Can one flow apply to multiple record types (e.g., events and payments)?**
A: No. Each flow is tied to a single record type. Create separate flows for events, payments, cases, and other record types.
**Q: What happens if I update a flow that is already assigned to existing records?**
A: New or updated records will automatically use the latest flow version. For existing records, click **Tools** > **Sync Messages** to apply the changes.
**Q: How does Simulate Mode work?**
A: When enabled, messages are created in the system but are not actually sent to clients. This lets you verify message content and timing without impacting real clients.
**Q: Can I assign multiple flows to a single record?**
A: No. Each record can only have one flow assigned at a time. If you need multiple message sequences, add all the messages to a single flow using different triggers.
**Q: What is the Auto Translate feature?**
A: After entering your English message, click **Auto Translate** to automatically generate translations for all languages enabled on your agency. You should review translations for accuracy before going live.
### Troubleshooting
**Issue:** Messages are not being sent for a record with an assigned flow.
**Symptoms:** The record has a flow assigned but no messages appear on the record's detail page.
**Solution:**
1. Open the record and click **Tools** > **Sync Messages** to force a resync.
2. Verify the flow's triggers match the record's current status and dates.
3. Check that **Simulate Mode** is not enabled on the flow.
4. Confirm the client has a valid phone number or email address for the message channel.
**Issue:** Flow messages are not updating after editing the flow.
**Symptoms:** Existing records still show the old message content after you update the flow.
**Solution:**
1. Open the flow and click **Tools** > **Sync Messages** to apply changes to all assigned records.
2. Alternatively, open individual records and click **Tools** > **Sync Messages** to update them one at a time.
**Issue:** Uploaded records are not picking up the correct flow.
**Symptoms:** Records imported via file upload have no flow or the wrong flow assigned.
**Solution:**
1. Verify that the flow column value in your file matches the **Flow Reference** or **Flow Name** exactly.
2. Check the upload template's **Default Flow** setting if you are using auto-assign.
3. Ensure the flow's record type matches the upload template's record type.
> **Important:** If you continue to experience issues after following these troubleshooting steps, sign in to eCourtDate and create a ticket by clicking the ticket button in the bottom right corner of the screen.
### Related Articles
- [How to Create an Auto Message](/how-to-create-an-auto-message)
- [How to Manage Events](/how-to-manage-events)
- [How to Create Events via Bulk Actions](/how-to-create-events-via-bulk-actions)
- [About eCourtDate Regions](/about-ecourtdate-regions)