Message Templates
How to Create an Auto Message
9 min read
Updated Feb 14, 2026
Auto messages allow you to send one-off or recurring messages to clients automatically based on triggers, or to pre-populate message content when sending manually or in bulk.
Auto messages allow you to send one-off or recurring messages to clients automatically based on triggers, or to pre-populate message content when sending manually or in bulk.
Overview
Auto messages in eCourtDate provide a flexible way to automate client communications. You can configure an auto message to fire when a specific event occurs (such as a client being created or a payment being received), on a recurring schedule, or only when triggered manually. Auto messages integrate with flows, bulk actions, and forms to give your agency a comprehensive messaging toolkit.
- Send automated messages when clients, events, payments, warrants, or form submissions are created or updated.
- Schedule recurring messages on a monthly, weekly, or daily basis based on client status.
- Use auto messages as reusable templates for manual one-off or bulk communications.
- Combine auto messages with flows to build complete multi-message sequences.
Prerequisites
Before creating an auto message, ensure you have the following:
- An eCourtDate staging or production agency
- Super admin access, or the Create Auto Messages and Update Auto Messages permissions
- At least one client record in the system for testing
How-To Steps
Step 1: Import a Sample Auto Message (Optional)
Importing a sample auto message is a quick way to get started.
- Go to Admin > Messaging in the top navigation bar.
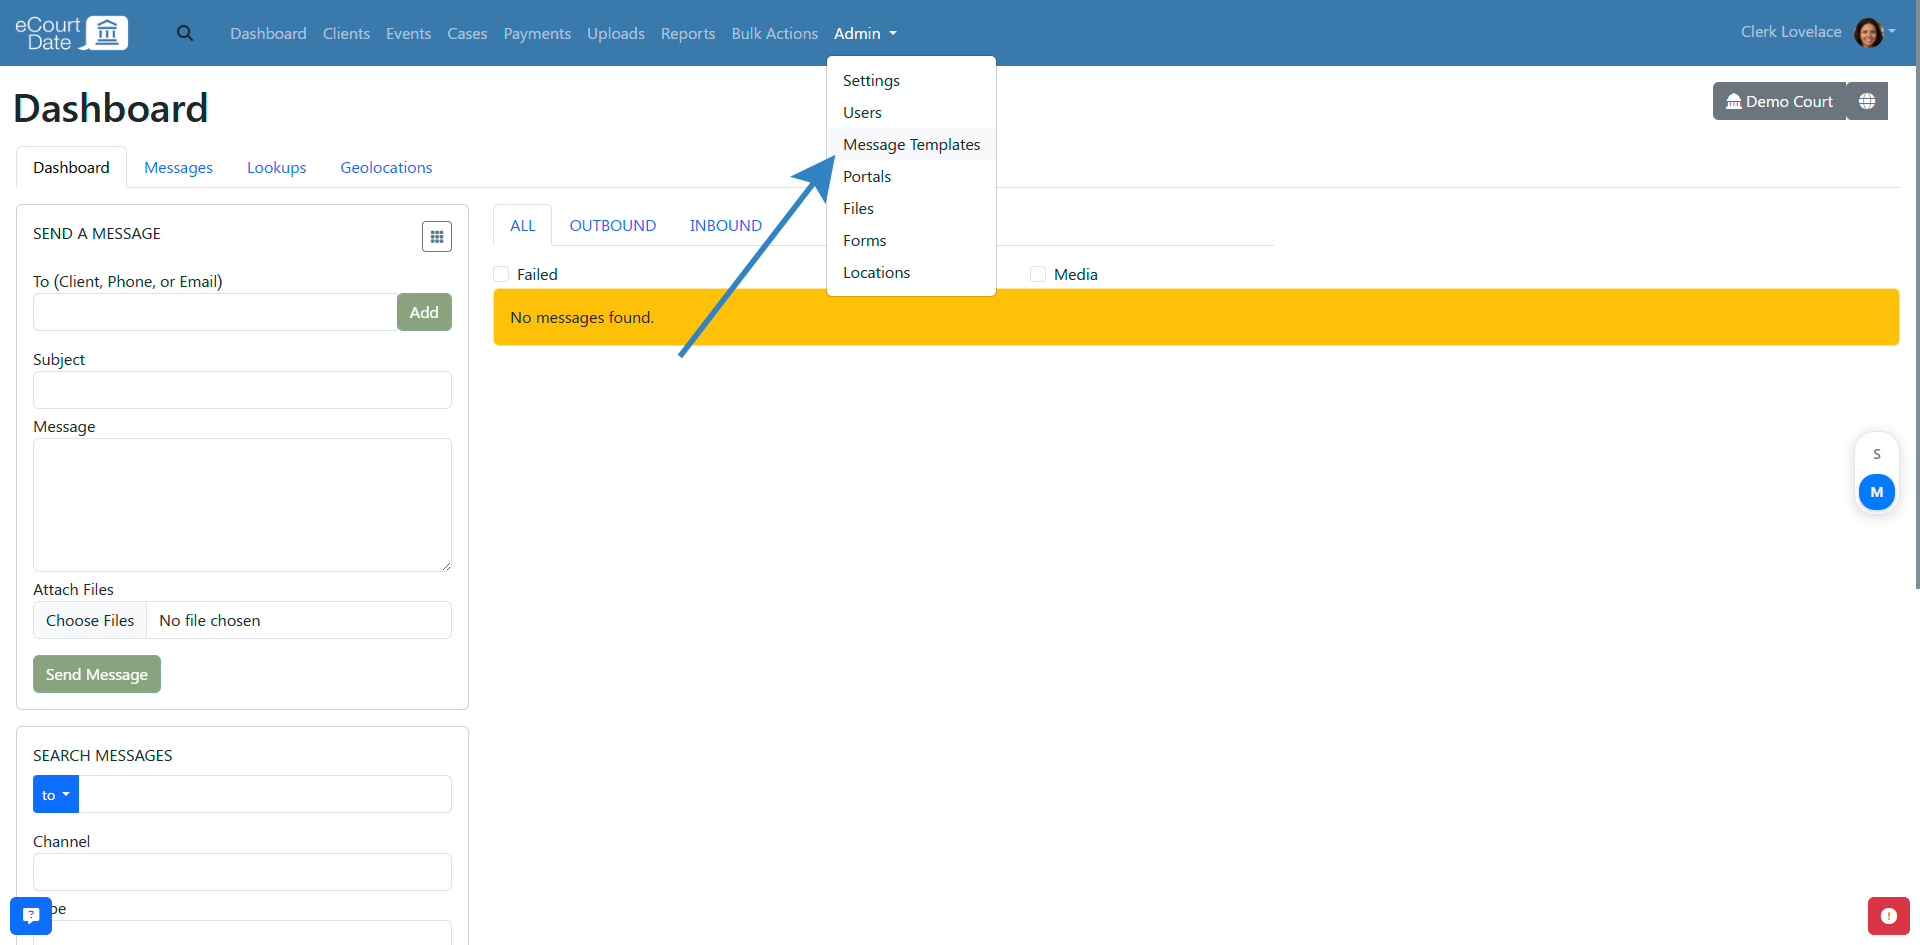
- Click the Sample Templates tab.
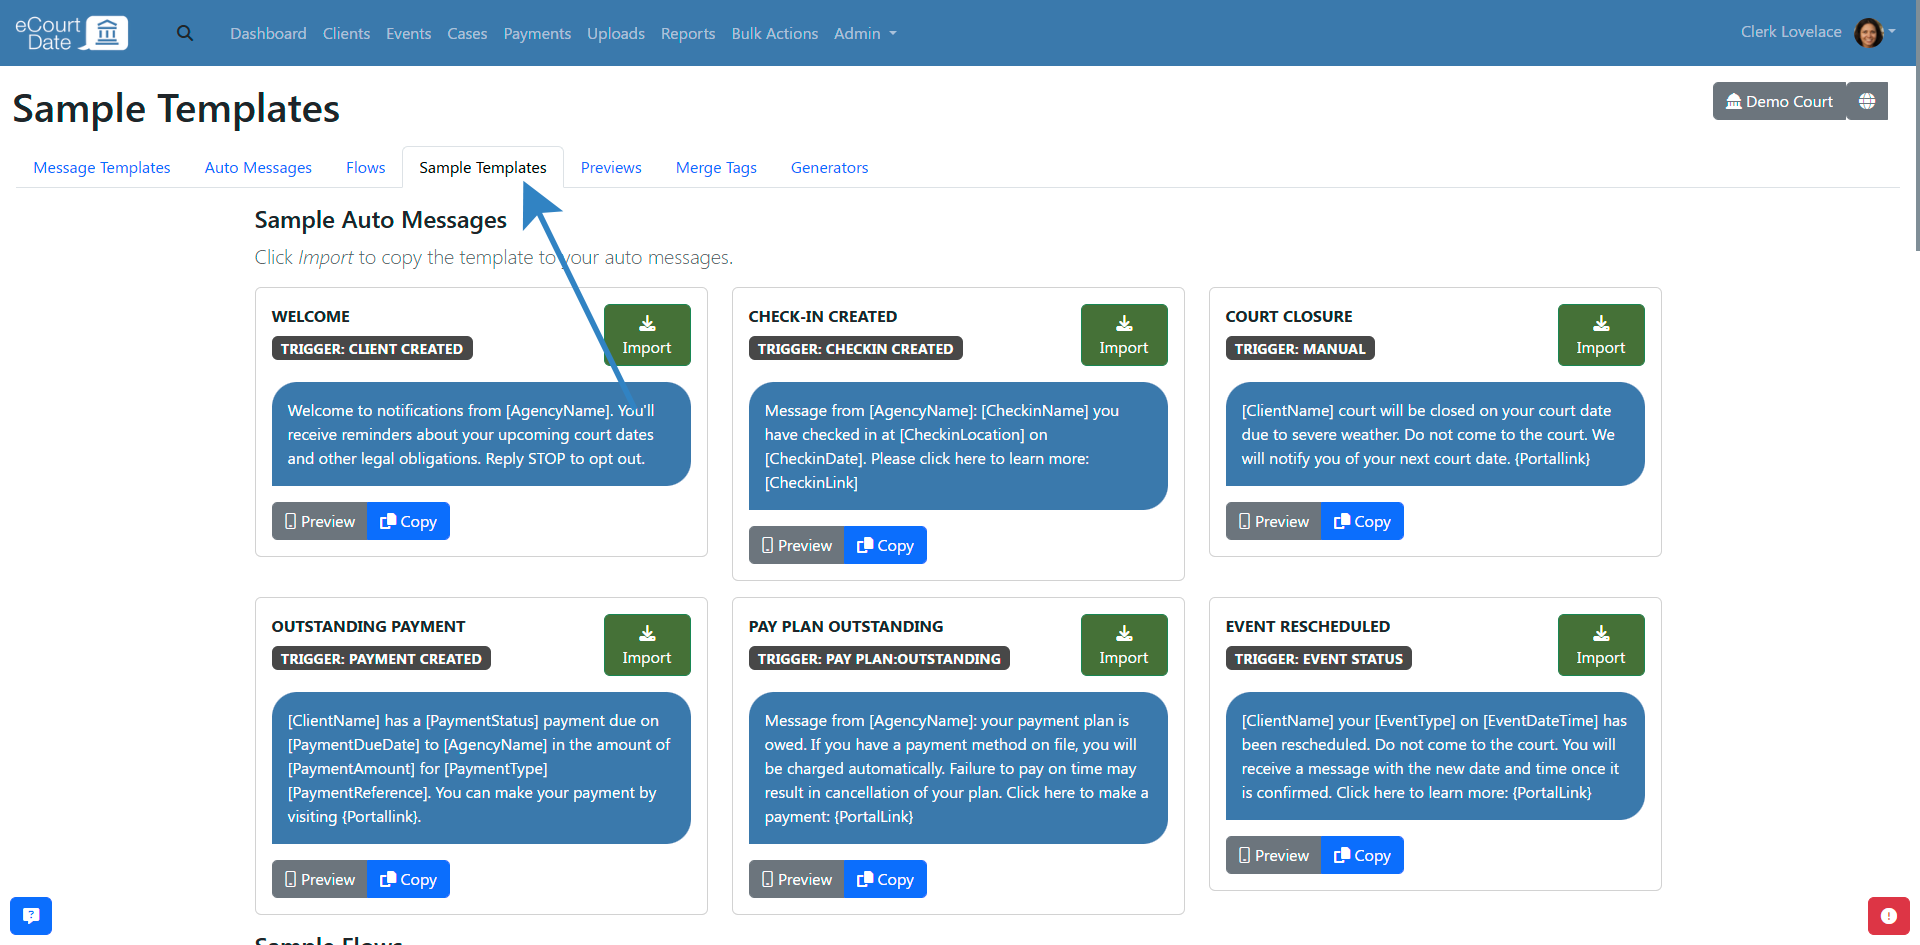
- Review the sample templates in the Auto Messages section.
- Click the Import button for the sample auto message you want to use.
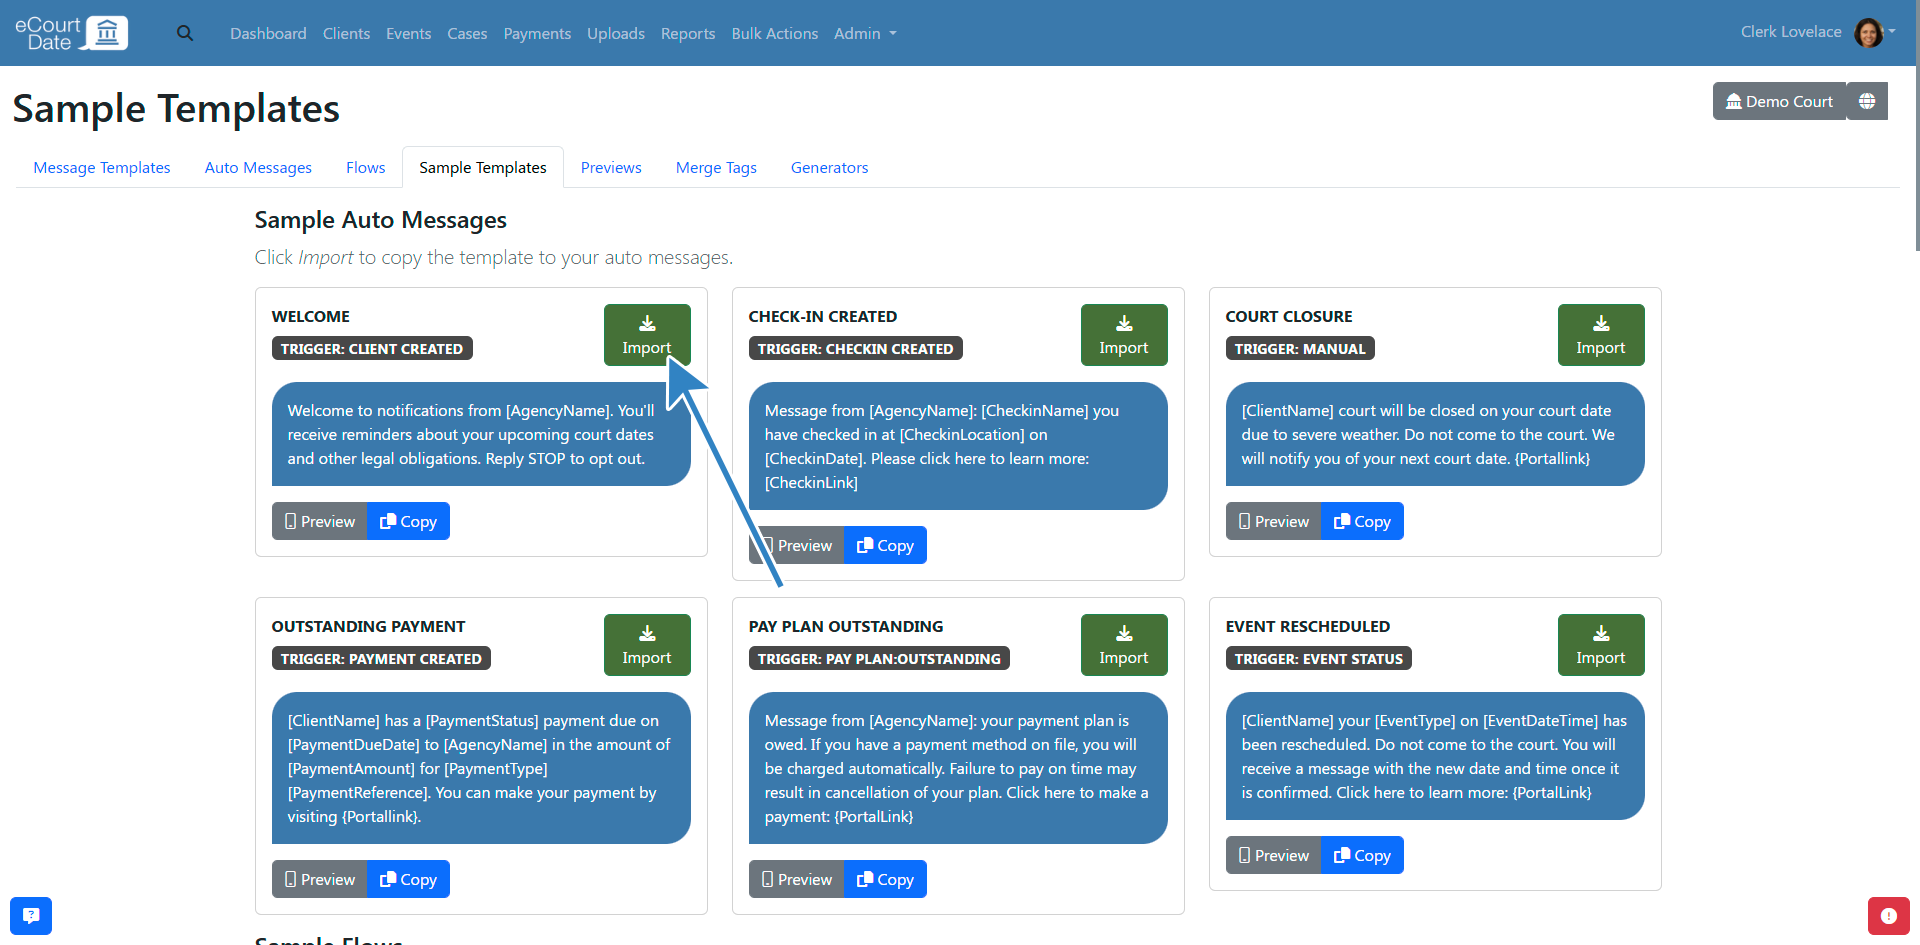
- You will be redirected to the newly created auto message.
- Edit the auto message to customize it for your agency or start assigning it to records.
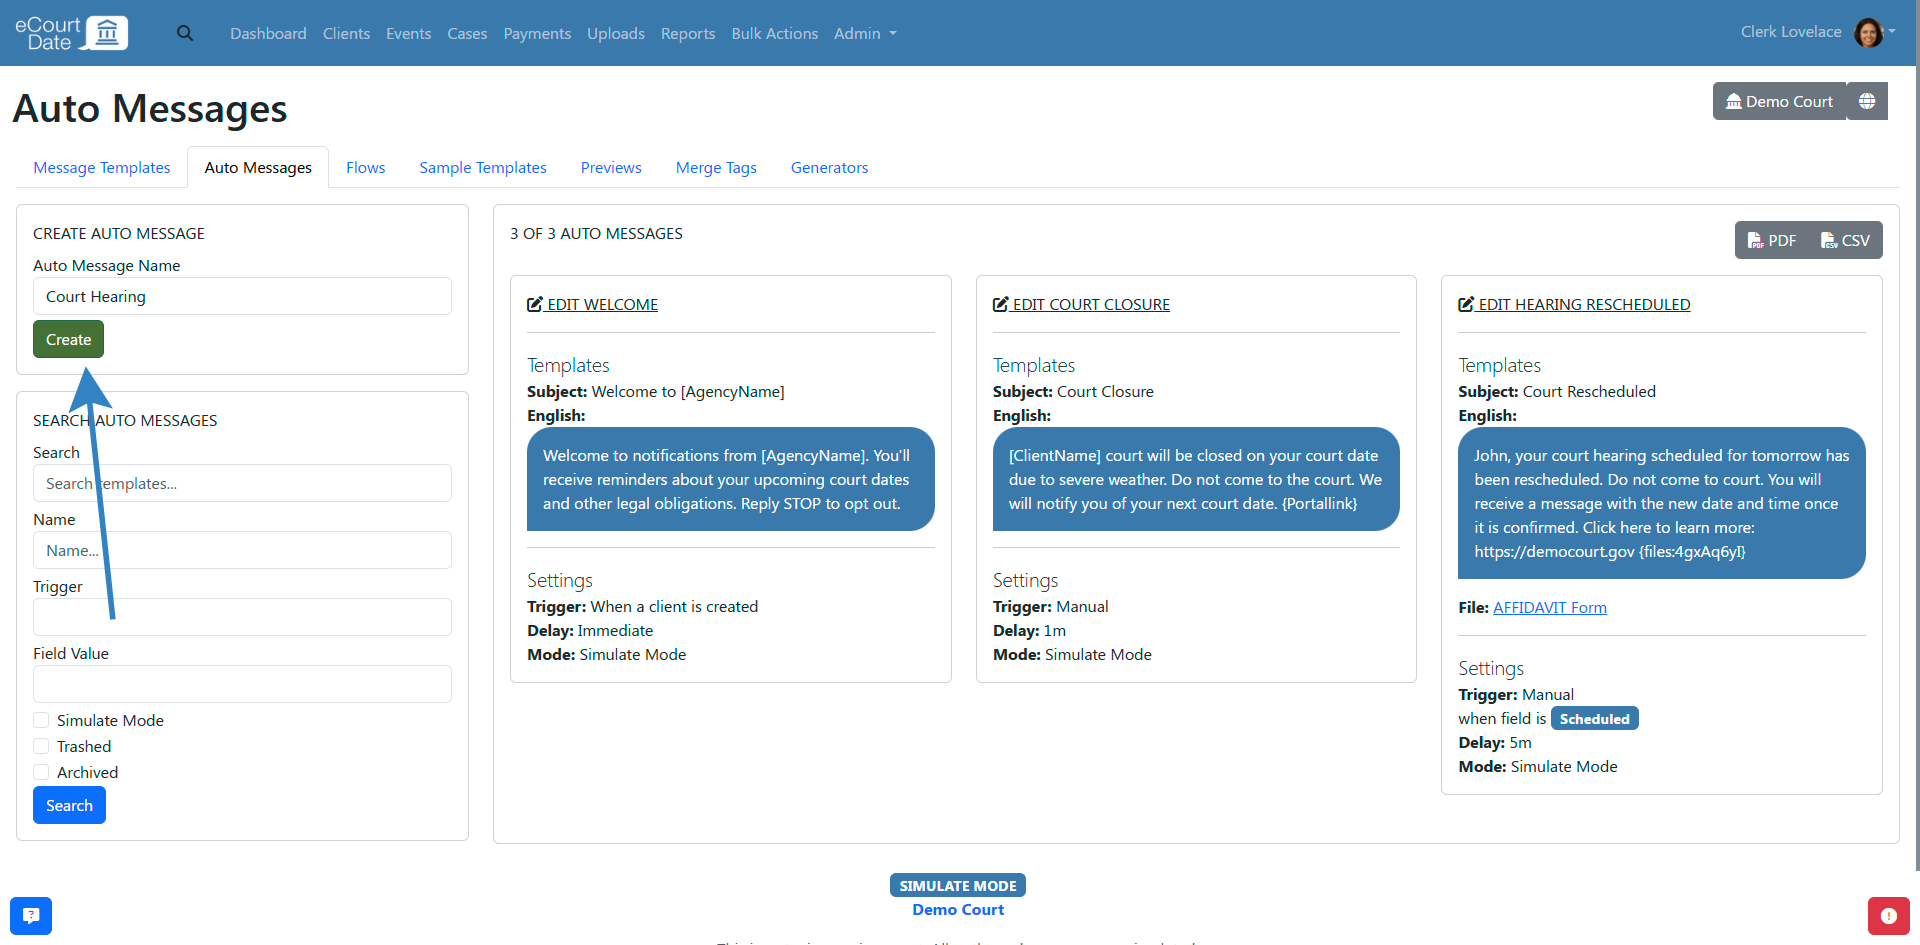
Step 2: Create an Auto Message from Scratch
- Go to Admin > Messaging in the top navigation bar.
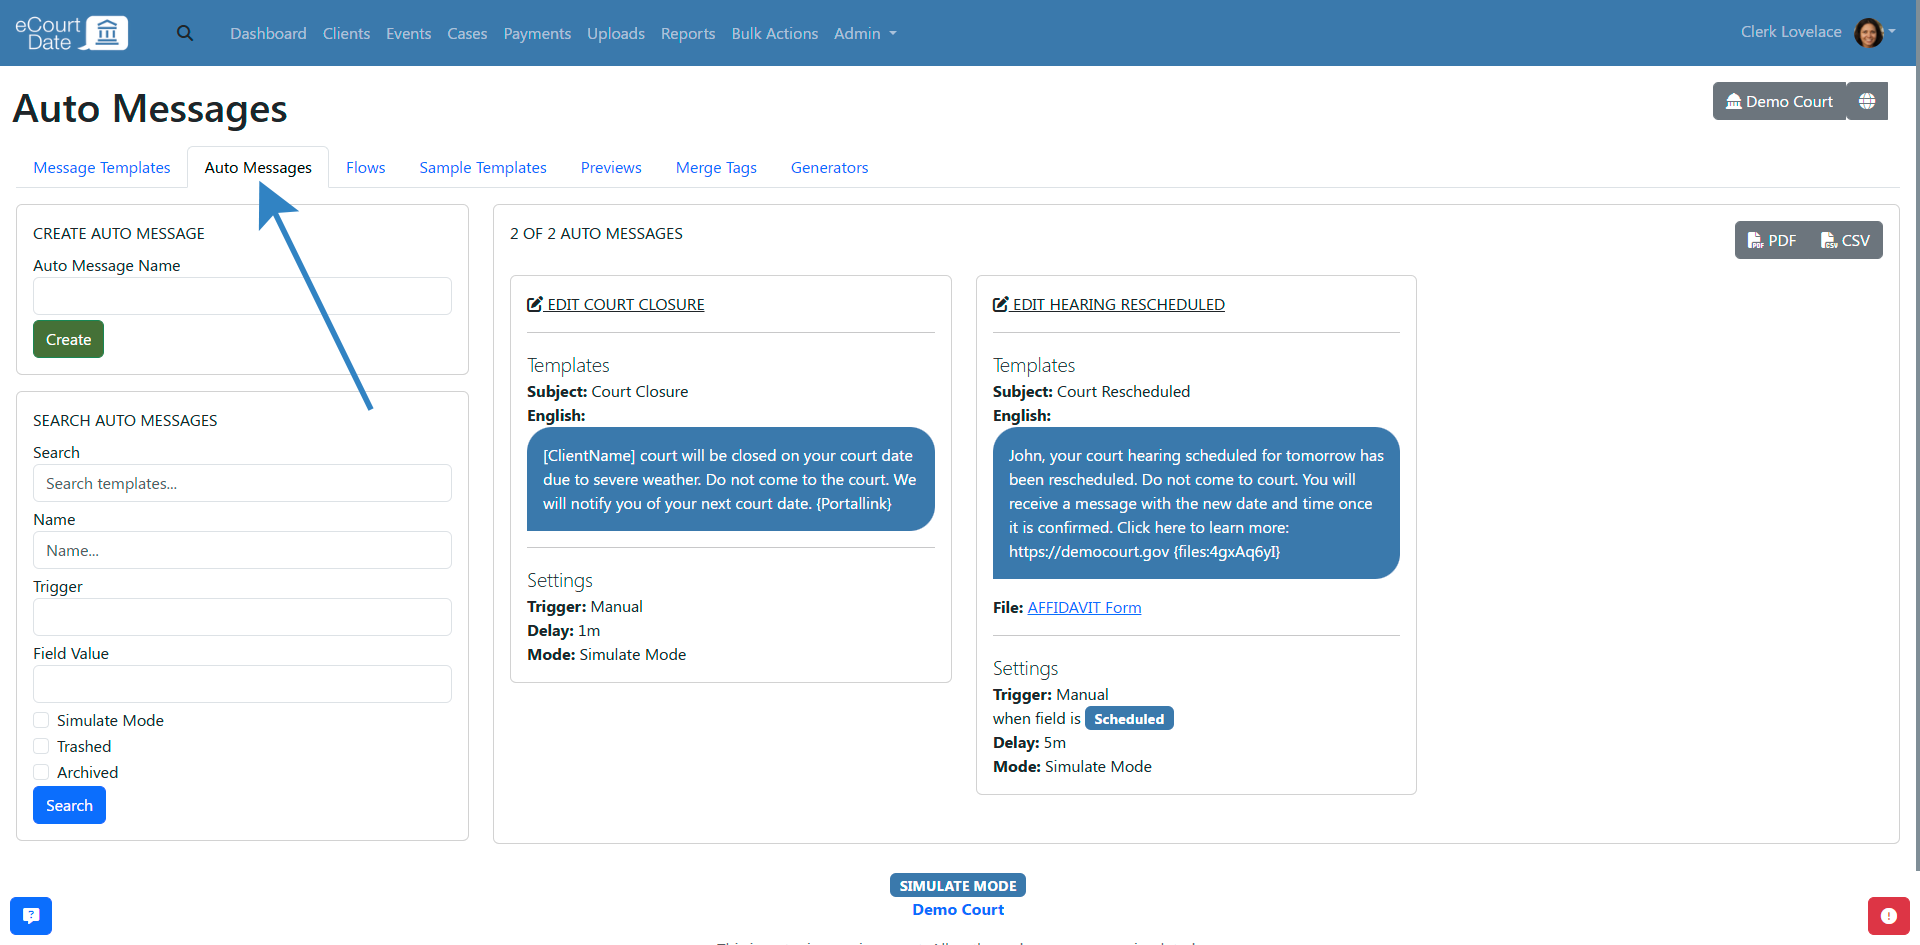
- Click the Auto Messages tab.
- Fill out the Create Auto Message form.

- Click the Create button.
- You will be redirected to the newly created auto message.
- Follow the steps below to edit and configure the auto message.

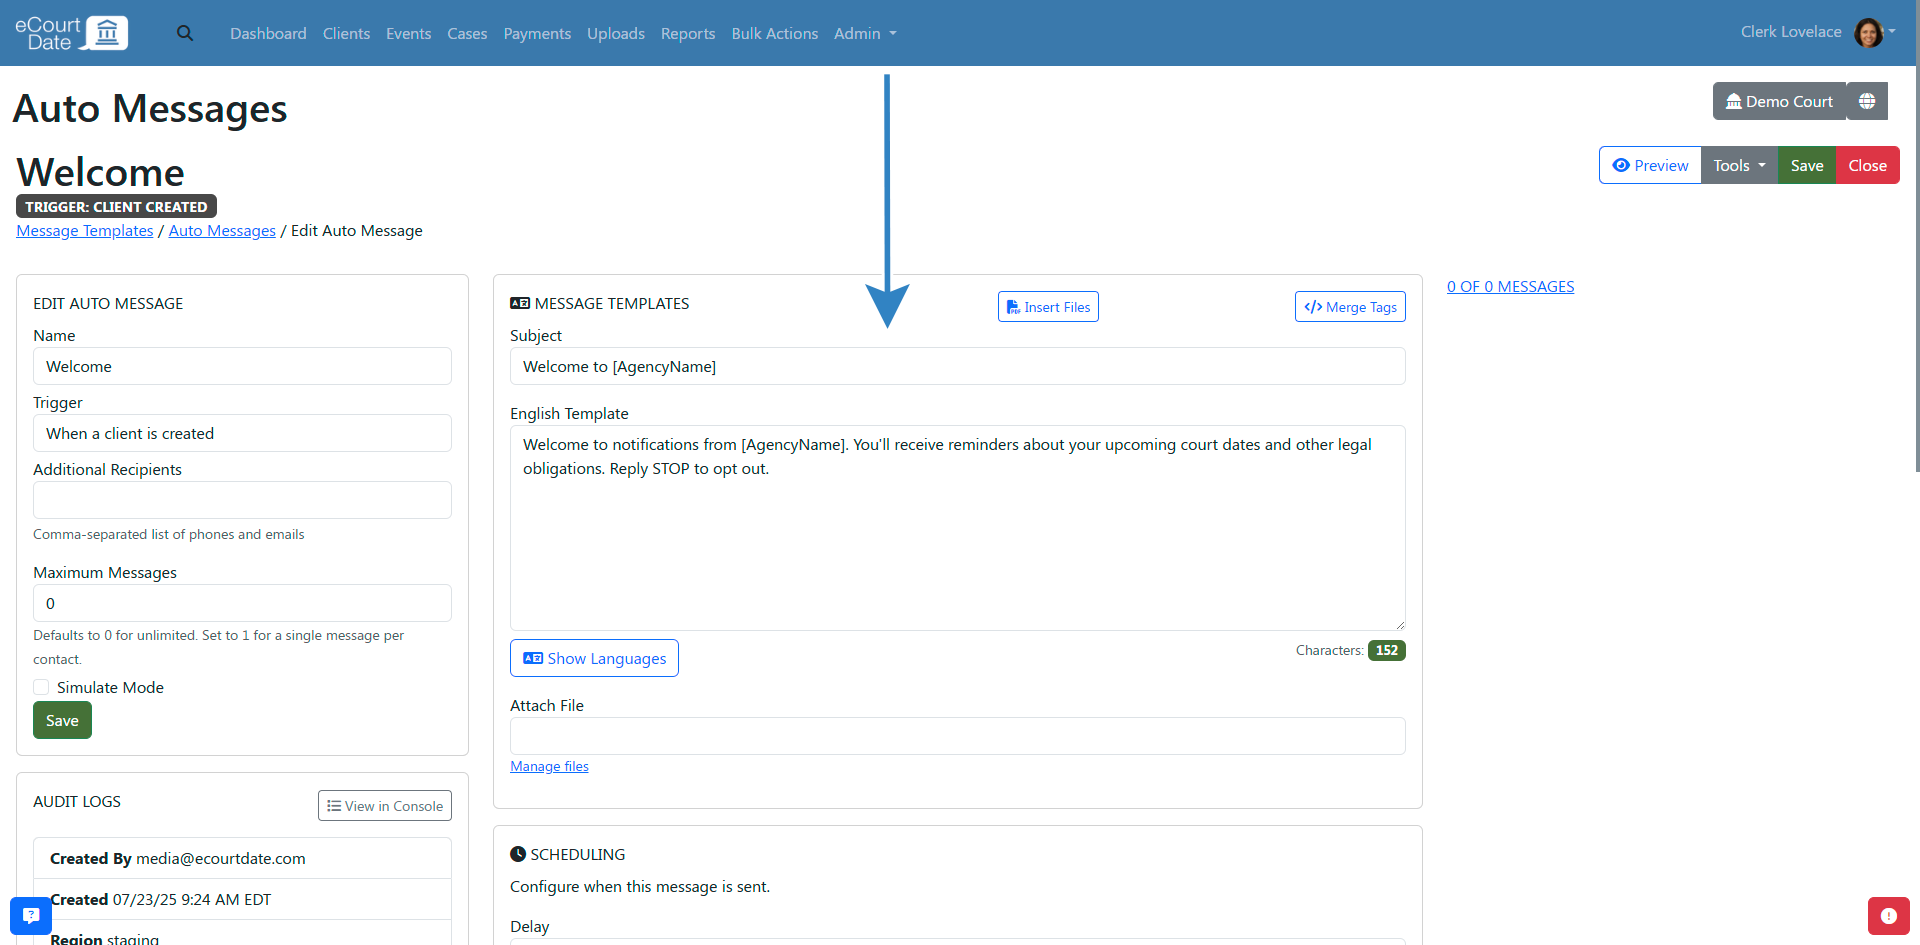
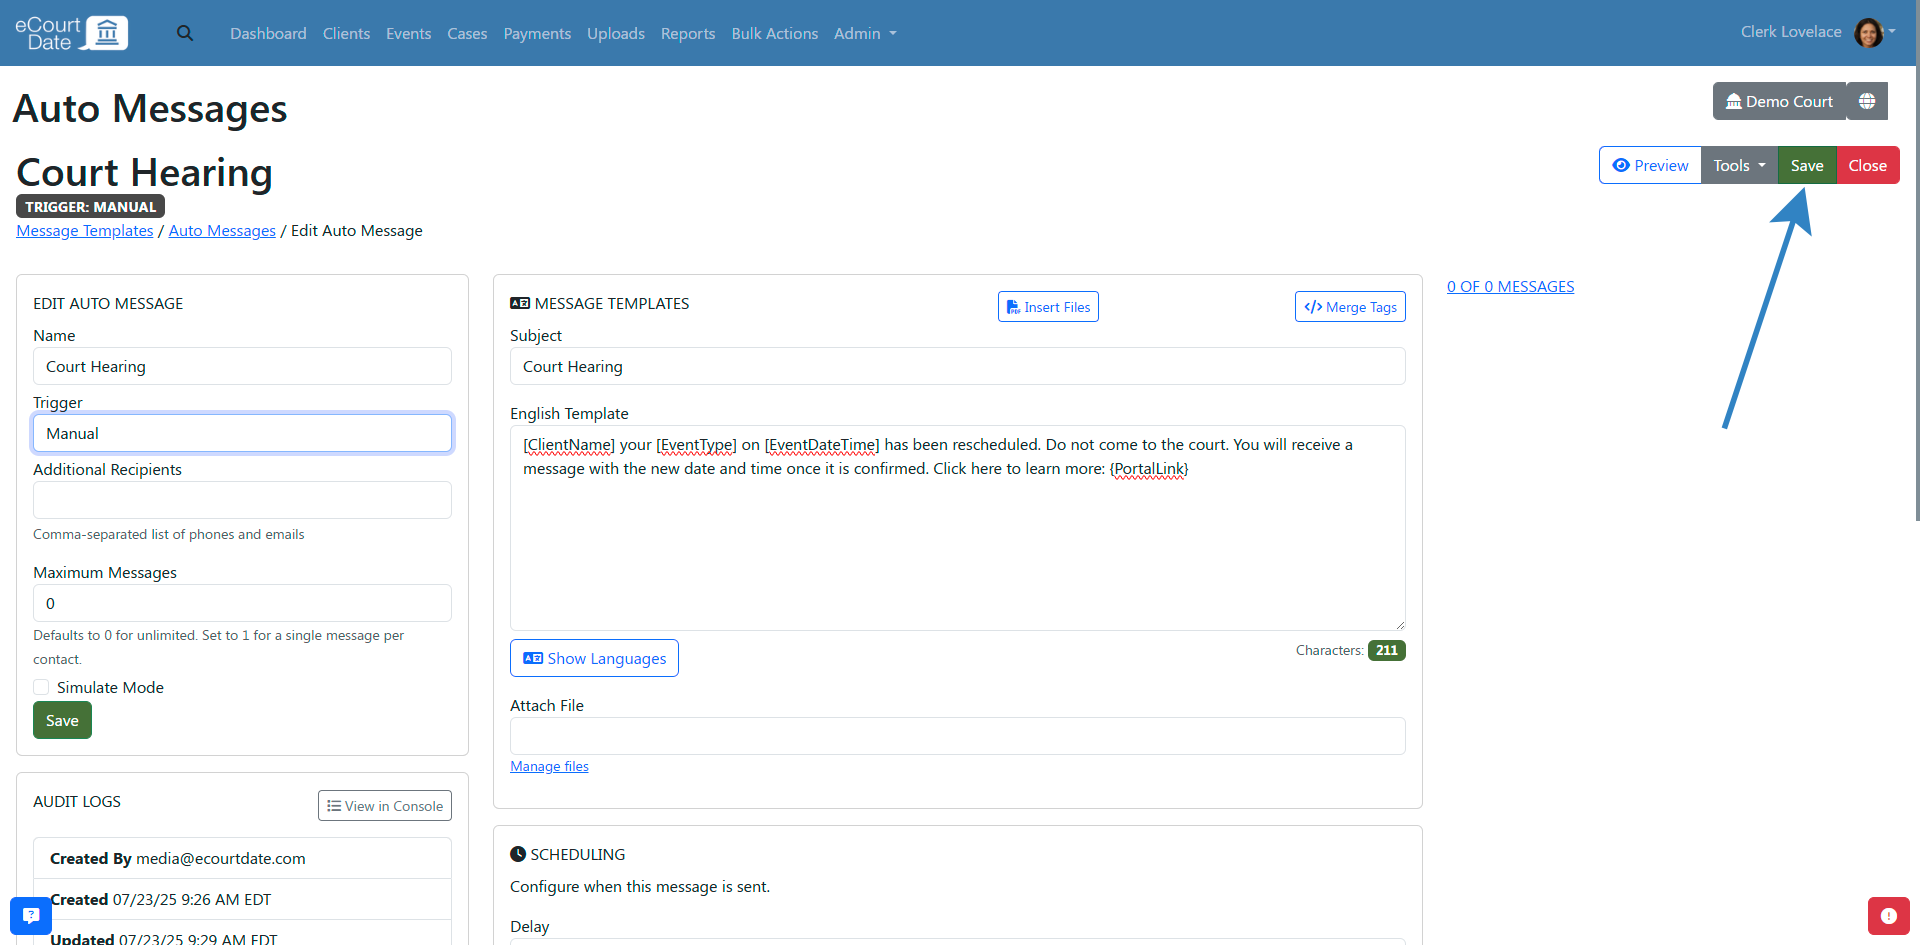
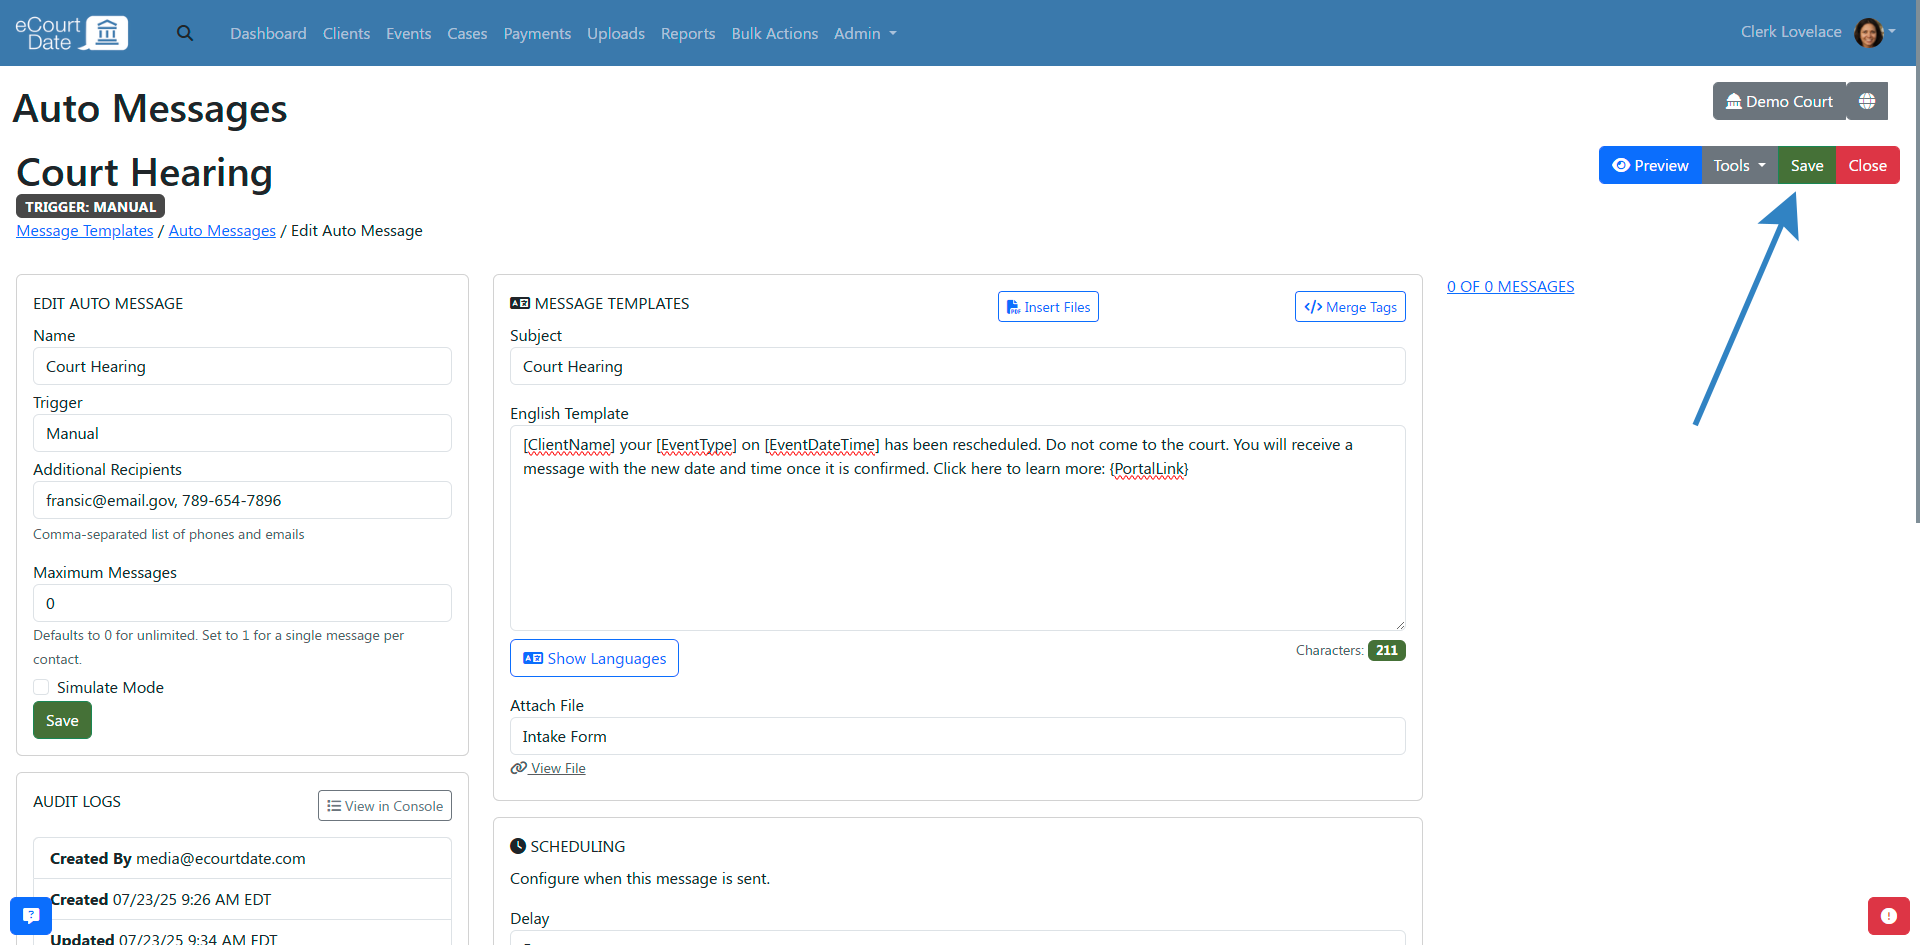
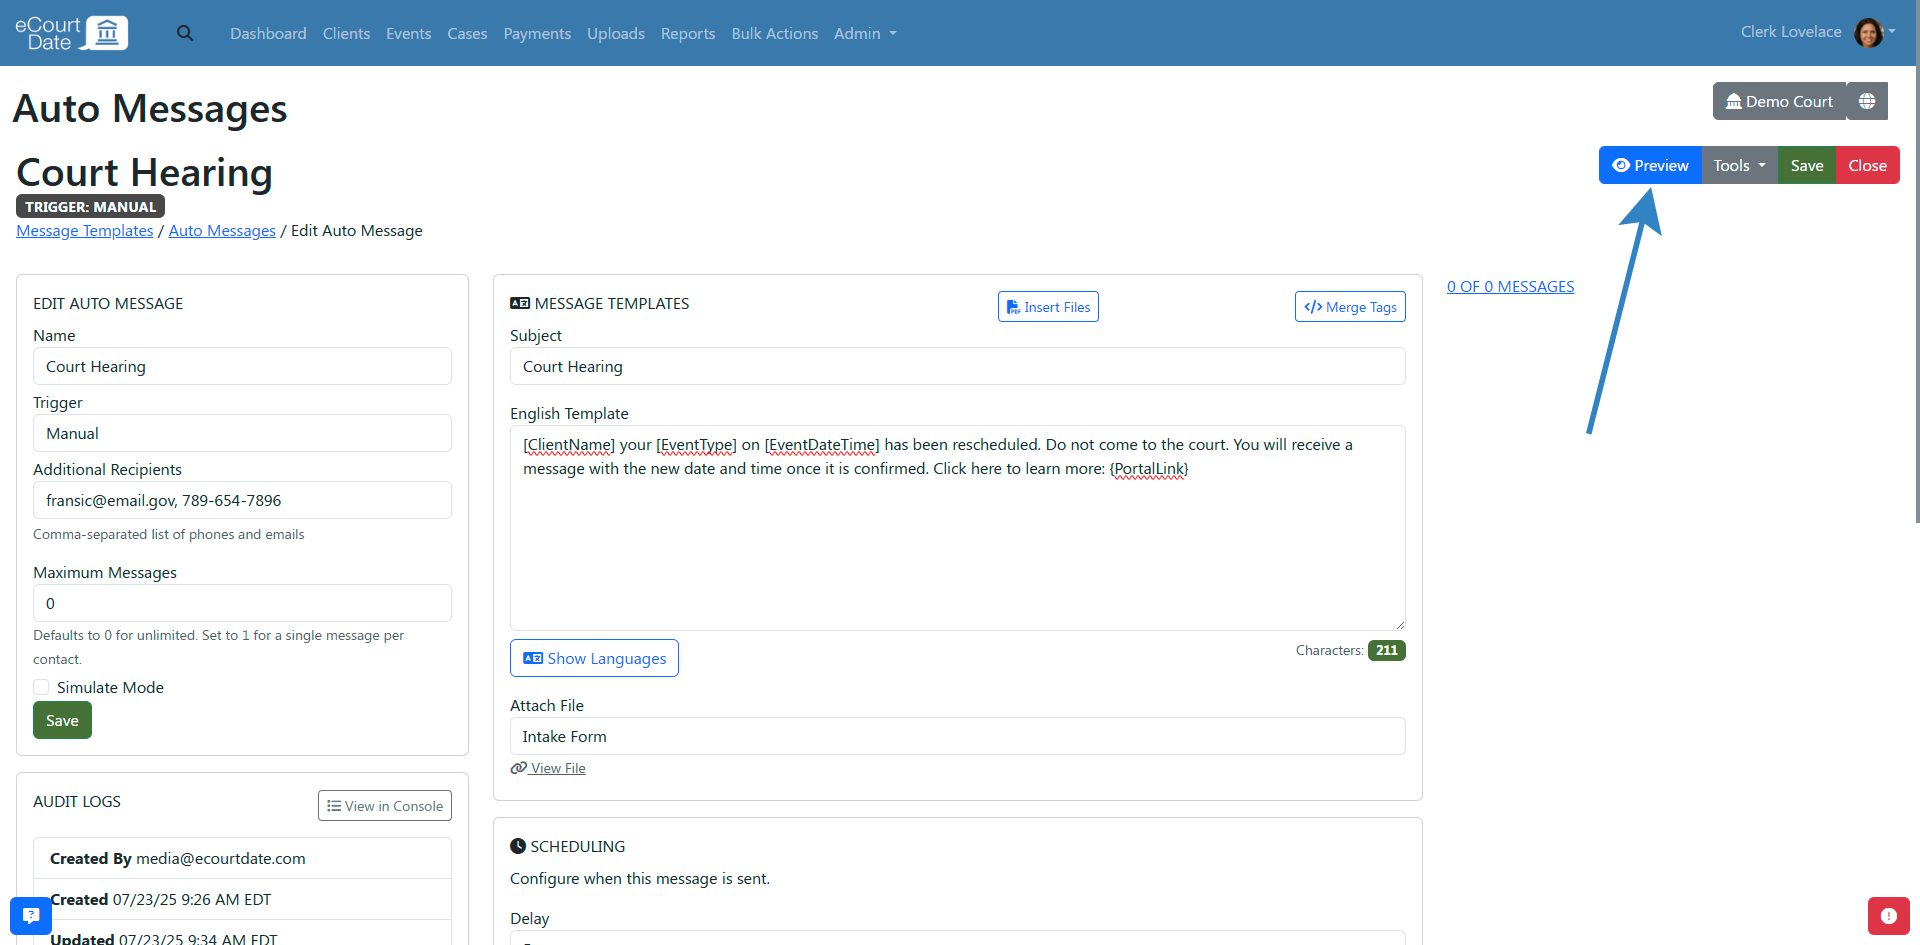
Step 3: Edit an Auto Message
Review and configure the following minimum settings:
- Auto Message Name: the internal name of the auto message
- Trigger: when the auto message is triggered (use Manual to only send the auto message manually)
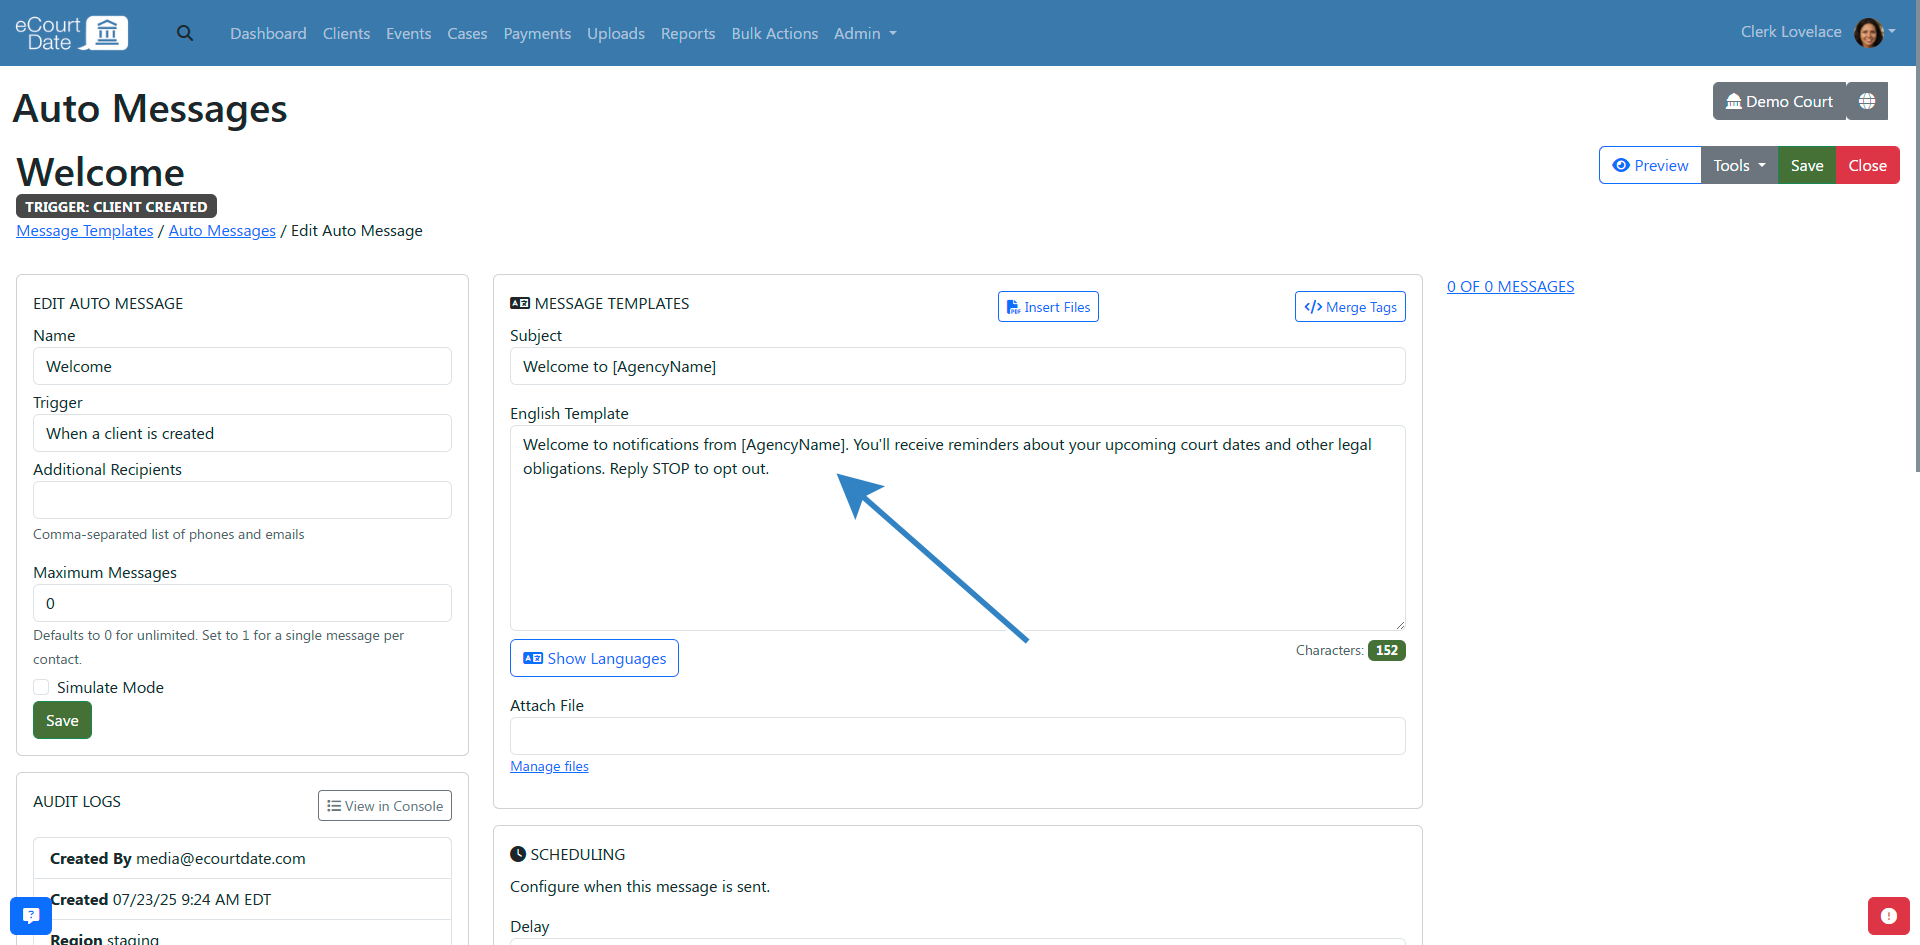
- Message Templates: the message template to use, with English as the default language
- Scheduling: when the auto message is sent

Click the Save button to apply your changes. We recommend testing the auto message with the Trigger set to Manual before assigning a specific trigger.
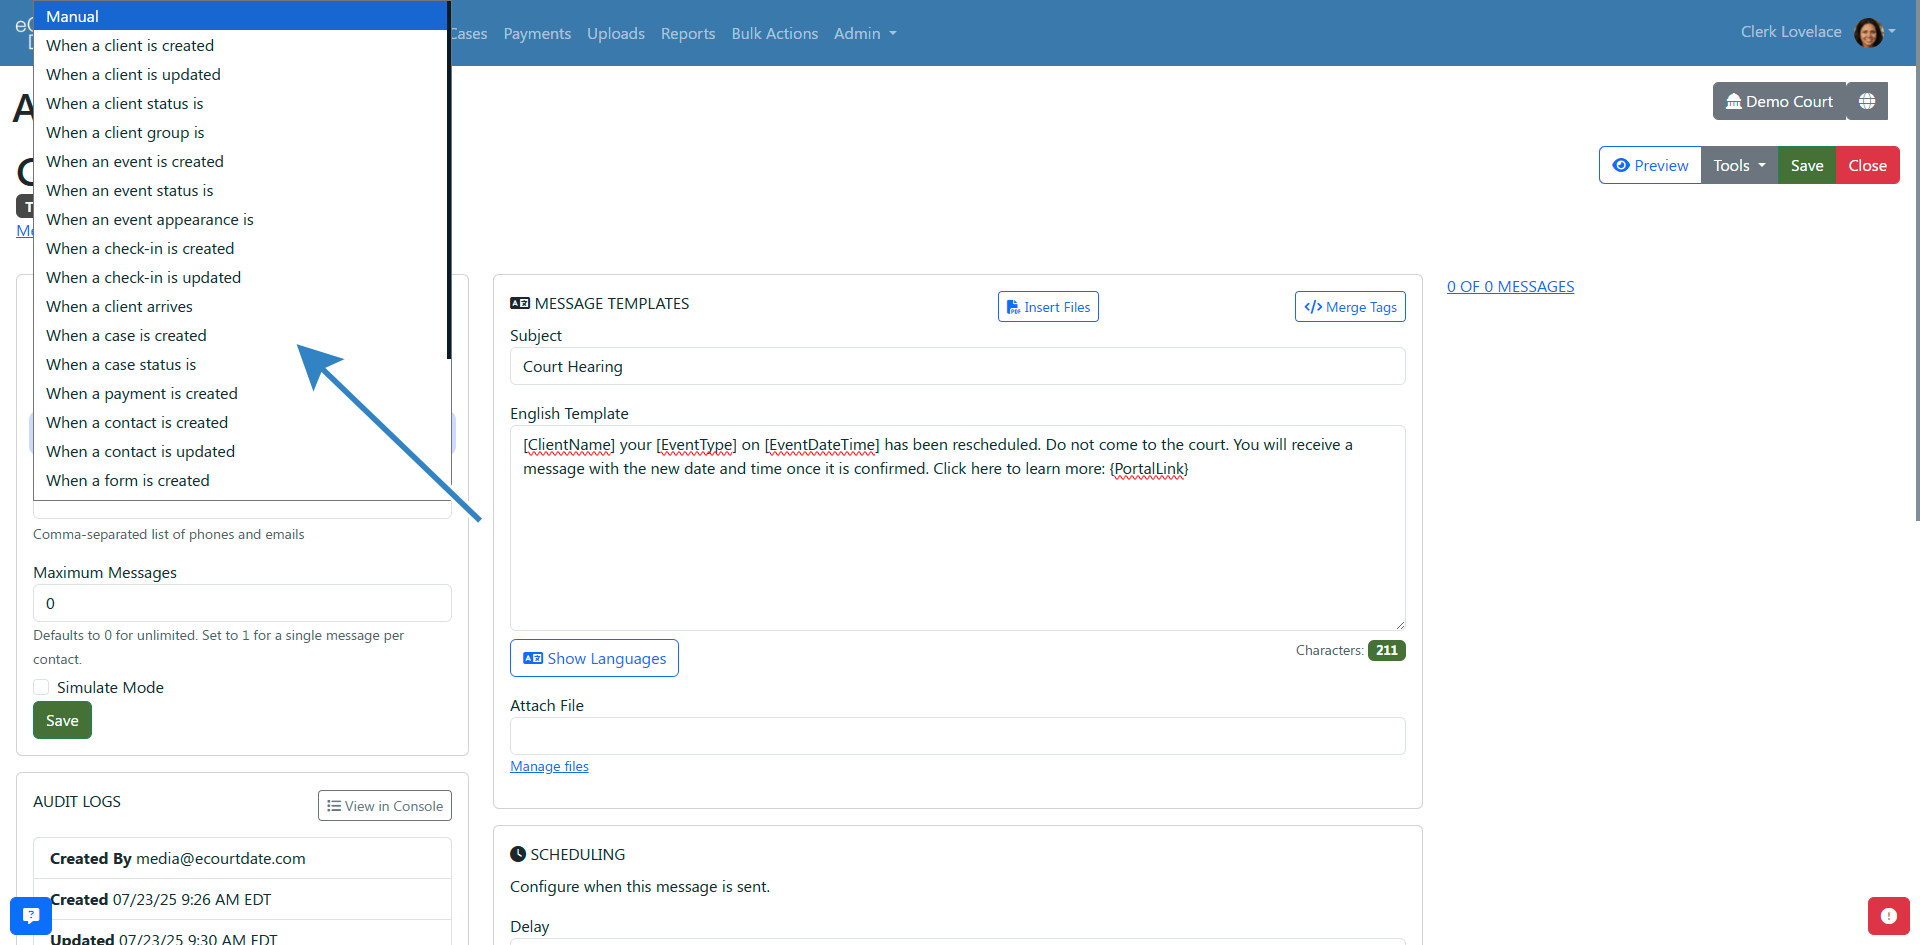
Step 4: Configure the Trigger
Auto messages are based on the Trigger field. If set to Manual, the auto message is only available for manual usage.
Choose a specific trigger based on your needs:
- When a client is created
- When a client is updated
- When a payment is created or updated
- When an event is created or updated
- When a form submission is created
- When a warrant is created or updated
- Monthly, weekly, or daily recurring messages based on a client's status
Based on the trigger, you can also restrict the auto message to specific statuses and other filters using the Filters section.
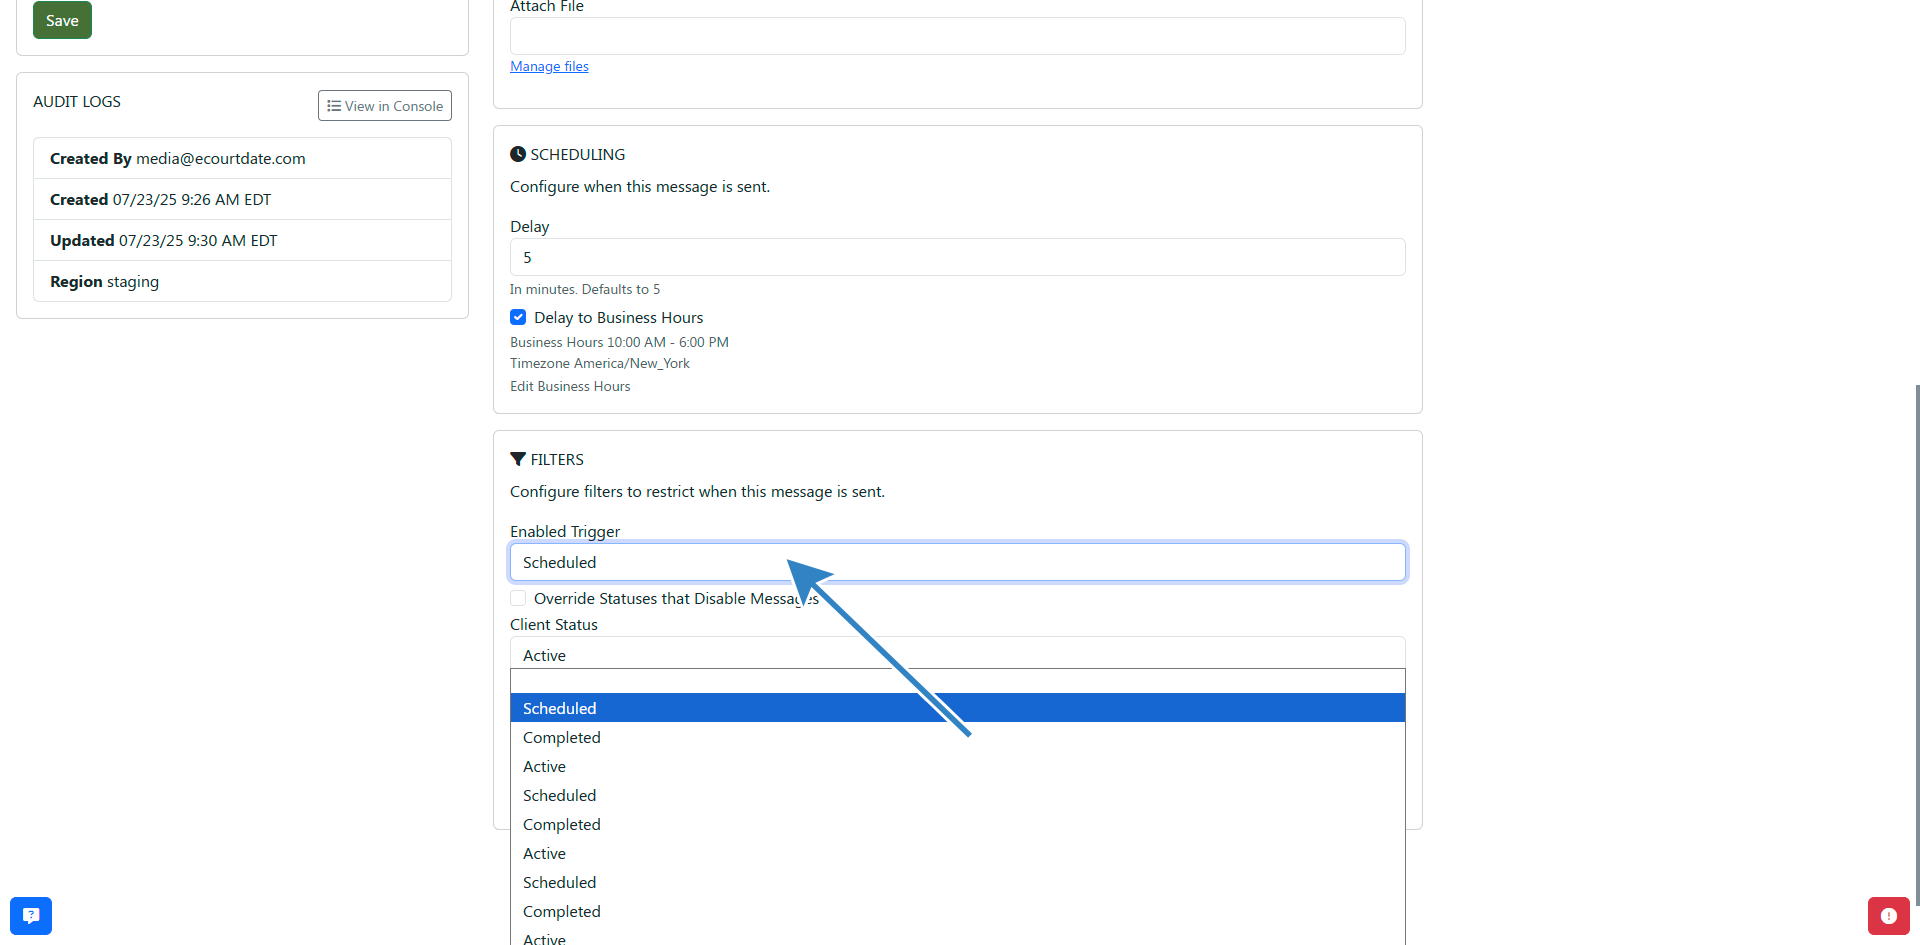
Step 5: Restrict to Specific Statuses
- Scroll down to the Filters section.
- Set the Enabled Statuses to the statuses you want to restrict the message to.
- Include additional statuses and filters based on your message trigger.
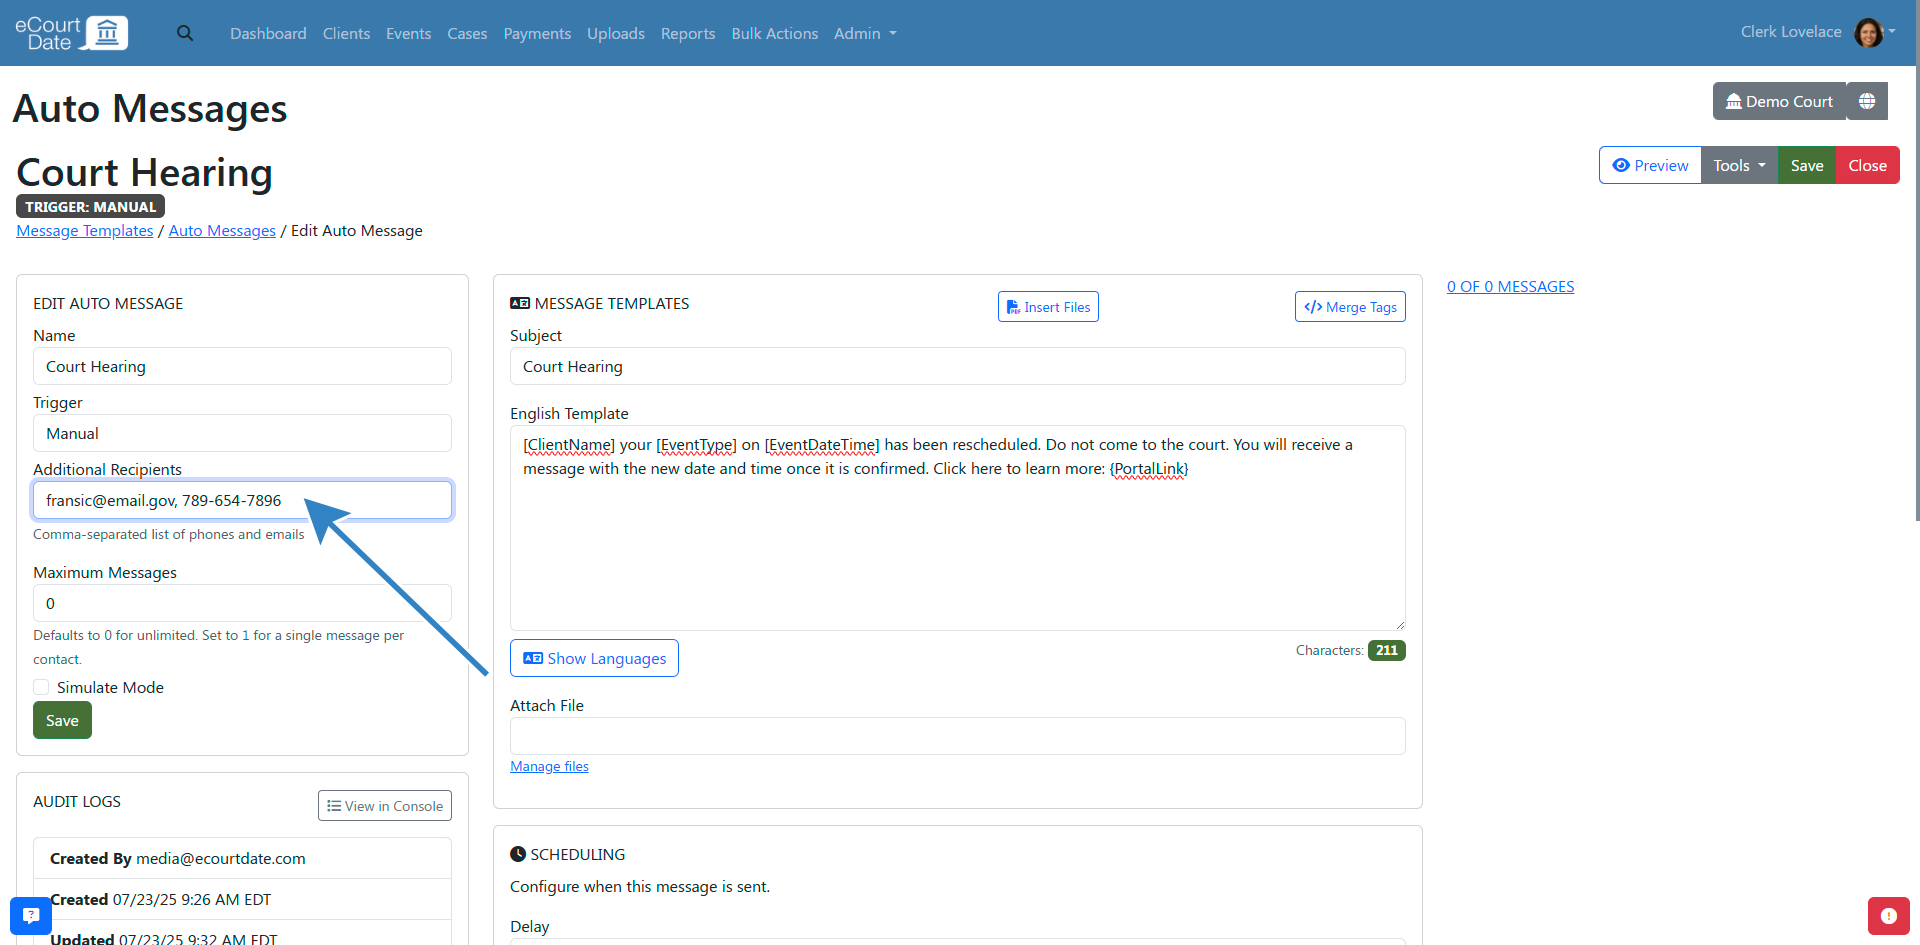
Step 6: Add Additional Recipients
Beyond the client, you can add additional recipients to an auto message. This functions similar to a BCC field in an email.
- Enter a comma-separated list of phone numbers, email addresses, or both in the Additional Recipients field.
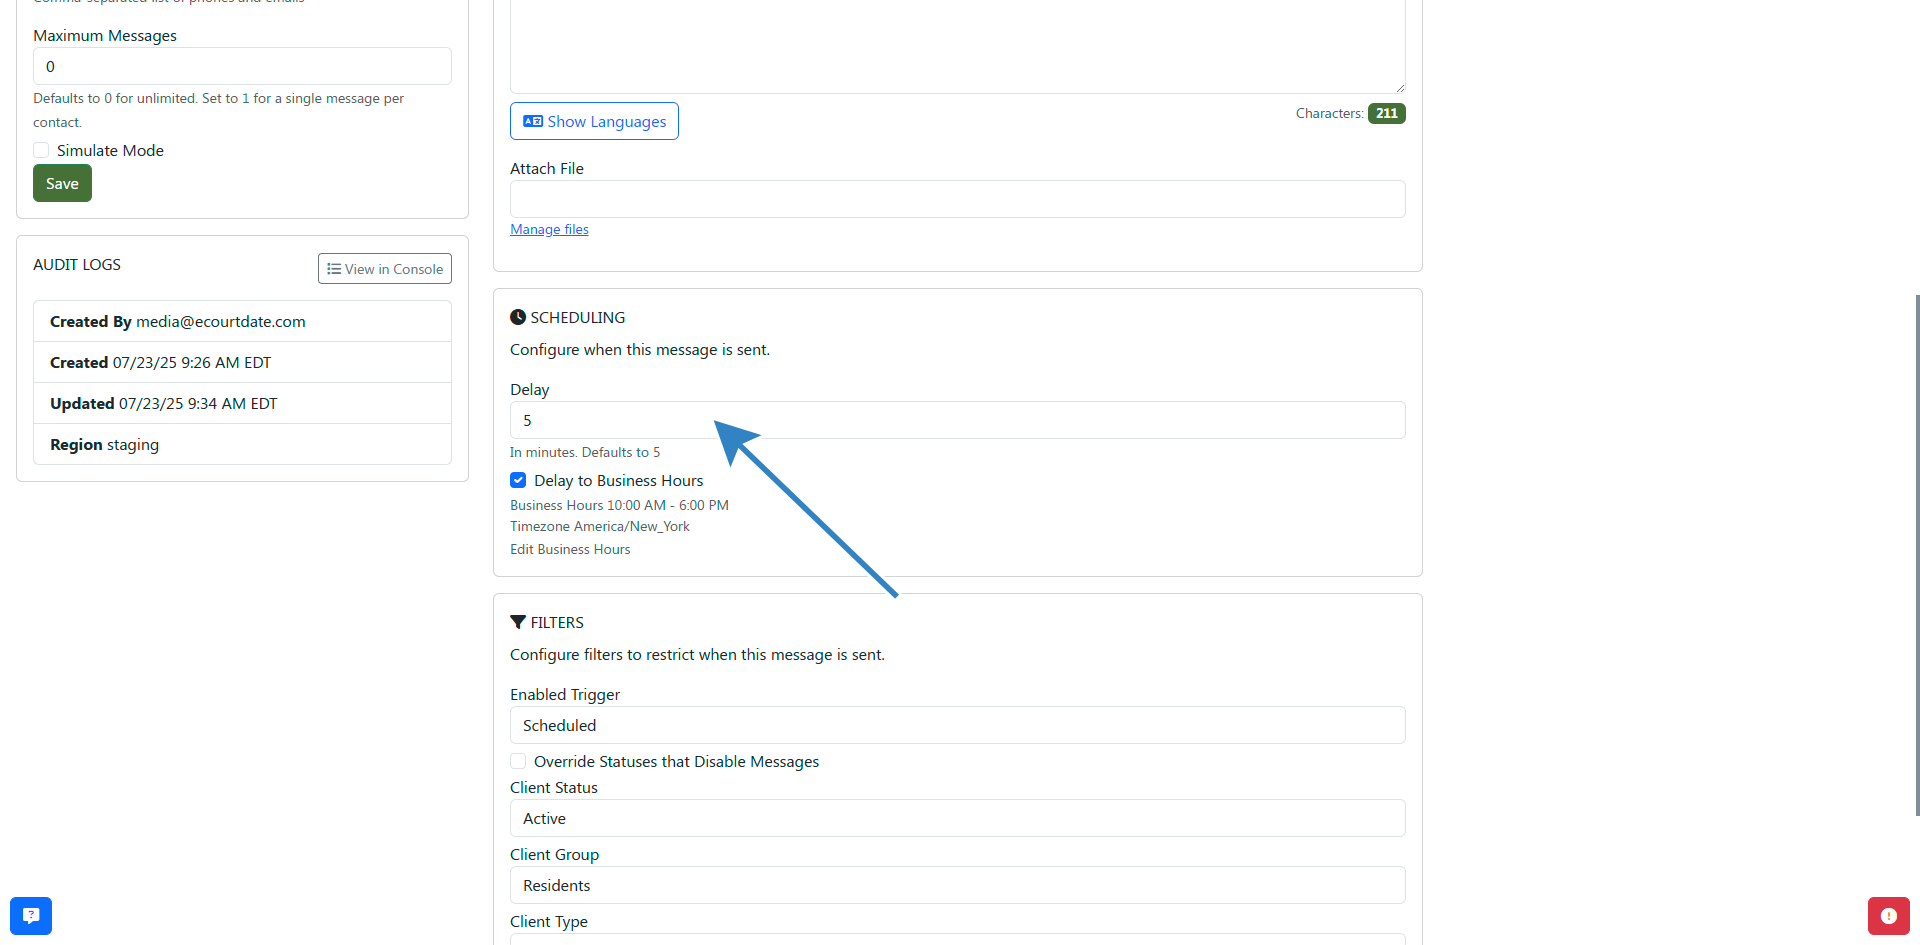
Step 7: Configure Scheduling
If an auto message is triggered, you can delay when the message is sent.
- Scroll down to the Scheduling section.
- Set the Delay field to the number of minutes to delay the message from when the trigger is met.
- Enable the Delay to Business Hours checkbox to delay the message to the earliest business hour if the trigger occurs outside of business hours.
Step 8: Attach a File
You can attach an individual file to an auto message.
- Click the Attach File dropdown.
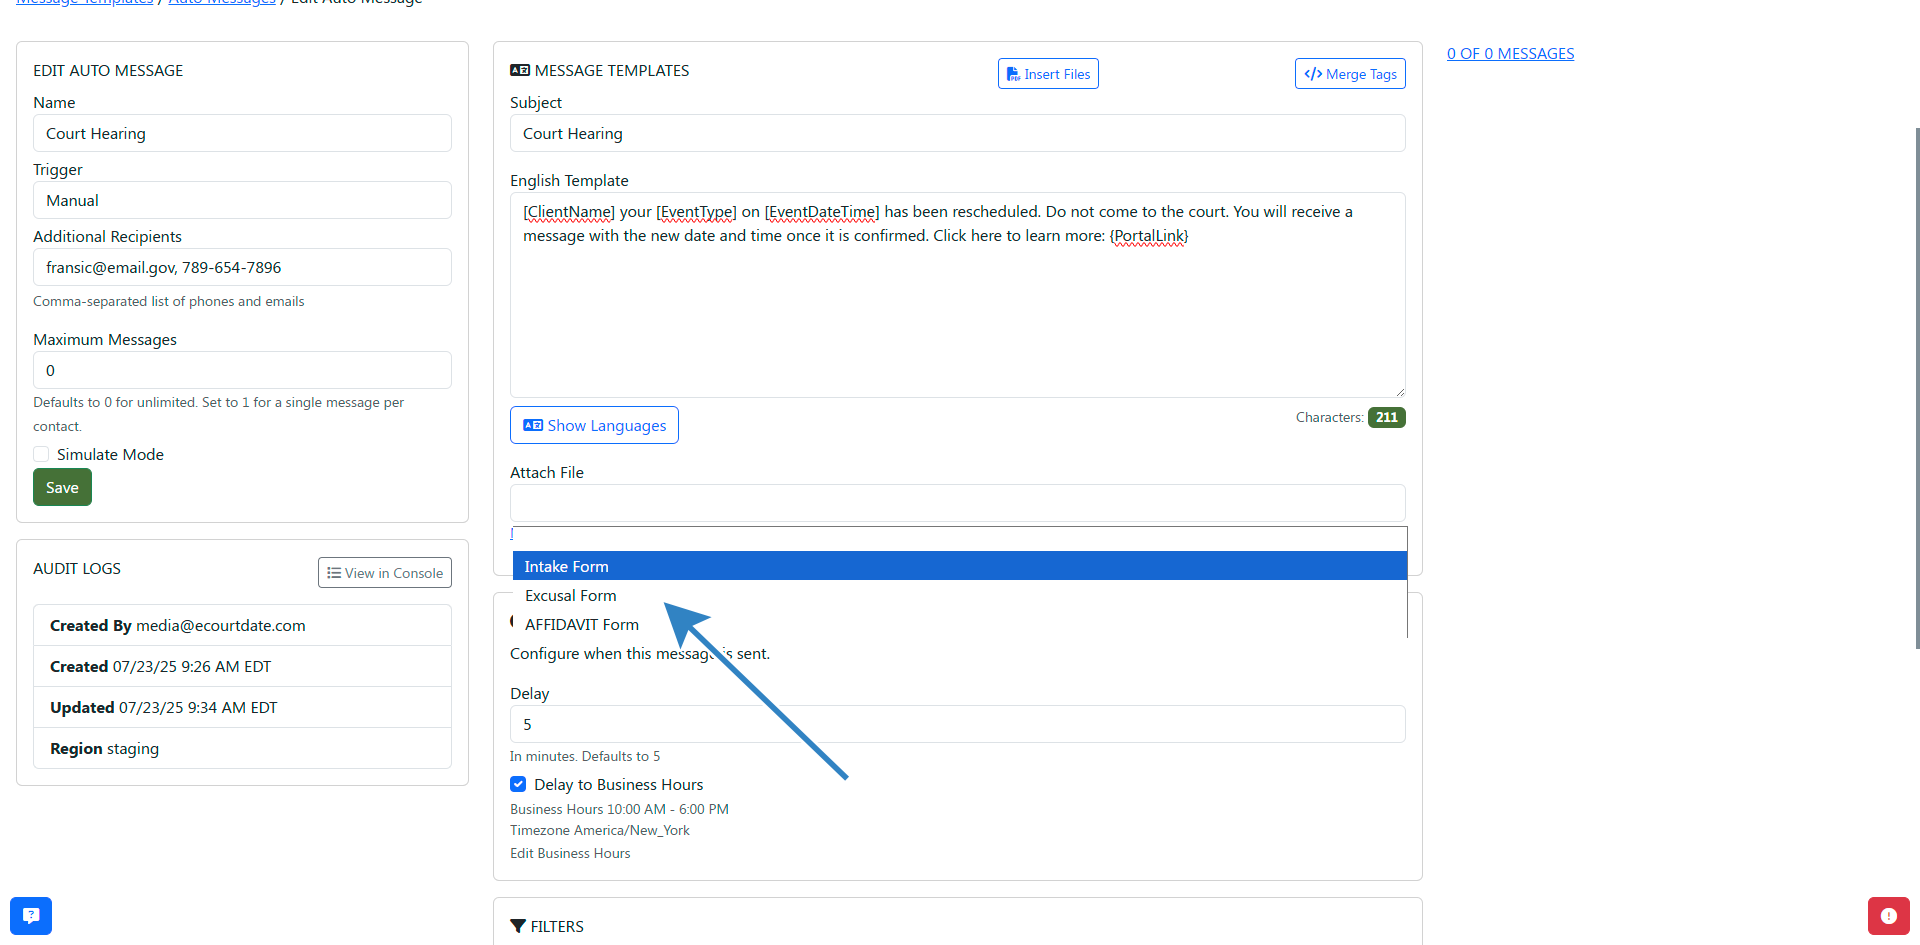
- Select the file you want to attach.
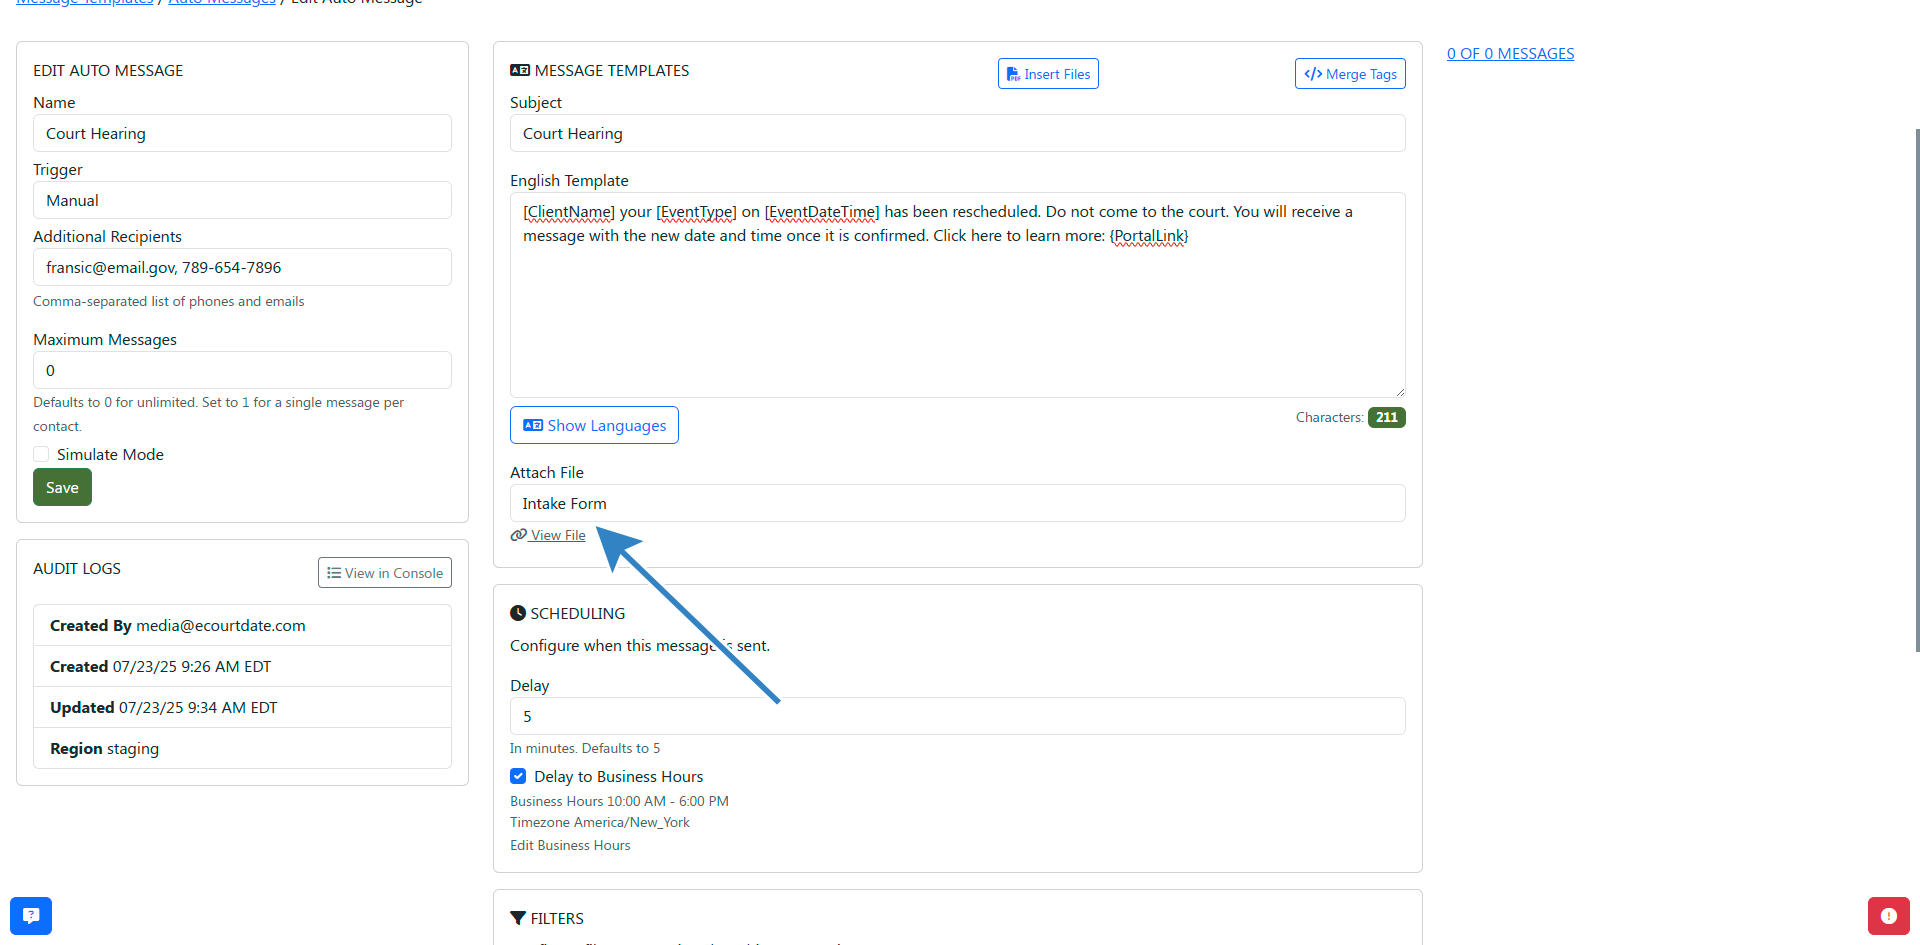
- Click the Save button to apply your changes.
Note: emails support attachments up to 40MB. SMS and MMS support attachments up to 1MB.
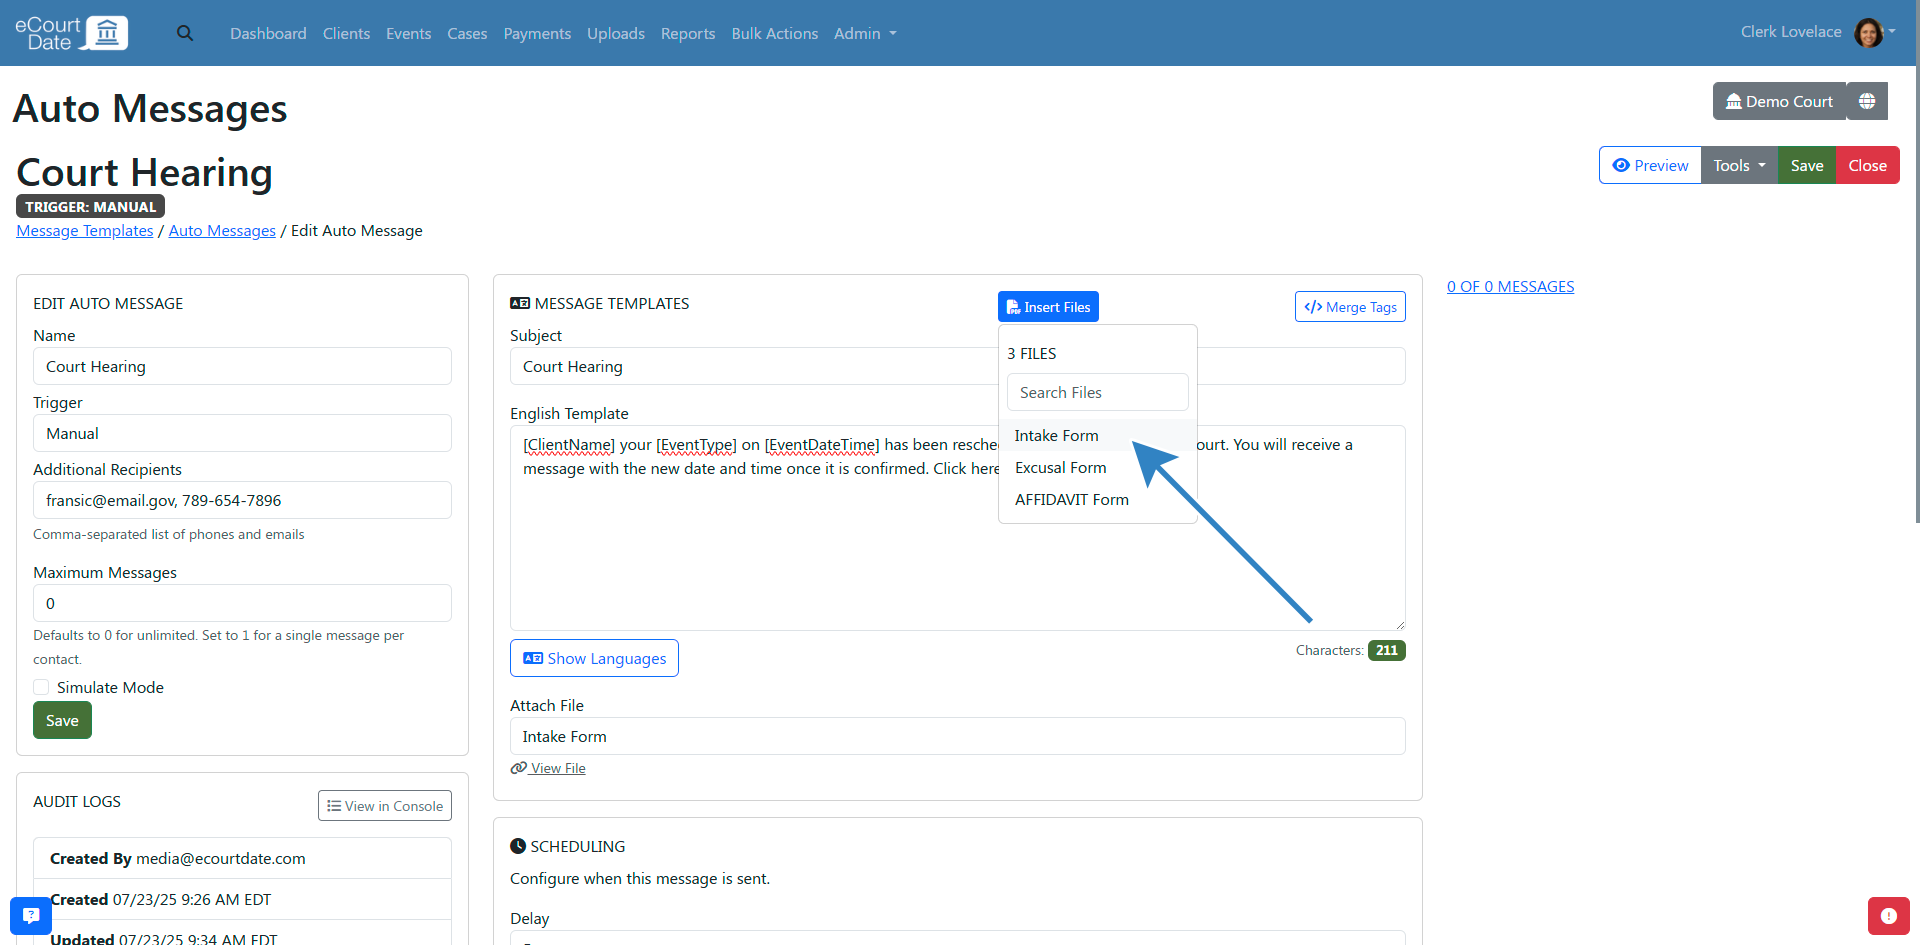
Step 9: Insert File Links
You can use the Insert Files button to insert links to files directly in the message. This allows you to include multiple files without file size limits on the recipient's end.
- Click the Insert Files button.
- Click each file you want to include in the message.
- A merge tag for each file will be inserted into the message.
- Move the merge tag to the desired location in your message.
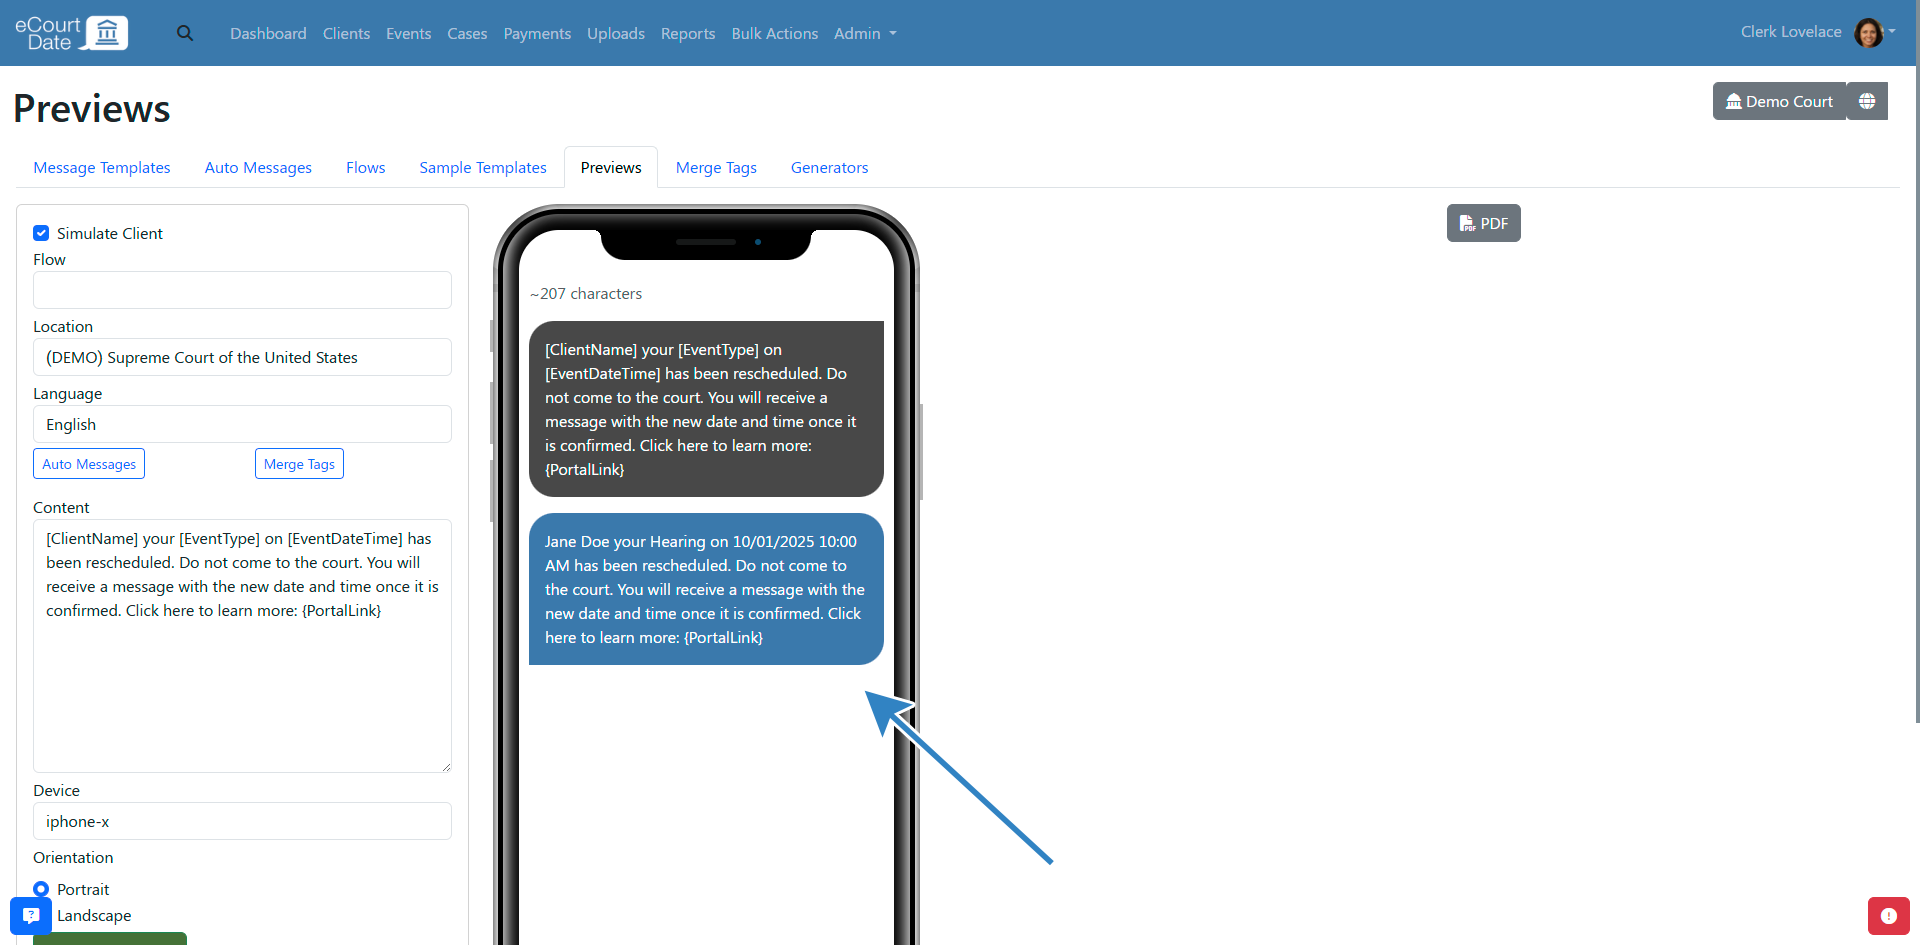
Step 10: Preview the Auto Message
- Click the Preview button while editing the auto message.
- Enable the Simulate Client checkbox to see a preview with sample client information.
- Or use the Search Clients field to filter for a specific client.
- If the client has related records (events, payments), the preview will list them.
- Click the Preview button to see the rendered messages.
Step 11: Enable Simulate Mode
Enable Simulate Mode and click Save to test the auto message without actually sending it. Any messages assigned to the auto message will be created in simulate mode and will not be delivered.

Step 12: Send an Auto Message Manually
Once you have an auto message created, you can assign it to a record manually.
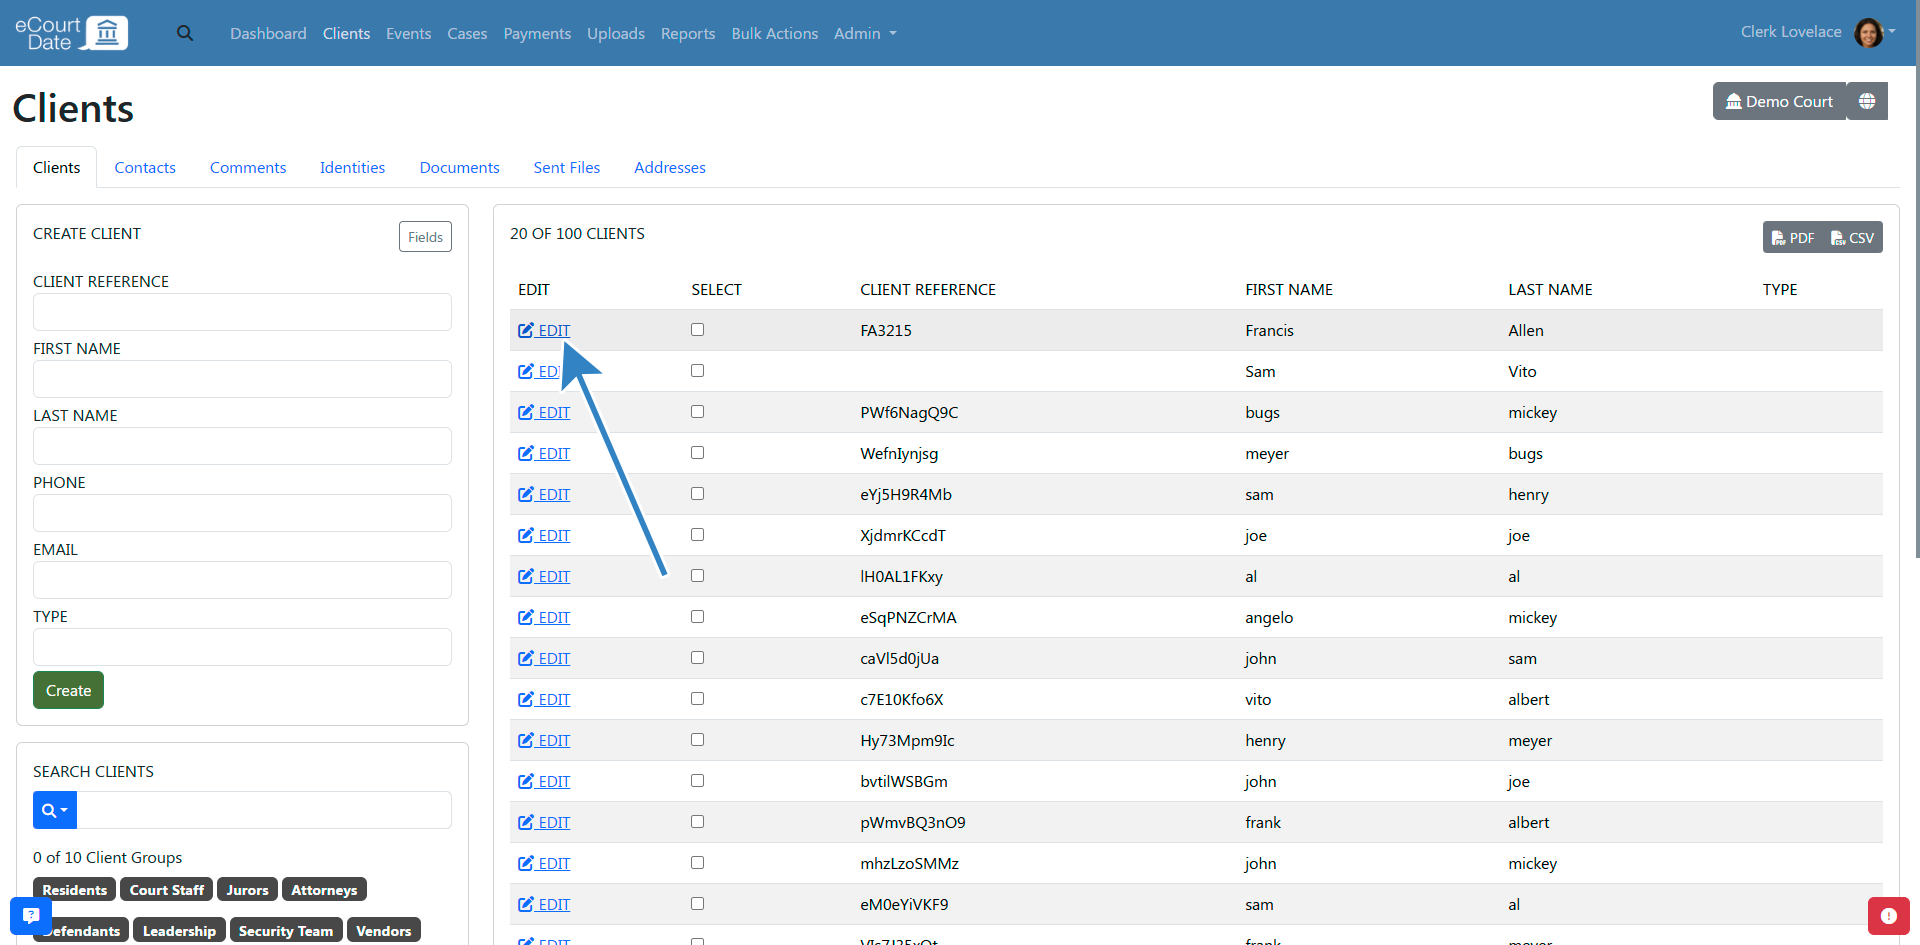
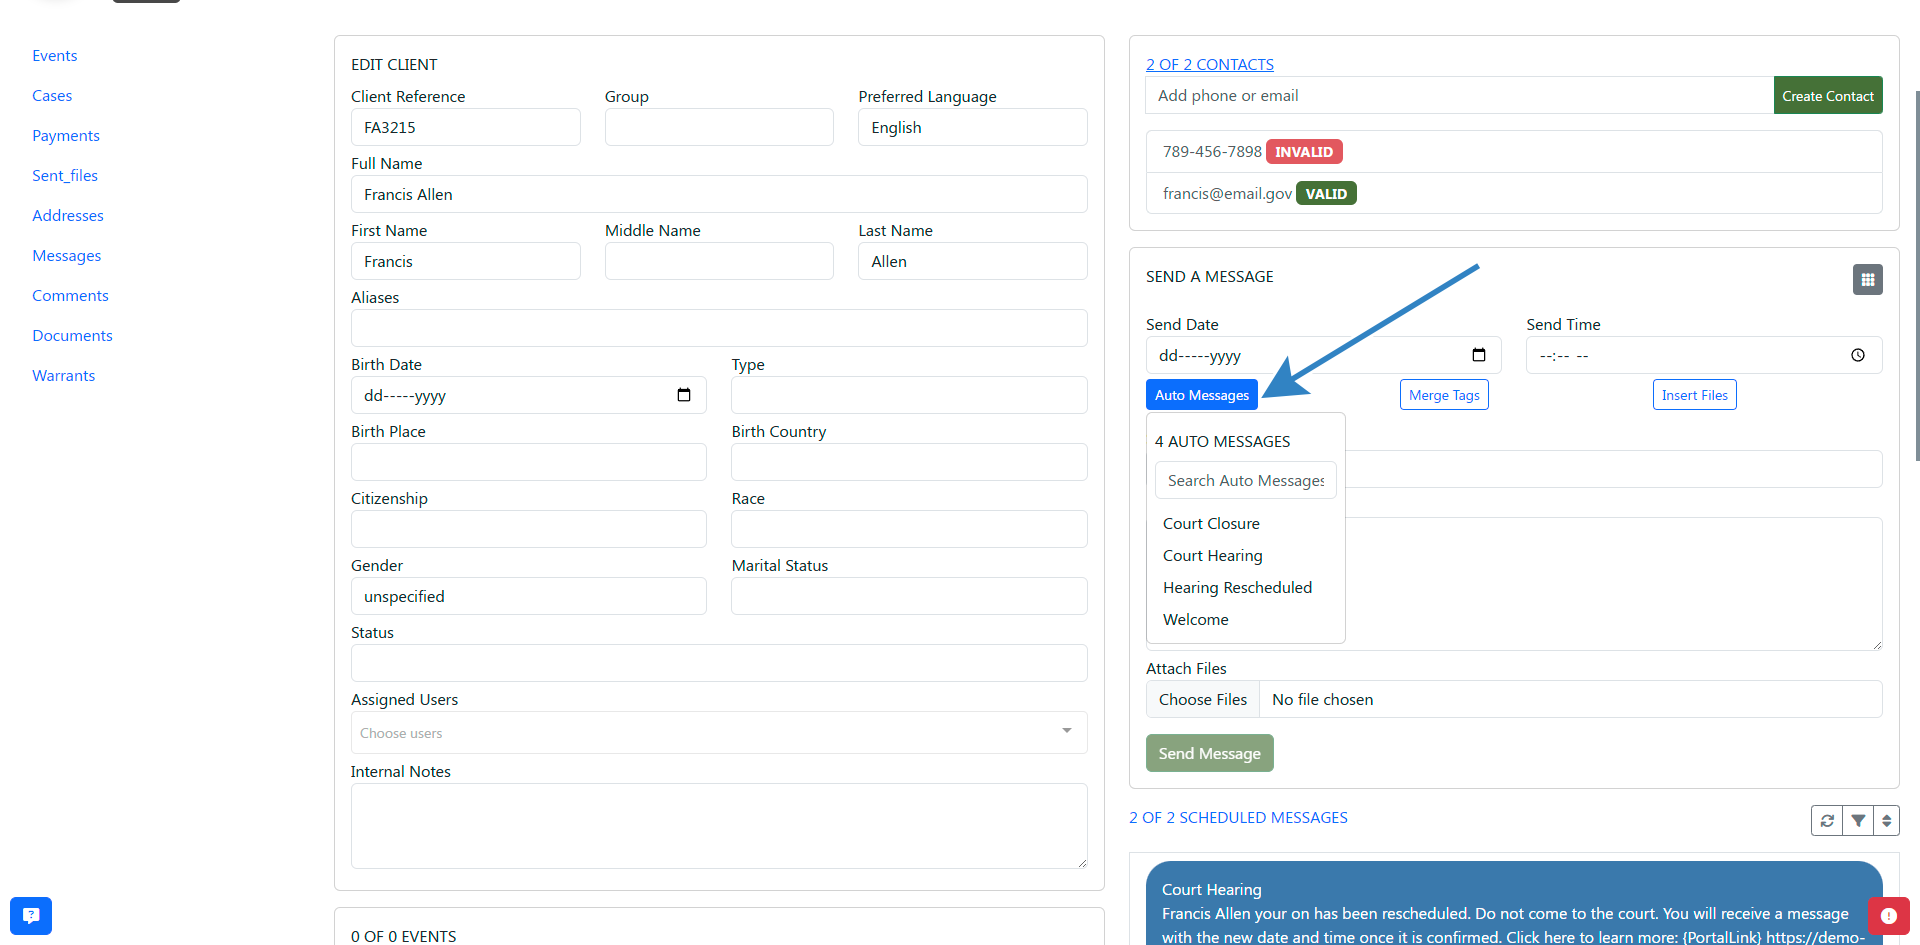
Sending from a Client Record
- Click Clients in the top navigation bar.

- Fill in the Create Client form or click Edit for an existing client.
- You have two options:
- Click the Send Auto Message button and select your auto message from the dropdown to send immediately.
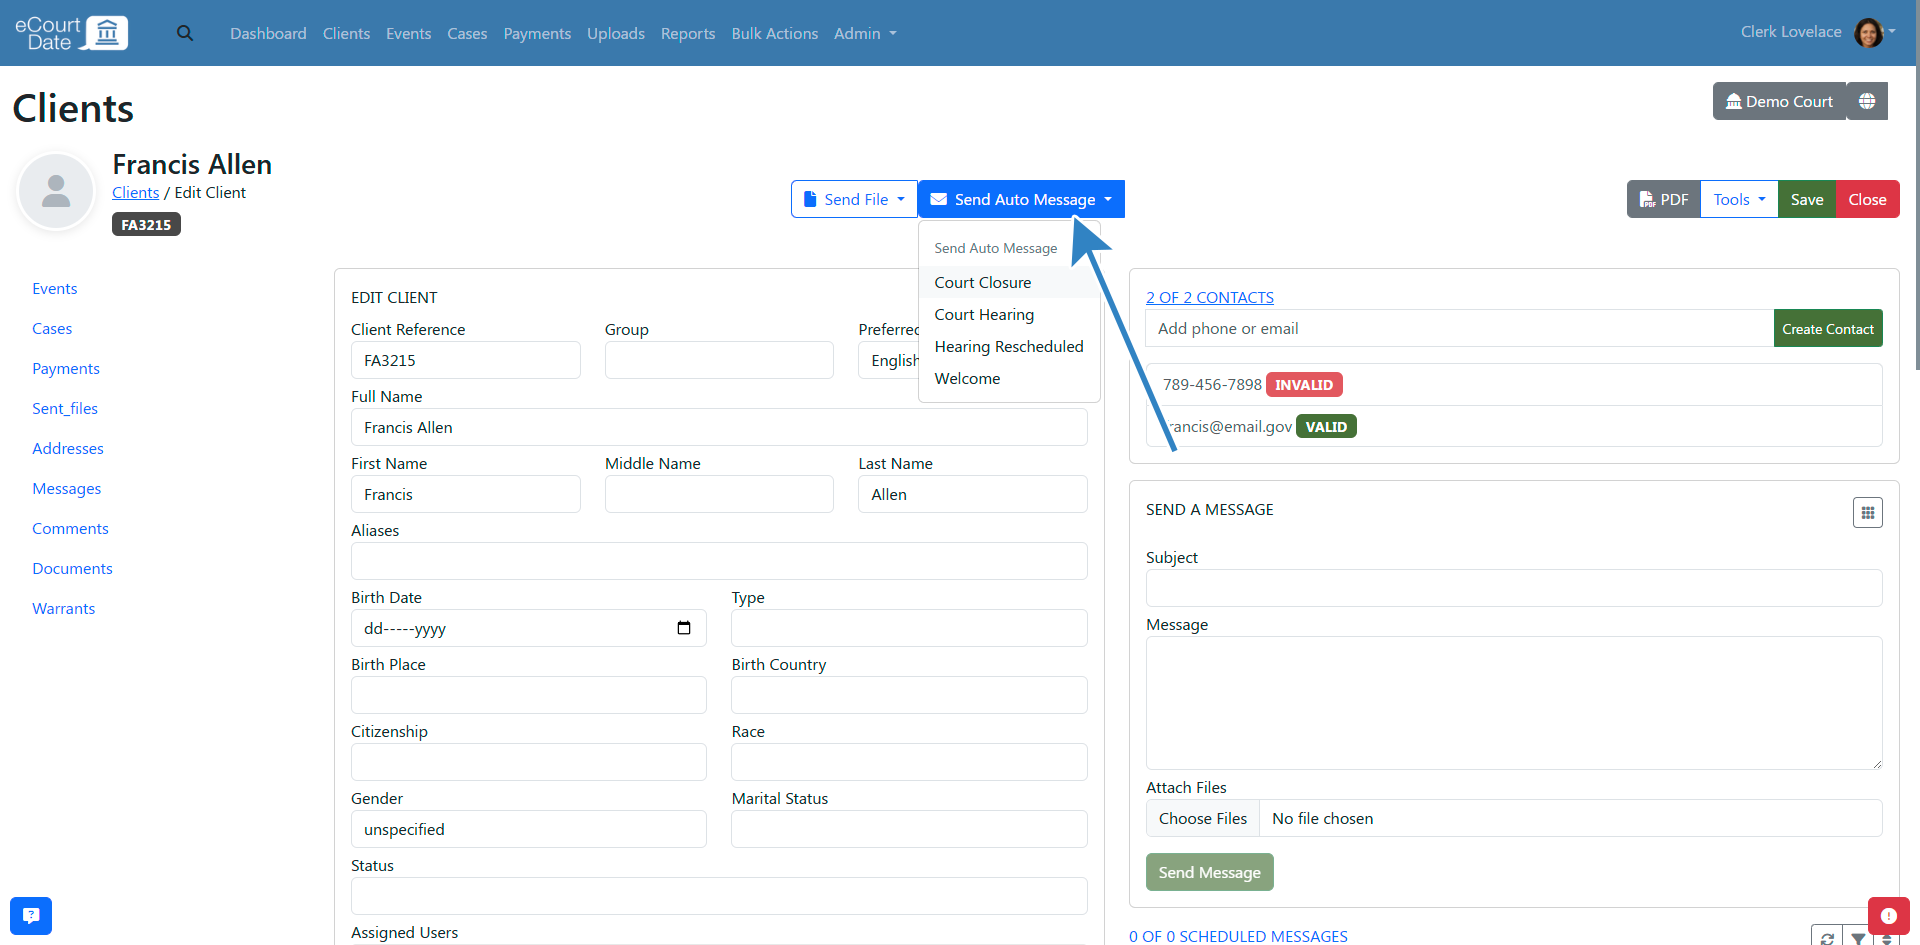
- In the Send a Message section, select your auto message from the Auto Message dropdown to pre-populate the message and customize it before sending.
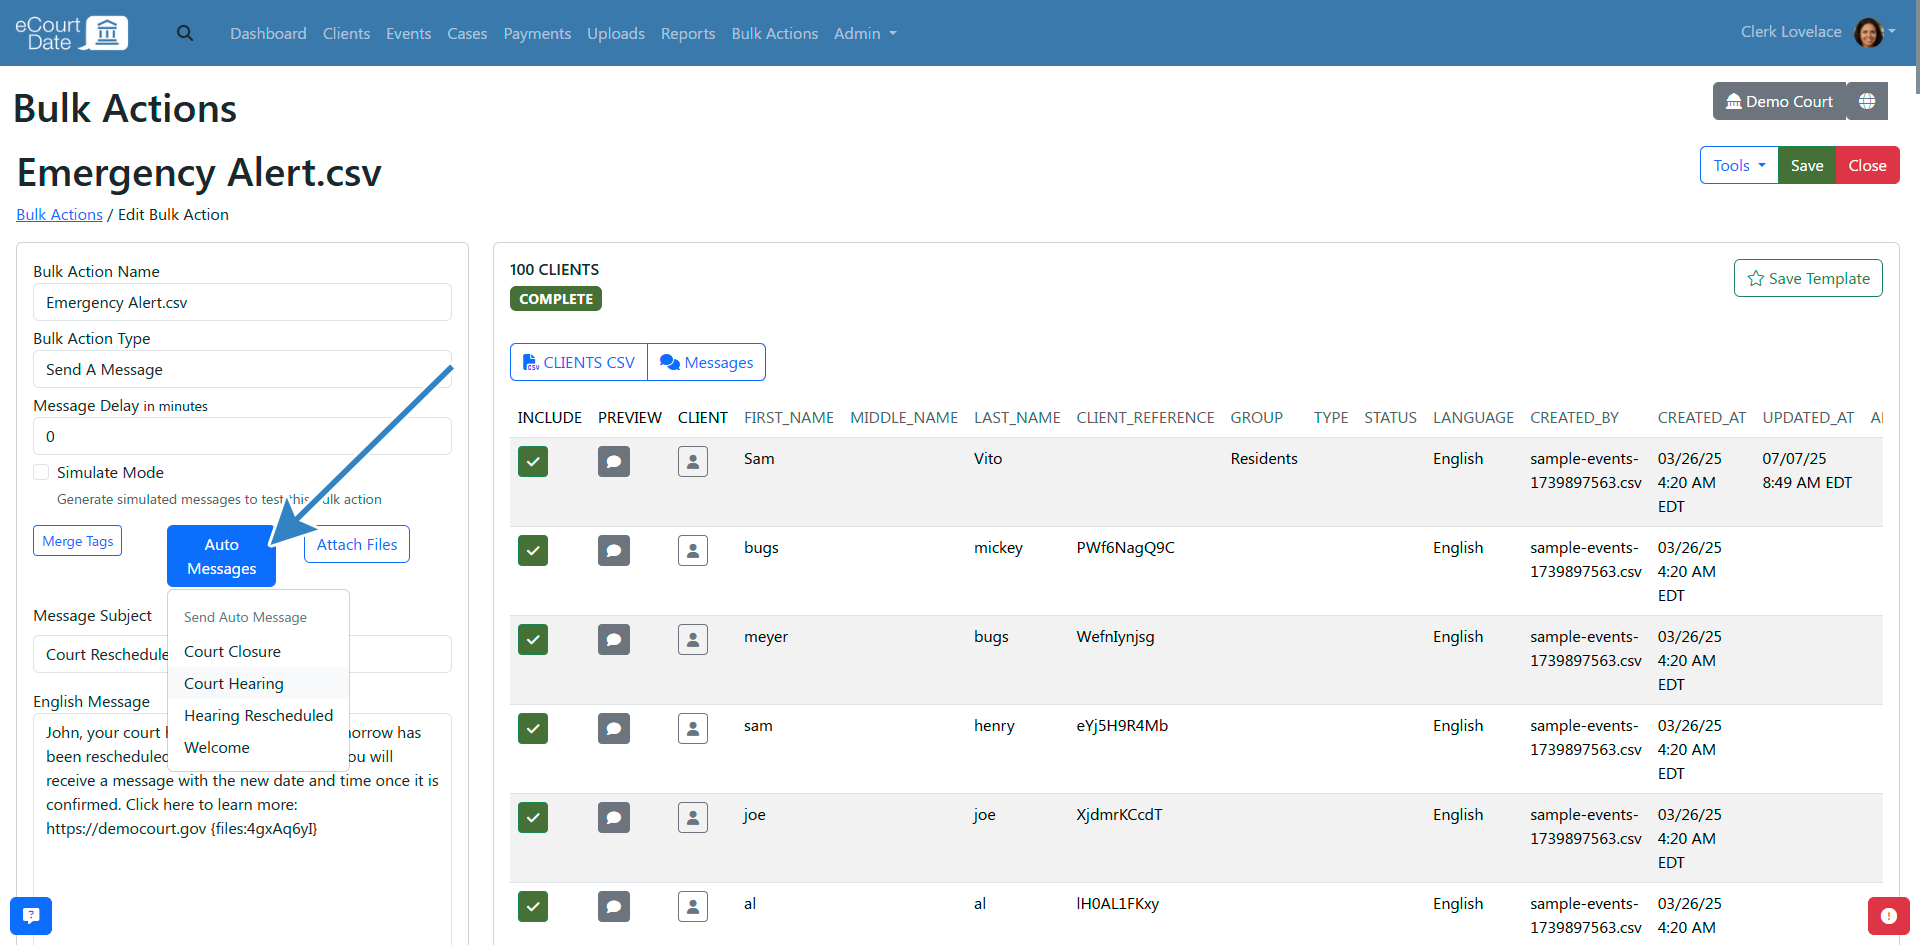
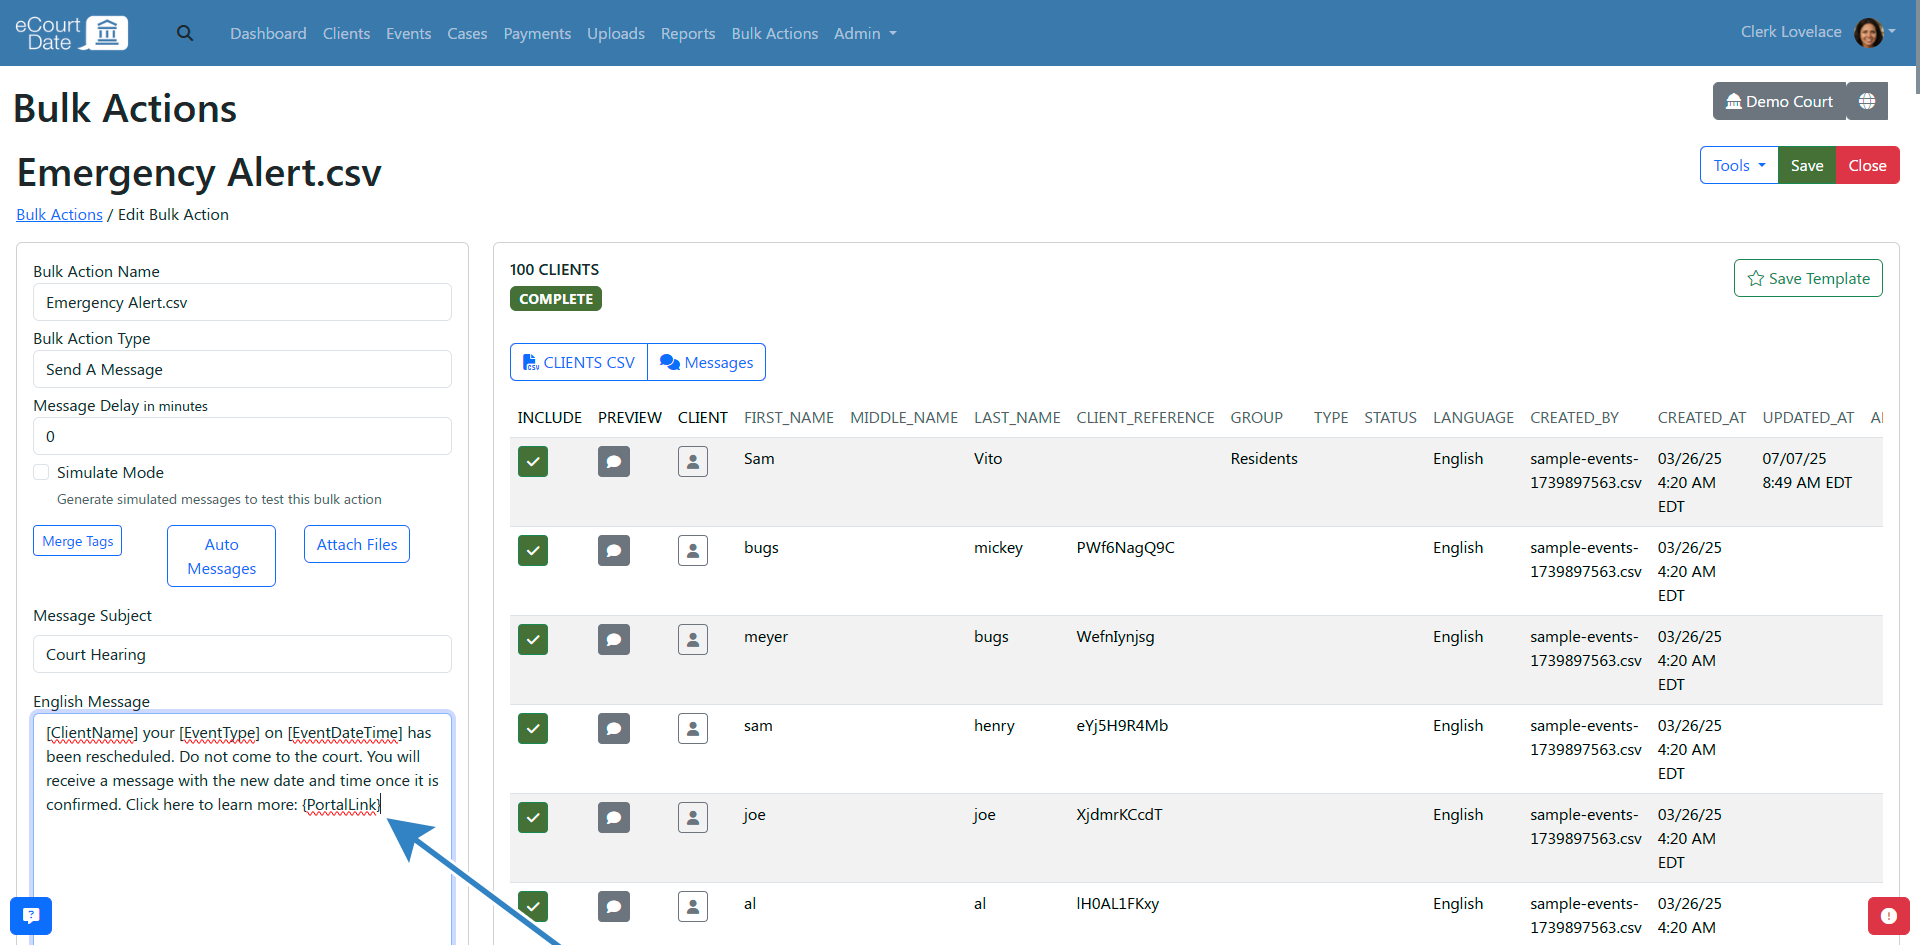
Sending from Bulk Actions
- Click Bulk Actions in the top navigation bar.
- Create a new bulk action or edit an existing one with the Action Type set to Send a Message.
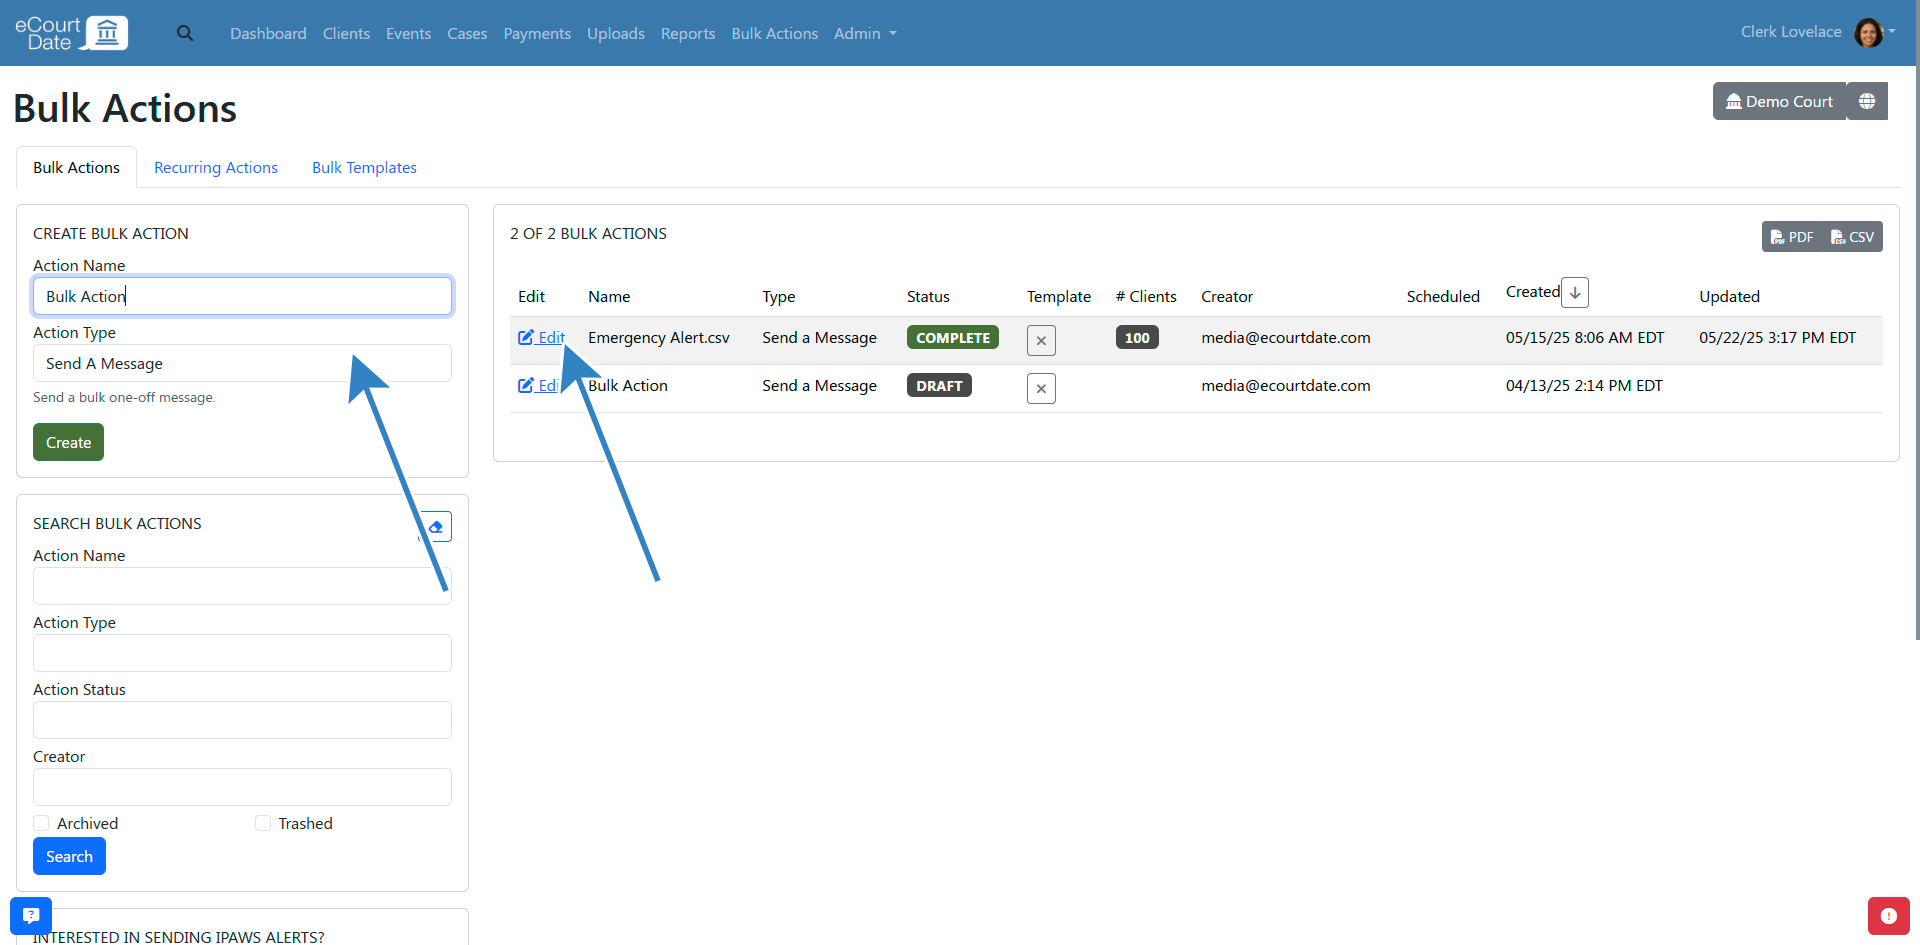
- Select your auto message from the Auto Message dropdown to pre-populate the message content.

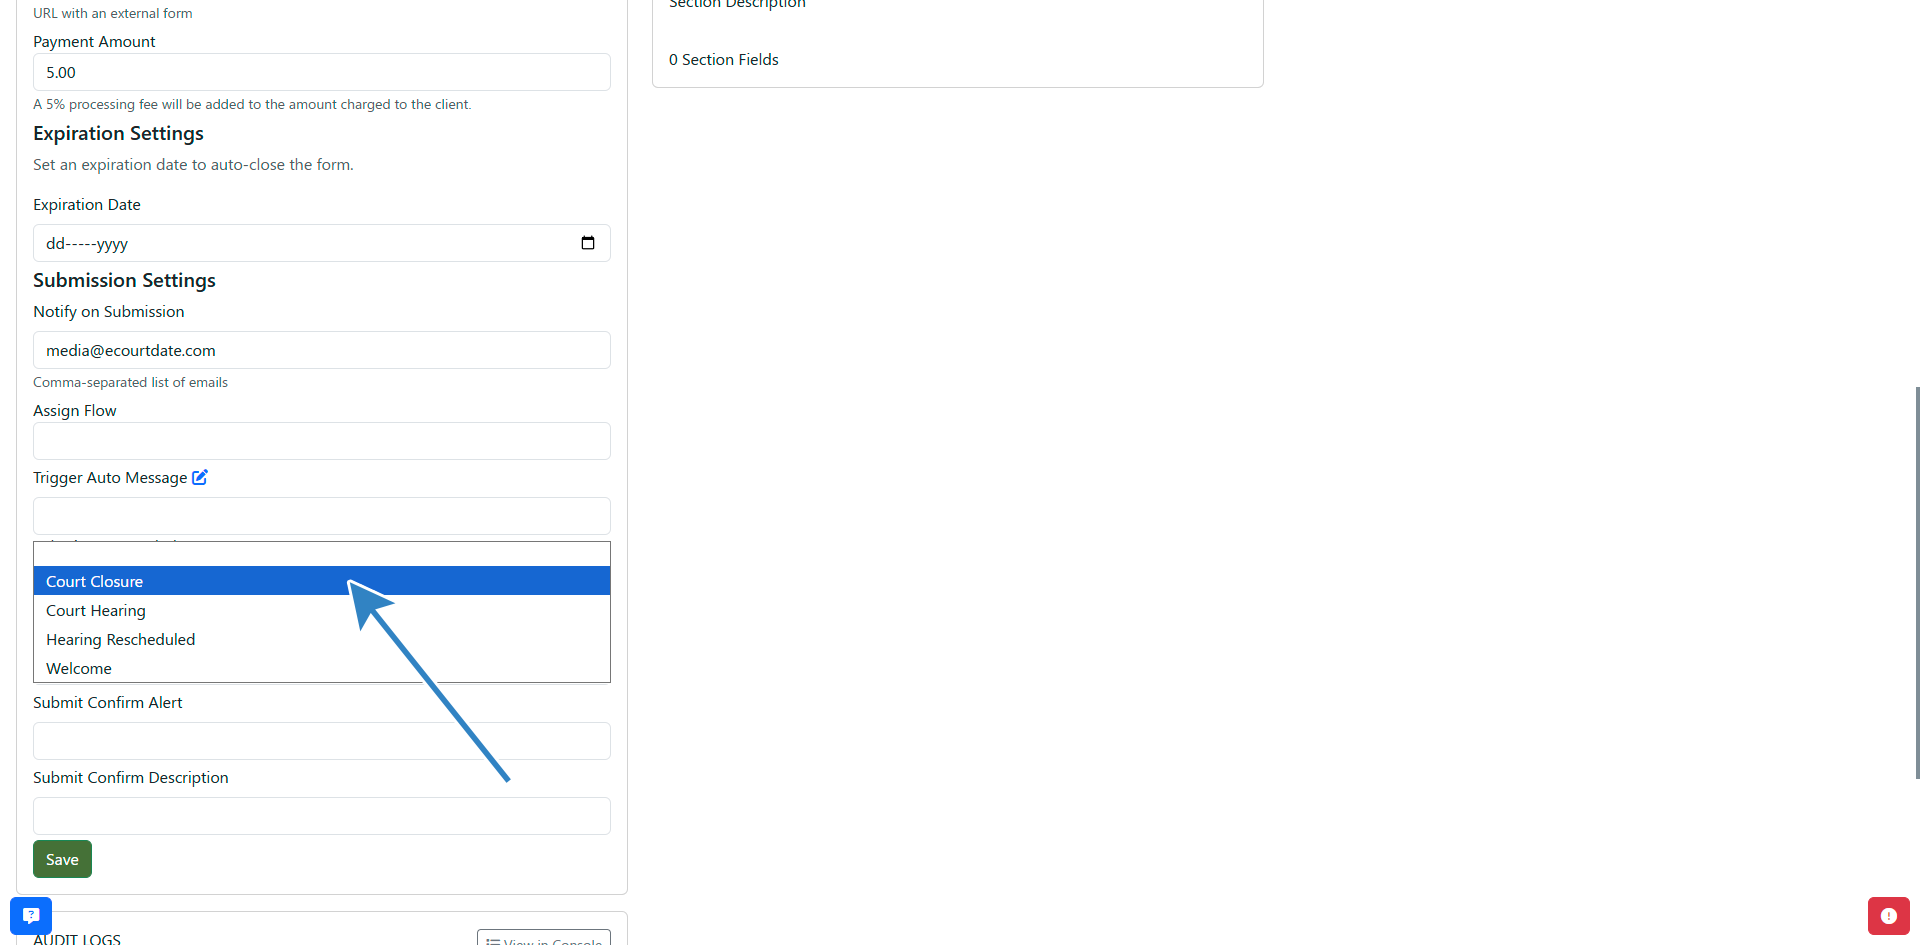
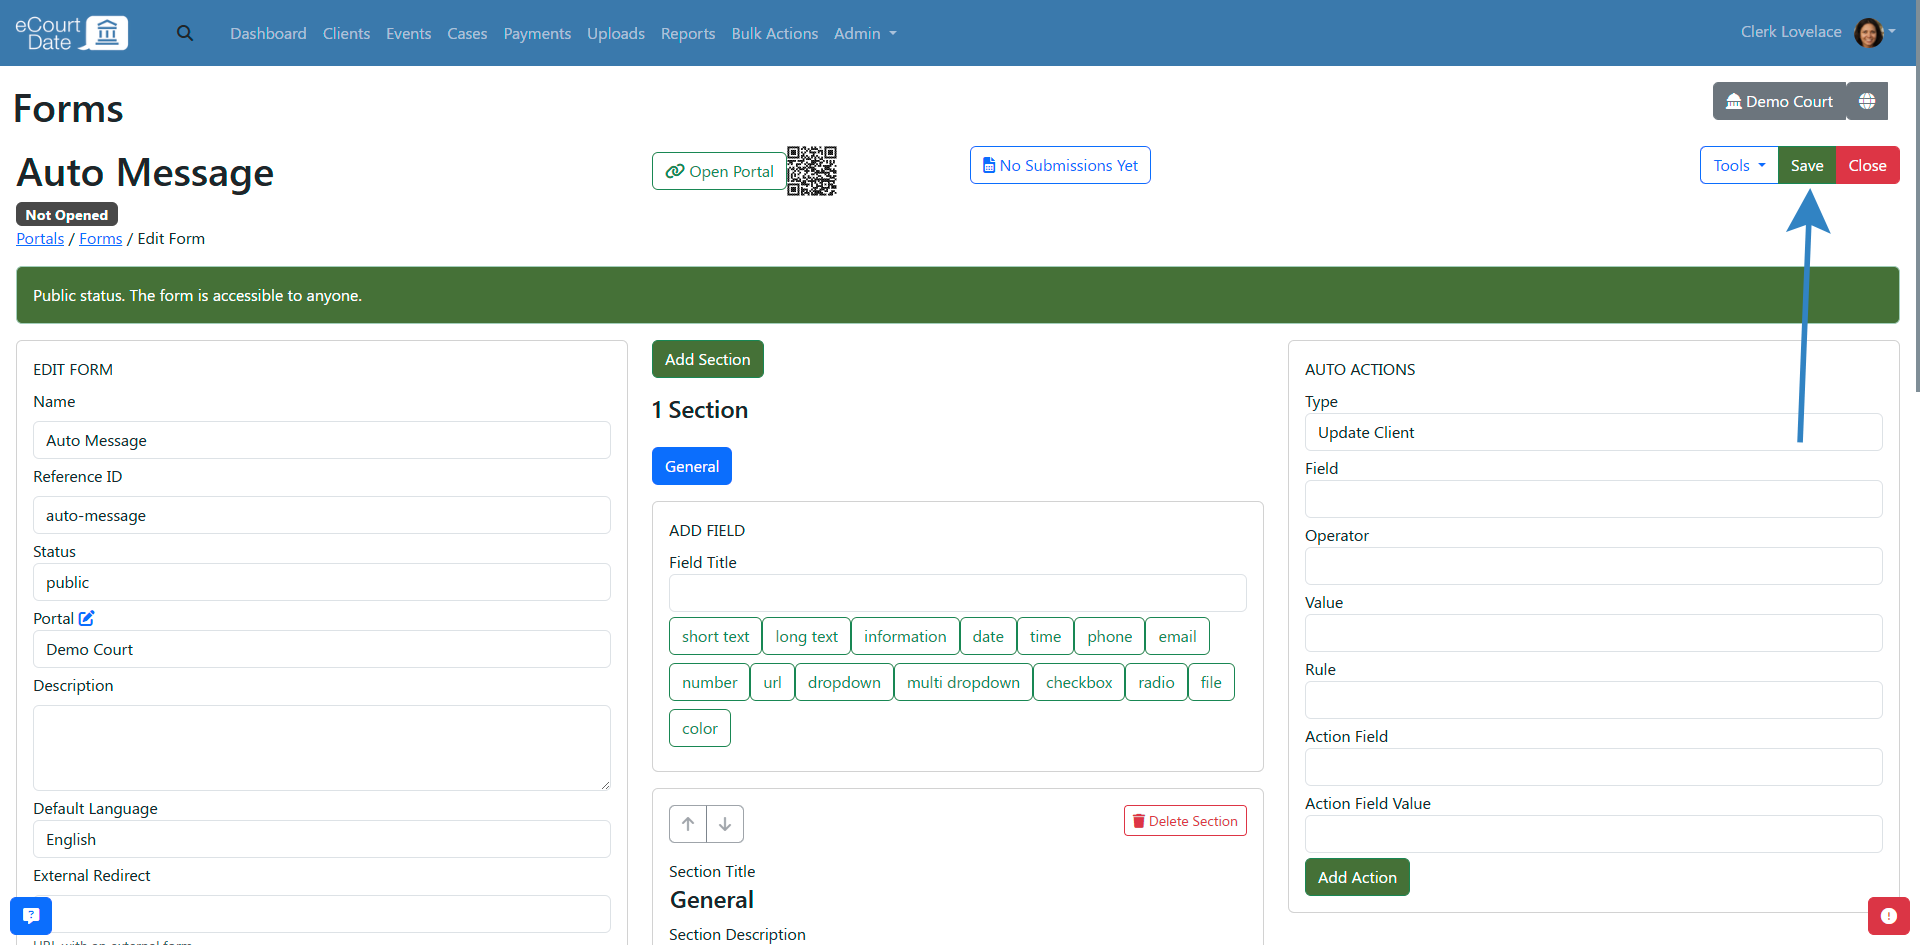
Sending from Forms
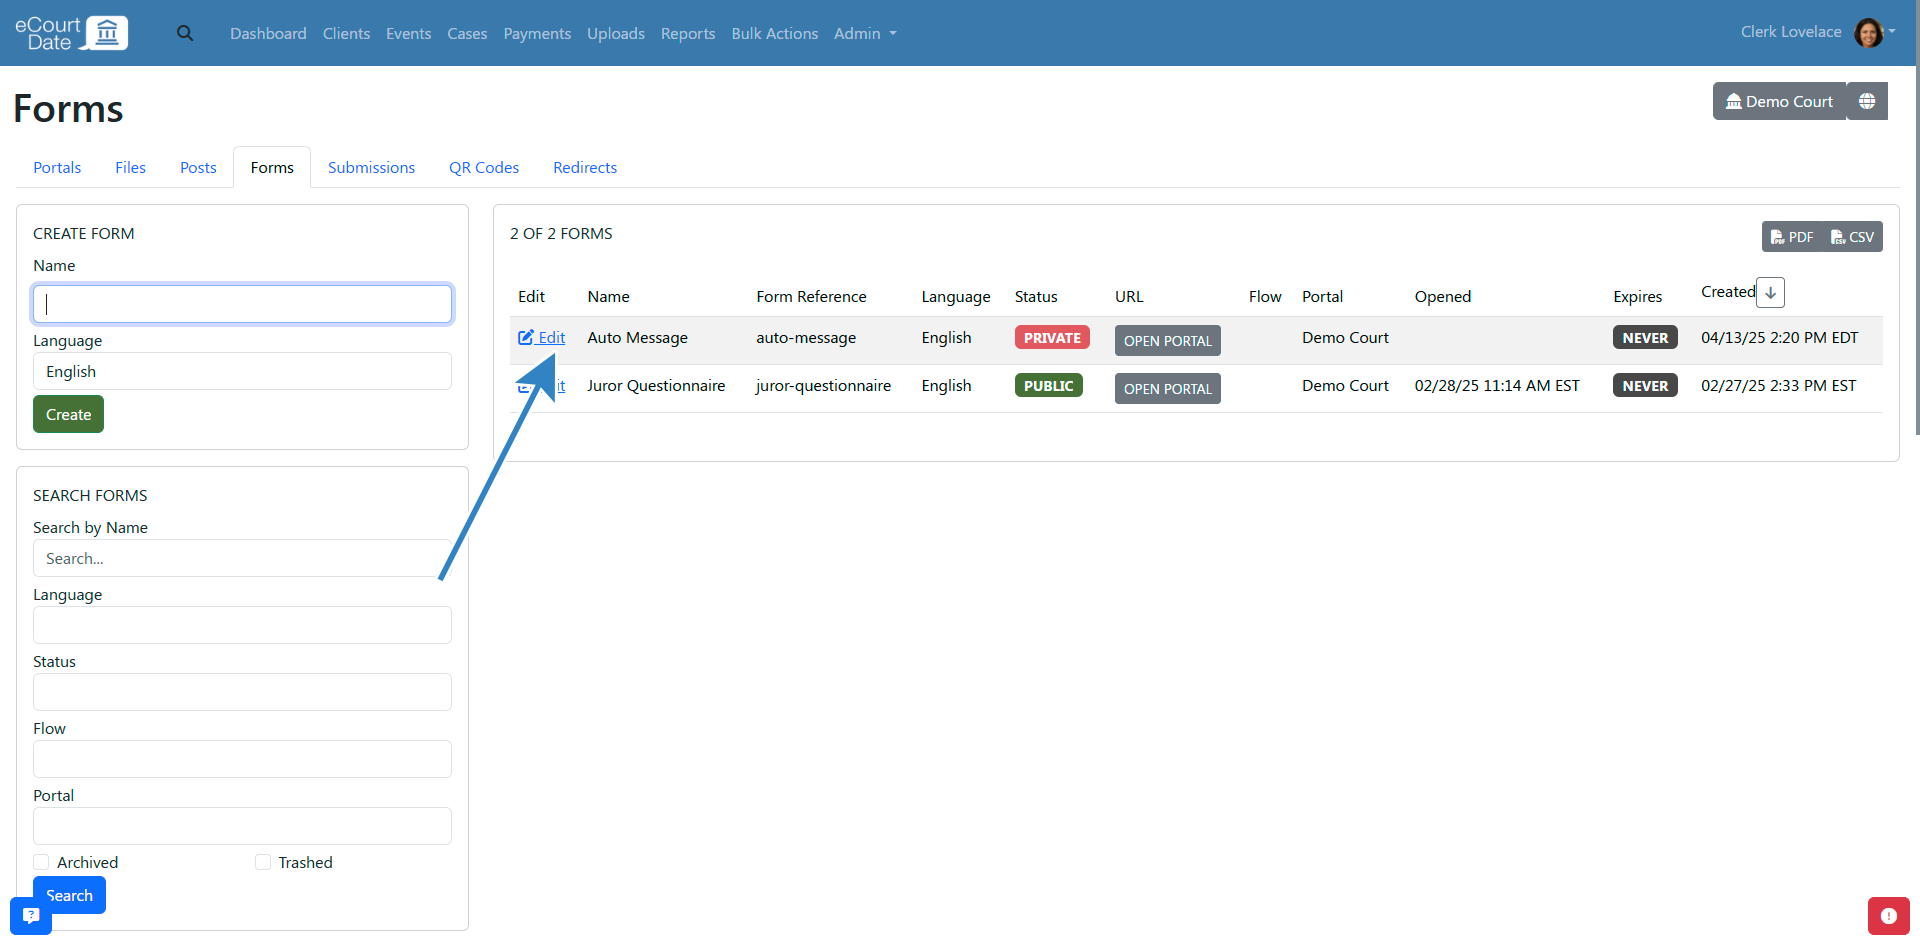
- Go to Admin > Forms in the top navigation bar.
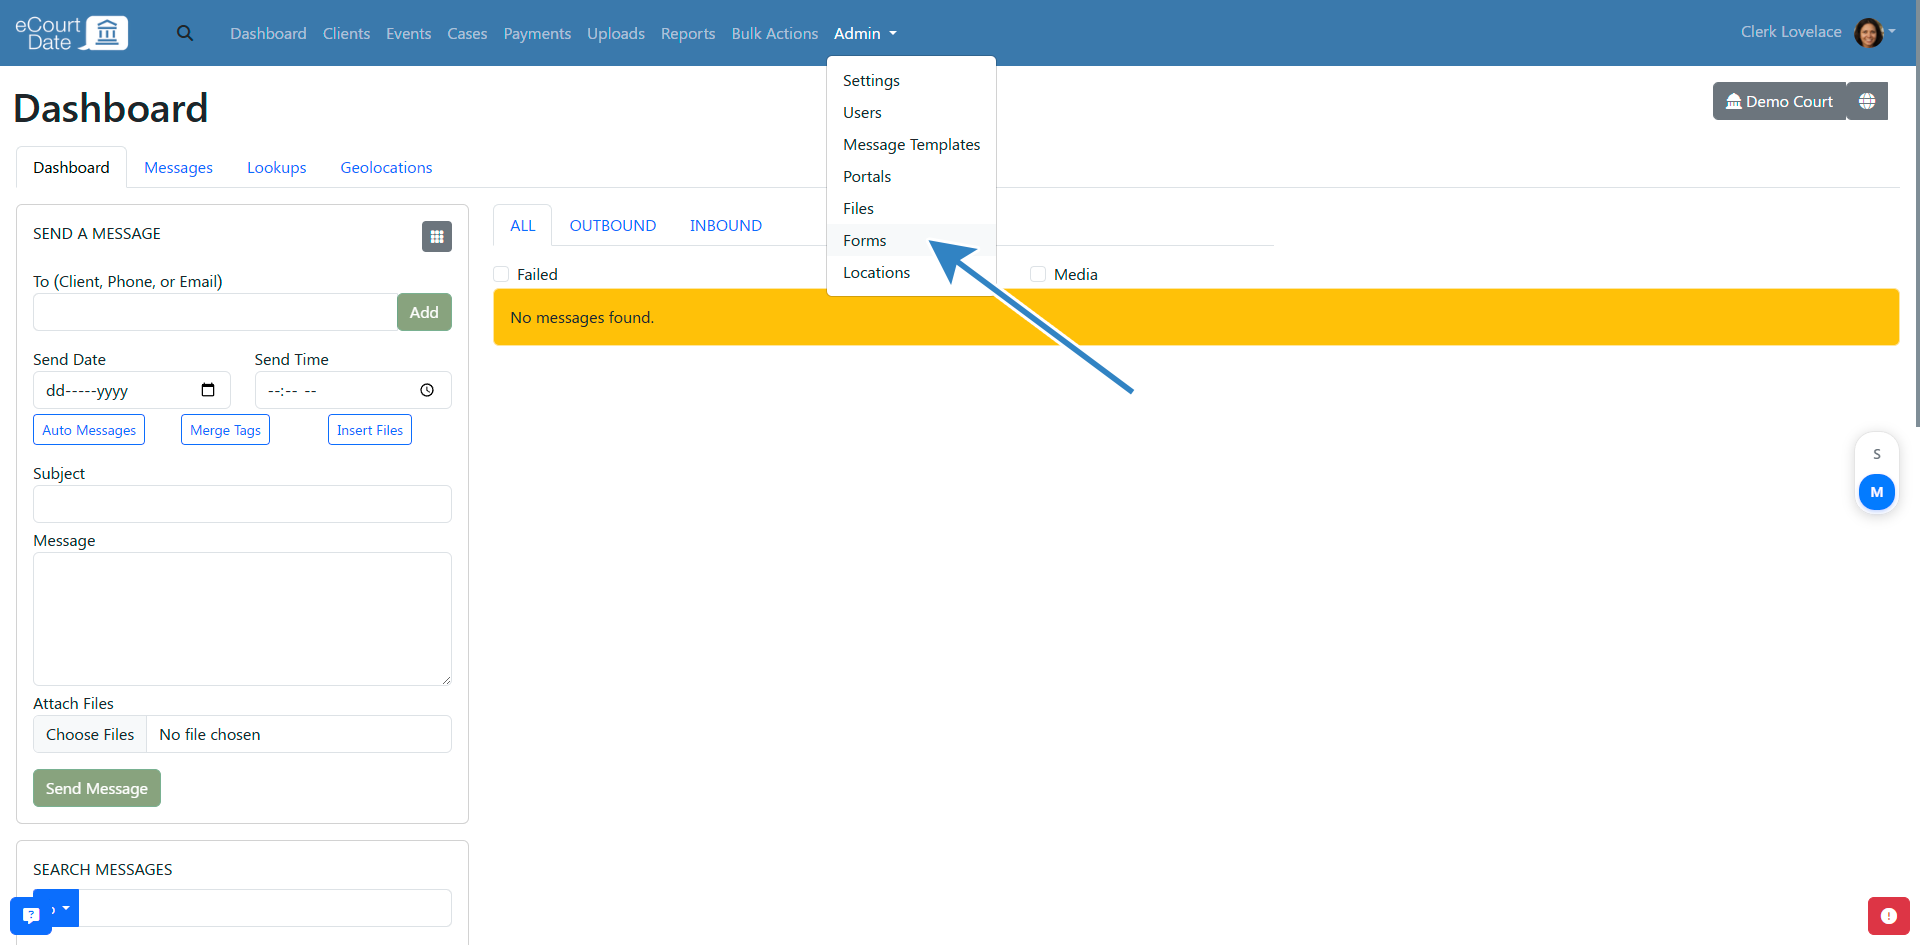
- Create a new form or edit an existing one.
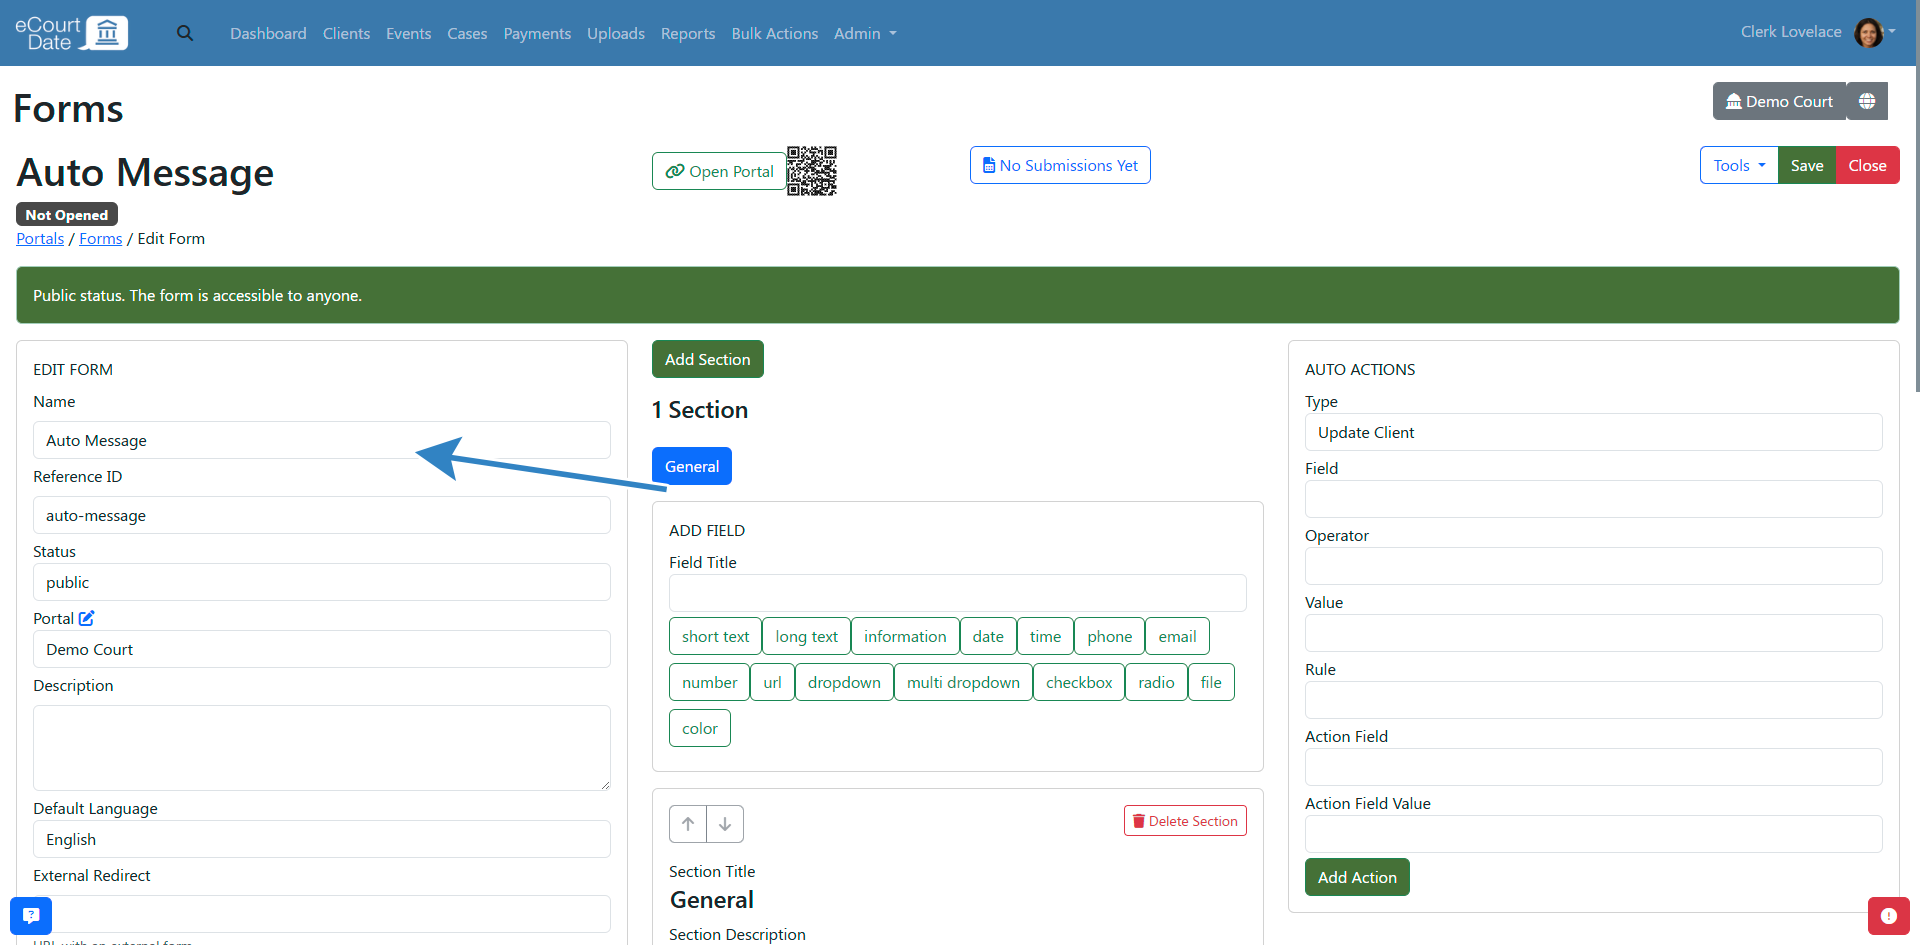
- In the Trigger Auto Message field, select the auto message you want to trigger when the form is submitted.
- Click the Save button to apply your changes.
- Any form submissions will automatically trigger the auto message.
What to Expect
After creating and configuring an auto message, it will trigger based on the conditions you set. Messages with a Manual trigger will only send when you explicitly assign them. Automated triggers fire immediately when the condition is met (or after the configured delay). Simulate mode messages appear in the system but are not delivered to clients. Changes take effect immediately after you click Save.
Best Practices
- Start with the Trigger set to Manual and test thoroughly using the preview and simulate mode before enabling an automated trigger.
- Use the Delay to Business Hours option to avoid sending messages outside of business hours.
- Combine auto messages with flows for multi-step communication sequences (e.g., a welcome message auto message paired with a court reminder flow).
- Keep your message templates concise and use merge tags to personalize content for each client.
- Review the Filters section carefully to ensure messages only go to the intended clients.
Frequently Asked Questions
Q: Can I use an auto message for both automated triggers and manual sending?
A: Yes. Set the trigger to the desired automated event, and you can still select the auto message manually from a client record, bulk action, or form. The automated trigger and manual usage work independently.
Q: What is the difference between attaching a file and inserting a file link?
A: Attaching a file sends the file directly with the message (subject to size limits: 40MB for email, 1MB for SMS/MMS). Inserting a file link adds a merge tag that generates a download link in the message, which has no file size limit for the recipient.
Q: Can I send an auto message in multiple languages?
A: Yes. Configure message templates for each language in the auto message settings. The system will send the appropriate language version based on the client's language preference.
Q: What happens if I enable an automated trigger on an existing auto message?
A: The trigger will apply to new events going forward. It will not retroactively send messages for events that already occurred.
Troubleshooting
Issue: Auto message is not triggering automatically.
Symptoms: The expected trigger event occurs (e.g., a client is created), but no message is generated.
Solution:
- Open the auto message and verify the Trigger field is set to the correct event (not Manual).
- Check the Filters section to ensure the client's status matches the Enabled Statuses.
- Verify that Simulate Mode is disabled if you expect messages to be delivered.
- Click Save to ensure all changes are applied.
Issue: Messages are being sent outside of business hours.
Symptoms: Clients receive messages late at night or on weekends.
Solution:
- Open the auto message and scroll to the Scheduling section.
- Enable the Delay to Business Hours checkbox.
- Click Save to apply the change.
Issue: File attachment is not included in the message.
Symptoms: The recipient does not receive the attached file.
Solution:
- Verify the file size does not exceed the channel limit (40MB for email, 1MB for SMS/MMS).
- Open the auto message and confirm a file is selected in the Attach File dropdown.
- Click Save to apply changes.
Related Articles
Auto messages allow you to send one-off or recurring messages to clients automatically based on triggers, or to pre-populate message content when sending manually or in bulk.
### Overview
Auto messages in eCourtDate provide a flexible way to automate client communications. You can configure an auto message to fire when a specific event occurs (such as a client being created or a payment being received), on a recurring schedule, or only when triggered manually. Auto messages integrate with flows, bulk actions, and forms to give your agency a comprehensive messaging toolkit.
- Send automated messages when clients, events, payments, warrants, or form submissions are created or updated.
- Schedule recurring messages on a monthly, weekly, or daily basis based on client status.
- Use auto messages as reusable templates for manual one-off or bulk communications.
- Combine auto messages with flows to build complete multi-message sequences.
### Prerequisites
Before creating an auto message, ensure you have the following:
- An eCourtDate staging or production agency
- Super admin access, or the **Create Auto Messages** and **Update Auto Messages** permissions
- At least one client record in the system for testing
### How-To Steps
#### Step 1: Import a Sample Auto Message (Optional)
Importing a sample auto message is a quick way to get started.
1. Go to **Admin** > **Messaging** in the top navigation bar.

2. Click the **Sample Templates** tab.

3. Review the sample templates in the **Auto Messages** section.

4. Click the **Import** button for the sample auto message you want to use.

5. You will be redirected to the newly created auto message.

6. Edit the auto message to customize it for your agency or start assigning it to records.

#### Step 2: Create an Auto Message from Scratch
1. Go to **Admin** > **Messaging** in the top navigation bar.

2. Click the **Auto Messages** tab.

3. Fill out the **Create Auto Message** form.

4. Click the **Create** button.

5. You will be redirected to the newly created auto message.
6. Follow the steps below to edit and configure the auto message.

#### Step 3: Edit an Auto Message
Review and configure the following minimum settings:
- **Auto Message Name**: the internal name of the auto message
- **Trigger**: when the auto message is triggered (use **Manual** to only send the auto message manually)
- **Message Templates**: the message template to use, with English as the default language
- **Scheduling**: when the auto message is sent

Click the **Save** button to apply your changes. We recommend testing the auto message with the **Trigger** set to **Manual** before assigning a specific trigger.

#### Step 4: Configure the Trigger
Auto messages are based on the **Trigger** field. If set to **Manual**, the auto message is only available for manual usage.
Choose a specific trigger based on your needs:
- When a client is created
- When a client is updated
- When a payment is created or updated
- When an event is created or updated
- When a form submission is created
- When a warrant is created or updated
- Monthly, weekly, or daily recurring messages based on a client's status

Based on the trigger, you can also restrict the auto message to specific statuses and other filters using the **Filters** section.
#### Step 5: Restrict to Specific Statuses
1. Scroll down to the **Filters** section.
2. Set the **Enabled Statuses** to the statuses you want to restrict the message to.
3. Include additional statuses and filters based on your message trigger.

#### Step 6: Add Additional Recipients
Beyond the client, you can add additional recipients to an auto message. This functions similar to a BCC field in an email.
1. Enter a comma-separated list of phone numbers, email addresses, or both in the **Additional Recipients** field.

#### Step 7: Configure Scheduling
If an auto message is triggered, you can delay when the message is sent.
1. Scroll down to the **Scheduling** section.
2. Set the **Delay** field to the number of minutes to delay the message from when the trigger is met.
3. Enable the **Delay to Business Hours** checkbox to delay the message to the earliest business hour if the trigger occurs outside of business hours.

#### Step 8: Attach a File
You can attach an individual file to an auto message.
1. Click the **Attach File** dropdown.

2. Select the file you want to attach.

3. Click the **Save** button to apply your changes.

Note: emails support attachments up to 40MB. SMS and MMS support attachments up to 1MB.
#### Step 9: Insert File Links
You can use the **Insert Files** button to insert links to files directly in the message. This allows you to include multiple files without file size limits on the recipient's end.
1. Click the **Insert Files** button.
2. Click each file you want to include in the message.
3. A merge tag for each file will be inserted into the message.
4. Move the merge tag to the desired location in your message.

#### Step 10: Preview the Auto Message
1. Click the **Preview** button while editing the auto message.

2. Enable the **Simulate Client** checkbox to see a preview with sample client information.
3. Or use the **Search Clients** field to filter for a specific client.
4. If the client has related records (events, payments), the preview will list them.
5. Click the **Preview** button to see the rendered messages.

#### Step 11: Enable Simulate Mode
Enable **Simulate Mode** and click **Save** to test the auto message without actually sending it. Any messages assigned to the auto message will be created in simulate mode and will not be delivered.

#### Step 12: Send an Auto Message Manually
Once you have an auto message created, you can assign it to a record manually.
#### Sending from a Client Record
1. Click **Clients** in the top navigation bar.

2. Fill in the **Create Client** form or click **Edit** for an existing client.

3. You have two options:
- Click the **Send Auto Message** button and select your auto message from the dropdown to send immediately.

- In the **Send a Message** section, select your auto message from the **Auto Message** dropdown to pre-populate the message and customize it before sending.

#### Sending from Bulk Actions
1. Click **Bulk Actions** in the top navigation bar.

2. Create a new bulk action or edit an existing one with the **Action Type** set to **Send a Message**.

3. Select your auto message from the **Auto Message** dropdown to pre-populate the message content.


#### Sending from Forms
1. Go to **Admin** > **Forms** in the top navigation bar.

2. Create a new form or edit an existing one.


3. In the **Trigger Auto Message** field, select the auto message you want to trigger when the form is submitted.

4. Click the **Save** button to apply your changes.

5. Any form submissions will automatically trigger the auto message.
### What to Expect
After creating and configuring an auto message, it will trigger based on the conditions you set. Messages with a **Manual** trigger will only send when you explicitly assign them. Automated triggers fire immediately when the condition is met (or after the configured delay). Simulate mode messages appear in the system but are not delivered to clients. Changes take effect immediately after you click **Save**.
### Best Practices
- Start with the **Trigger** set to **Manual** and test thoroughly using the preview and simulate mode before enabling an automated trigger.
- Use the **Delay to Business Hours** option to avoid sending messages outside of business hours.
- Combine auto messages with flows for multi-step communication sequences (e.g., a welcome message auto message paired with a court reminder flow).
- Keep your message templates concise and use merge tags to personalize content for each client.
- Review the **Filters** section carefully to ensure messages only go to the intended clients.
### Frequently Asked Questions
**Q: Can I use an auto message for both automated triggers and manual sending?**
A: Yes. Set the trigger to the desired automated event, and you can still select the auto message manually from a client record, bulk action, or form. The automated trigger and manual usage work independently.
**Q: What is the difference between attaching a file and inserting a file link?**
A: Attaching a file sends the file directly with the message (subject to size limits: 40MB for email, 1MB for SMS/MMS). Inserting a file link adds a merge tag that generates a download link in the message, which has no file size limit for the recipient.
**Q: Can I send an auto message in multiple languages?**
A: Yes. Configure message templates for each language in the auto message settings. The system will send the appropriate language version based on the client's language preference.
**Q: What happens if I enable an automated trigger on an existing auto message?**
A: The trigger will apply to new events going forward. It will not retroactively send messages for events that already occurred.
### Troubleshooting
**Issue:** Auto message is not triggering automatically.
**Symptoms:** The expected trigger event occurs (e.g., a client is created), but no message is generated.
**Solution:**
1. Open the auto message and verify the **Trigger** field is set to the correct event (not **Manual**).
2. Check the **Filters** section to ensure the client's status matches the **Enabled Statuses**.
3. Verify that **Simulate Mode** is disabled if you expect messages to be delivered.
4. Click **Save** to ensure all changes are applied.
**Issue:** Messages are being sent outside of business hours.
**Symptoms:** Clients receive messages late at night or on weekends.
**Solution:**
1. Open the auto message and scroll to the **Scheduling** section.
2. Enable the **Delay to Business Hours** checkbox.
3. Click **Save** to apply the change.
**Issue:** File attachment is not included in the message.
**Symptoms:** The recipient does not receive the attached file.
**Solution:**
1. Verify the file size does not exceed the channel limit (40MB for email, 1MB for SMS/MMS).
2. Open the auto message and confirm a file is selected in the **Attach File** dropdown.
3. Click **Save** to apply changes.
### Related Articles
- [How to Create a Flow](/how-to-create-a-flow)
- [How to Manage Agency Emails](/how-to-manage-agency-emails)
- [How to Use Merge Tags](/how-to-use-merge-tags)
- [How to Send a One-off Message](/how-to-send-a-one-off-message)
- [How to Build Automated Workflows](/how-to-build-automated-workflows)
- [How to Manage Clients](/how-to-manage-clients)