Roles pair enabled permissions with hidden navigations so every person at your agency reaches only the records and screens their job needs.
A role in eCourtDate is a saved set of permissions and hidden navigations that you attach to the people at your agency. Roles live on the Roles tab under Admin > Users, and each person picks up the permissions from every role assigned to them.
Overview
- What it is: A named record that holds a list of enabled permissions and a list of hidden navigations
- Why it matters: Permissions decide which records a person can view, create, update, or trash, so a tight role keeps client and case data away from staff who do not need it
- Who uses it: Agency administrators and Super Admins who manage staff access
- Where to find it: Go to Admin > Users, then click the Roles tab
Super Admin
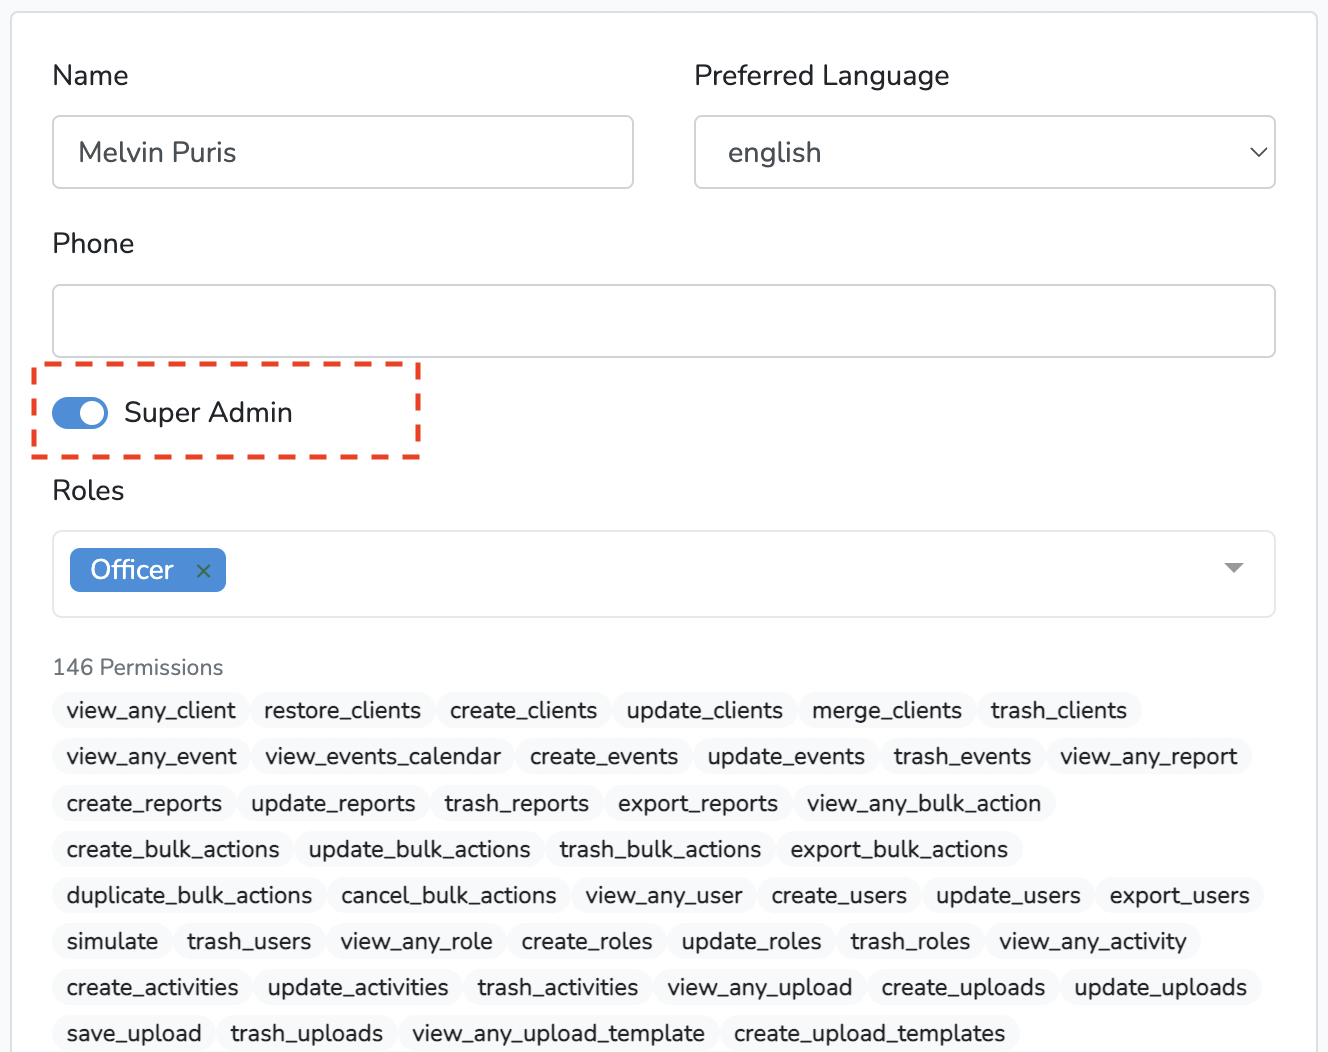
Super Admin is a checkbox on an account, not an entry in the Roles list. A Super Admin passes every permission check and sees every navigation no matter which roles are assigned, so keep it for IT and help desk staff. The Users list shows a Super Admin column with a green check on each account that has it.
Prerequisites
- A Super Admin account, or a role that includes View Any User Role, Create User Roles, and Update User Roles
- Super Admin access to assign a role, because the Roles field on an account only appears when you are a Super Admin
- A list of the staff at your agency and the records each person needs to reach
How-To Steps
Open the Roles Page
- Click Admin > Users in the top navigation.
- Click the Roles tab.
- Review the list, which shows the Name, Permissions, Hidden Navigations, Creator, Created, and Updated columns for every role.
Create a Role
- Enter a name in the Name field of the Create Role card.
- Click Create.
- Click the edit icon beside the new role, which appears at the top of the list.
Import a Sample Role
- Scroll to the Import Sample card on the left of the Roles page.
- Read the description under each sample name.
- Click Import under the sample you want.
| Sample |
Description |
| Admin |
Admin role with all permissions for the agency; excluding the Console. |
| Analyst |
User role with limited read-only permissions. |
| Editor |
User role with the ability to create and edit records; without editing agency settings. |
| Guest |
Guest role with limited permissions. |
| ConsoleUser |
Console only role with limited read-only permissions. |
| Security |
Console only role with admin permissions. |
| Jurisdiction Admin |
Assign this role to a user who will be managing the jurisdiction with state agencies. |
Every sample except Admin is created with the settings, console, setup, checklist, and uploads navigations already hidden. Jurisdiction Admin only appears in the us-texas region.
Set Permissions on a Role
- Click the edit icon beside the role you want to change.
- Enter a new name in the Role Name field if the role needs renaming.
- Select each permission you need in the Enabled Permissions field.
- Click Create Permissions, View/Read Permissions, Update Permissions, or Trash Permissions to add a whole group of permissions in one click.
- Click Remove All to clear the field, or Add All to select every permission.
- Click Save.
The line under Enabled Permissions counts how many of the available permissions are enabled as you make changes.
Hide Navigations for a Role
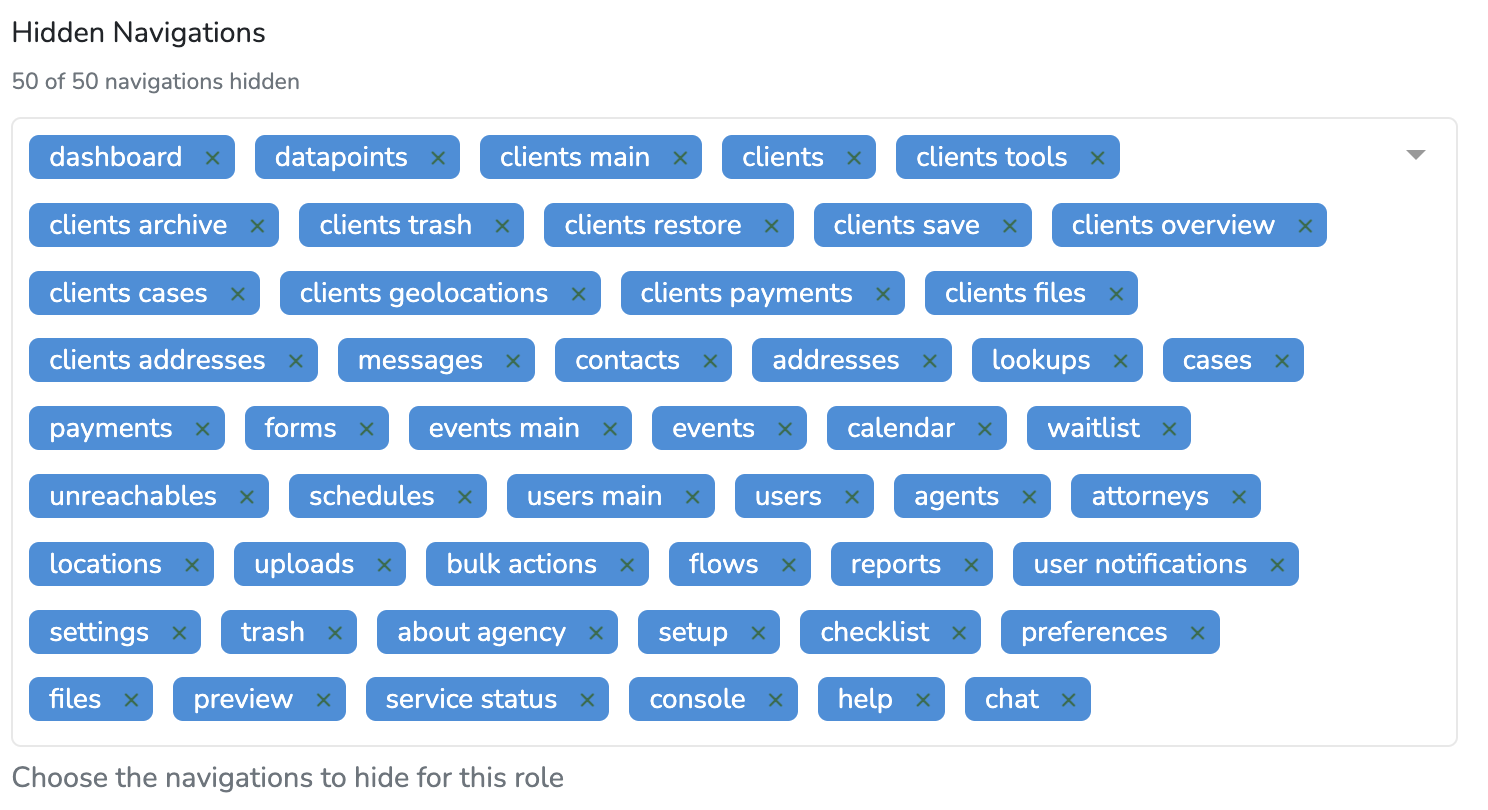
- Scroll to the Hidden Navigations field on the role edit page.
- Select each navigation you want to hide from this role.
- Click Save.
Hidden navigations remove links from the main top navigation and from the tab strip at the top of a page. They do not remove permissions. Hiding the settings navigation hides the entire Admin menu, and a Super Admin ignores hidden navigations completely.
Assign a Role to a User
- Click Admin > Users in the top navigation.
- Click the edit icon beside the person you want to change.
- Select one or more roles in the Roles field.
- Click Save.
The badges below the Roles field list every permission the account ends up with.
Archive or Trash a Role
- Open the role you want to remove.
- Click Tools.
- Click Archive to set the role aside, or Trash to remove it.
- Click Restore in the same menu to bring back an archived or trashed role.
To find these roles again, select the Archived or Trashed checkbox in the Search Roles card and click Search. You can also select several roles in the list and use the Archive or Trash buttons, then click Confirm. The Restore button takes their place while you are viewing archived or trashed roles.
Permission Reference
The Enabled Permissions field covers the areas below. Not every area offers all four actions.
| Area |
Permissions |
| Clients |
View Any Client, Create Clients, Update Clients, Trash Clients |
| Contacts |
View Any Contacts, Create Contacts, Update Contacts, Trash Contacts |
| Cases |
View Any Case, Create Cases, Update Cases, Trash Cases |
| Events |
View Any Event, Create Events, Update Events, Trash Events |
| Checkins |
View Any Checkin, Create Checkins, Update Checkins |
| Payments |
View Any Payment, Create Payments, Update Payments, Trash Payments |
| Messages |
View Any Message, Create Messages, Update Messages, Trash Messages |
| Comments |
Create Comments, Update Comments, Trash Comments |
| Flows |
Create Flows, Update Flows, Trash Flows |
| Auto Messages |
Create Auto Messages, Update Auto Messages, Trash Auto Messages |
| Bulk Actions |
Create Bulk Actions, Update Bulk Actions |
| Uploads |
View Any Upload, Create Uploads, Update Uploads, Trash Uploads |
| Upload Templates |
Create Upload Templates, Update Upload Templates, Trash Upload Templates |
| Locations |
Create Locations, Update Locations, Trash Locations |
| Attorneys |
Create Attorneys, Update Attorneys, Trash Attorneys |
| Portals |
Create Portals, Update Portals, Trash Portals |
| Files |
View Any File, Trash Files |
| Statuses |
View Any Status, Create Statuses, Update Statuses, Trash Statuses |
| Agency Phones |
Create Agency Phones, Update Agency Phones, Search Agency Phones, Trash Agency Phones |
| Agency Emails |
Create Agency Emails, Update Agency Emails, Trash Agency Emails |
| Users |
Create Users, Update Users, Trash Users |
| User Roles |
View Any User Role, Create User Roles, Update User Roles, Trash User Roles |
| Settings |
View Settings, Update Settings |
| Reports |
Create Reports, Update Reports, Trash Reports |
| Datasets |
View Any Dataset, Create Datasets, Update Datasets, Trash Datasets |
| Datapoints |
View Any Datapoint, Create Datapoints |
| Geolocations |
View Geolocations |
One permission changes behavior rather than granting an action. When a role includes Only Assigned Clients, the Clients page opens filtered to the clients assigned to that person instead of every client at your agency.
What to Expect
Creating a role shows a "Role created" alert and places the role at the top of the list. Saving a role shows a "Role updated" alert, and the right side of the role edit page lists everyone who currently holds the role with a count that links to the filtered Users list.
Permissions load when the app starts, so a person picks up a role change after a browser reload or a fresh sign in. Moving between pages inside the app does not refresh them.
Best Practices
- Grant only the permissions a job needs. Click Remove All, then add the permissions the work requires.
- Import a sample such as Analyst or Editor as a starting point, then trim it rather than building a role from nothing.
- Keep Super Admin for IT and help desk staff, since it overrides every role and every hidden navigation.
- Use Hidden Navigations to tidy the interface, and remove the matching permission when you need to block the action itself.
- Check the list on the right of the role edit page before you archive or trash a role, so you know who is affected.
Frequently Asked Questions
Q: Can one person hold more than one role?
A: Yes. The Roles field on an account accepts several roles at once, and the badges below it show the full permission list the account ends up with.
Q: Why is there no Roles field on the account I opened?
A: The Roles field only appears when you are signed in as a Super Admin. Ask a Super Admin at your agency to make the assignment.
Q: Can I edit the Super Admin role?
A: No. Super Admin is a checkbox on an account rather than an entry in the Roles list, so there is nothing to edit. Clear the checkbox and assign a role instead.
Q: Are there permissions for archiving and restoring records?
A: No. The Enabled Permissions field offers view, create, update, and trash permissions, plus a few standalone entries such as View Settings and Only Assigned Clients.
Q: Does hiding a navigation block the feature behind it?
A: No. Hidden Navigations only removes links from the top navigation and the page tabs. Remove the matching permission from the role to stop the action itself.
Troubleshooting
Issue: A person sees a red banner saying they have no permissions.
Symptoms: The message "You do not have any permissions assigned to your account. Please contact an administrator to assign permissions to your account." sits at the top of every page.
Solution: Go to Admin > Users, open the account, select at least one role in the Roles field, and click Save. A Super Admin account never sees this banner.
Issue: A role change has not reached the person yet.
Symptoms: They still see the old menus, or they still cannot open a record, after you saved the role.
Solution: Ask them to reload the browser or sign out and back in. Permissions load once when the app starts, so moving between pages inside the app does not pick up the change.
Issue: The Admin menu is missing for everyone on a role.
Symptoms: The top navigation shows the standard links but no Admin dropdown.
Solution: Open the role, remove settings from Hidden Navigations, and click Save. The Admin dropdown is tied to the settings navigation, and every imported sample except Admin starts with settings hidden.
Related Articles
A role in eCourtDate is a saved set of permissions and hidden navigations that you attach to the people at your agency. Roles live on the **Roles** tab under **Admin** > **Users**, and each person picks up the permissions from every role assigned to them.
### Overview
- **What it is:** A named record that holds a list of enabled permissions and a list of hidden navigations
- **Why it matters:** Permissions decide which records a person can view, create, update, or trash, so a tight role keeps client and case data away from staff who do not need it
- **Who uses it:** Agency administrators and Super Admins who manage staff access
- **Where to find it:** Go to **Admin** > **Users**, then click the **Roles** tab
#### Super Admin
**Super Admin** is a checkbox on an account, not an entry in the **Roles** list. A Super Admin passes every permission check and sees every navigation no matter which roles are assigned, so keep it for IT and help desk staff. The **Users** list shows a **Super Admin** column with a green check on each account that has it.

### Prerequisites
- A **Super Admin** account, or a role that includes **View Any User Role**, **Create User Roles**, and **Update User Roles**
- **Super Admin** access to assign a role, because the **Roles** field on an account only appears when you are a Super Admin
- A list of the staff at your agency and the records each person needs to reach
### How-To Steps
#### Open the Roles Page
1. Click **Admin** > **Users** in the top navigation.
2. Click the **Roles** tab.
3. Review the list, which shows the **Name**, **Permissions**, **Hidden Navigations**, **Creator**, **Created**, and **Updated** columns for every role.
#### Create a Role
1. Enter a name in the **Name** field of the **Create Role** card.
2. Click **Create**.
3. Click the edit icon beside the new role, which appears at the top of the list.
#### Import a Sample Role
1. Scroll to the **Import Sample** card on the left of the **Roles** page.
2. Read the description under each sample name.
3. Click **Import** under the sample you want.
| Sample | Description |
|--------|-------------|
| **Admin** | Admin role with all permissions for the agency; excluding the Console. |
| **Analyst** | User role with limited read-only permissions. |
| **Editor** | User role with the ability to create and edit records; without editing agency settings. |
| **Guest** | Guest role with limited permissions. |
| **ConsoleUser** | Console only role with limited read-only permissions. |
| **Security** | Console only role with admin permissions. |
| **Jurisdiction Admin** | Assign this role to a user who will be managing the jurisdiction with state agencies. |
Every sample except **Admin** is created with the settings, console, setup, checklist, and uploads navigations already hidden. **Jurisdiction Admin** only appears in the us-texas region.
#### Set Permissions on a Role
1. Click the edit icon beside the role you want to change.
2. Enter a new name in the **Role Name** field if the role needs renaming.
3. Select each permission you need in the **Enabled Permissions** field.
4. Click **Create Permissions**, **View/Read Permissions**, **Update Permissions**, or **Trash Permissions** to add a whole group of permissions in one click.
5. Click **Remove All** to clear the field, or **Add All** to select every permission.
6. Click **Save**.
The line under **Enabled Permissions** counts how many of the available permissions are enabled as you make changes.
#### Hide Navigations for a Role
1. Scroll to the **Hidden Navigations** field on the role edit page.
2. Select each navigation you want to hide from this role.
3. Click **Save**.
Hidden navigations remove links from the main top navigation and from the tab strip at the top of a page. They do not remove permissions. Hiding the settings navigation hides the entire **Admin** menu, and a Super Admin ignores hidden navigations completely.

#### Assign a Role to a User
1. Click **Admin** > **Users** in the top navigation.
2. Click the edit icon beside the person you want to change.
3. Select one or more roles in the **Roles** field.
4. Click **Save**.
The badges below the **Roles** field list every permission the account ends up with.
#### Archive or Trash a Role
1. Open the role you want to remove.
2. Click **Tools**.
3. Click **Archive** to set the role aside, or **Trash** to remove it.
4. Click **Restore** in the same menu to bring back an archived or trashed role.
To find these roles again, select the **Archived** or **Trashed** checkbox in the **Search Roles** card and click **Search**. You can also select several roles in the list and use the **Archive** or **Trash** buttons, then click **Confirm**. The **Restore** button takes their place while you are viewing archived or trashed roles.
#### Permission Reference
The **Enabled Permissions** field covers the areas below. Not every area offers all four actions.
| Area | Permissions |
|------|-------------|
| Clients | **View Any Client**, **Create Clients**, **Update Clients**, **Trash Clients** |
| Contacts | **View Any Contacts**, **Create Contacts**, **Update Contacts**, **Trash Contacts** |
| Cases | **View Any Case**, **Create Cases**, **Update Cases**, **Trash Cases** |
| Events | **View Any Event**, **Create Events**, **Update Events**, **Trash Events** |
| Checkins | **View Any Checkin**, **Create Checkins**, **Update Checkins** |
| Payments | **View Any Payment**, **Create Payments**, **Update Payments**, **Trash Payments** |
| Messages | **View Any Message**, **Create Messages**, **Update Messages**, **Trash Messages** |
| Comments | **Create Comments**, **Update Comments**, **Trash Comments** |
| Flows | **Create Flows**, **Update Flows**, **Trash Flows** |
| Auto Messages | **Create Auto Messages**, **Update Auto Messages**, **Trash Auto Messages** |
| Bulk Actions | **Create Bulk Actions**, **Update Bulk Actions** |
| Uploads | **View Any Upload**, **Create Uploads**, **Update Uploads**, **Trash Uploads** |
| Upload Templates | **Create Upload Templates**, **Update Upload Templates**, **Trash Upload Templates** |
| Locations | **Create Locations**, **Update Locations**, **Trash Locations** |
| Attorneys | **Create Attorneys**, **Update Attorneys**, **Trash Attorneys** |
| Portals | **Create Portals**, **Update Portals**, **Trash Portals** |
| Files | **View Any File**, **Trash Files** |
| Statuses | **View Any Status**, **Create Statuses**, **Update Statuses**, **Trash Statuses** |
| Agency Phones | **Create Agency Phones**, **Update Agency Phones**, **Search Agency Phones**, **Trash Agency Phones** |
| Agency Emails | **Create Agency Emails**, **Update Agency Emails**, **Trash Agency Emails** |
| Users | **Create Users**, **Update Users**, **Trash Users** |
| User Roles | **View Any User Role**, **Create User Roles**, **Update User Roles**, **Trash User Roles** |
| Settings | **View Settings**, **Update Settings** |
| Reports | **Create Reports**, **Update Reports**, **Trash Reports** |
| Datasets | **View Any Dataset**, **Create Datasets**, **Update Datasets**, **Trash Datasets** |
| Datapoints | **View Any Datapoint**, **Create Datapoints** |
| Geolocations | **View Geolocations** |
One permission changes behavior rather than granting an action. When a role includes **Only Assigned Clients**, the **Clients** page opens filtered to the clients assigned to that person instead of every client at your agency.
### What to Expect
Creating a role shows a "Role created" alert and places the role at the top of the list. Saving a role shows a "Role updated" alert, and the right side of the role edit page lists everyone who currently holds the role with a count that links to the filtered **Users** list.
Permissions load when the app starts, so a person picks up a role change after a browser reload or a fresh sign in. Moving between pages inside the app does not refresh them.
### Best Practices
- Grant only the permissions a job needs. Click **Remove All**, then add the permissions the work requires.
- Import a sample such as **Analyst** or **Editor** as a starting point, then trim it rather than building a role from nothing.
- Keep **Super Admin** for IT and help desk staff, since it overrides every role and every hidden navigation.
- Use **Hidden Navigations** to tidy the interface, and remove the matching permission when you need to block the action itself.
- Check the list on the right of the role edit page before you archive or trash a role, so you know who is affected.
### Frequently Asked Questions
**Q: Can one person hold more than one role?**
A: Yes. The **Roles** field on an account accepts several roles at once, and the badges below it show the full permission list the account ends up with.
**Q: Why is there no Roles field on the account I opened?**
A: The **Roles** field only appears when you are signed in as a **Super Admin**. Ask a Super Admin at your agency to make the assignment.
**Q: Can I edit the Super Admin role?**
A: No. **Super Admin** is a checkbox on an account rather than an entry in the **Roles** list, so there is nothing to edit. Clear the checkbox and assign a role instead.
**Q: Are there permissions for archiving and restoring records?**
A: No. The **Enabled Permissions** field offers view, create, update, and trash permissions, plus a few standalone entries such as **View Settings** and **Only Assigned Clients**.
**Q: Does hiding a navigation block the feature behind it?**
A: No. **Hidden Navigations** only removes links from the top navigation and the page tabs. Remove the matching permission from the role to stop the action itself.
### Troubleshooting
**Issue:** A person sees a red banner saying they have no permissions.
**Symptoms:** The message "You do not have any permissions assigned to your account. Please contact an administrator to assign permissions to your account." sits at the top of every page.
**Solution:** Go to **Admin** > **Users**, open the account, select at least one role in the **Roles** field, and click **Save**. A **Super Admin** account never sees this banner.
**Issue:** A role change has not reached the person yet.
**Symptoms:** They still see the old menus, or they still cannot open a record, after you saved the role.
**Solution:** Ask them to reload the browser or sign out and back in. Permissions load once when the app starts, so moving between pages inside the app does not pick up the change.
**Issue:** The **Admin** menu is missing for everyone on a role.
**Symptoms:** The top navigation shows the standard links but no **Admin** dropdown.
**Solution:** Open the role, remove settings from **Hidden Navigations**, and click **Save**. The **Admin** dropdown is tied to the settings navigation, and every imported sample except **Admin** starts with settings hidden.
### Related Articles
- [How to Manage Roles Assigned to a User](/how-to-manage-roles-assigned-to-a-user)
- [How to Manage Users](/how-to-manage-users)
- [How to Edit Your User Profile](/how-to-edit-your-user-profile)
- [How to Filter Assigned Clients by Users](/how-to-filter-assigned-clients-by-users)