Events and Calendars
How to Manage Events
9 min read
Updated Feb 15, 2026
Events represent any in-person or virtual appointment, such as a court hearing or office visit, and are the core record type for client notifications in eCourtDate.
Events represent any in-person or virtual appointment, such as a court hearing or office visit, and are the core record type for client notifications in eCourtDate.
Overview
Managing events in eCourtDate allows your agency to create, update, search, assign, archive, trash, and restore appointment records. Events tie directly to client communication workflows, so when you create or update an event, any assigned flows or auto messages automatically sync.
- What it does: Provides full lifecycle management for court hearings, office visits, and other scheduled appointments.
- Why it matters: Events drive automated client notifications through flows and auto messages, ensuring clients receive timely reminders.
- Who uses it: Agency administrators and staff responsible for scheduling and client communication.
- Expected outcome: Organized event records with automated, reliable client outreach.
Prerequisites
Before managing events, make sure you have:
- An active eCourtDate agency on staging or production
- Super admin access, or the Create Events and Update Events permissions
- Client records already created (if you plan to assign events to clients)
- (Optional) A flow configured for events if you want automated messages
How-To Steps
Create an Event
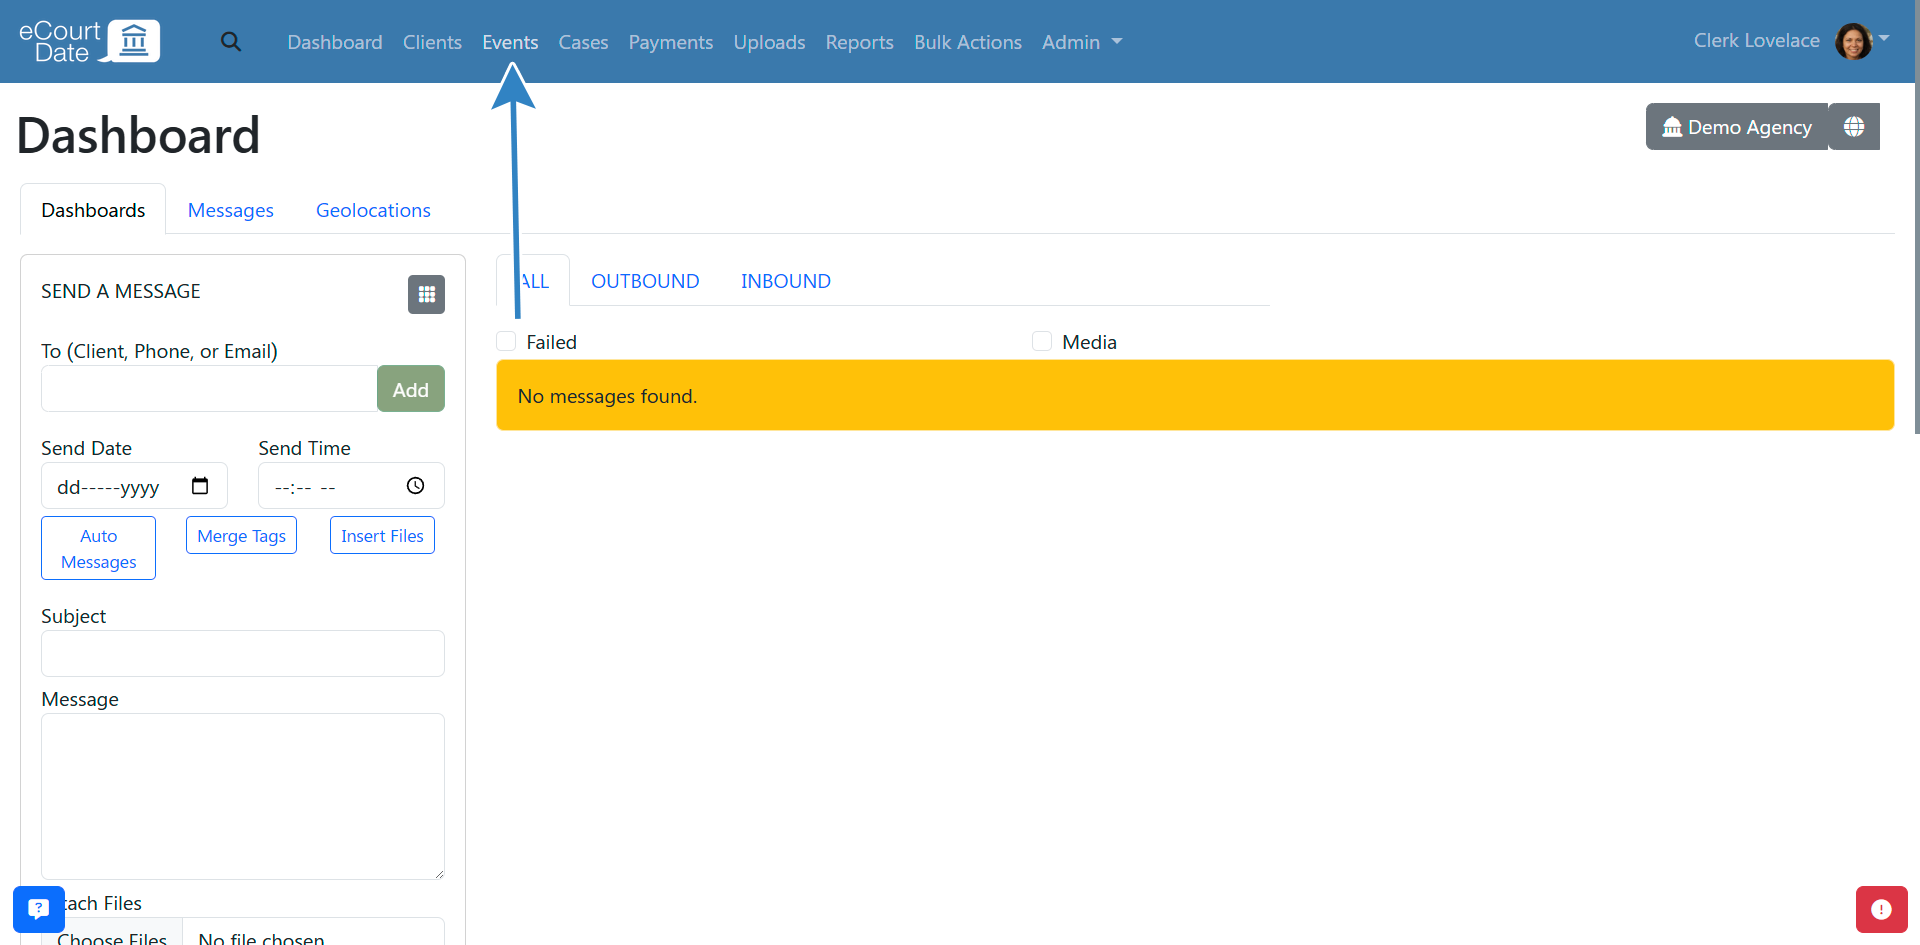
- Click Events in the top navigation bar.
- Fill in the Create Event form with the required details (event type, date, time, location, etc.).
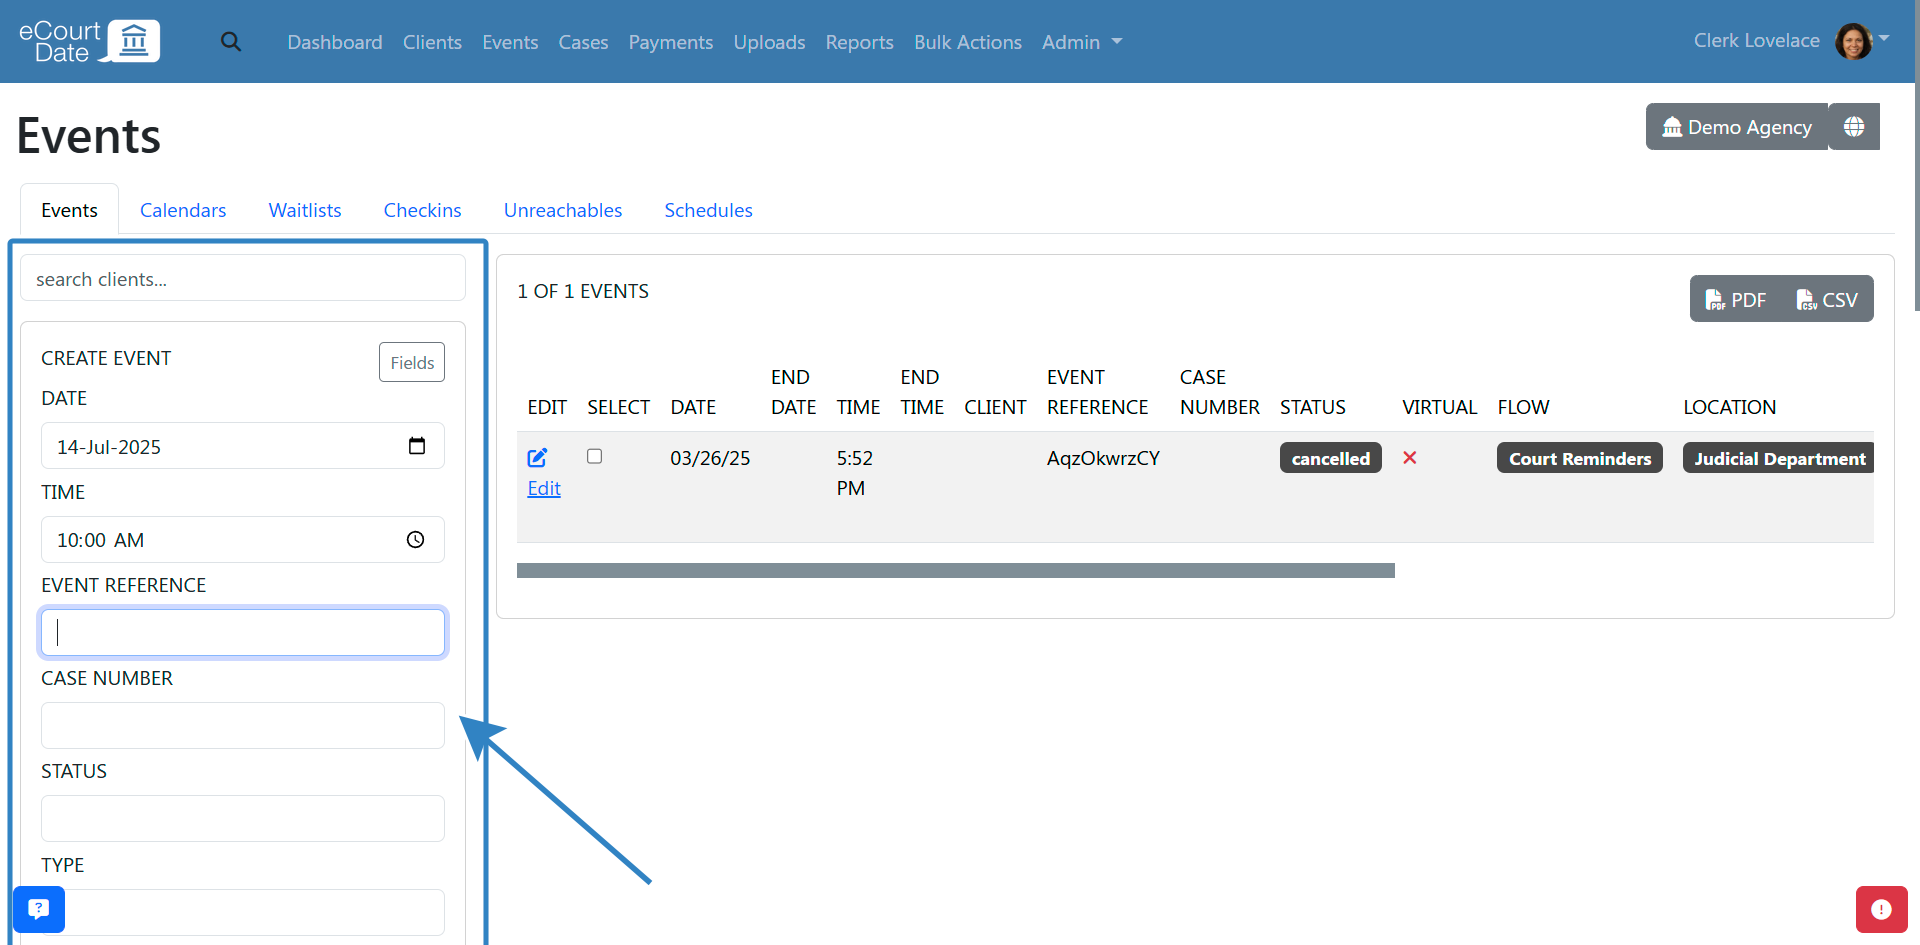
- Click the Create button.
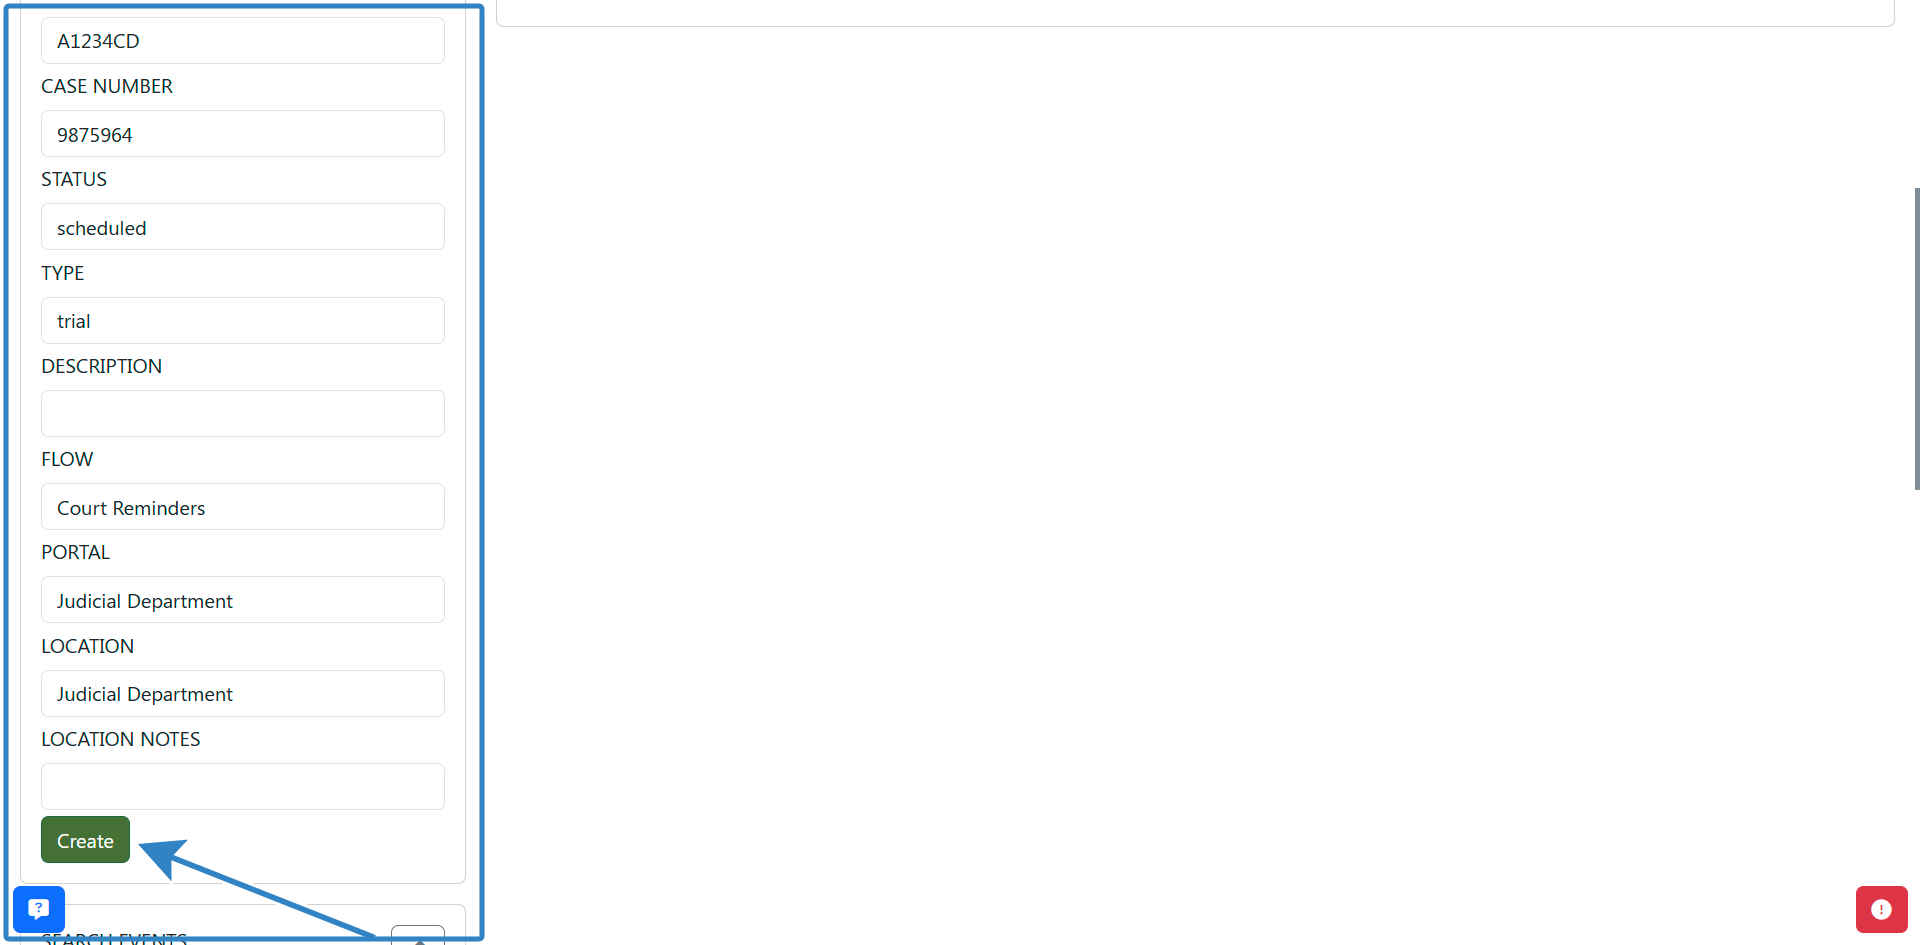
- Click the Edit button to view the newly created event, or fill in the form again to create another.
Update an Event
- Click Events in the top navigation bar.
- Search for the event you want to update.
- Click the Edit button to open the event.
- Update the event information as needed.
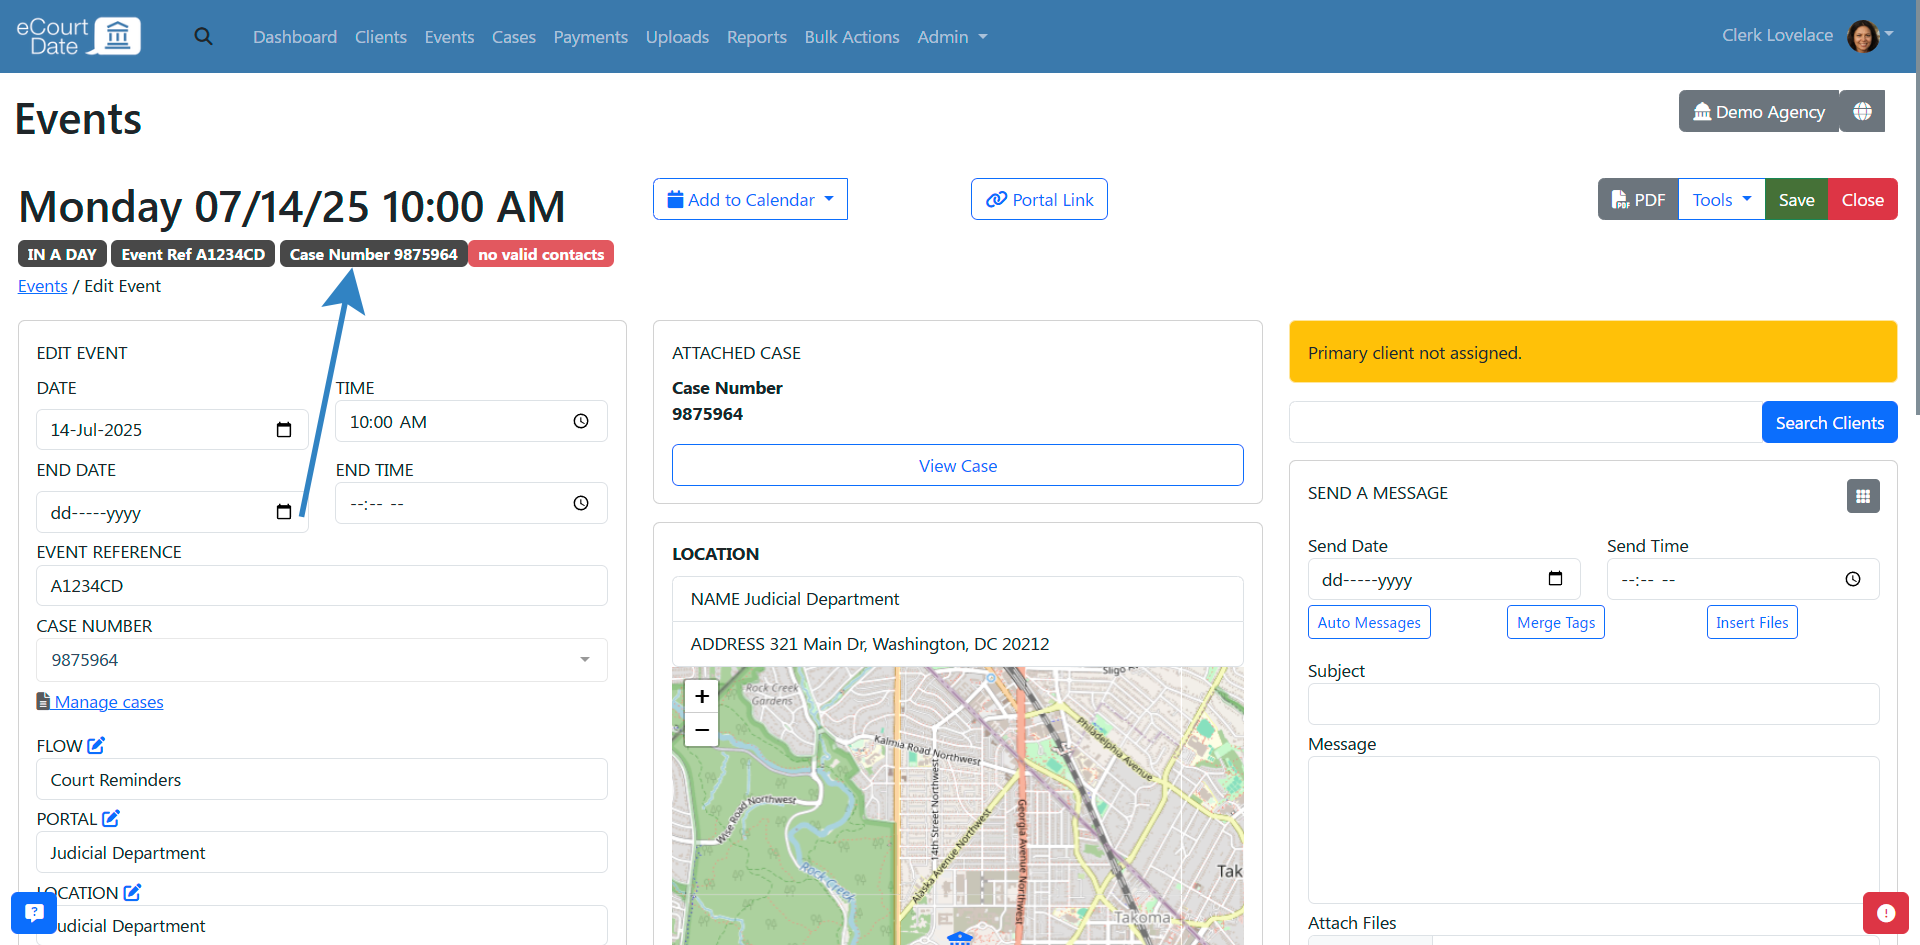
- Click the Save button.
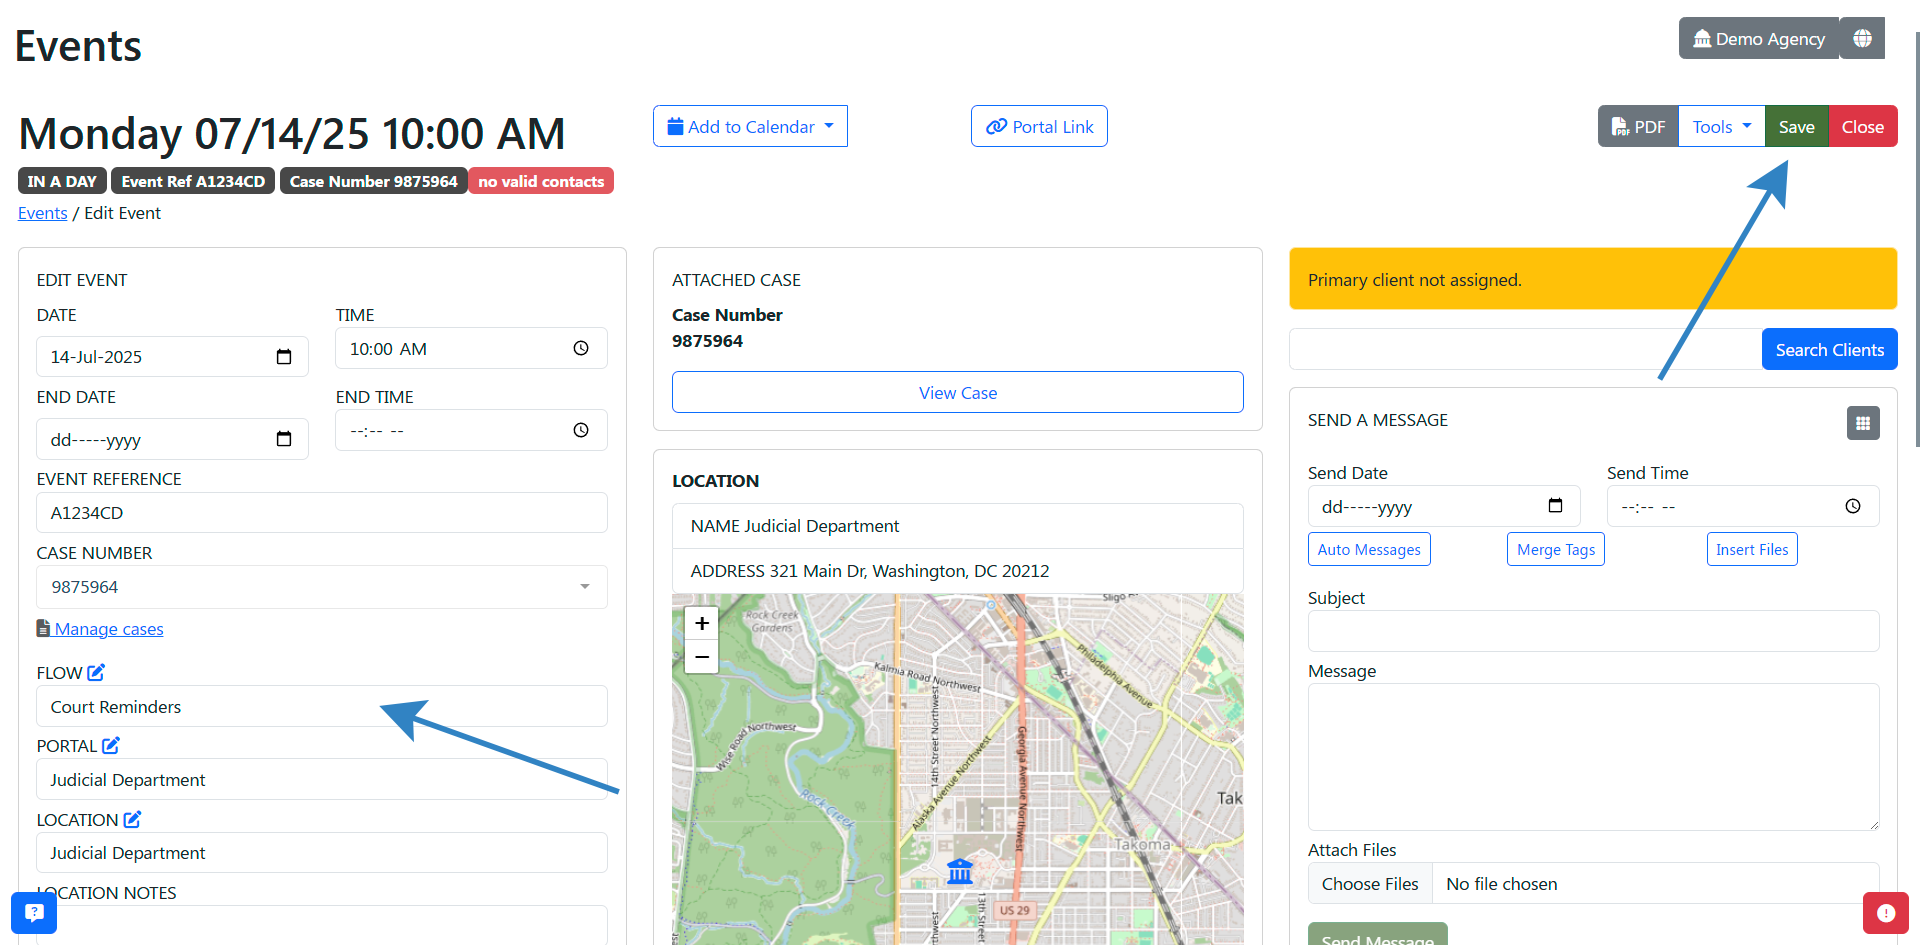
Assign an Event to a Client
Each event can be assigned to multiple clients. You can also designate one client as the primary.
- Click Events in the top navigation bar.
- Search for and open the event you want to assign.
- Click the Edit button.
- In the Attach to Client section, enter the client's name or ID and click the Search button.
- Select the client from the search results.
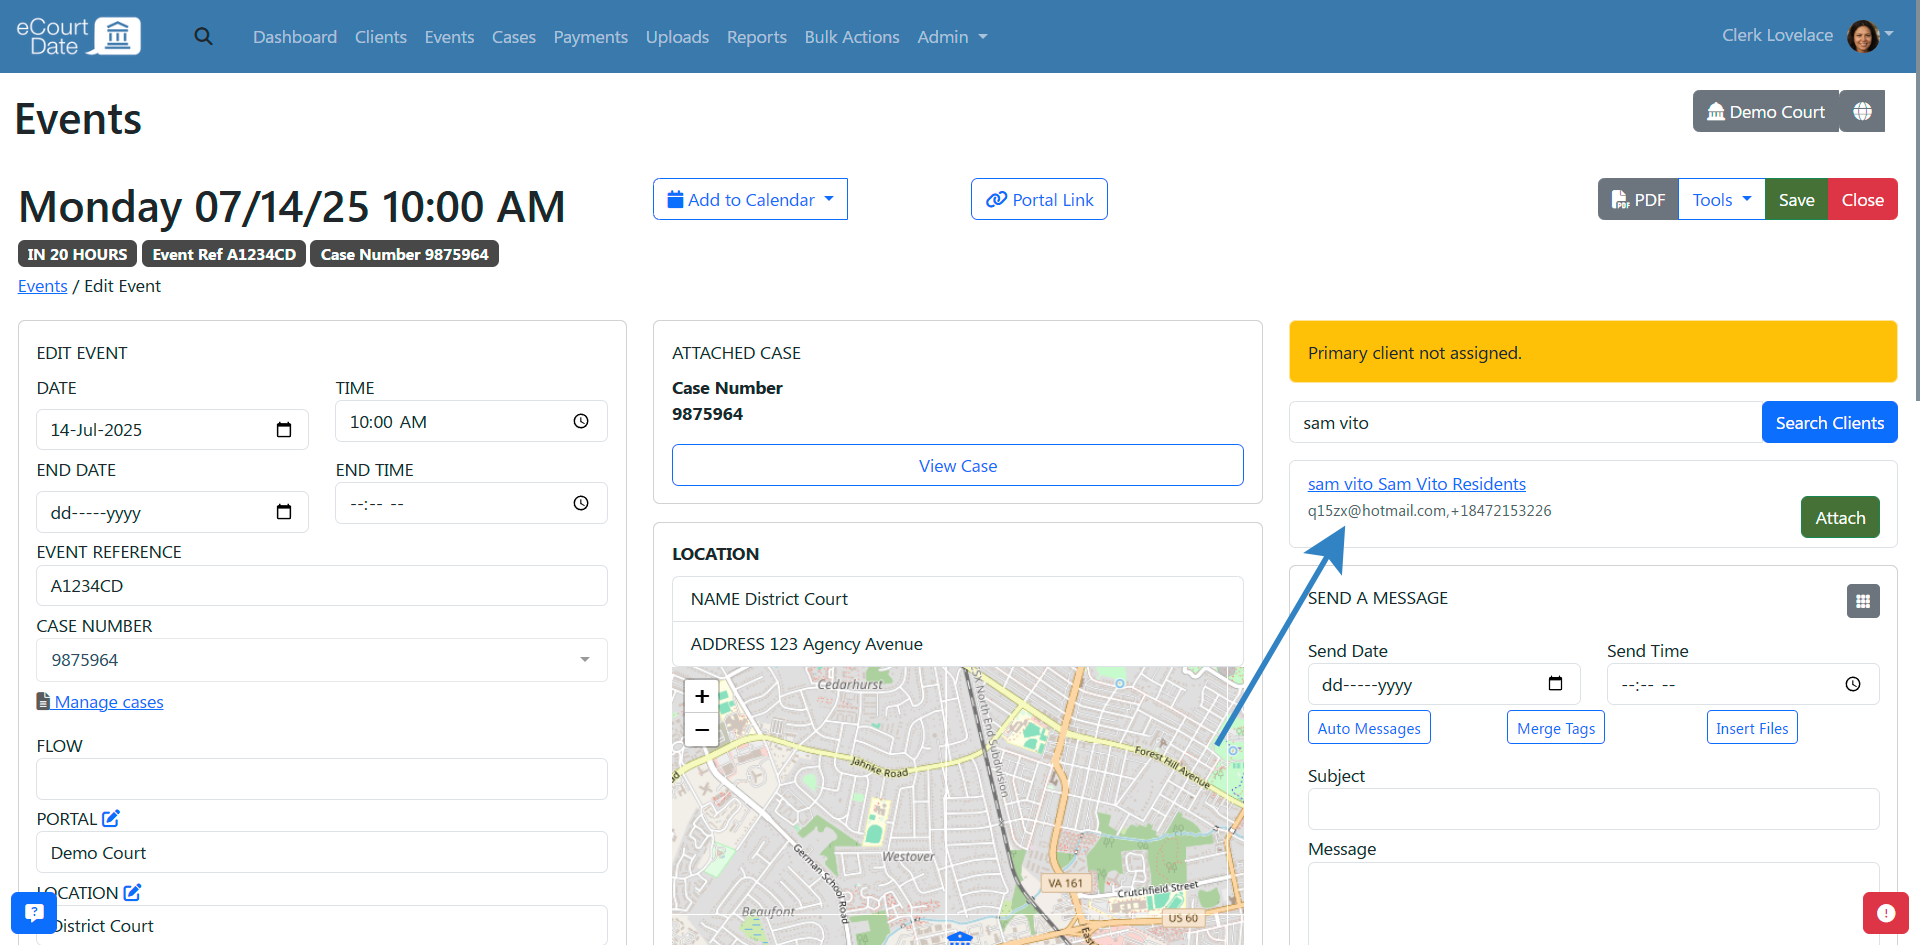
- Click the Attach button.
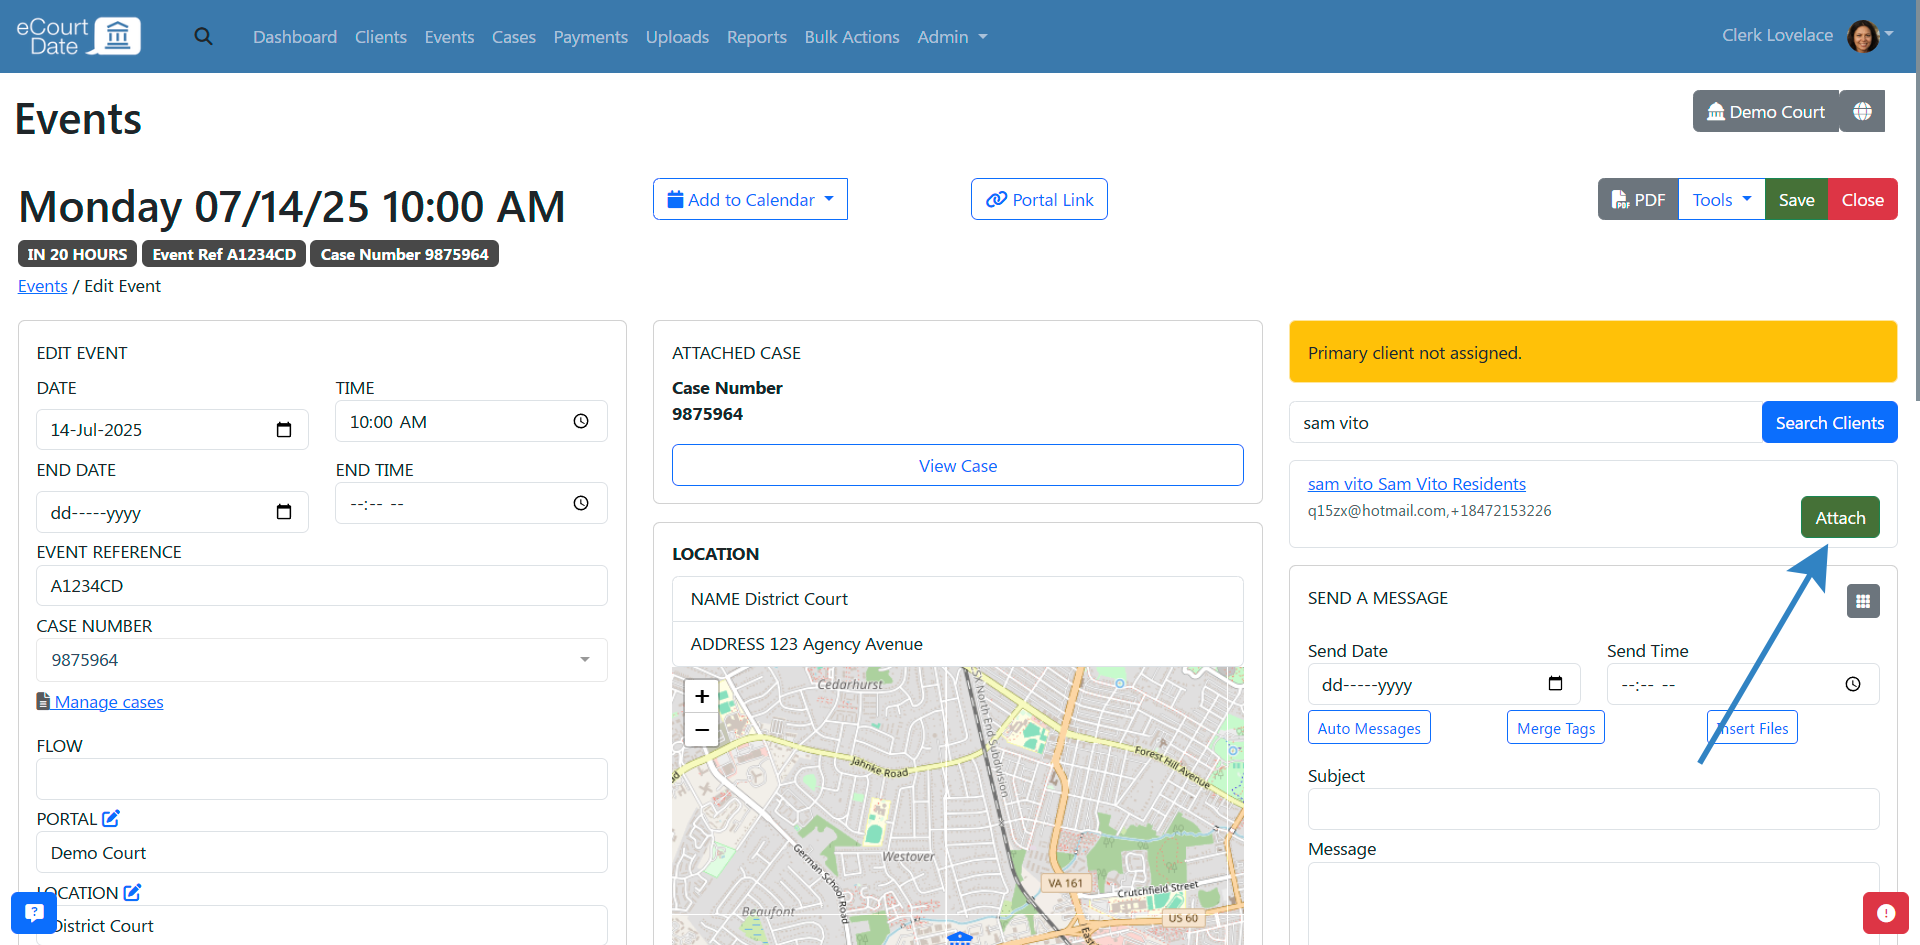
- Repeat steps 4 through 6 to attach additional clients.
- To designate a primary client, click the Make Primary button next to the client's name.
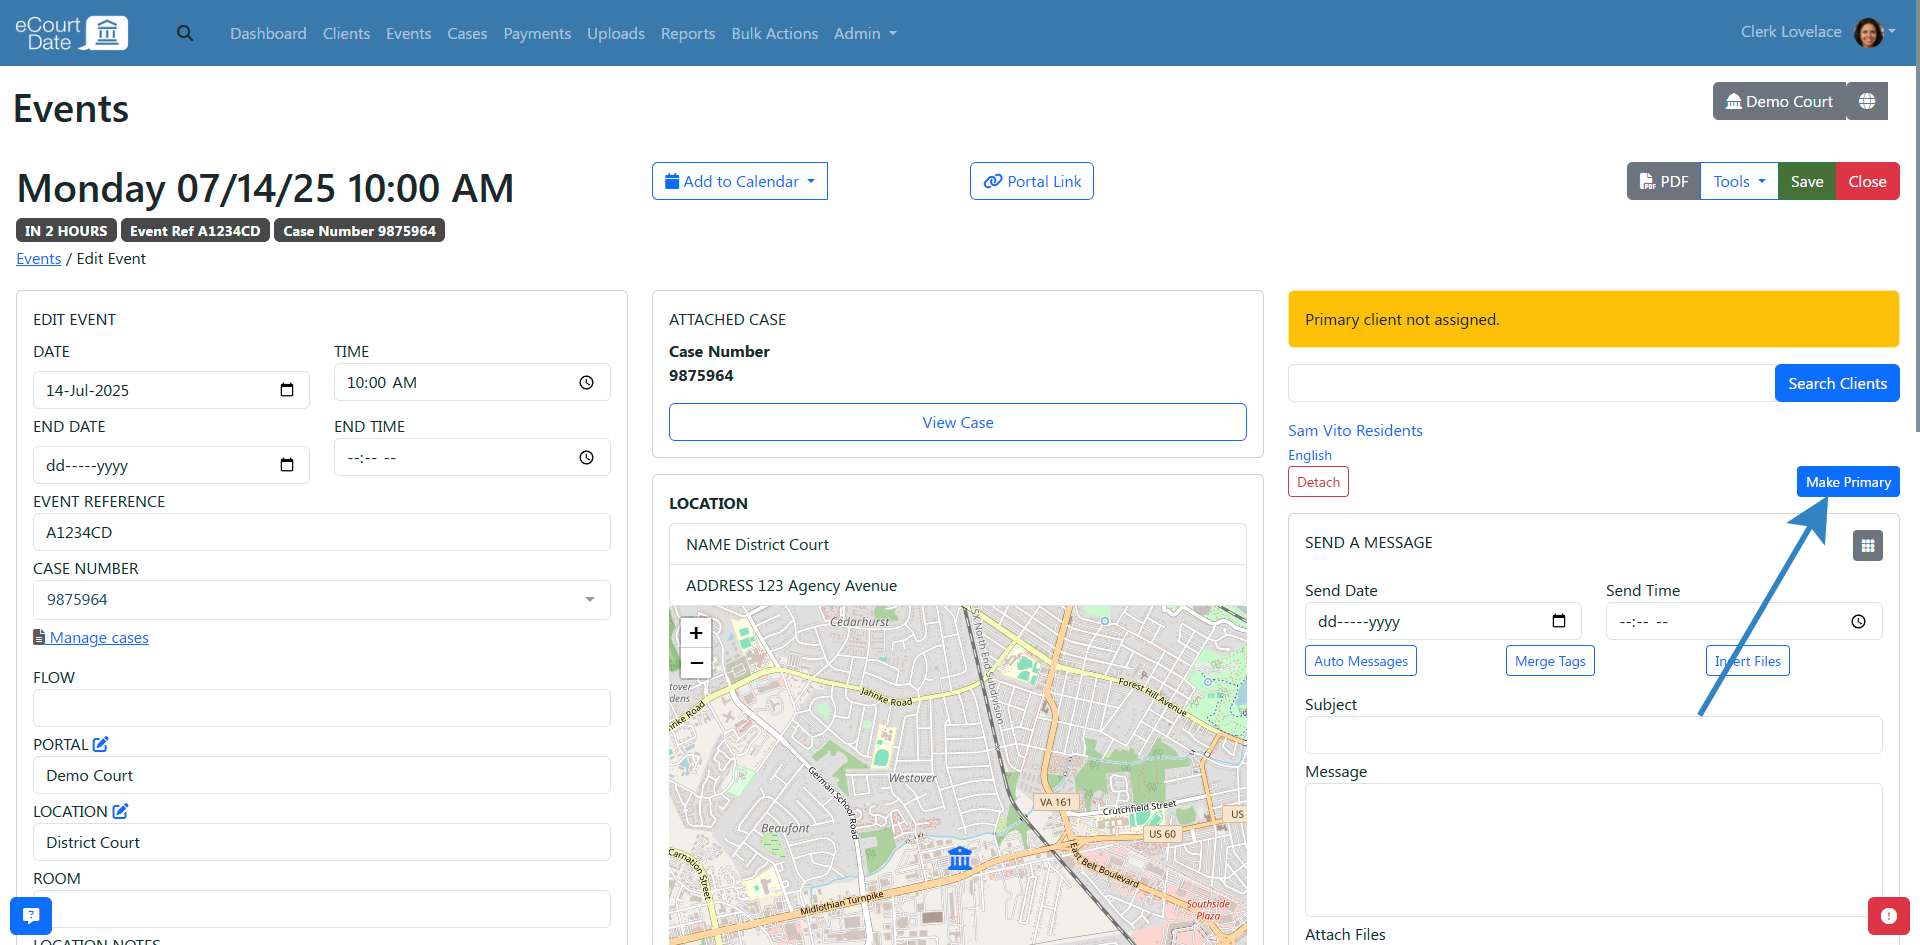
Any flows or auto messages for the event will be sent to all attached clients. A primary client is not required. If you create the event from a client's profile, that client is automatically attached. To remove a client, click the Detach button.
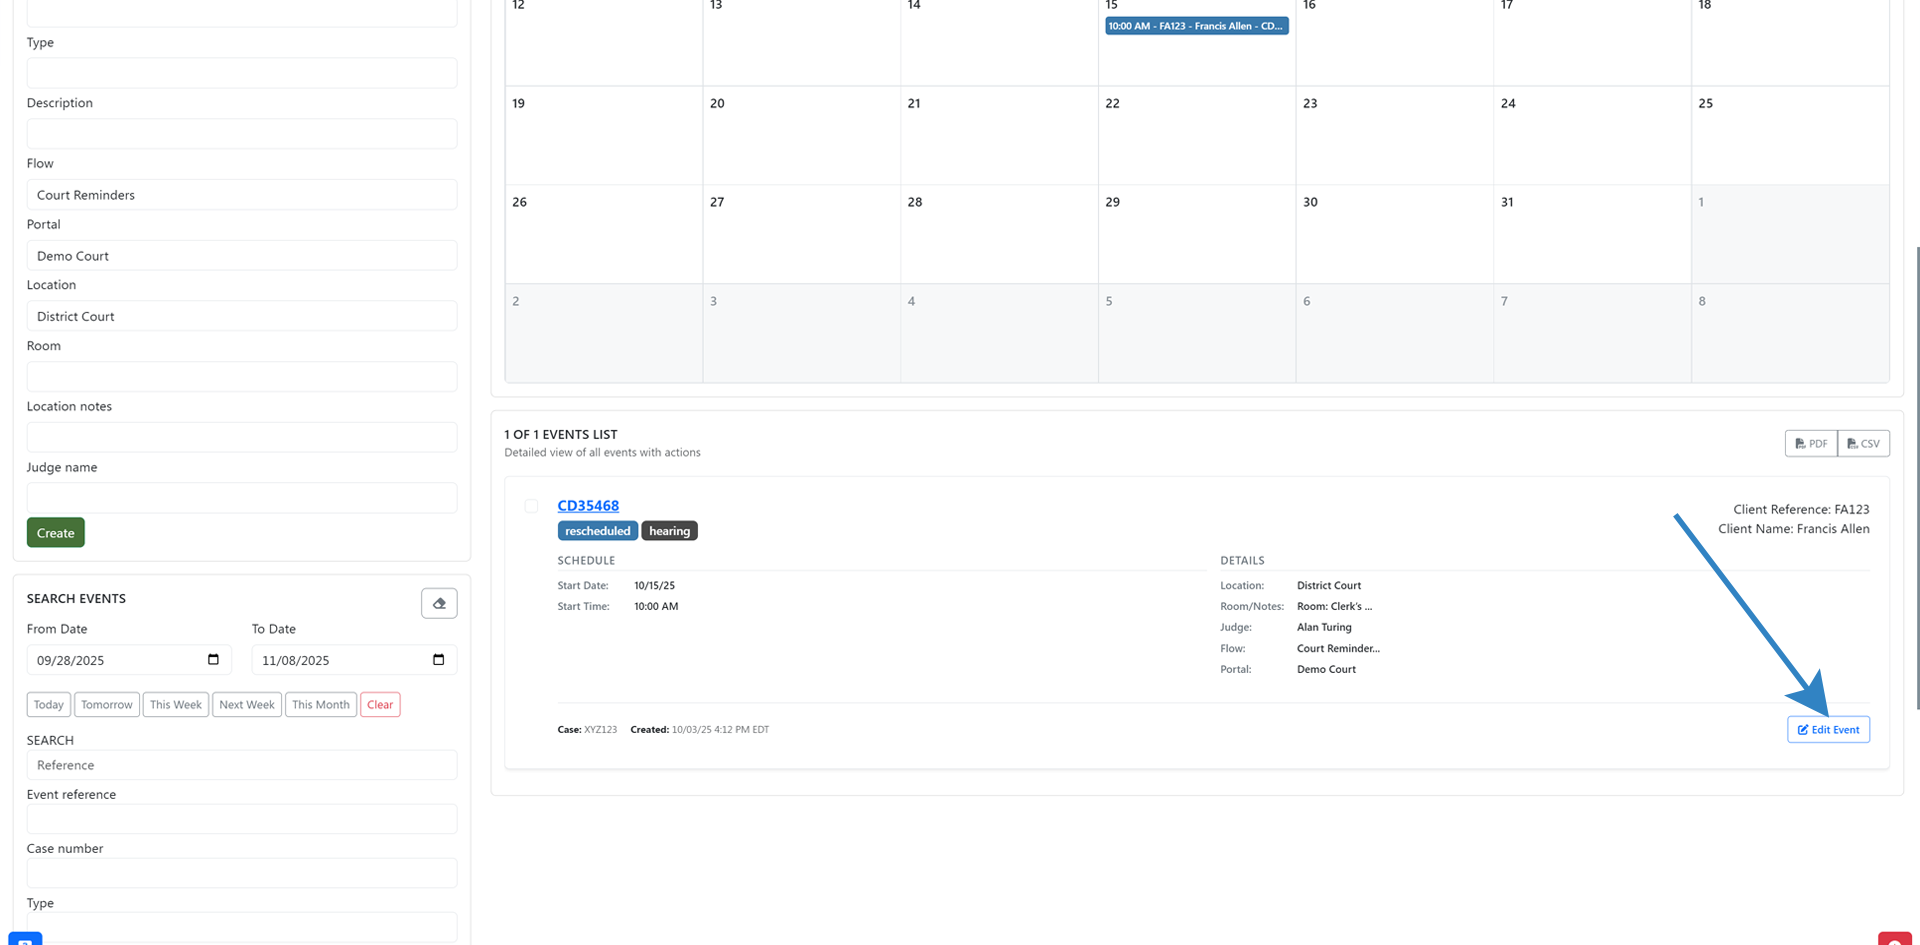
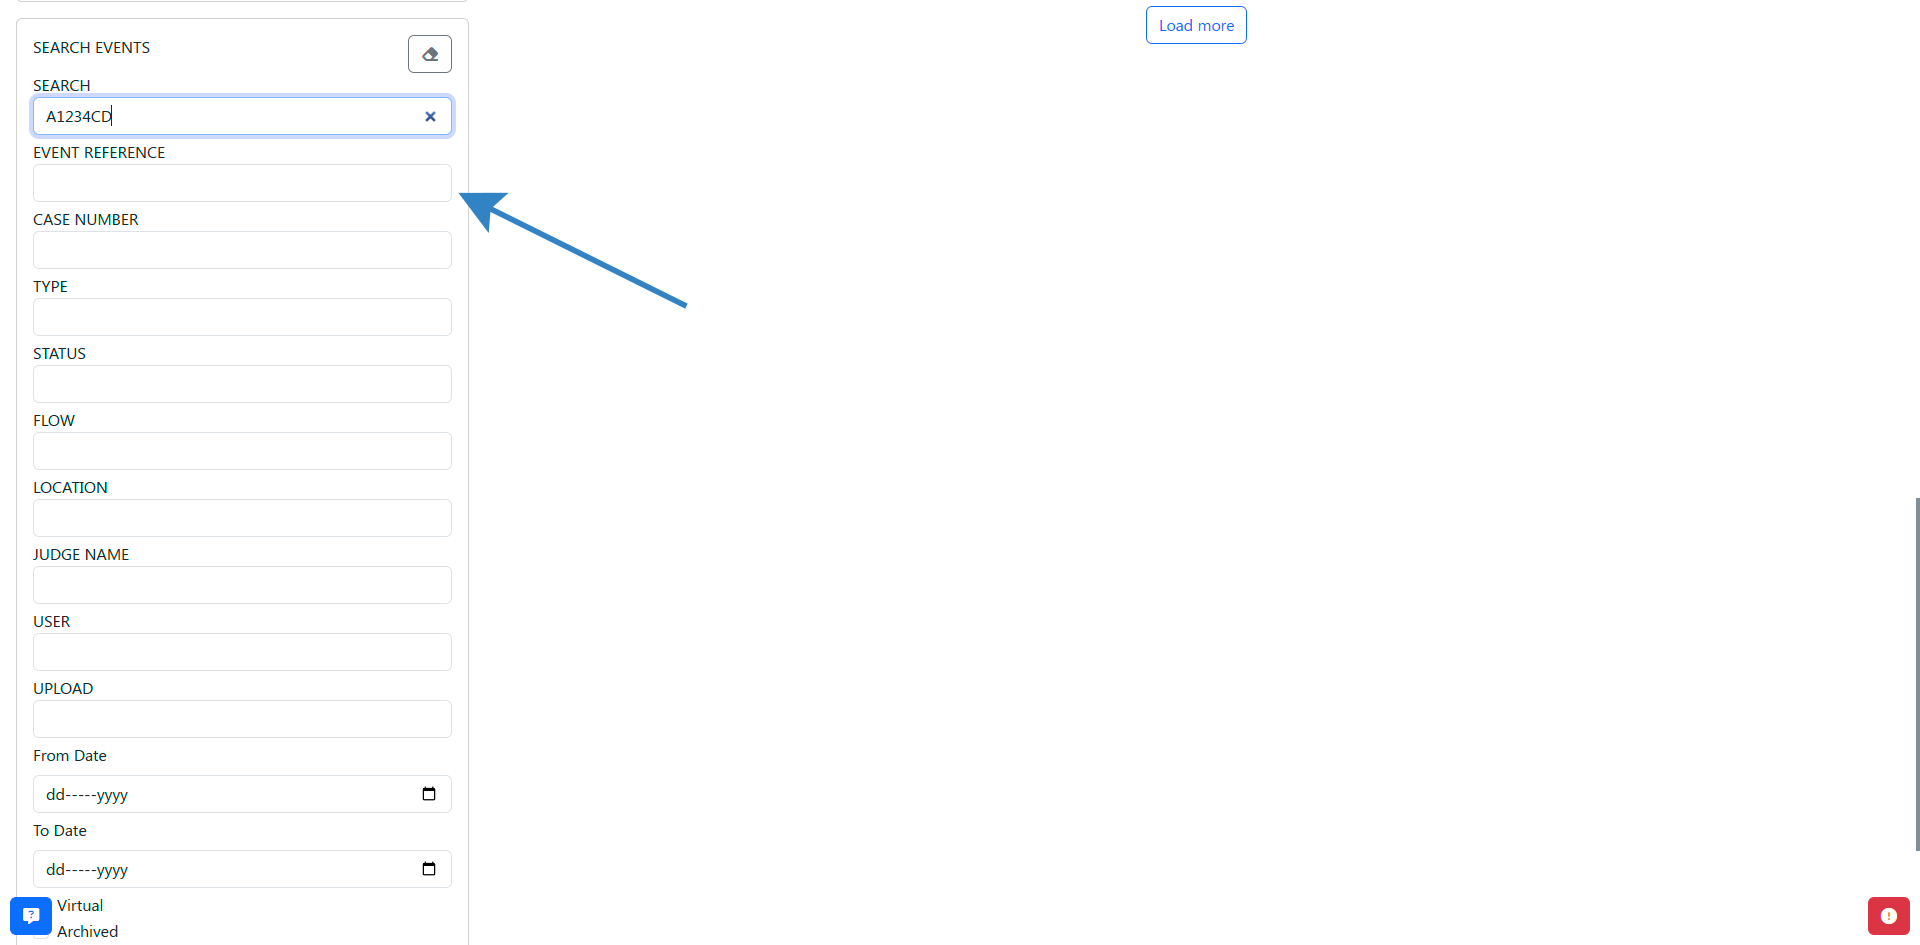
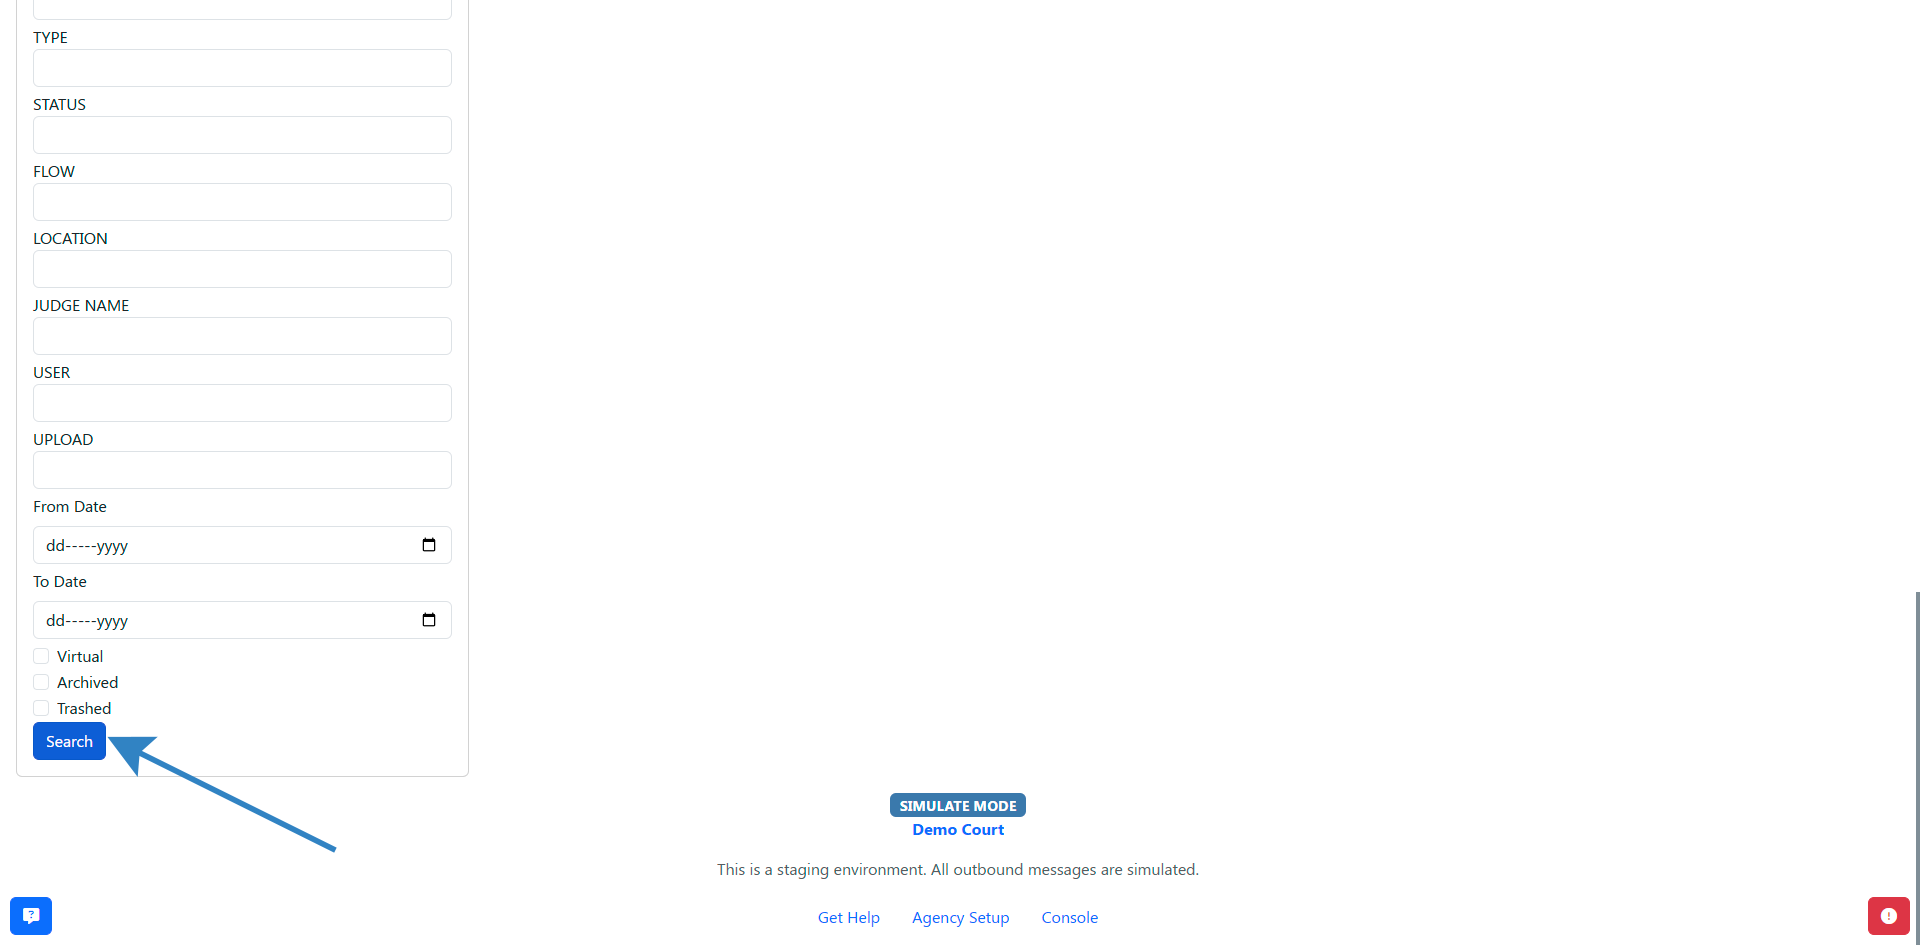
Search for an Event
- Click Events in the top navigation bar.
- In the Search Events section, apply any filters (keyword, date range, status, etc.).
- Click the Search button.
- Click the Edit button on any result to view the event details.
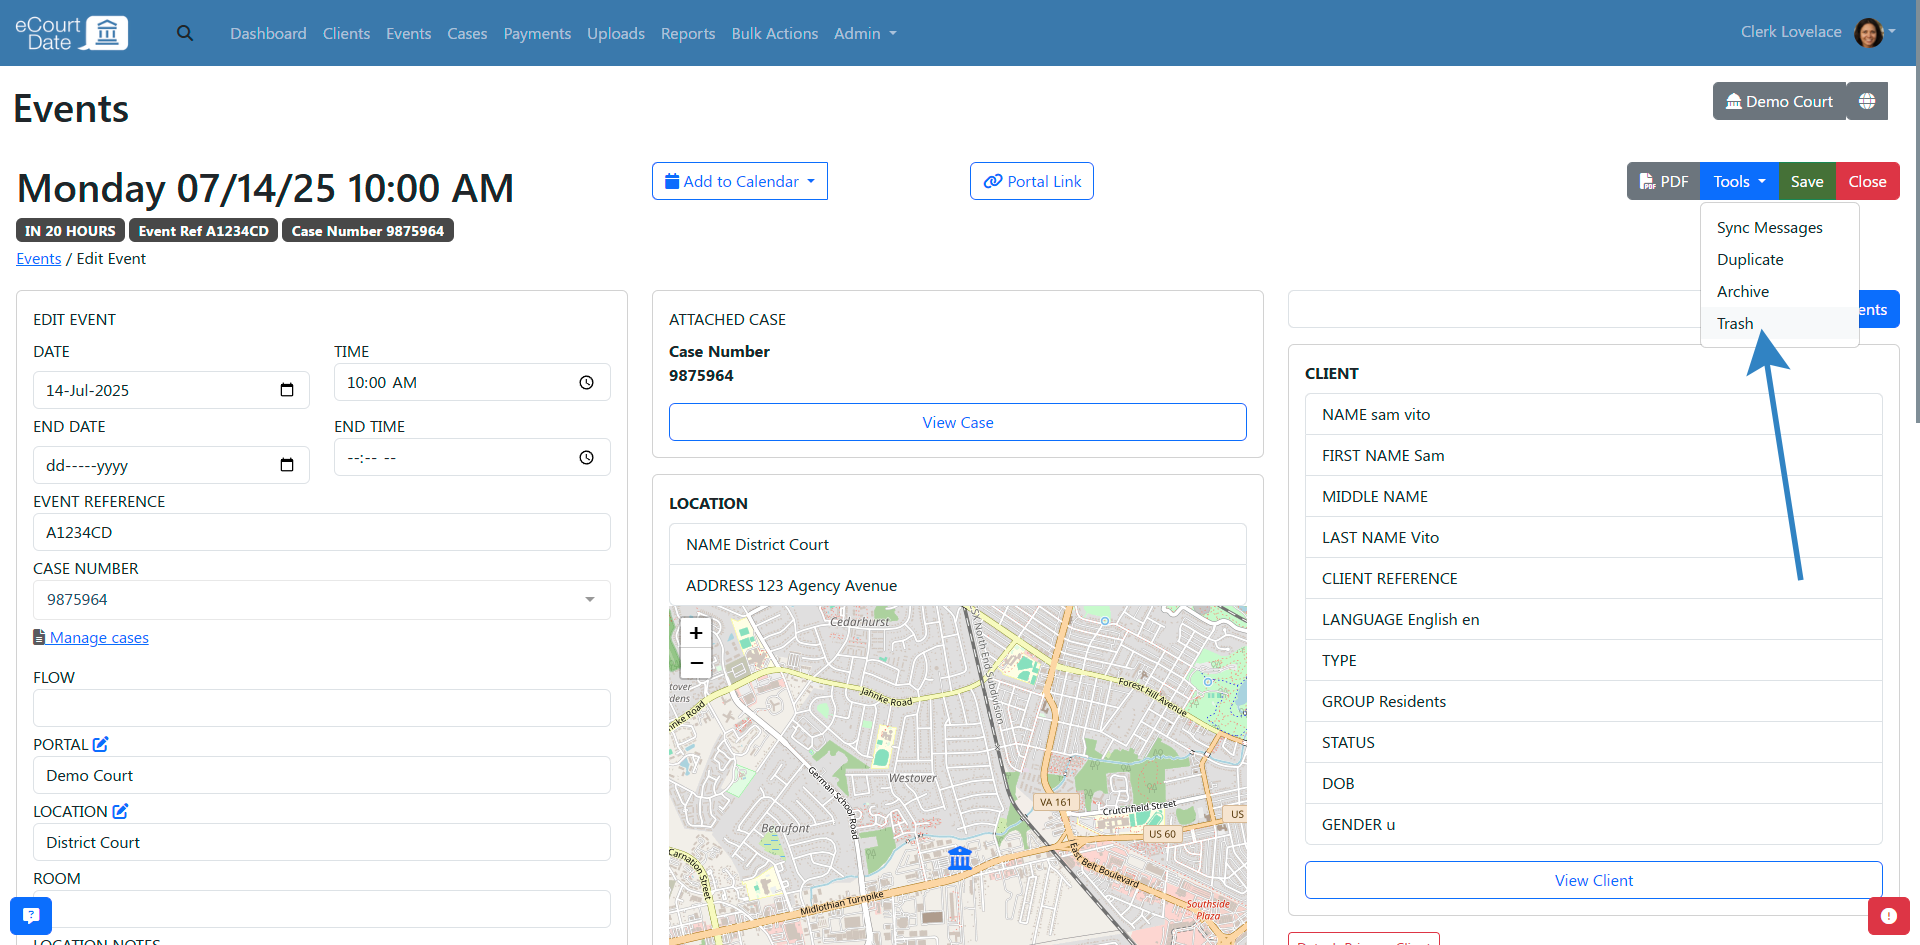
Trash an Event
- Click Events in the top navigation bar.
- Search for the event you want to trash.
- Click the Edit button to open the event.
- Click Tools > Trash.
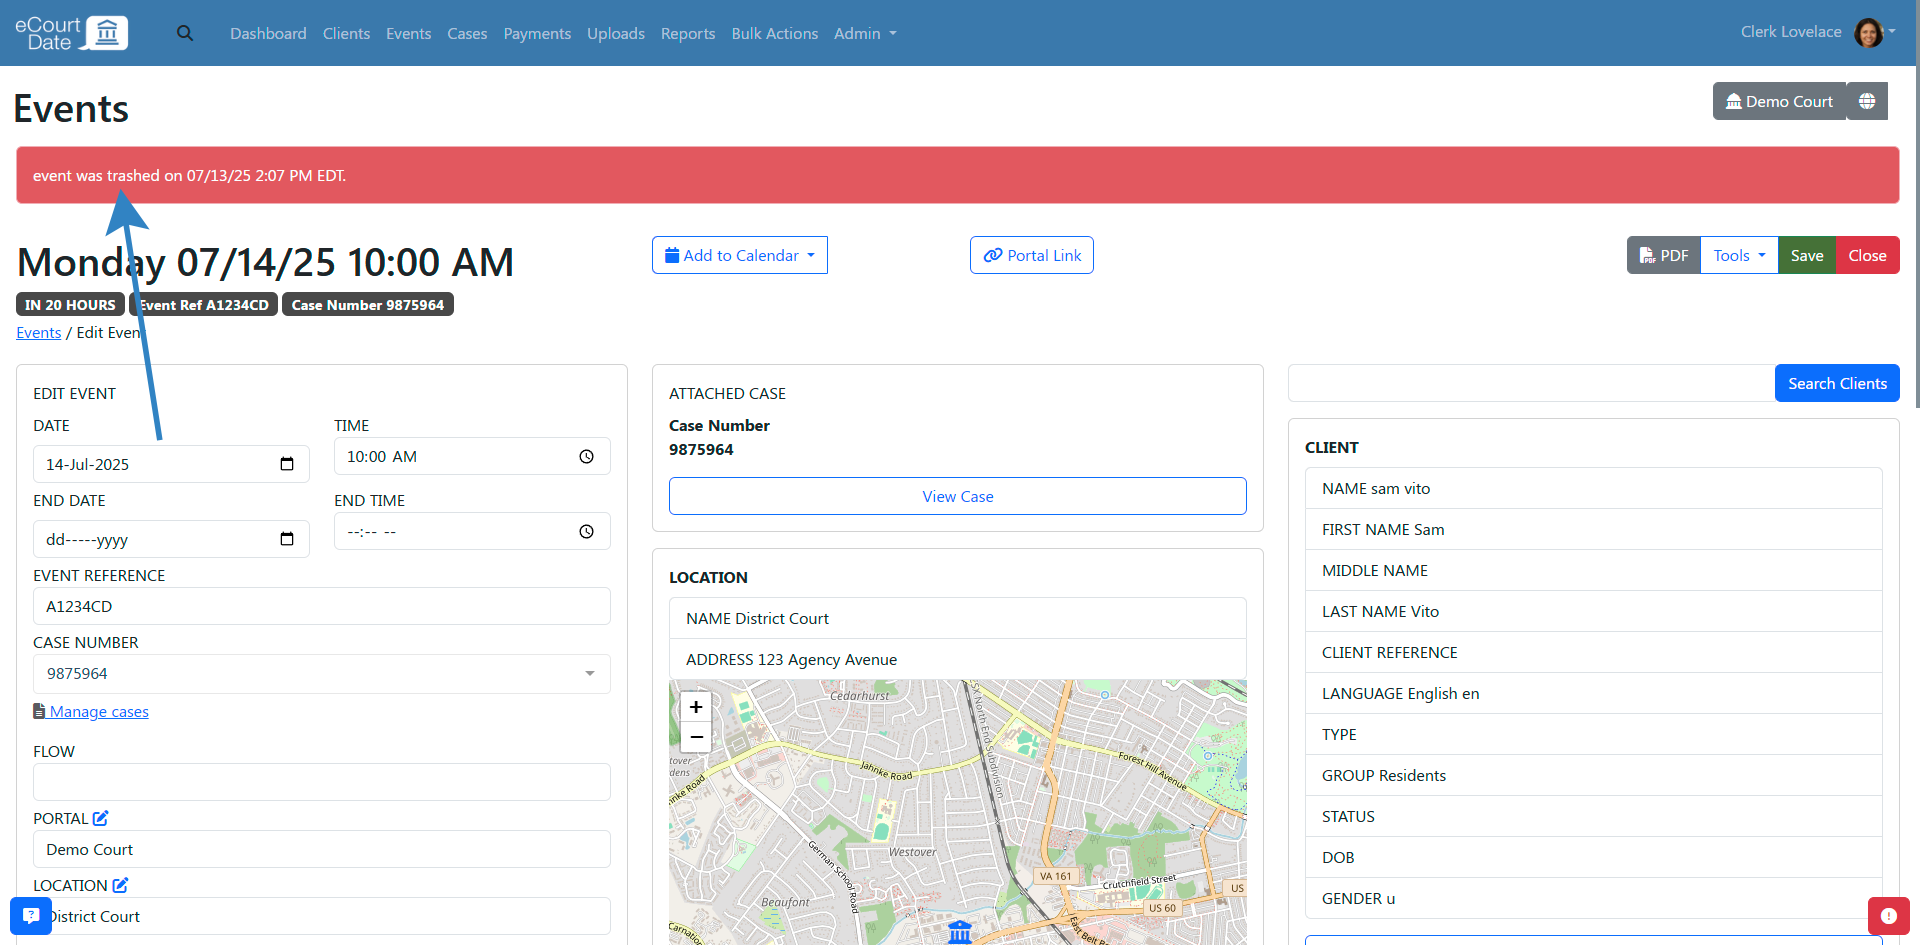
After trashing an event:
- An alert confirms the event has been trashed.
- The event is hidden from quick search and only appears in advanced search.
- All scheduled messages for the event are deleted.
- Unless restored, the event is permanently deleted after 30 days.
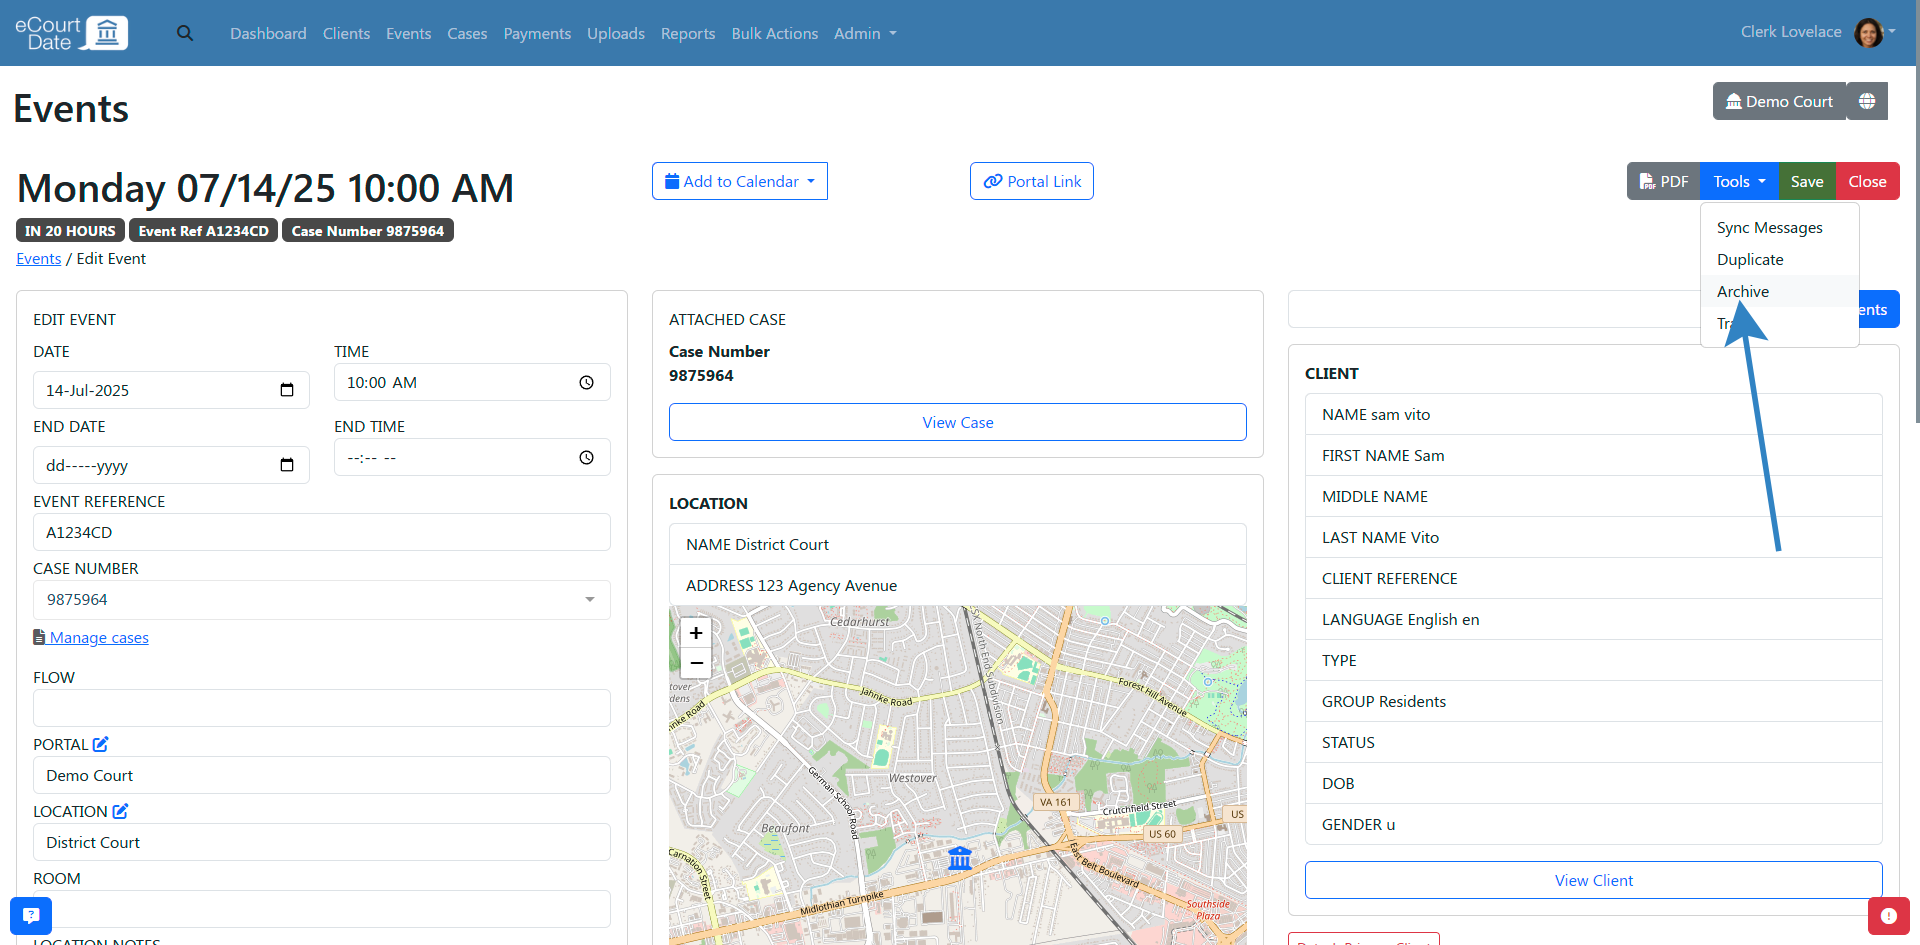
Archive an Event
- Click Events in the top navigation bar.
- Search for the event you want to archive.
- Click the Edit button.
- Click Tools > Archive.
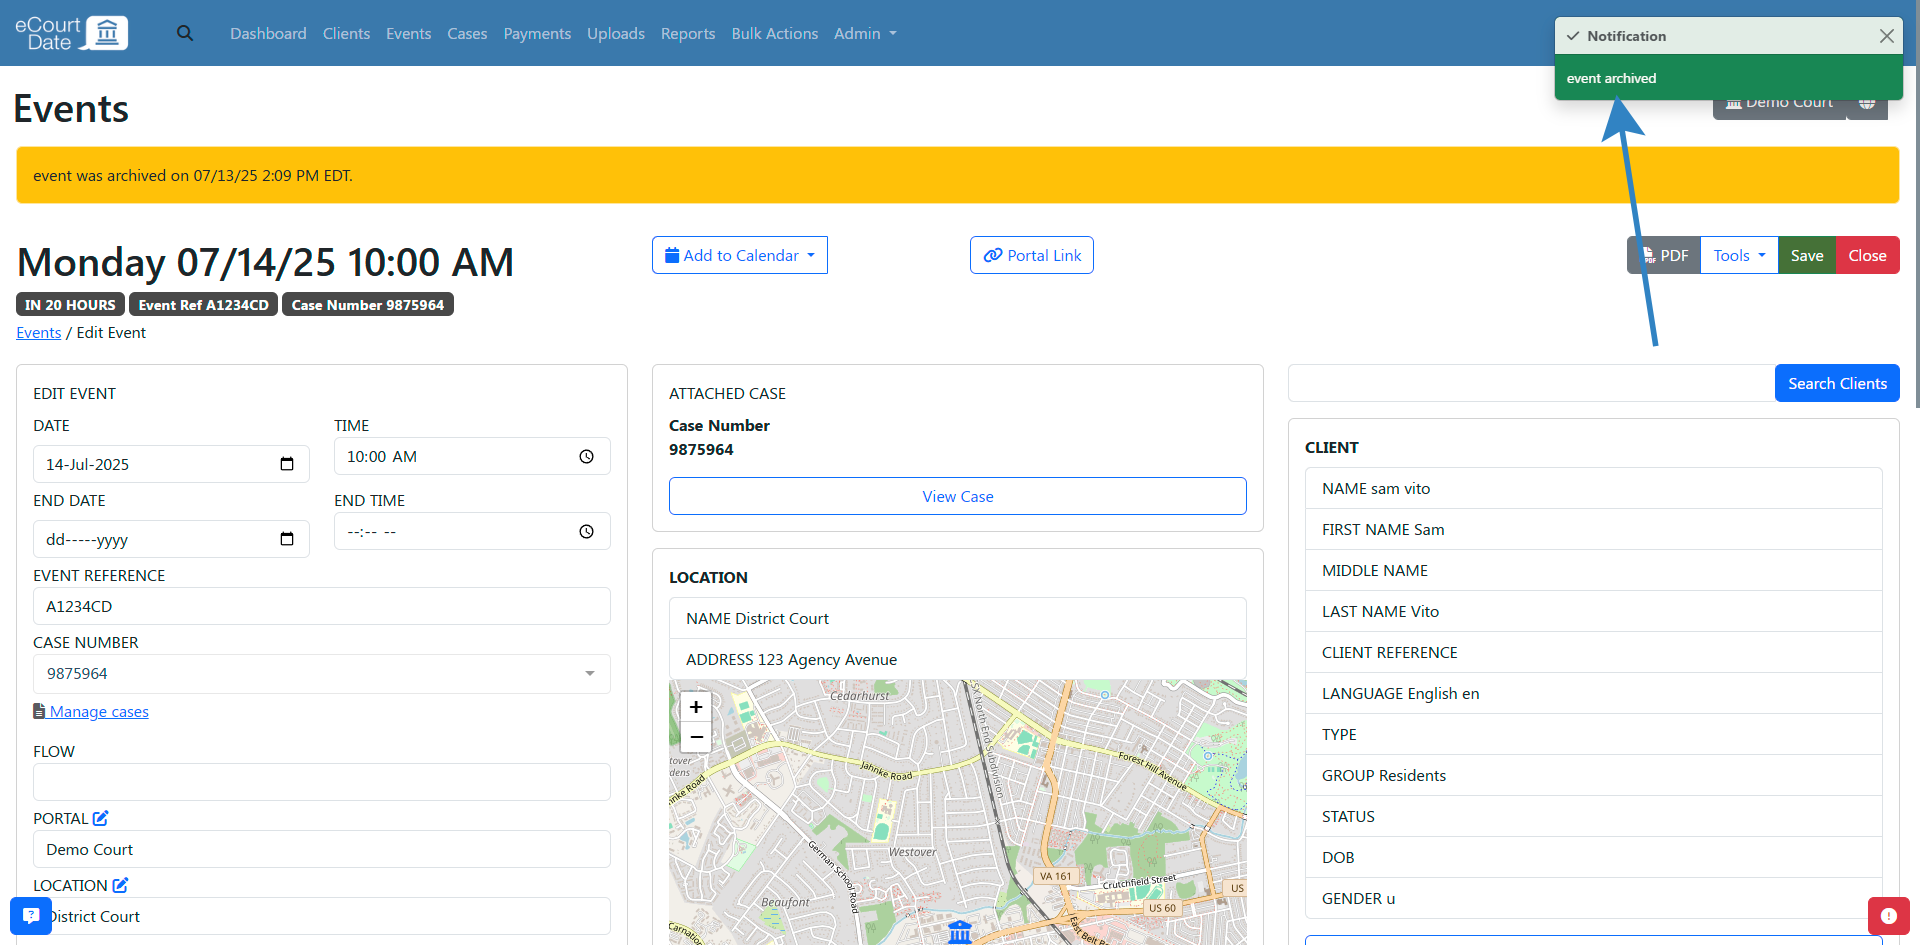
After archiving an event:
- An alert confirms the event has been archived.
- The event is hidden from quick search and only appears in advanced search.
- All scheduled messages for the event are deleted.
- Archived data remains indefinitely. You can unarchive the event at any time.
Restore an Event
- Click Events in the top navigation bar.
- In the Search Events section, select the Archived checkbox (for archived events) or the Trashed checkbox (for trashed events).
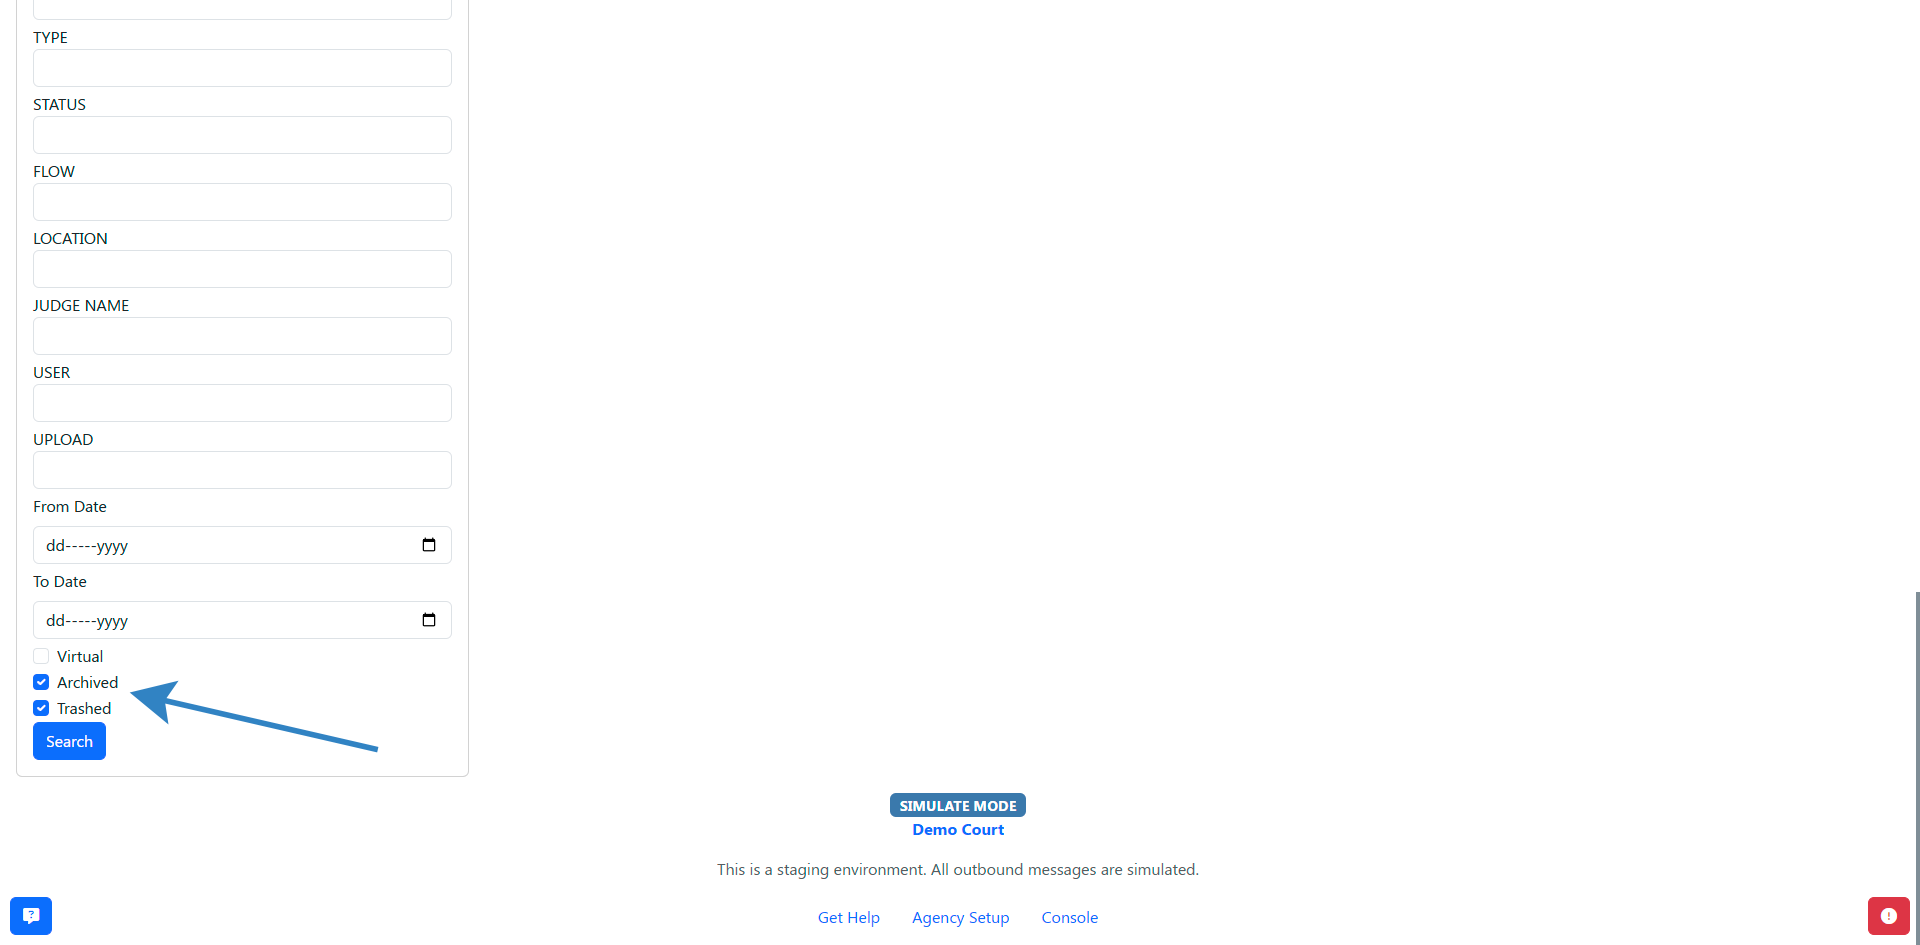
- Click the Search button.
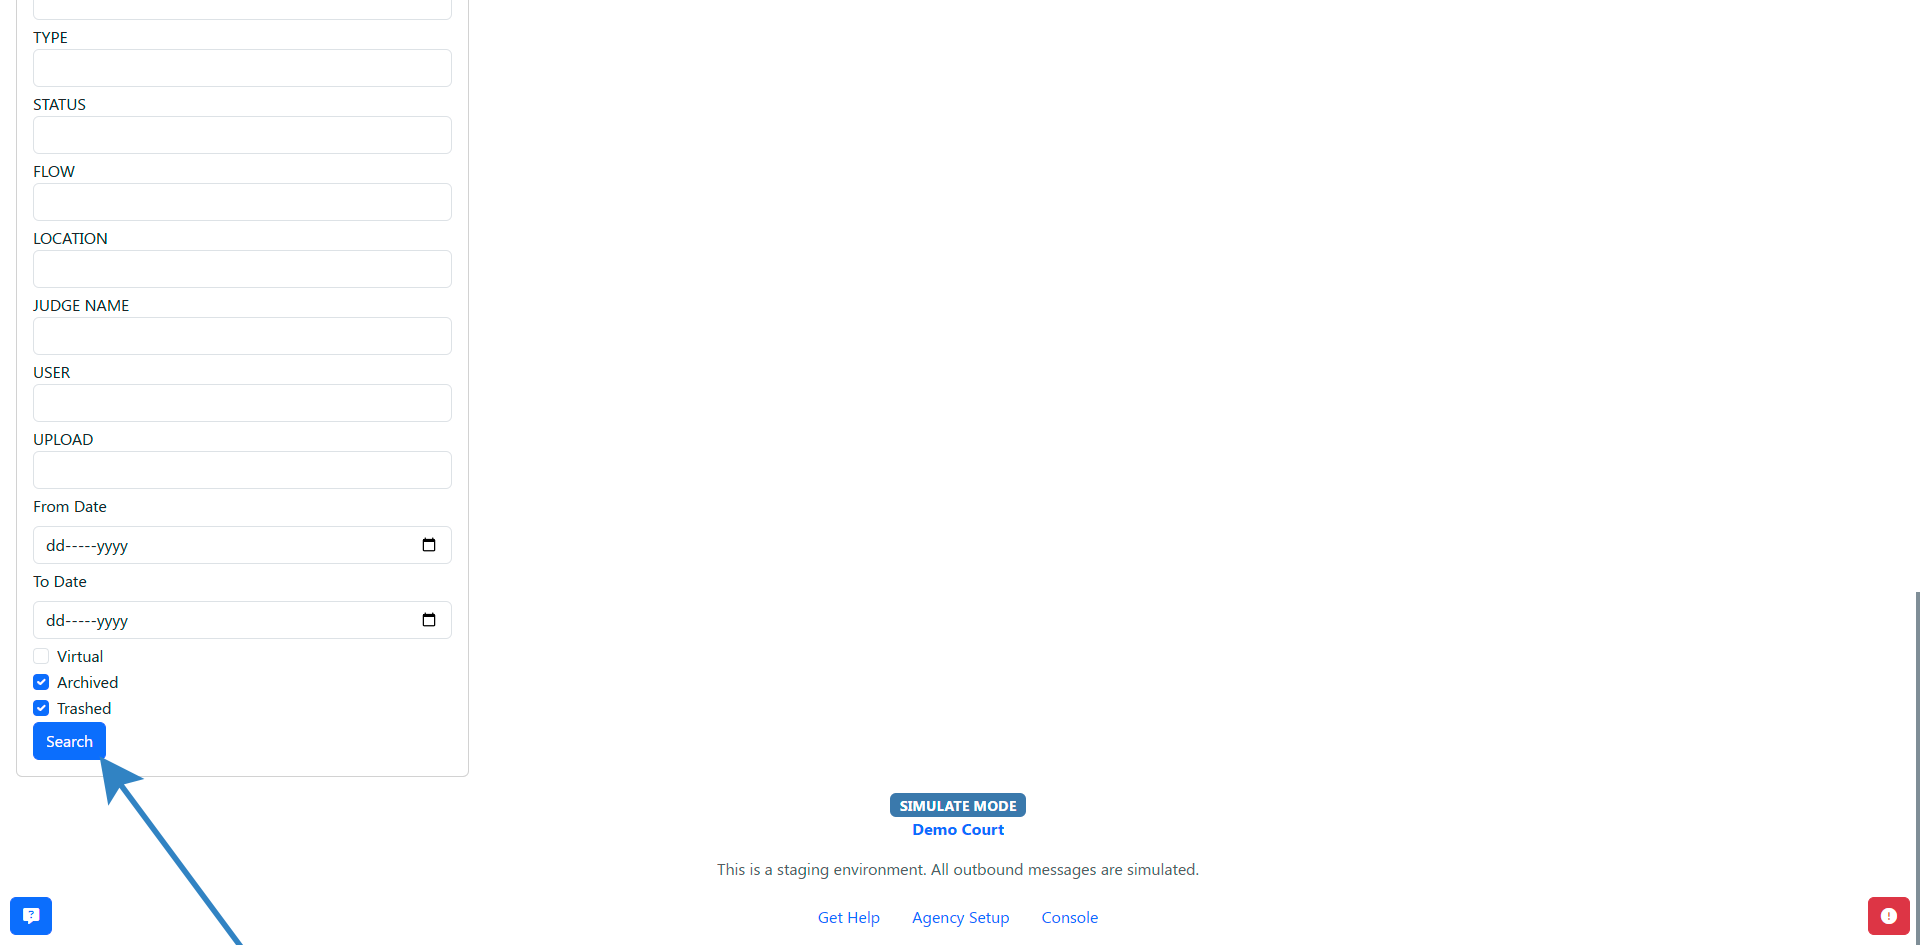
- Click the Edit button to open the event.
- Click Tools > Restore.
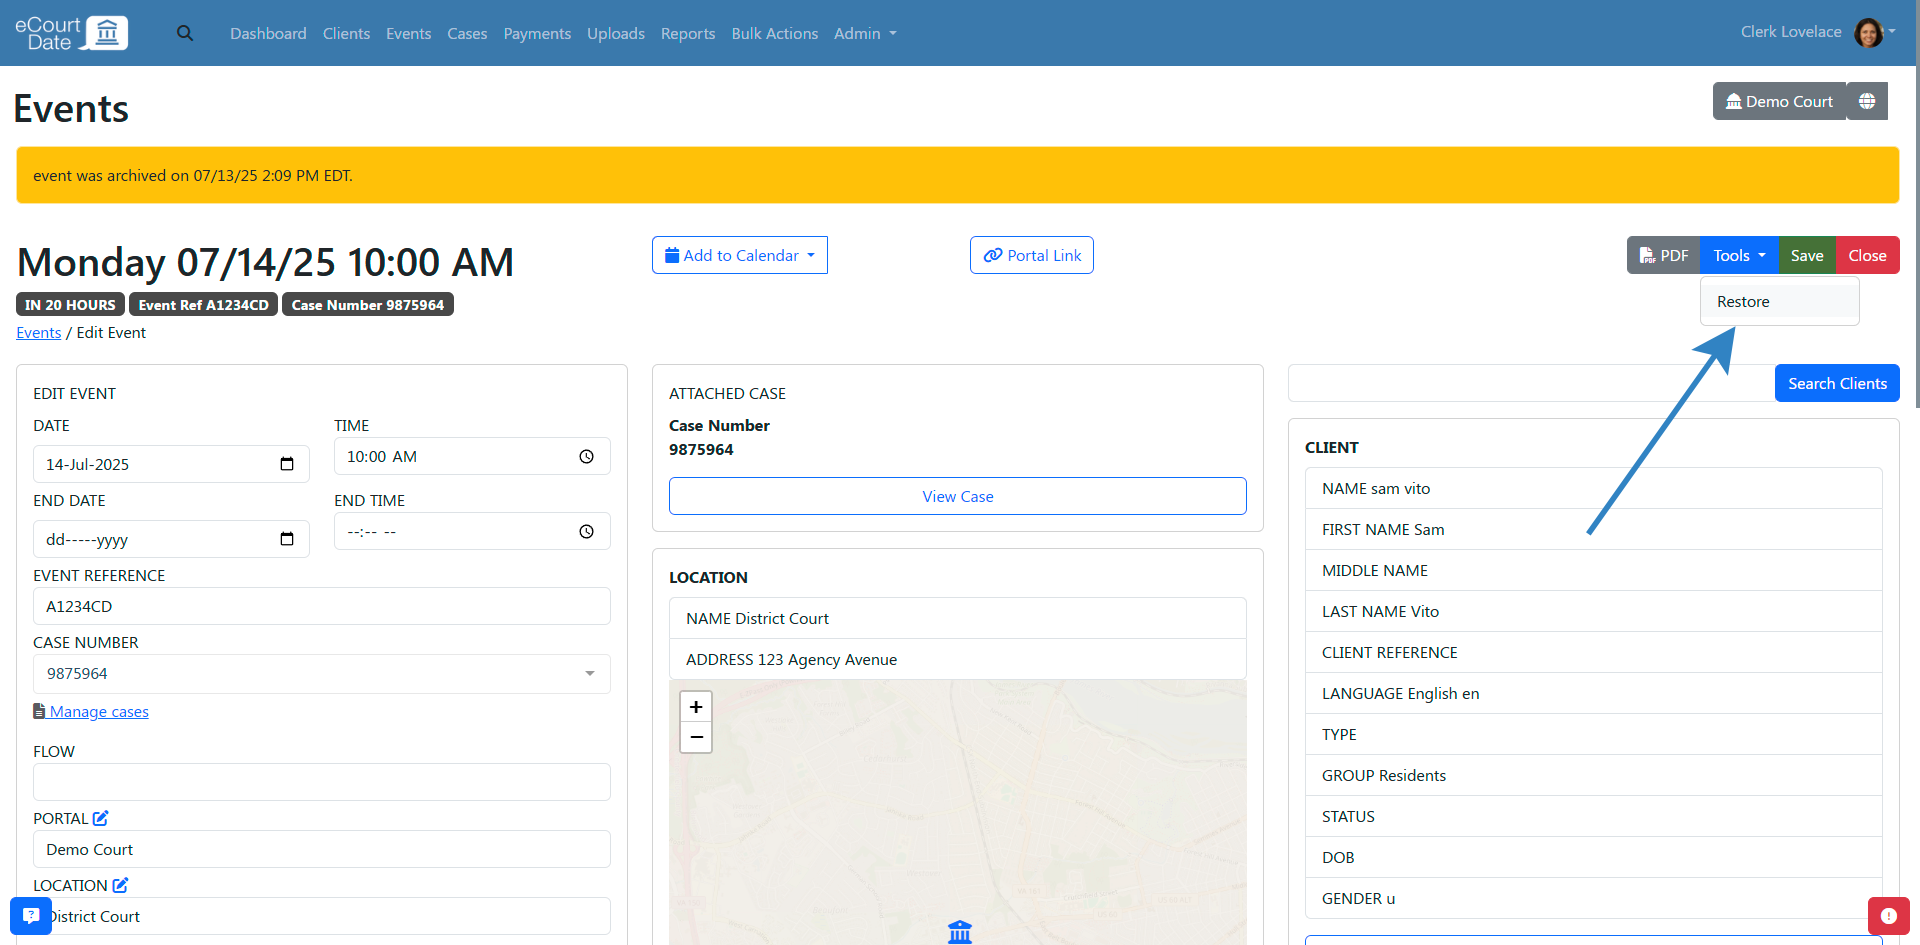
After restoring an event:
- The archived or trashed alert is removed.
- The event is visible in both quick and advanced search.
- If the event has an assigned flow, messages are resynced automatically.
- Auto messages are not retriggered for the restored event.
Create a Virtual Event
You can create virtual events for online meetings and video conferences.
- Click Events in the top navigation bar.
- Fill in the Create Event form.
- Select a virtual Location (configured under Admin > Settings > Locations with a meeting link).
- Click the Create button.
The virtual meeting link is included automatically in event notifications sent through flows and auto messages. Clients can join the meeting directly from their portal or reminder message. See How to Create a Virtual Event for detailed instructions.
Share Events Through Portals and Calendars
Events can be shared with clients through multiple channels:
- Portals: Enable events on your web portal so clients can view their upcoming appointments. Go to Admin > Portals, edit a portal, and enable the Events section.
- Calendars: Create shareable calendars under Events > Calendars to embed on your website or share via link. Clients can subscribe to calendars in Outlook, Google, or Apple. See How to Create Calendars for details.
- Reminders: Assign a flow to events to send automated reminders via text, email, or voice call.
Track Event Attendance and Status
Monitor event attendance and status from the events list or individual event records.
- Click Events in the top navigation bar.
- Use the Status filter to view events by their current status (e.g., Scheduled, Completed, Canceled).
- Open an individual event to view attached clients and their check-in status.
Enable Check-ins and Check-outs for Events
Require clients to check in and check out for events to track attendance.
- Go to Admin > Settings.
- Enable the Enable Check-ins toggle.
- Configure the time window before and after the event when the Check In button is available.
- Click Save.
When enabled, clients see a Check In button on their portal within the configured time window. Staff can view check-in records under Events > Checkins. See How to Manage Portal Check-ins for details.
Use Event Templates for Recurring Events
Create reusable event templates to streamline scheduling for recurring appointments.
- Click Events in the top navigation bar.
- Click the Templates tab.
- Click Create Template.
- Fill in the template details:
- Template Name: A descriptive name (for example, "Weekly Probation Check-In" or "Monthly Court Review").
- Event Type: Select the event type.
- Location: Set the default location.
- Duration: Set the default event duration.
- Flow: Assign a default flow for automated reminders.
- Recurrence: Configure the recurring schedule (daily, weekly, bi-weekly, or monthly).
- Click Save to create the template.
To create events from a template:
- Click Events in the top navigation bar.
- Click Create from Template.
- Select the template from the dropdown.
- Adjust the date, time, or other details as needed for this specific instance.
- Click Create to generate the event with the template's default settings.
Event templates save time when your agency schedules the same type of appointment regularly.
Track Event Analytics
Use reports and dashboards to analyze event data.
- Navigate to Dashboards > Reports.
- Create a new report with Events as the data source.
- Filter by date range, status, location, or event type.
- Export the report in CSV or PDF format.
You can also create data dashboards with event datapoints to visualize trends over time. See How to Create Data Dashboards for details.
What to Expect
After creating an event, it immediately appears in your events list and any assigned flow messages are queued. Updates to an event automatically resync flow messages. Trashed events are permanently deleted after 30 days unless restored. Archived events remain indefinitely and can be restored at any time.
Best Practices
- Assign a flow to events at creation time to ensure clients receive timely reminders automatically.
- Use the Search Events filters (date range, status, keyword) to quickly locate records instead of scrolling through the list.
- Archive events you no longer need active rather than trashing them, so you retain the data indefinitely.
- Attach all relevant clients to an event before assigning a flow so all parties receive notifications.
- Review and test event flows on your staging agency before deploying to production.
Frequently Asked Questions
Q: Can I assign multiple clients to a single event?
A: Yes. Use the Attach to Client section on the event edit page to add as many clients as needed. You can also designate one client as the primary.
Q: What happens to scheduled messages when I trash an event?
A: All scheduled messages for the event are immediately deleted. If you restore the event and it has an assigned flow, messages are resynced automatically.
Q: What is the difference between trashing and archiving an event?
A: Trashed events are permanently deleted after 30 days. Archived events are retained indefinitely and can be restored at any time. Both actions hide the event from quick search and delete scheduled messages.
Q: Can I bulk-create events instead of adding them one at a time?
A: Yes. Use the Uploads feature or Bulk Actions to create multiple events at once. See How to Create Events via Bulk Actions for details.
Q: Will auto messages fire again if I restore an event?
A: No. Auto messages are not retriggered when an event is restored. However, if the event has an assigned flow, the flow messages will resync automatically.
Troubleshooting
Issue: Event does not appear in search results after creation.
Symptoms: You created an event but cannot find it using the quick search or event list.
Solution:
- Verify the event was created successfully by checking for a confirmation alert.
- Check that your search filters (date range, status) include the event's values.
- If the event was trashed or archived, select the Trashed or Archived checkbox in the search form.
Issue: Flow messages are not being generated for a new event.
Symptoms: You created an event with a flow assigned, but no messages appear on the event detail page.
Solution:
- Confirm a flow is assigned by checking the Flow field on the event edit page.
- Open the event and click Tools > Sync Messages to force a resync.
- Verify the flow has at least one message with a valid trigger configured.
- Ensure a client is attached to the event, as messages require a recipient.
Important: If you continue to experience issues after following these troubleshooting steps, sign in to eCourtDate and create a ticket by clicking the ticket button in the bottom right corner of the screen.
Related Articles
Events represent any in-person or virtual appointment, such as a court hearing or office visit, and are the core record type for client notifications in eCourtDate.
### Overview
Managing events in eCourtDate allows your agency to create, update, search, assign, archive, trash, and restore appointment records. Events tie directly to client communication workflows, so when you create or update an event, any assigned flows or auto messages automatically sync.
- **What it does:** Provides full lifecycle management for court hearings, office visits, and other scheduled appointments.
- **Why it matters:** Events drive automated client notifications through flows and auto messages, ensuring clients receive timely reminders.
- **Who uses it:** Agency administrators and staff responsible for scheduling and client communication.
- **Expected outcome:** Organized event records with automated, reliable client outreach.
### Prerequisites
Before managing events, make sure you have:
- An active eCourtDate agency on [staging](https://staging.ecourtdate.com) or [production](https://app.ecourtdate.com)
- Super admin access, or the **Create Events** and **Update Events** permissions
- Client records already created (if you plan to assign events to clients)
- (Optional) A flow configured for events if you want automated messages
### How-To Steps
#### Create an Event
1. Click **Events** in the top navigation bar.

2. Fill in the **Create Event** form with the required details (event type, date, time, location, etc.).

3. Click the **Create** button.

4. Click the **Edit** button to view the newly created event, or fill in the form again to create another.

#### Update an Event
1. Click **Events** in the top navigation bar.

2. Search for the event you want to update.

3. Click the **Edit** button to open the event.

4. Update the event information as needed.

5. Click the **Save** button.

#### Assign an Event to a Client
Each event can be assigned to multiple clients. You can also designate one client as the primary.
1. Click **Events** in the top navigation bar.

2. Search for and open the event you want to assign.

3. Click the **Edit** button.

4. In the **Attach to Client** section, enter the client's name or ID and click the **Search** button.

5. Select the client from the search results.

6. Click the **Attach** button.

7. Repeat steps 4 through 6 to attach additional clients.
8. To designate a primary client, click the **Make Primary** button next to the client's name.

Any flows or auto messages for the event will be sent to all attached clients. A primary client is not required. If you create the event from a client's profile, that client is automatically attached. To remove a client, click the **Detach** button.
#### Search for an Event
1. Click **Events** in the top navigation bar.

2. In the **Search Events** section, apply any filters (keyword, date range, status, etc.).

3. Click the **Search** button.

4. Click the **Edit** button on any result to view the event details.

#### Trash an Event
1. Click **Events** in the top navigation bar.

2. Search for the event you want to trash.

3. Click the **Edit** button to open the event.

4. Click **Tools** > **Trash**.


After trashing an event:
- An alert confirms the event has been trashed.
- The event is hidden from quick search and only appears in advanced search.
- All scheduled messages for the event are deleted.
- Unless restored, the event is permanently deleted after 30 days.
#### Archive an Event
1. Click **Events** in the top navigation bar.

2. Search for the event you want to archive.

3. Click the **Edit** button.

4. Click **Tools** > **Archive**.


After archiving an event:
- An alert confirms the event has been archived.
- The event is hidden from quick search and only appears in advanced search.
- All scheduled messages for the event are deleted.
- Archived data remains indefinitely. You can unarchive the event at any time.
#### Restore an Event
1. Click **Events** in the top navigation bar.

2. In the **Search Events** section, select the **Archived** checkbox (for archived events) or the **Trashed** checkbox (for trashed events).

3. Click the **Search** button.

4. Click the **Edit** button to open the event.

5. Click **Tools** > **Restore**.

After restoring an event:
- The archived or trashed alert is removed.
- The event is visible in both quick and advanced search.
- If the event has an assigned flow, messages are resynced automatically.
- Auto messages are not retriggered for the restored event.
#### Create a Virtual Event
You can create virtual events for online meetings and video conferences.
1. Click **Events** in the top navigation bar.
2. Fill in the **Create Event** form.
3. Select a virtual **Location** (configured under **Admin** > **Settings** > **Locations** with a meeting link).
4. Click the **Create** button.
The virtual meeting link is included automatically in event notifications sent through flows and auto messages. Clients can join the meeting directly from their portal or reminder message. See [How to Create a Virtual Event](/how-to-create-a-virtual-event) for detailed instructions.
#### Share Events Through Portals and Calendars
Events can be shared with clients through multiple channels:
- **Portals:** Enable events on your web portal so clients can view their upcoming appointments. Go to **Admin** > **Portals**, edit a portal, and enable the **Events** section.
- **Calendars:** Create shareable calendars under **Events** > **Calendars** to embed on your website or share via link. Clients can subscribe to calendars in Outlook, Google, or Apple. See [How to Create Calendars](/how-to-create-calendars) for details.
- **Reminders:** Assign a flow to events to send automated reminders via text, email, or voice call.
#### Track Event Attendance and Status
Monitor event attendance and status from the events list or individual event records.
1. Click **Events** in the top navigation bar.
2. Use the **Status** filter to view events by their current status (e.g., Scheduled, Completed, Canceled).
3. Open an individual event to view attached clients and their check-in status.
#### Enable Check-ins and Check-outs for Events
Require clients to check in and check out for events to track attendance.
1. Go to **Admin** > **Settings**.
2. Enable the **Enable Check-ins** toggle.
3. Configure the time window before and after the event when the **Check In** button is available.
4. Click **Save**.
When enabled, clients see a **Check In** button on their portal within the configured time window. Staff can view check-in records under **Events** > **Checkins**. See [How to Manage Portal Check-ins](/how-to-manage-portal-check-ins) for details.
#### Use Event Templates for Recurring Events
Create reusable event templates to streamline scheduling for recurring appointments.
1. Click **Events** in the top navigation bar.
2. Click the **Templates** tab.
3. Click **Create Template**.
4. Fill in the template details:
- **Template Name**: A descriptive name (for example, "Weekly Probation Check-In" or "Monthly Court Review").
- **Event Type**: Select the event type.
- **Location**: Set the default location.
- **Duration**: Set the default event duration.
- **Flow**: Assign a default flow for automated reminders.
- **Recurrence**: Configure the recurring schedule (daily, weekly, bi-weekly, or monthly).
5. Click **Save** to create the template.
To create events from a template:
1. Click **Events** in the top navigation bar.
2. Click **Create from Template**.
3. Select the template from the dropdown.
4. Adjust the date, time, or other details as needed for this specific instance.
5. Click **Create** to generate the event with the template's default settings.
Event templates save time when your agency schedules the same type of appointment regularly.
#### Track Event Analytics
Use reports and dashboards to analyze event data.
1. Navigate to **Dashboards** > **Reports**.
2. Create a new report with **Events** as the data source.
3. Filter by date range, status, location, or event type.
4. Export the report in CSV or PDF format.
You can also create data dashboards with event datapoints to visualize trends over time. See [How to Create Data Dashboards](/how-to-create-data-dashboards) for details.
### What to Expect
After creating an event, it immediately appears in your events list and any assigned flow messages are queued. Updates to an event automatically resync flow messages. Trashed events are permanently deleted after 30 days unless restored. Archived events remain indefinitely and can be restored at any time.
### Best Practices
- Assign a flow to events at creation time to ensure clients receive timely reminders automatically.
- Use the **Search Events** filters (date range, status, keyword) to quickly locate records instead of scrolling through the list.
- Archive events you no longer need active rather than trashing them, so you retain the data indefinitely.
- Attach all relevant clients to an event before assigning a flow so all parties receive notifications.
- Review and test event flows on your staging agency before deploying to production.
### Frequently Asked Questions
**Q: Can I assign multiple clients to a single event?**
A: Yes. Use the **Attach to Client** section on the event edit page to add as many clients as needed. You can also designate one client as the primary.
**Q: What happens to scheduled messages when I trash an event?**
A: All scheduled messages for the event are immediately deleted. If you restore the event and it has an assigned flow, messages are resynced automatically.
**Q: What is the difference between trashing and archiving an event?**
A: Trashed events are permanently deleted after 30 days. Archived events are retained indefinitely and can be restored at any time. Both actions hide the event from quick search and delete scheduled messages.
**Q: Can I bulk-create events instead of adding them one at a time?**
A: Yes. Use the **Uploads** feature or **Bulk Actions** to create multiple events at once. See [How to Create Events via Bulk Actions](/how-to-create-events-via-bulk-actions) for details.
**Q: Will auto messages fire again if I restore an event?**
A: No. Auto messages are not retriggered when an event is restored. However, if the event has an assigned flow, the flow messages will resync automatically.
### Troubleshooting
**Issue:** Event does not appear in search results after creation.
**Symptoms:** You created an event but cannot find it using the quick search or event list.
**Solution:**
1. Verify the event was created successfully by checking for a confirmation alert.
2. Check that your search filters (date range, status) include the event's values.
3. If the event was trashed or archived, select the **Trashed** or **Archived** checkbox in the search form.
**Issue:** Flow messages are not being generated for a new event.
**Symptoms:** You created an event with a flow assigned, but no messages appear on the event detail page.
**Solution:**
1. Confirm a flow is assigned by checking the **Flow** field on the event edit page.
2. Open the event and click **Tools** > **Sync Messages** to force a resync.
3. Verify the flow has at least one message with a valid trigger configured.
4. Ensure a client is attached to the event, as messages require a recipient.
> **Important:** If you continue to experience issues after following these troubleshooting steps, sign in to eCourtDate and create a ticket by clicking the ticket button in the bottom right corner of the screen.
### Related Articles
- [How to Restore Events](/how-to-restore-events)
- [How to Create a Virtual Event](/how-to-create-a-virtual-event)
- [How to Create Events via Bulk Actions](/how-to-create-events-via-bulk-actions)
- [How to Create a Flow](/how-to-create-a-flow)
- [How to Create an Auto Message](/how-to-create-an-auto-message)