Portals
How to Create Forms
8 min read
Updated Feb 15, 2026
Custom web forms in eCourtDate let your agency collect information from clients through your portal, reducing paperwork and ensuring accurate, secure data submission.
Custom web forms in eCourtDate let your agency collect information from clients through your portal, reducing paperwork and ensuring accurate, secure data submission.
Overview
- What it is: A form builder that allows you to create custom web forms for collecting information from clients through your agency's portal
- Why it matters: Streamlines data collection for events, cases, and payments while minimizing manual entry errors and paperwork
- Who uses it: Court personnel, administrative staff, and agency administrators who need to gather structured information from clients
- Expected outcomes: Clients complete forms on the portal, staff receive notifications, and form actions can trigger automated workflows
Prerequisites
- You must have admin access or the Create Portals and Update Portals permissions
- Your agency must have at least one portal configured
- Gather the list of fields and required data you want to collect before building the form
- (Optional) Configure Auto Messages if you want form submissions to trigger automated responses
How-To Steps
Step 1: Access the Forms Section
- Navigate to the top navigation bar and select the Admin dropdown.
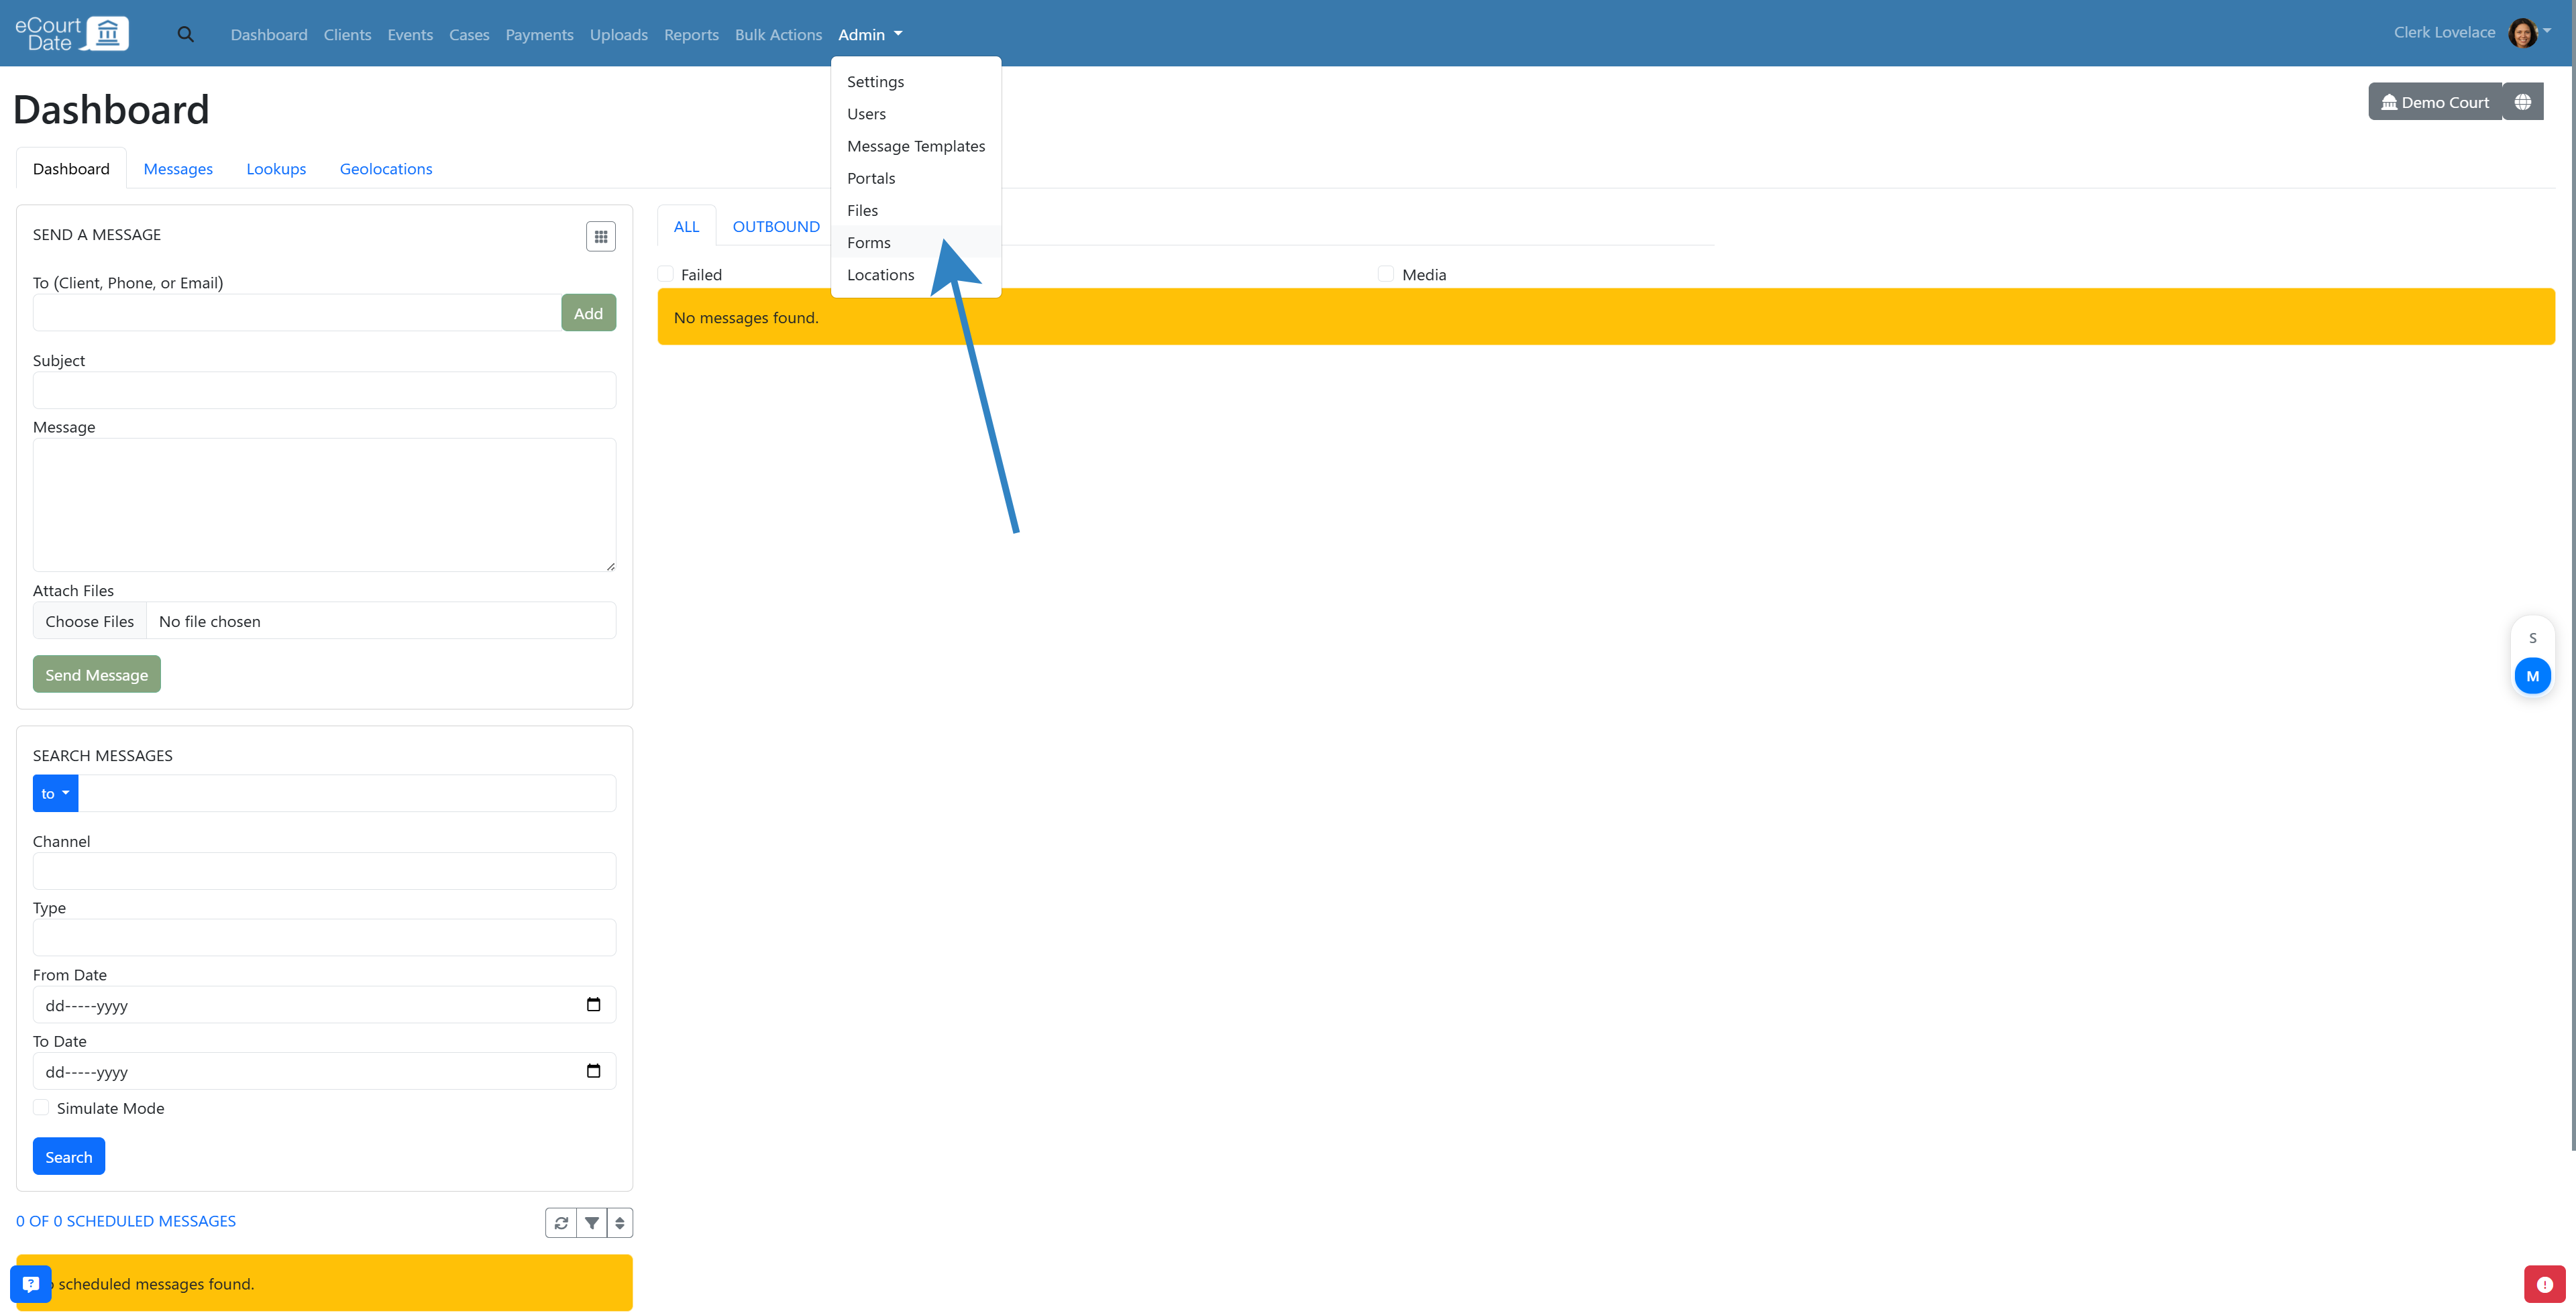
- Click Forms from the dropdown menu.
- Locate the Create Form section in the left column.
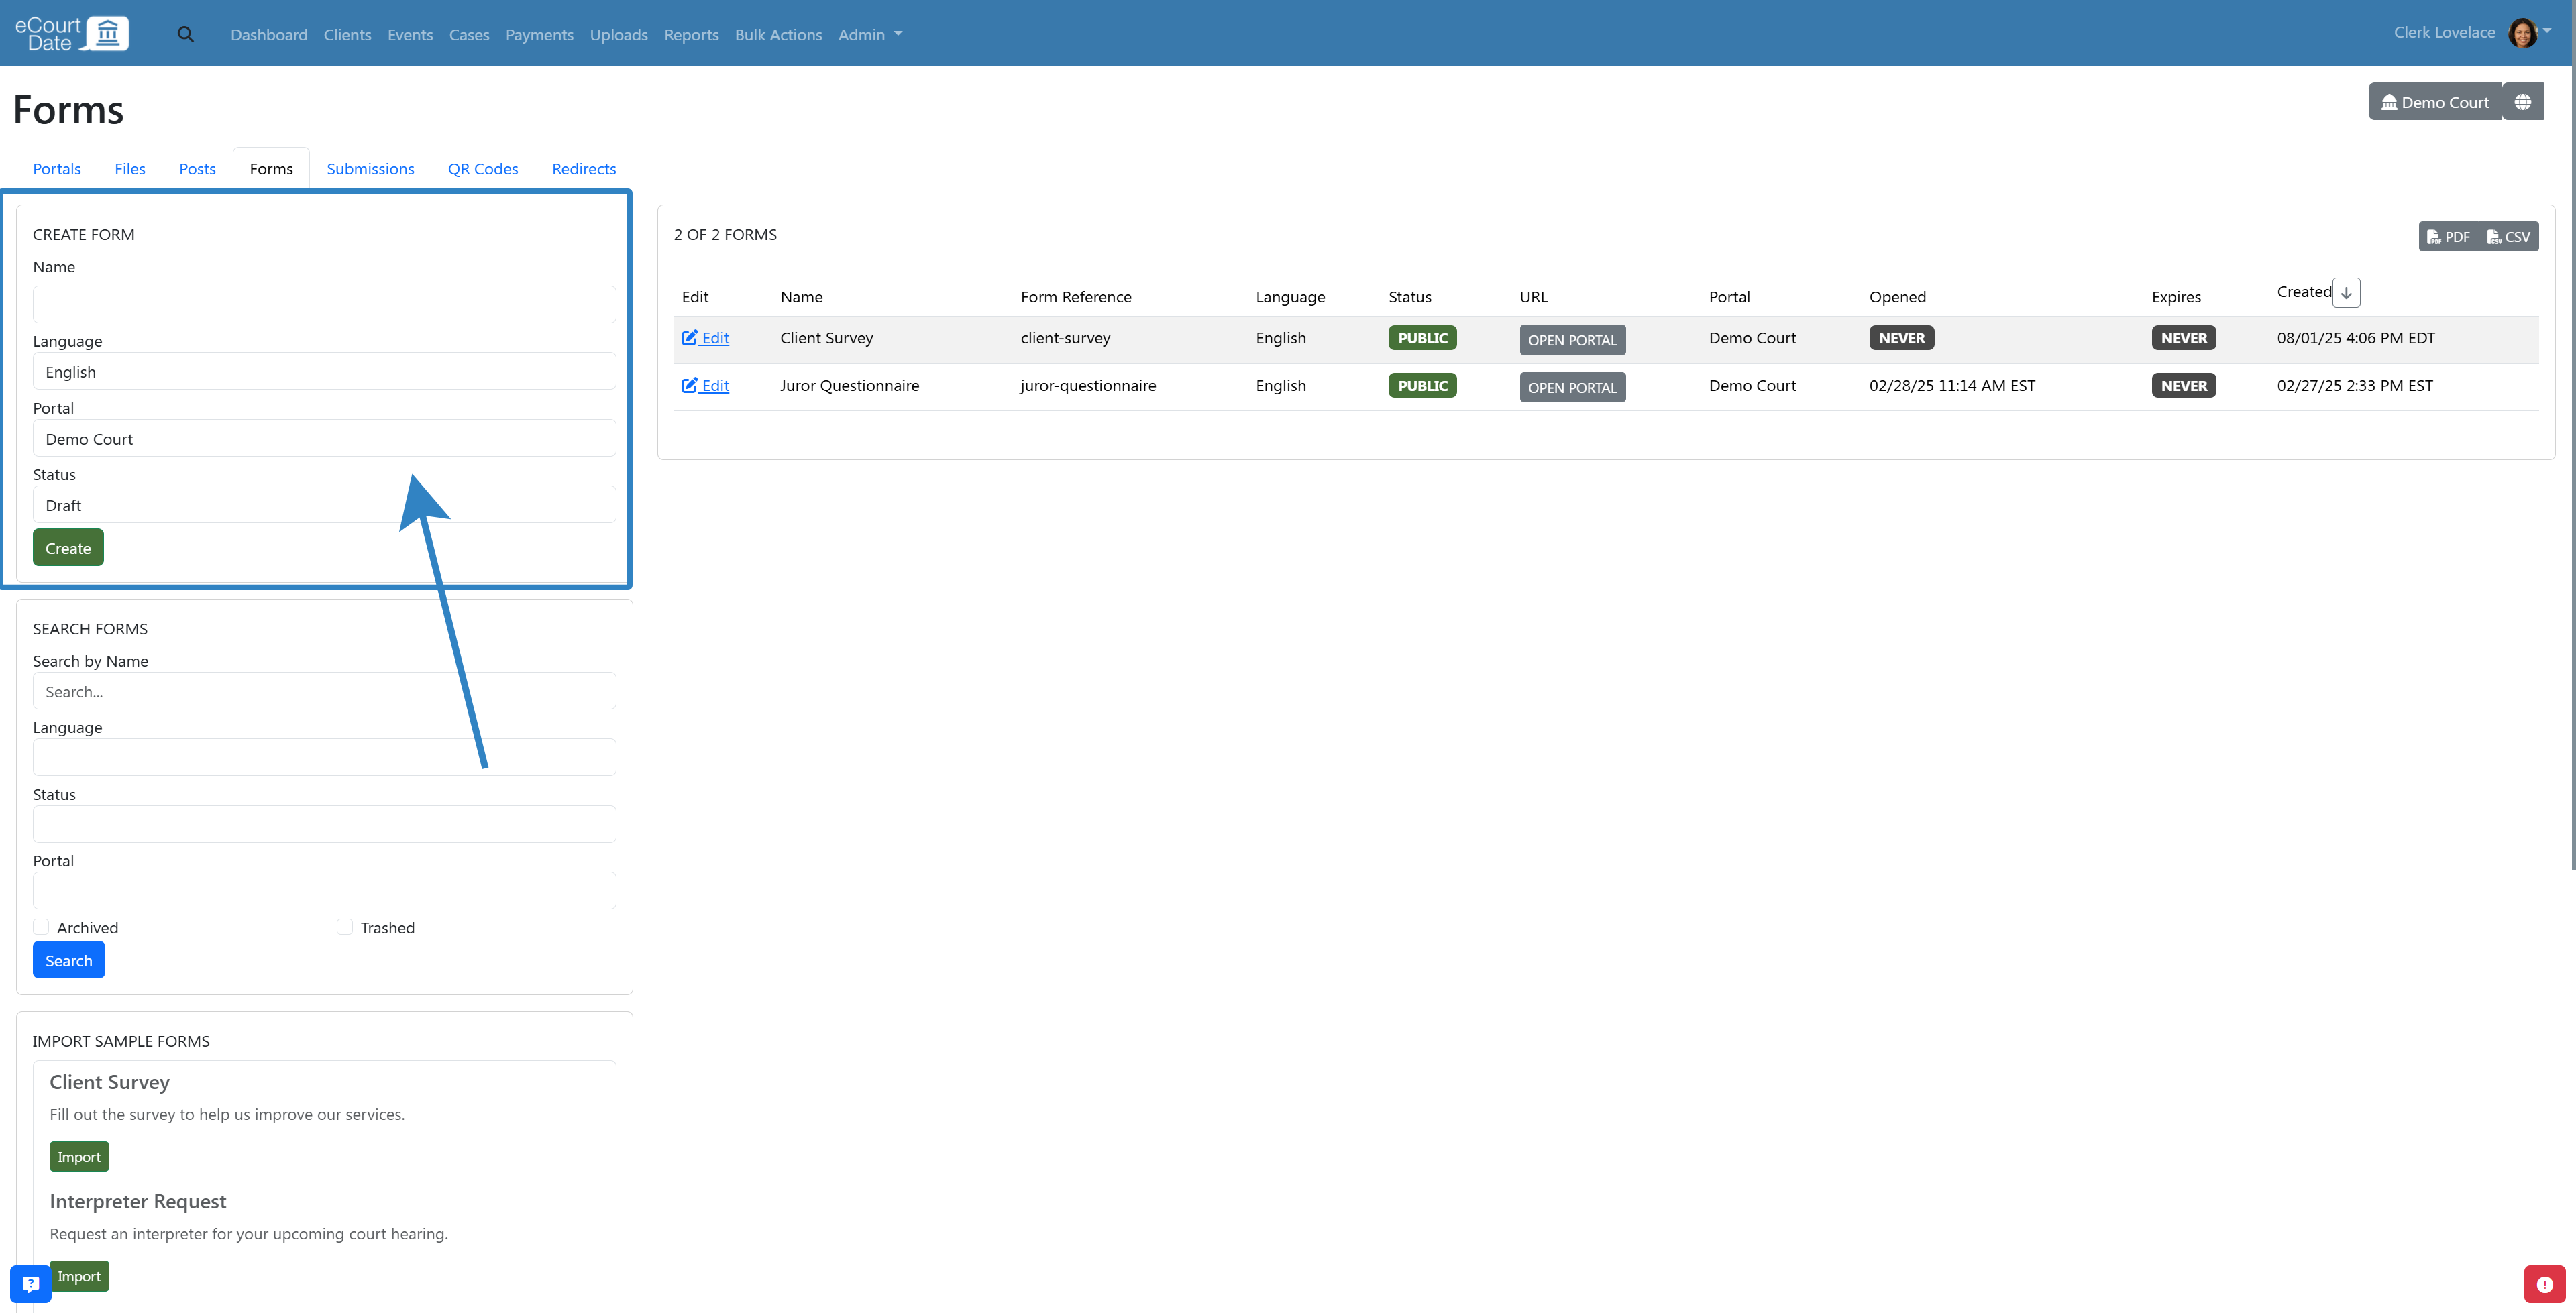
Step 2: Create the Form
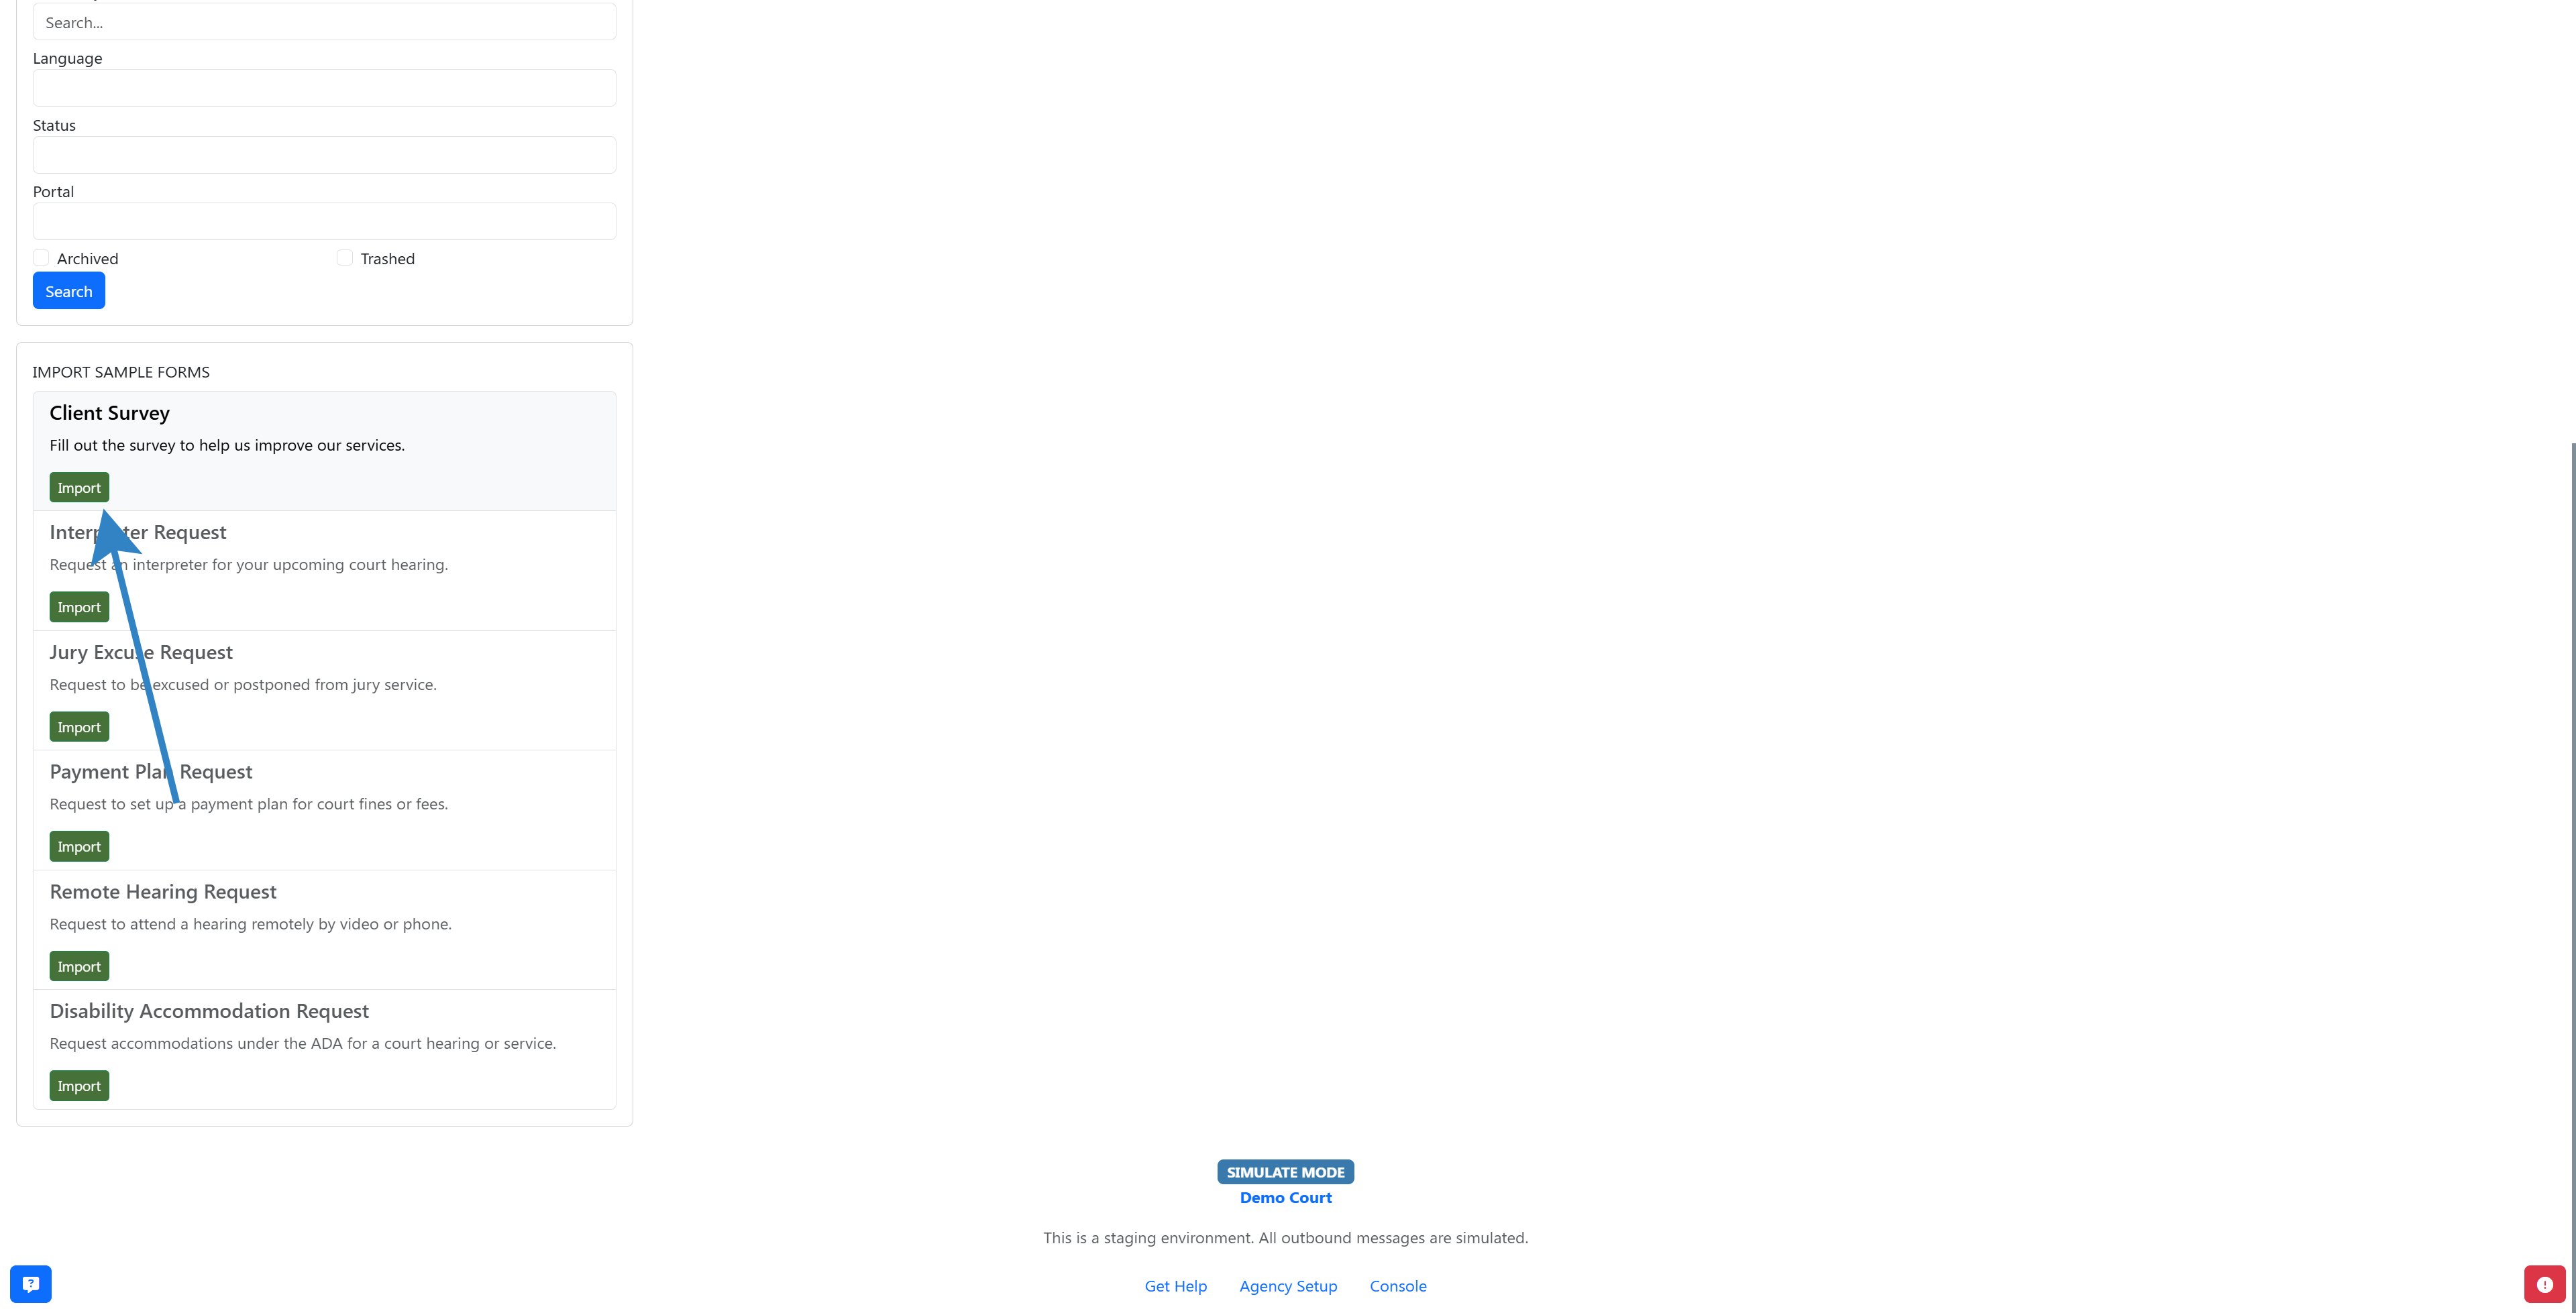
Tip: Use the Import Forms section to quickly import a sample form. You can skip to Step 3 if you import a form.
- Enter the desired name, select the language, portal, and status.
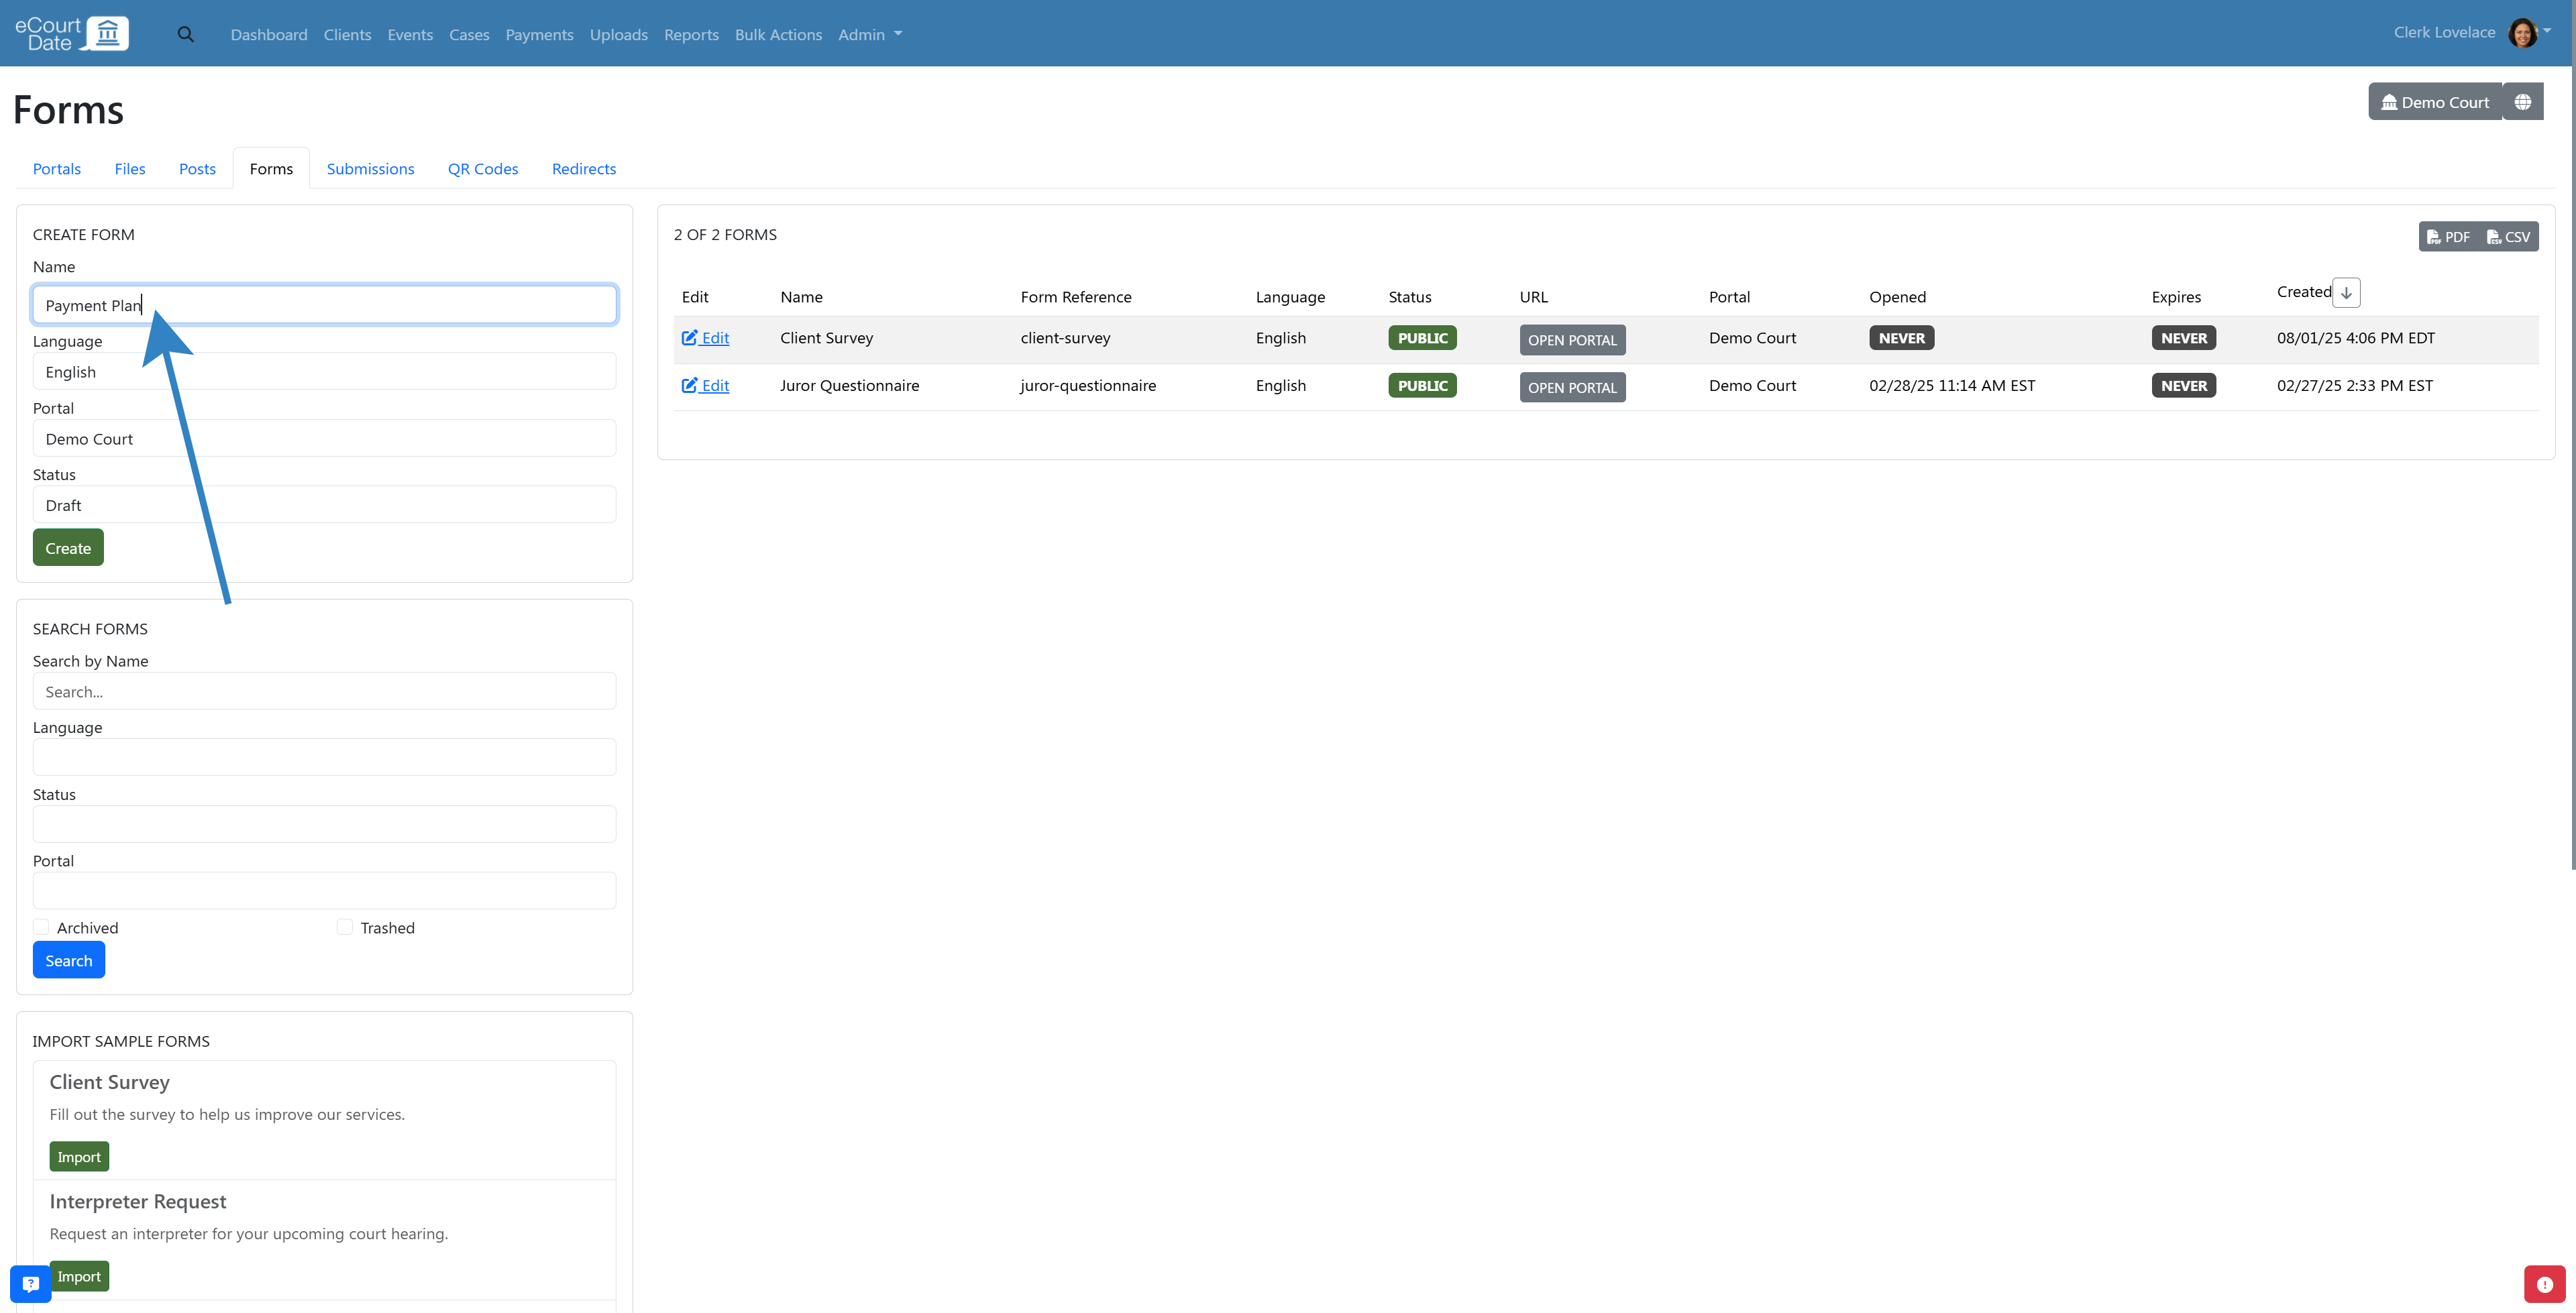
- Click the Create button.
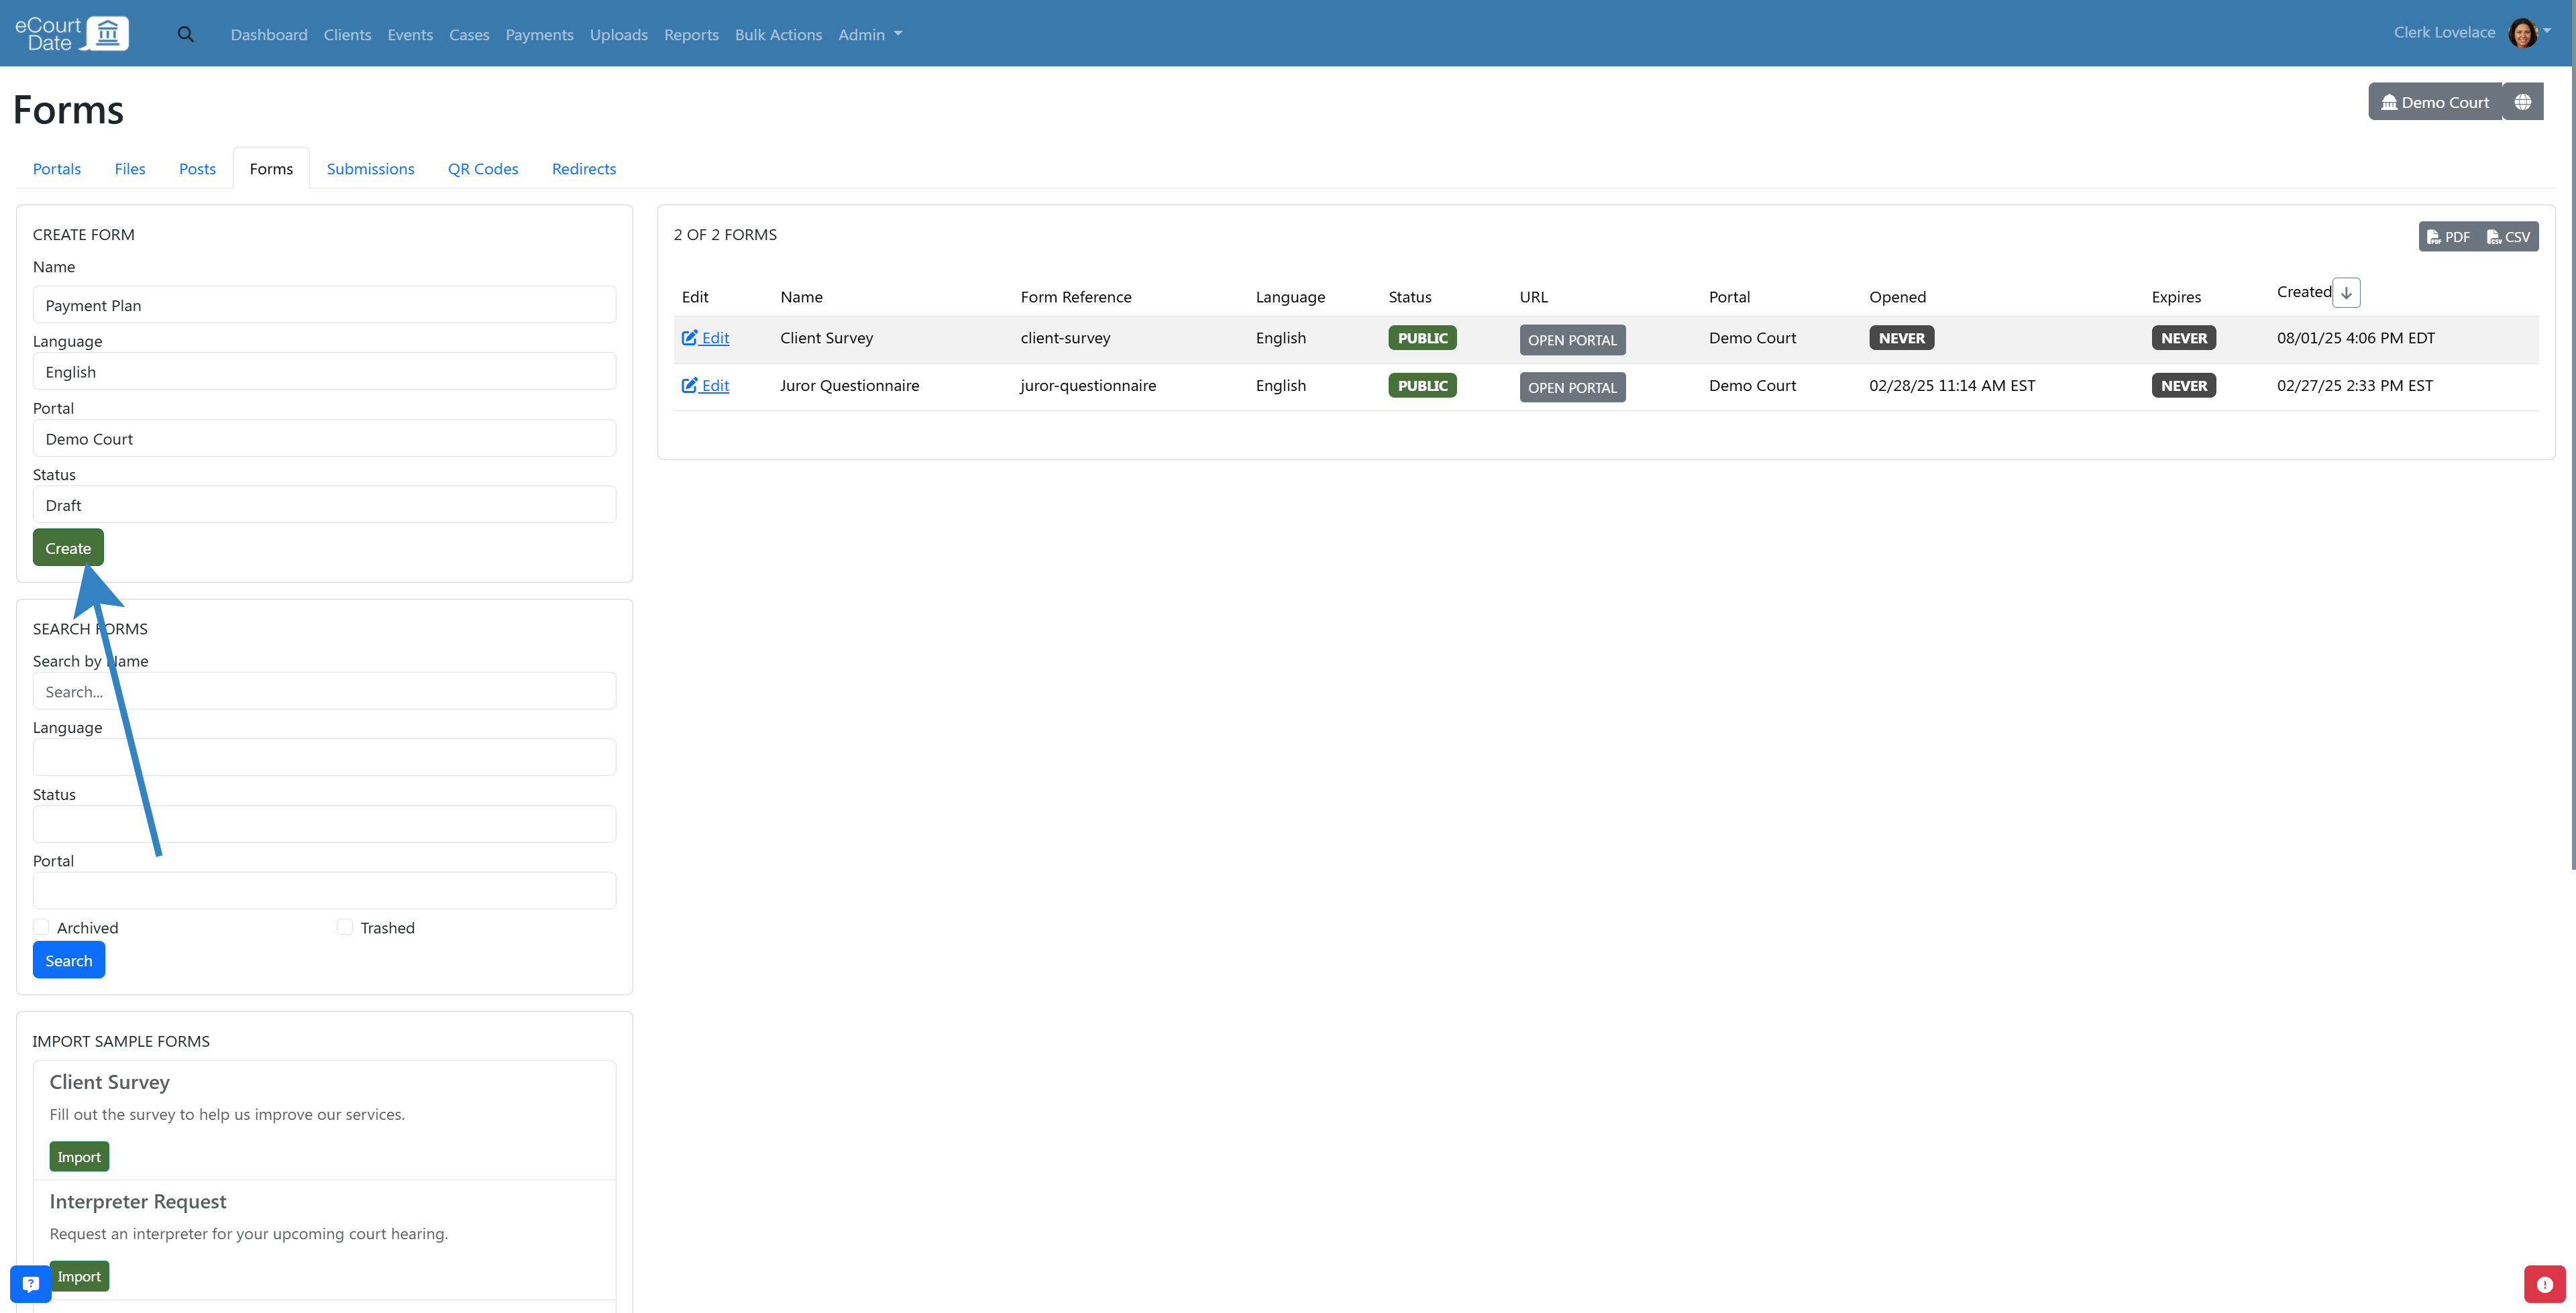
- Review the newly created form page.
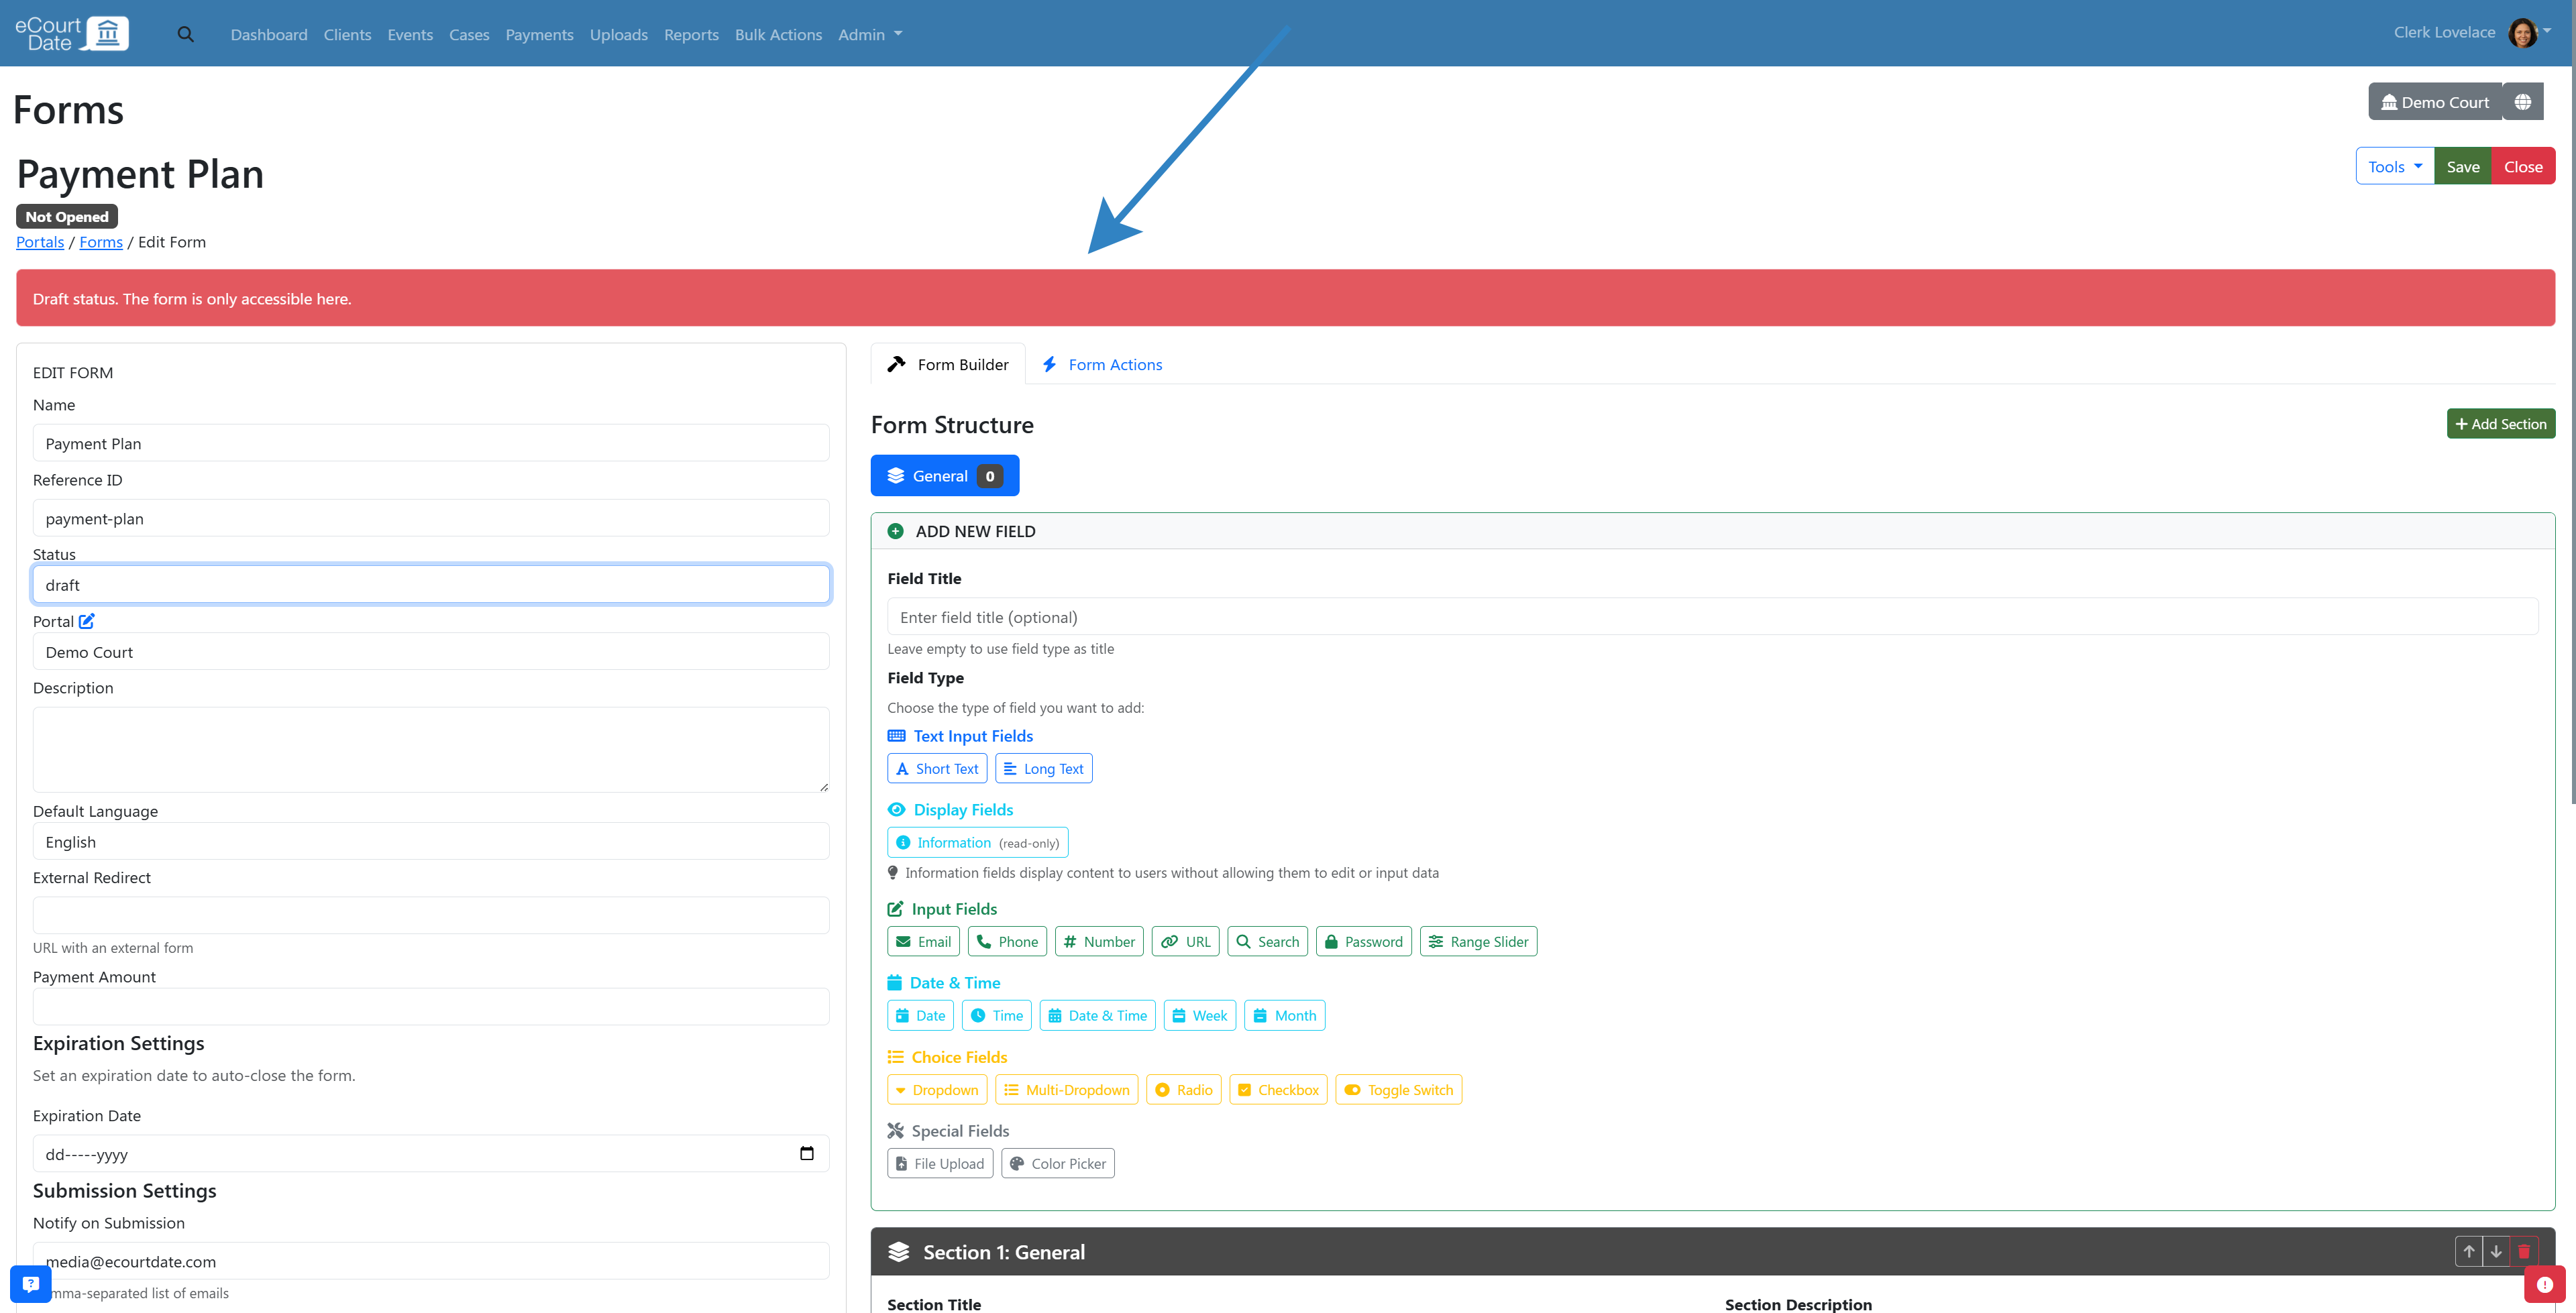
Step 3: Edit Form Settings
After making any changes, click Save. Review the following key settings:
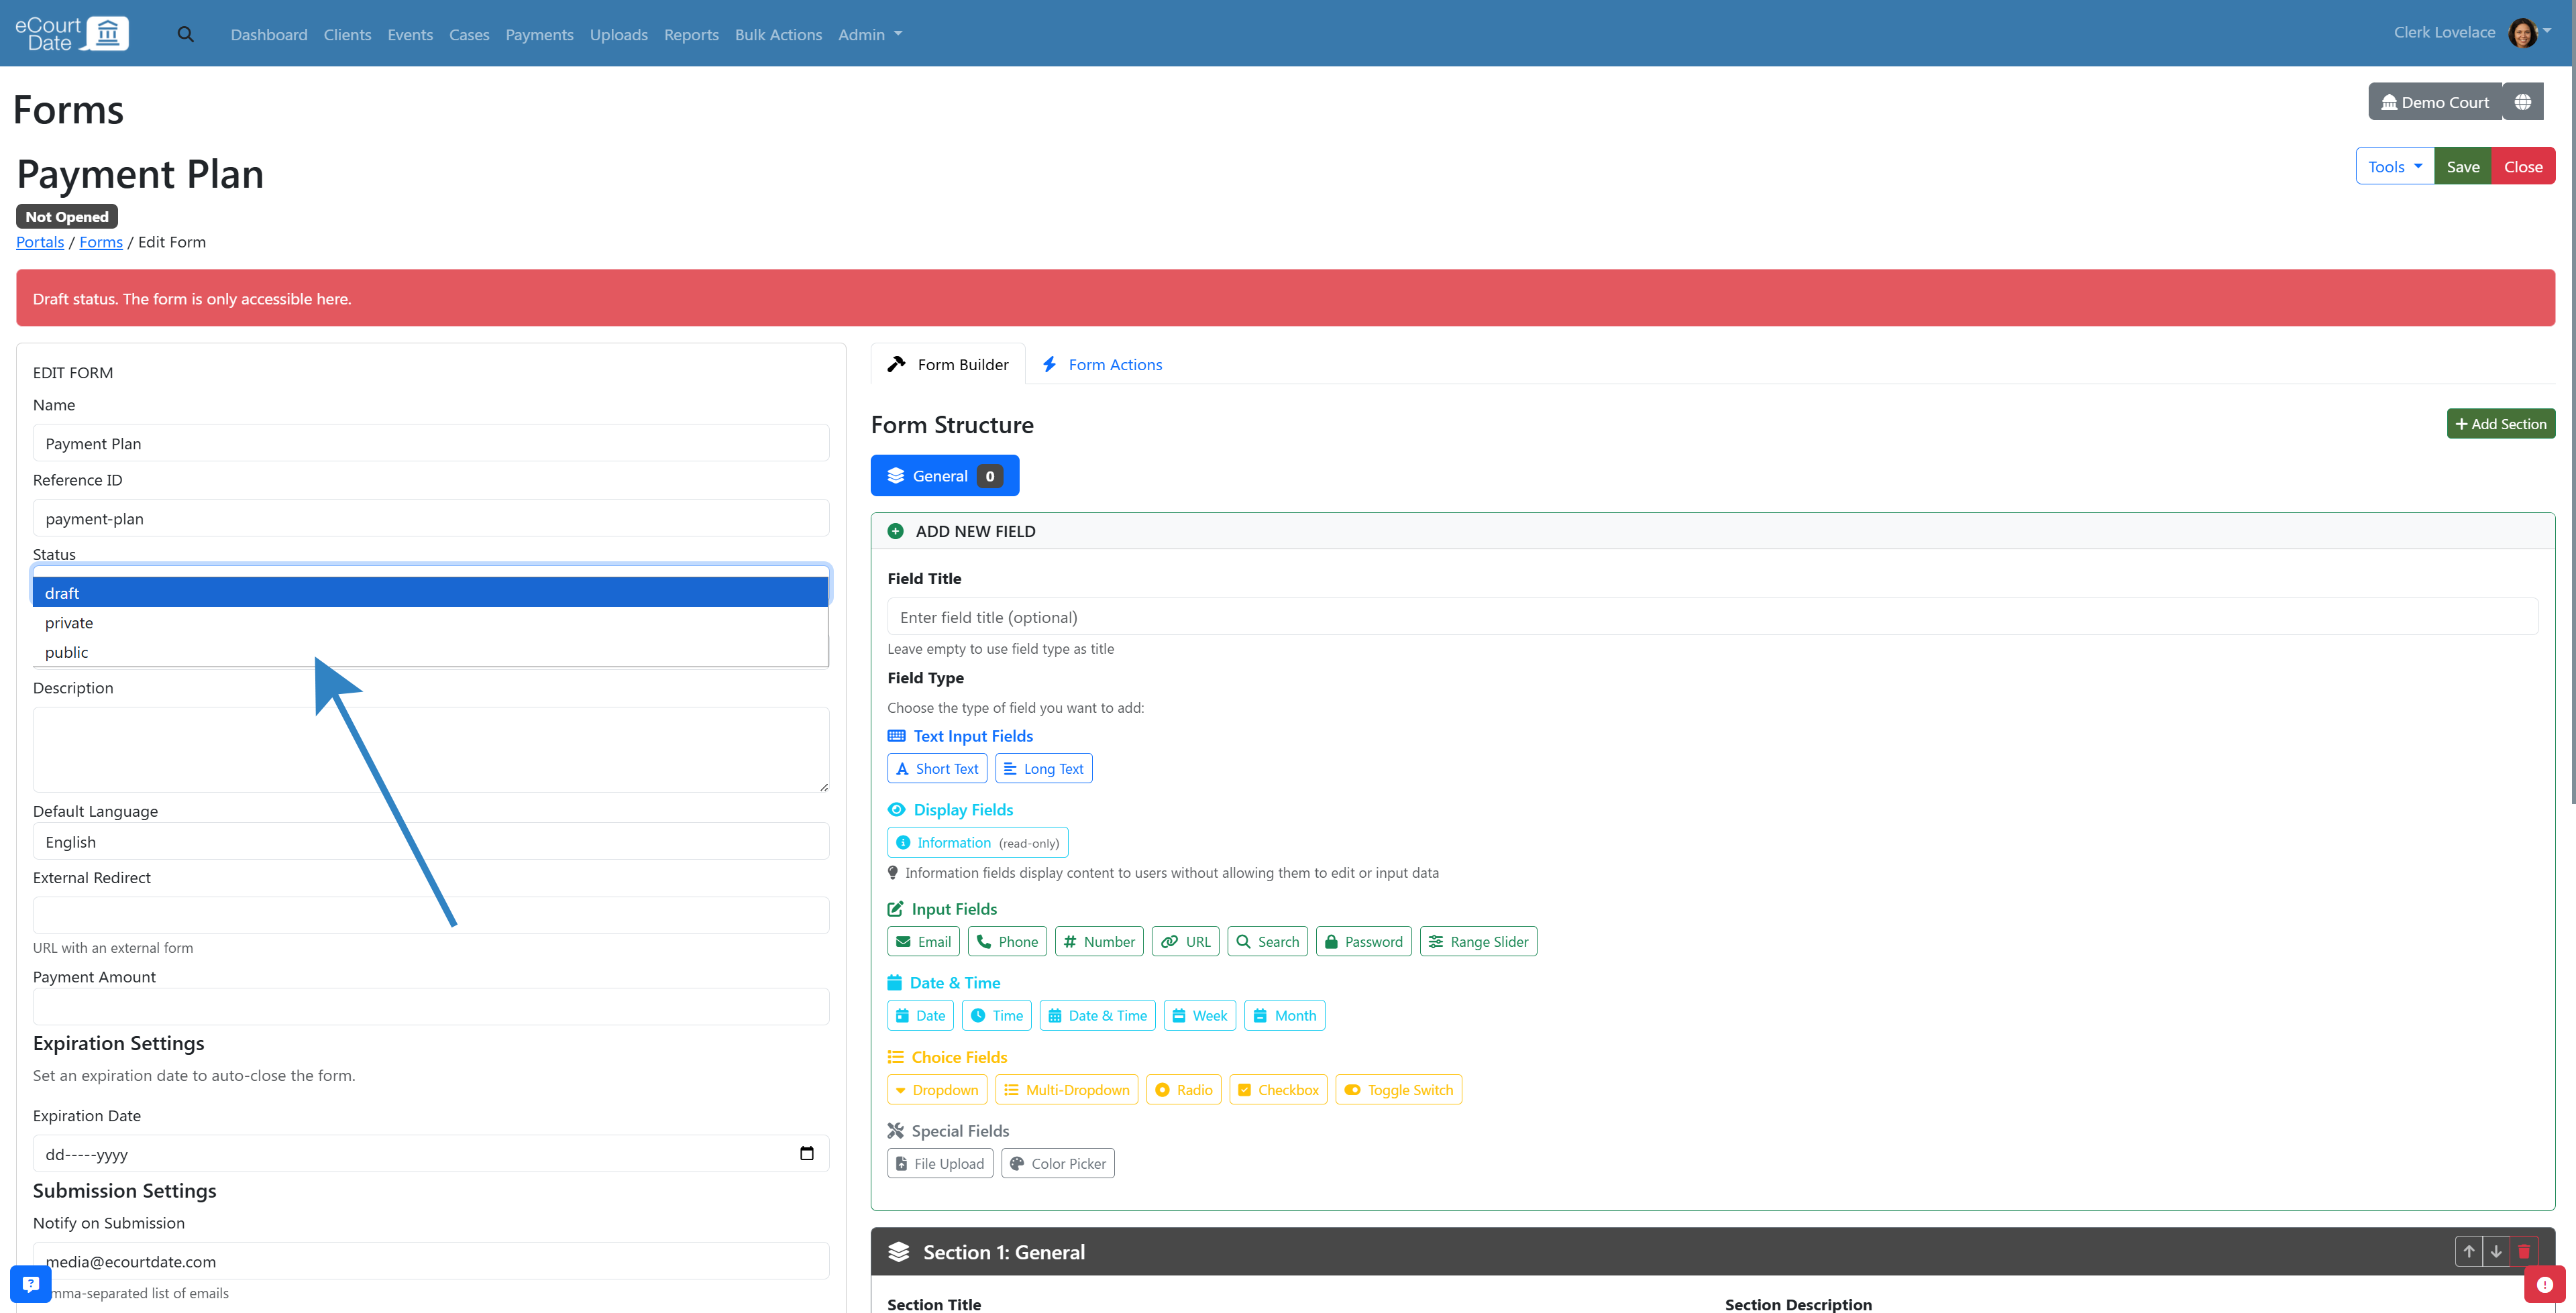
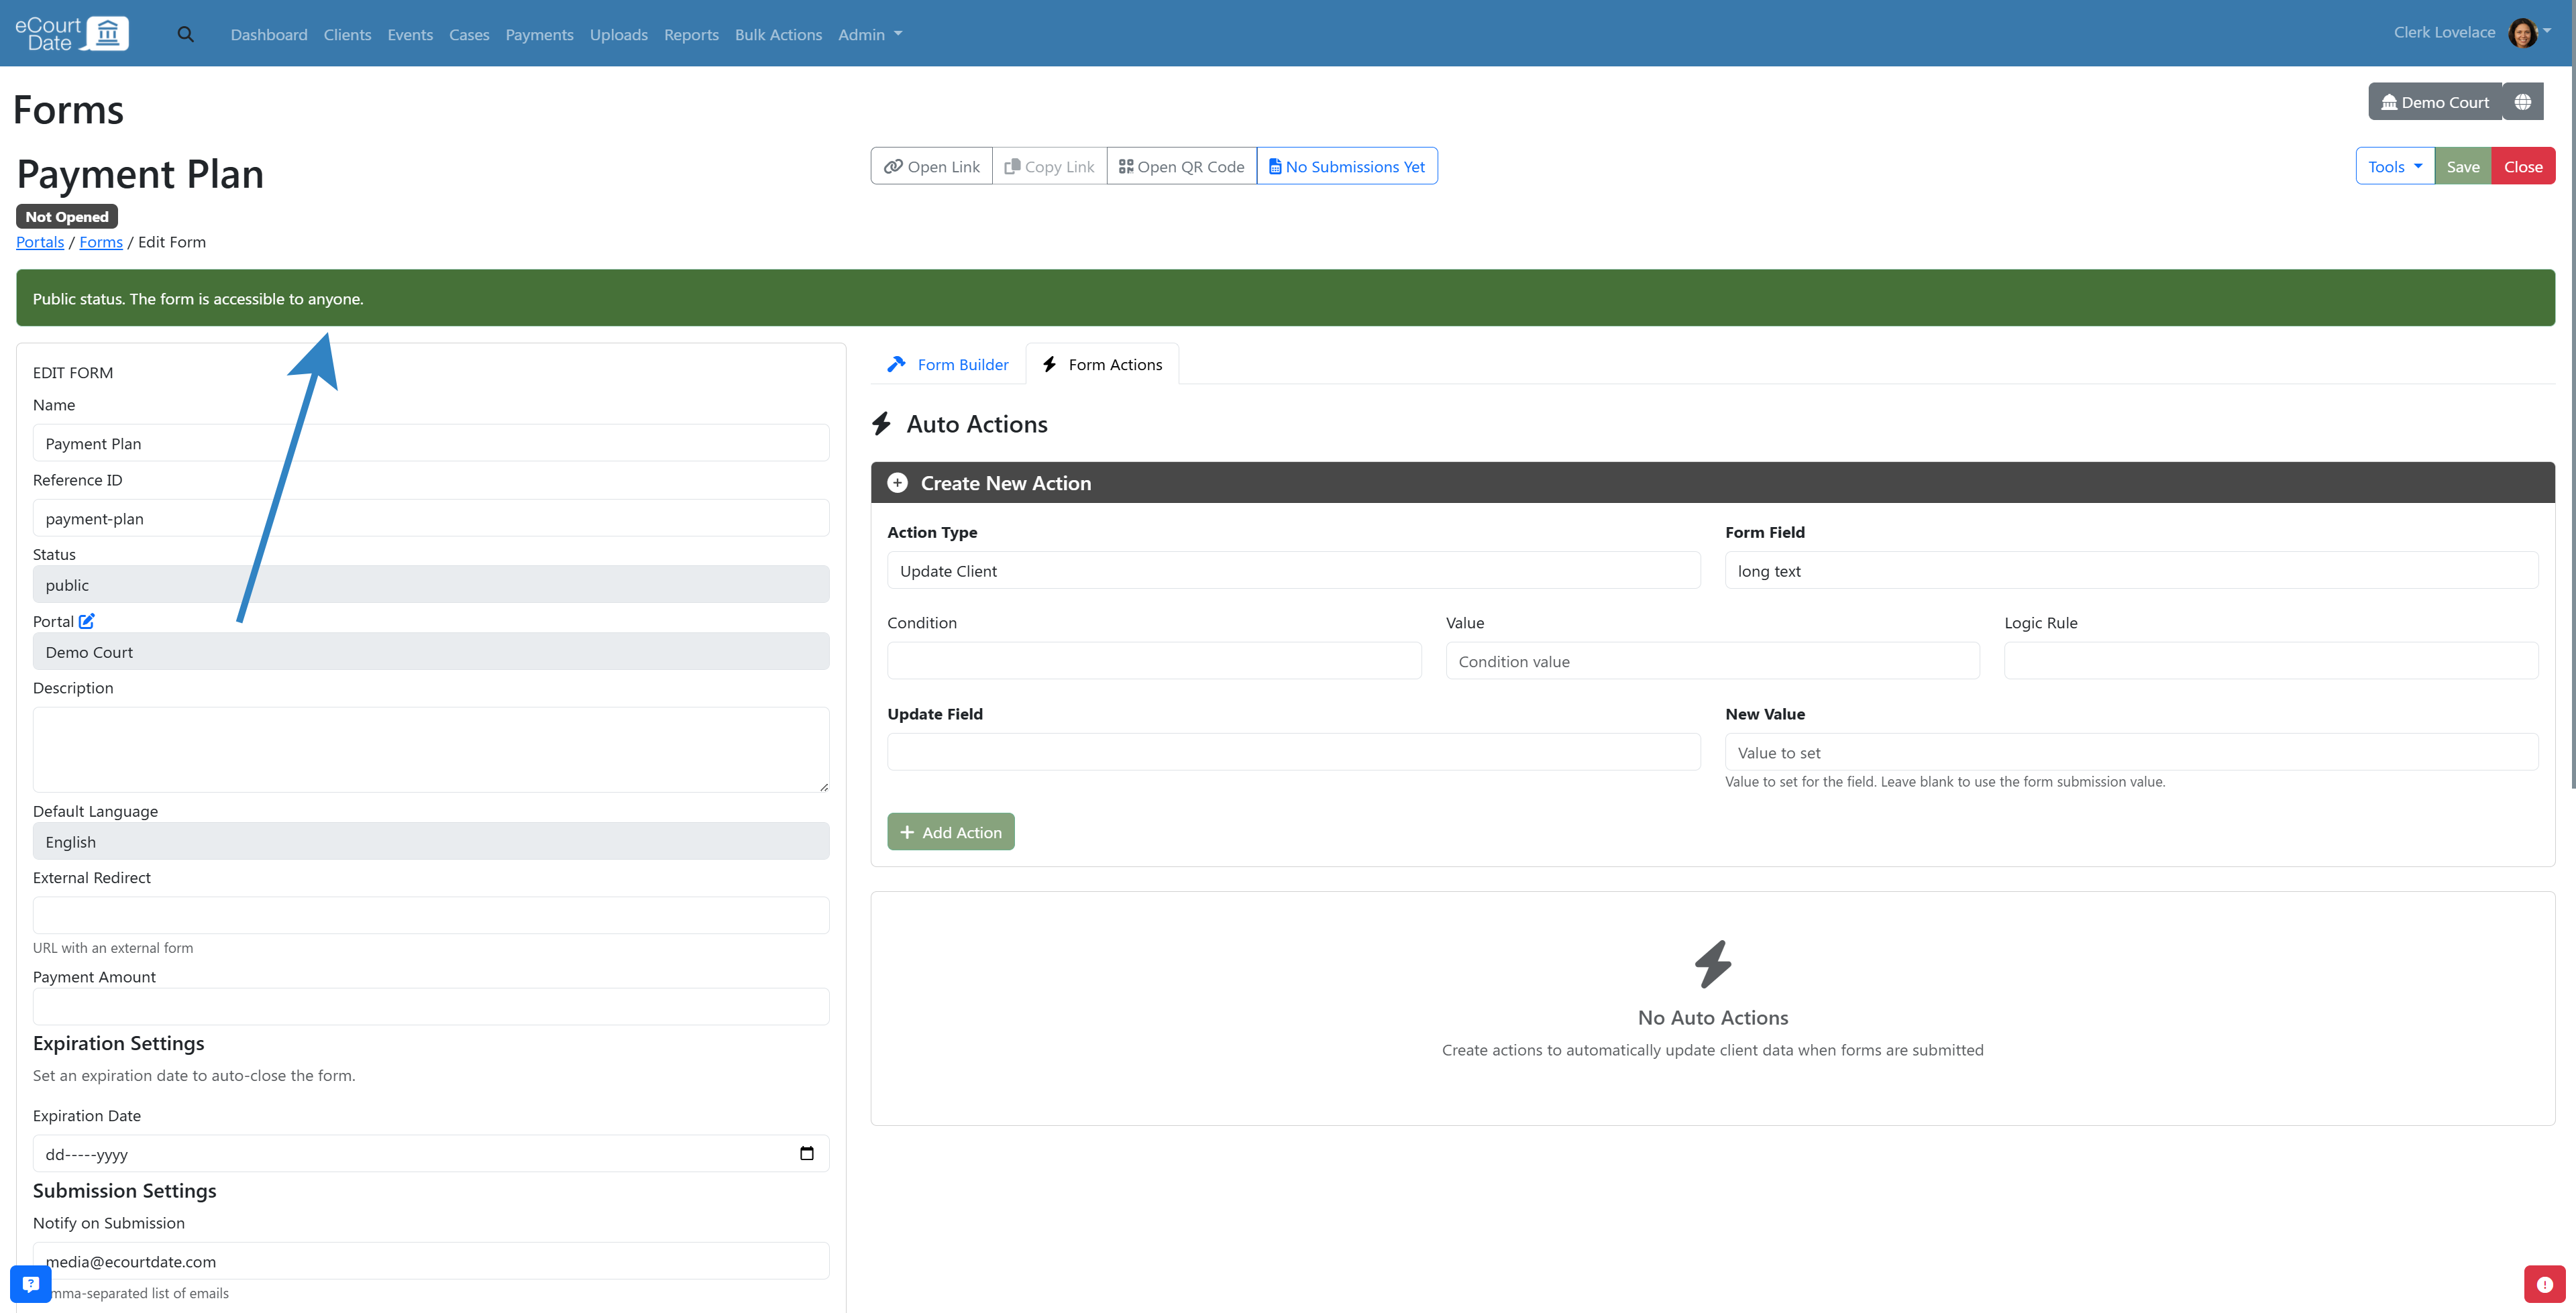
Form Status
Select one of the following status options:
- Draft: The form is not accessible in the portal
- Public: The form is accessible in the portal without requiring sign-in
- Private: The form requires clients to sign in before accessing it
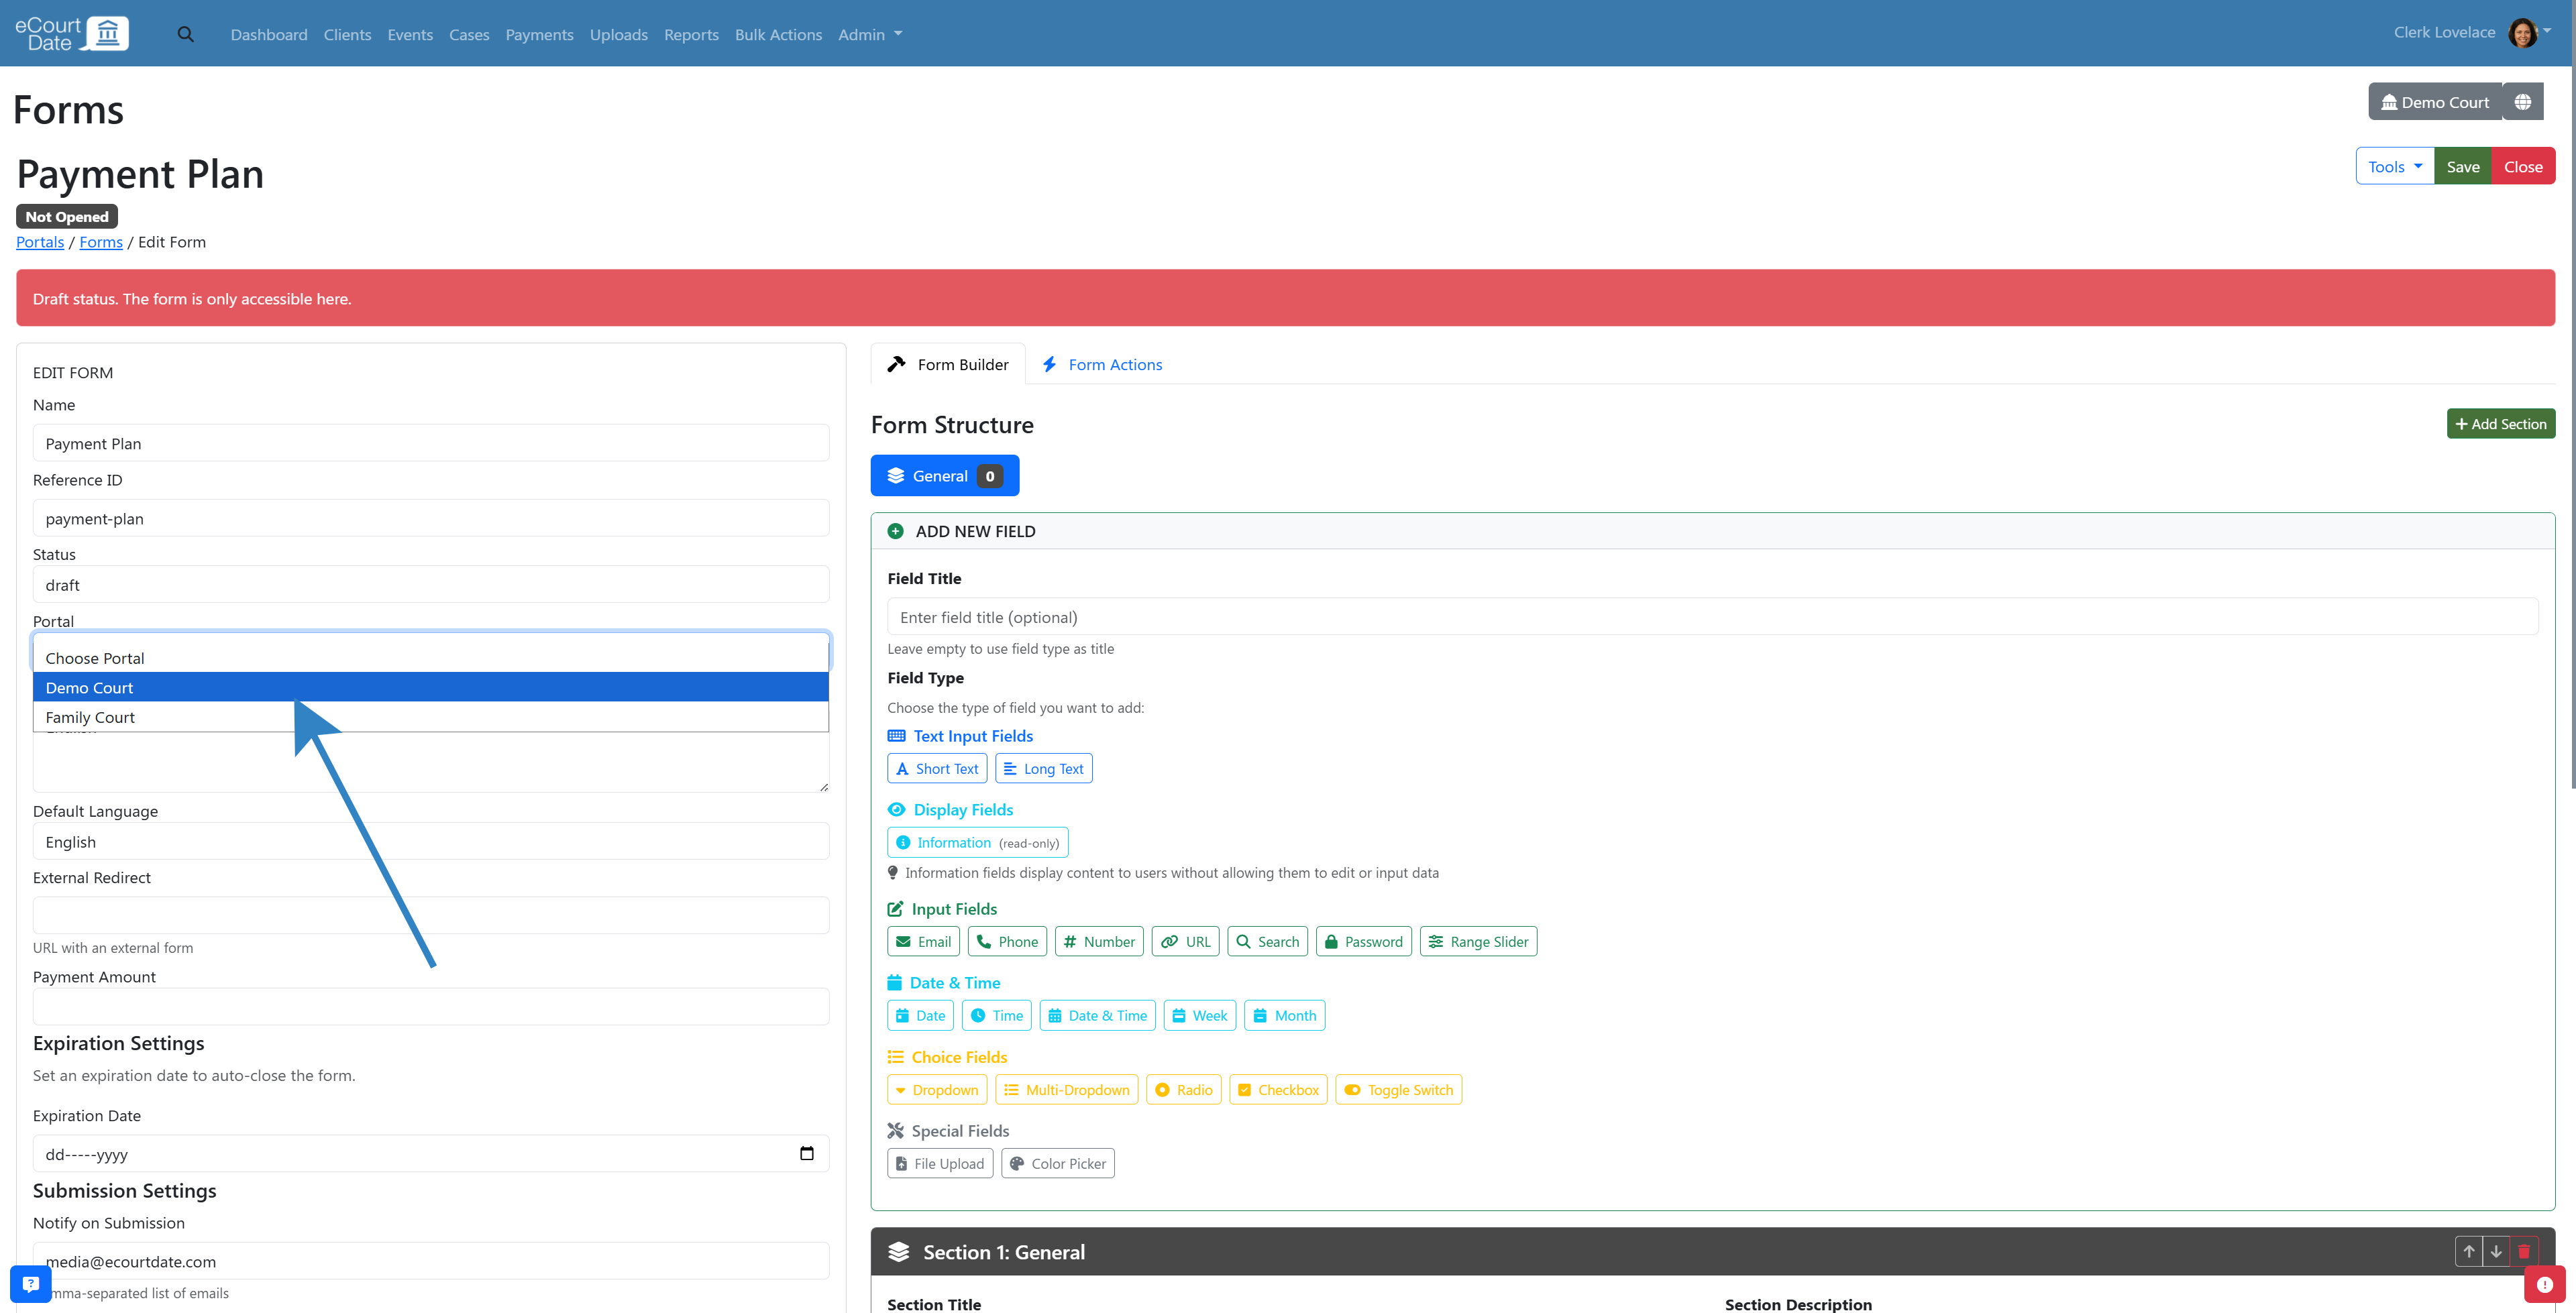
Form Portal
If you have more than one portal, select which portal to use for the form. A portal is required for the form to work.
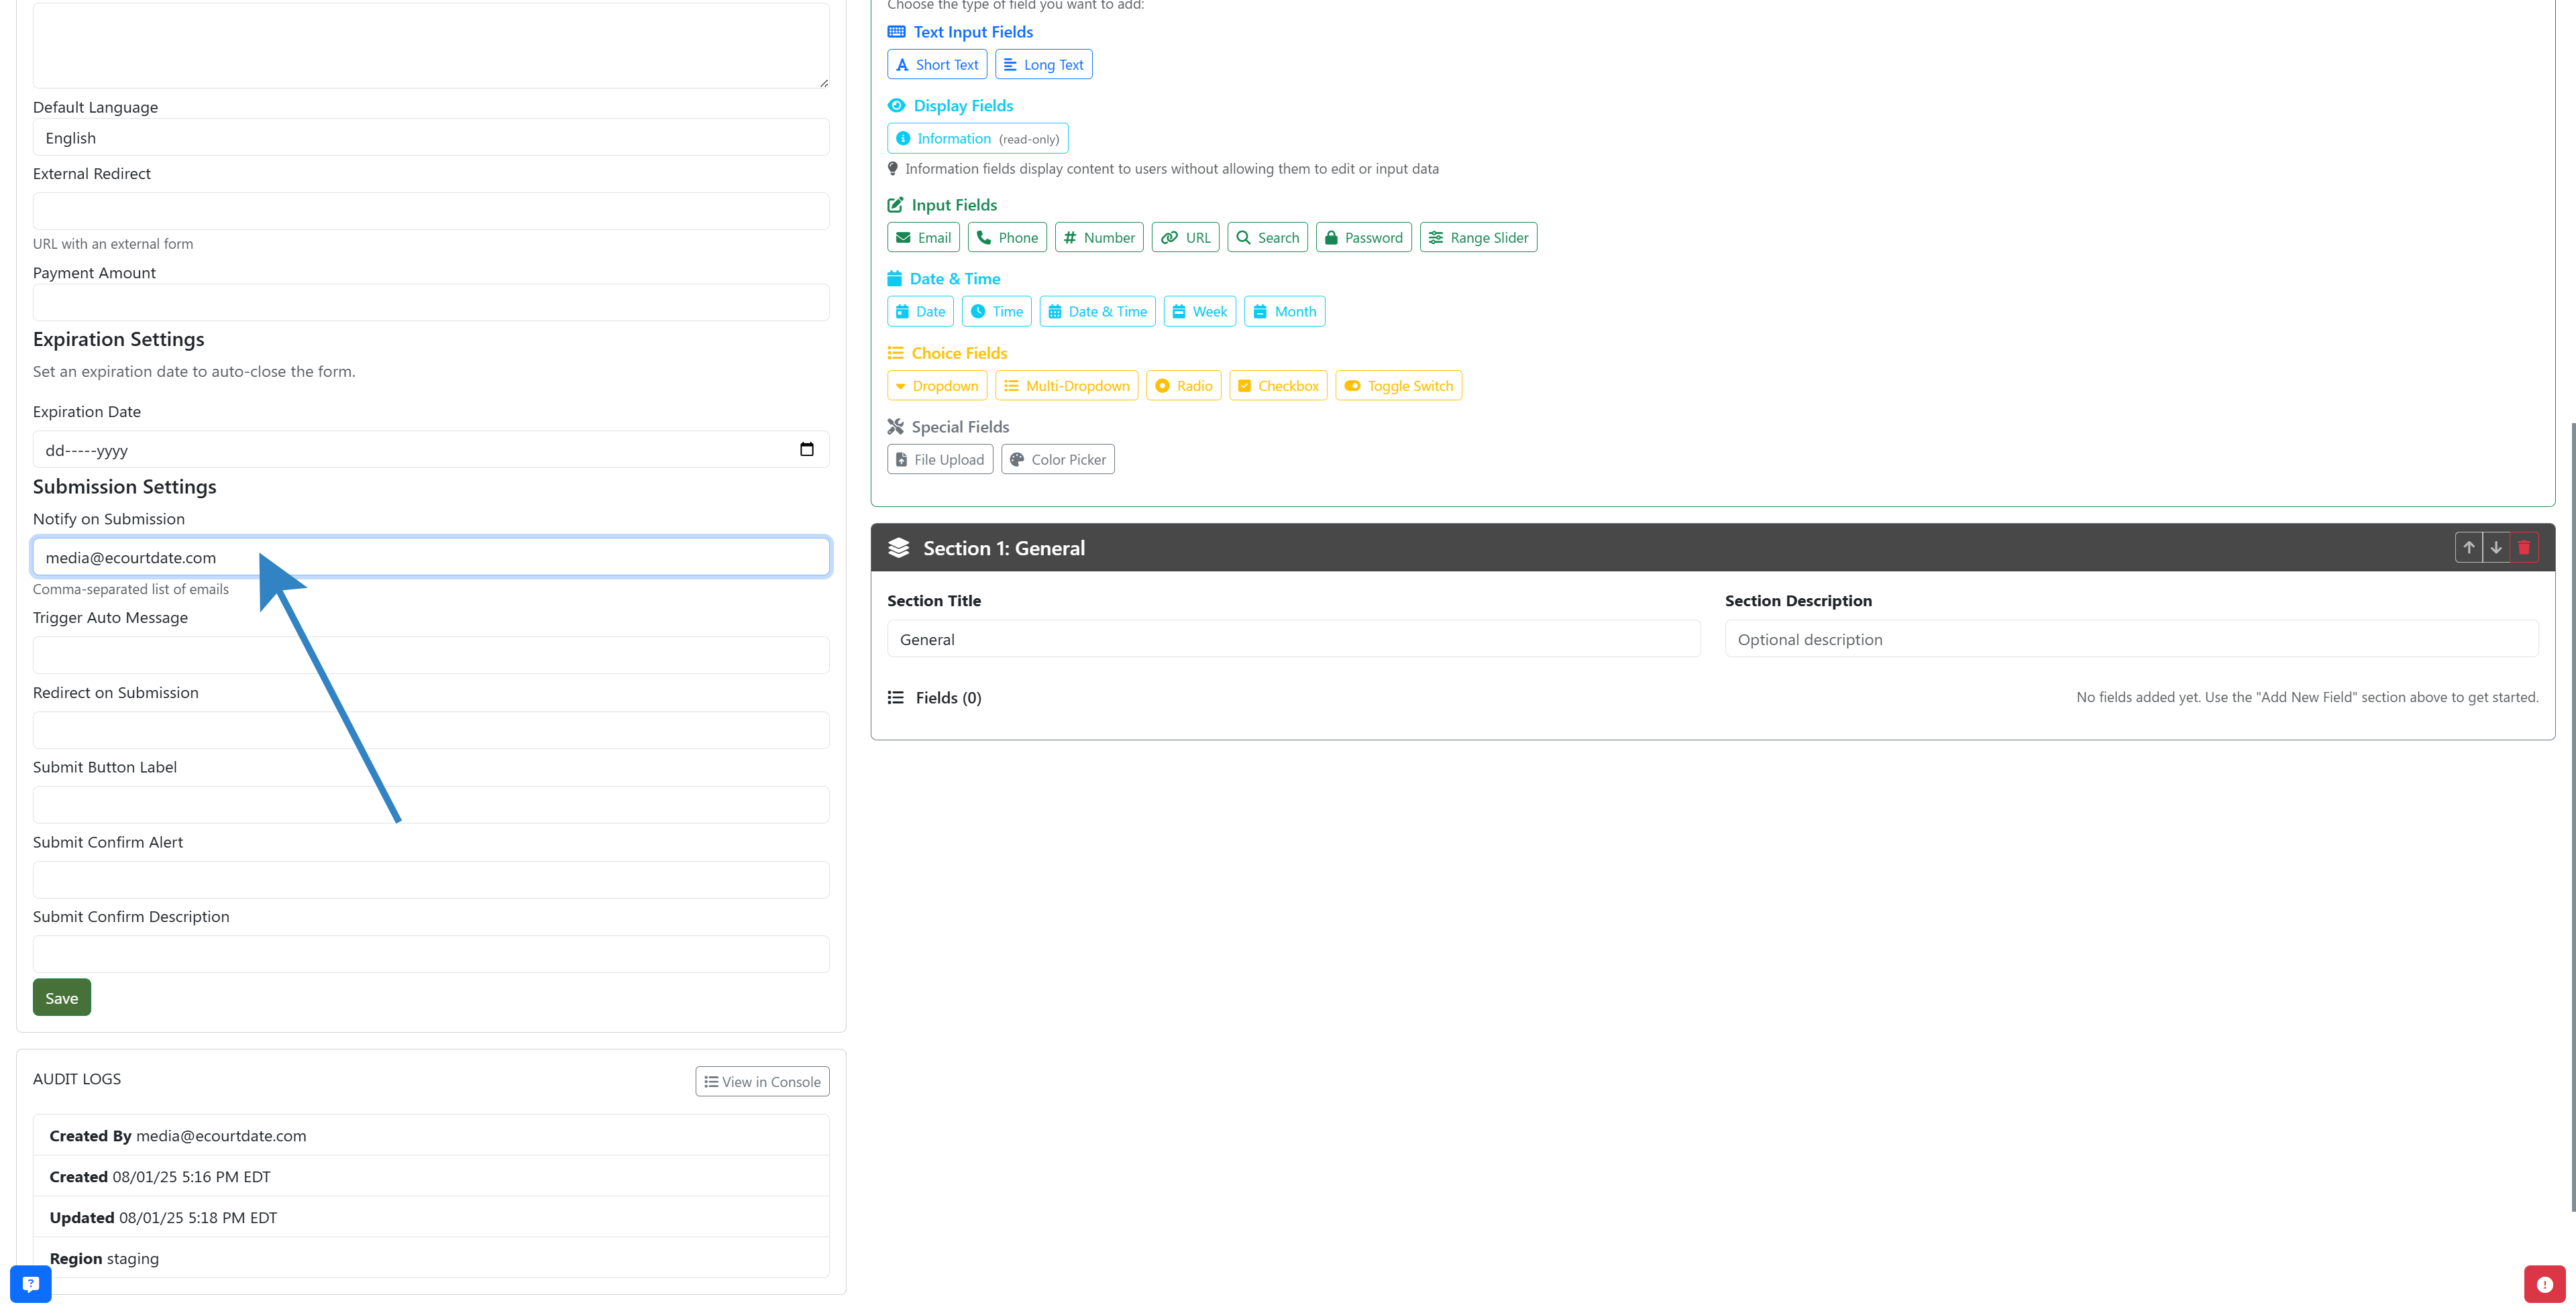
Notify on Submissions
Enter one or more email addresses to receive a notification whenever a client submits the form.
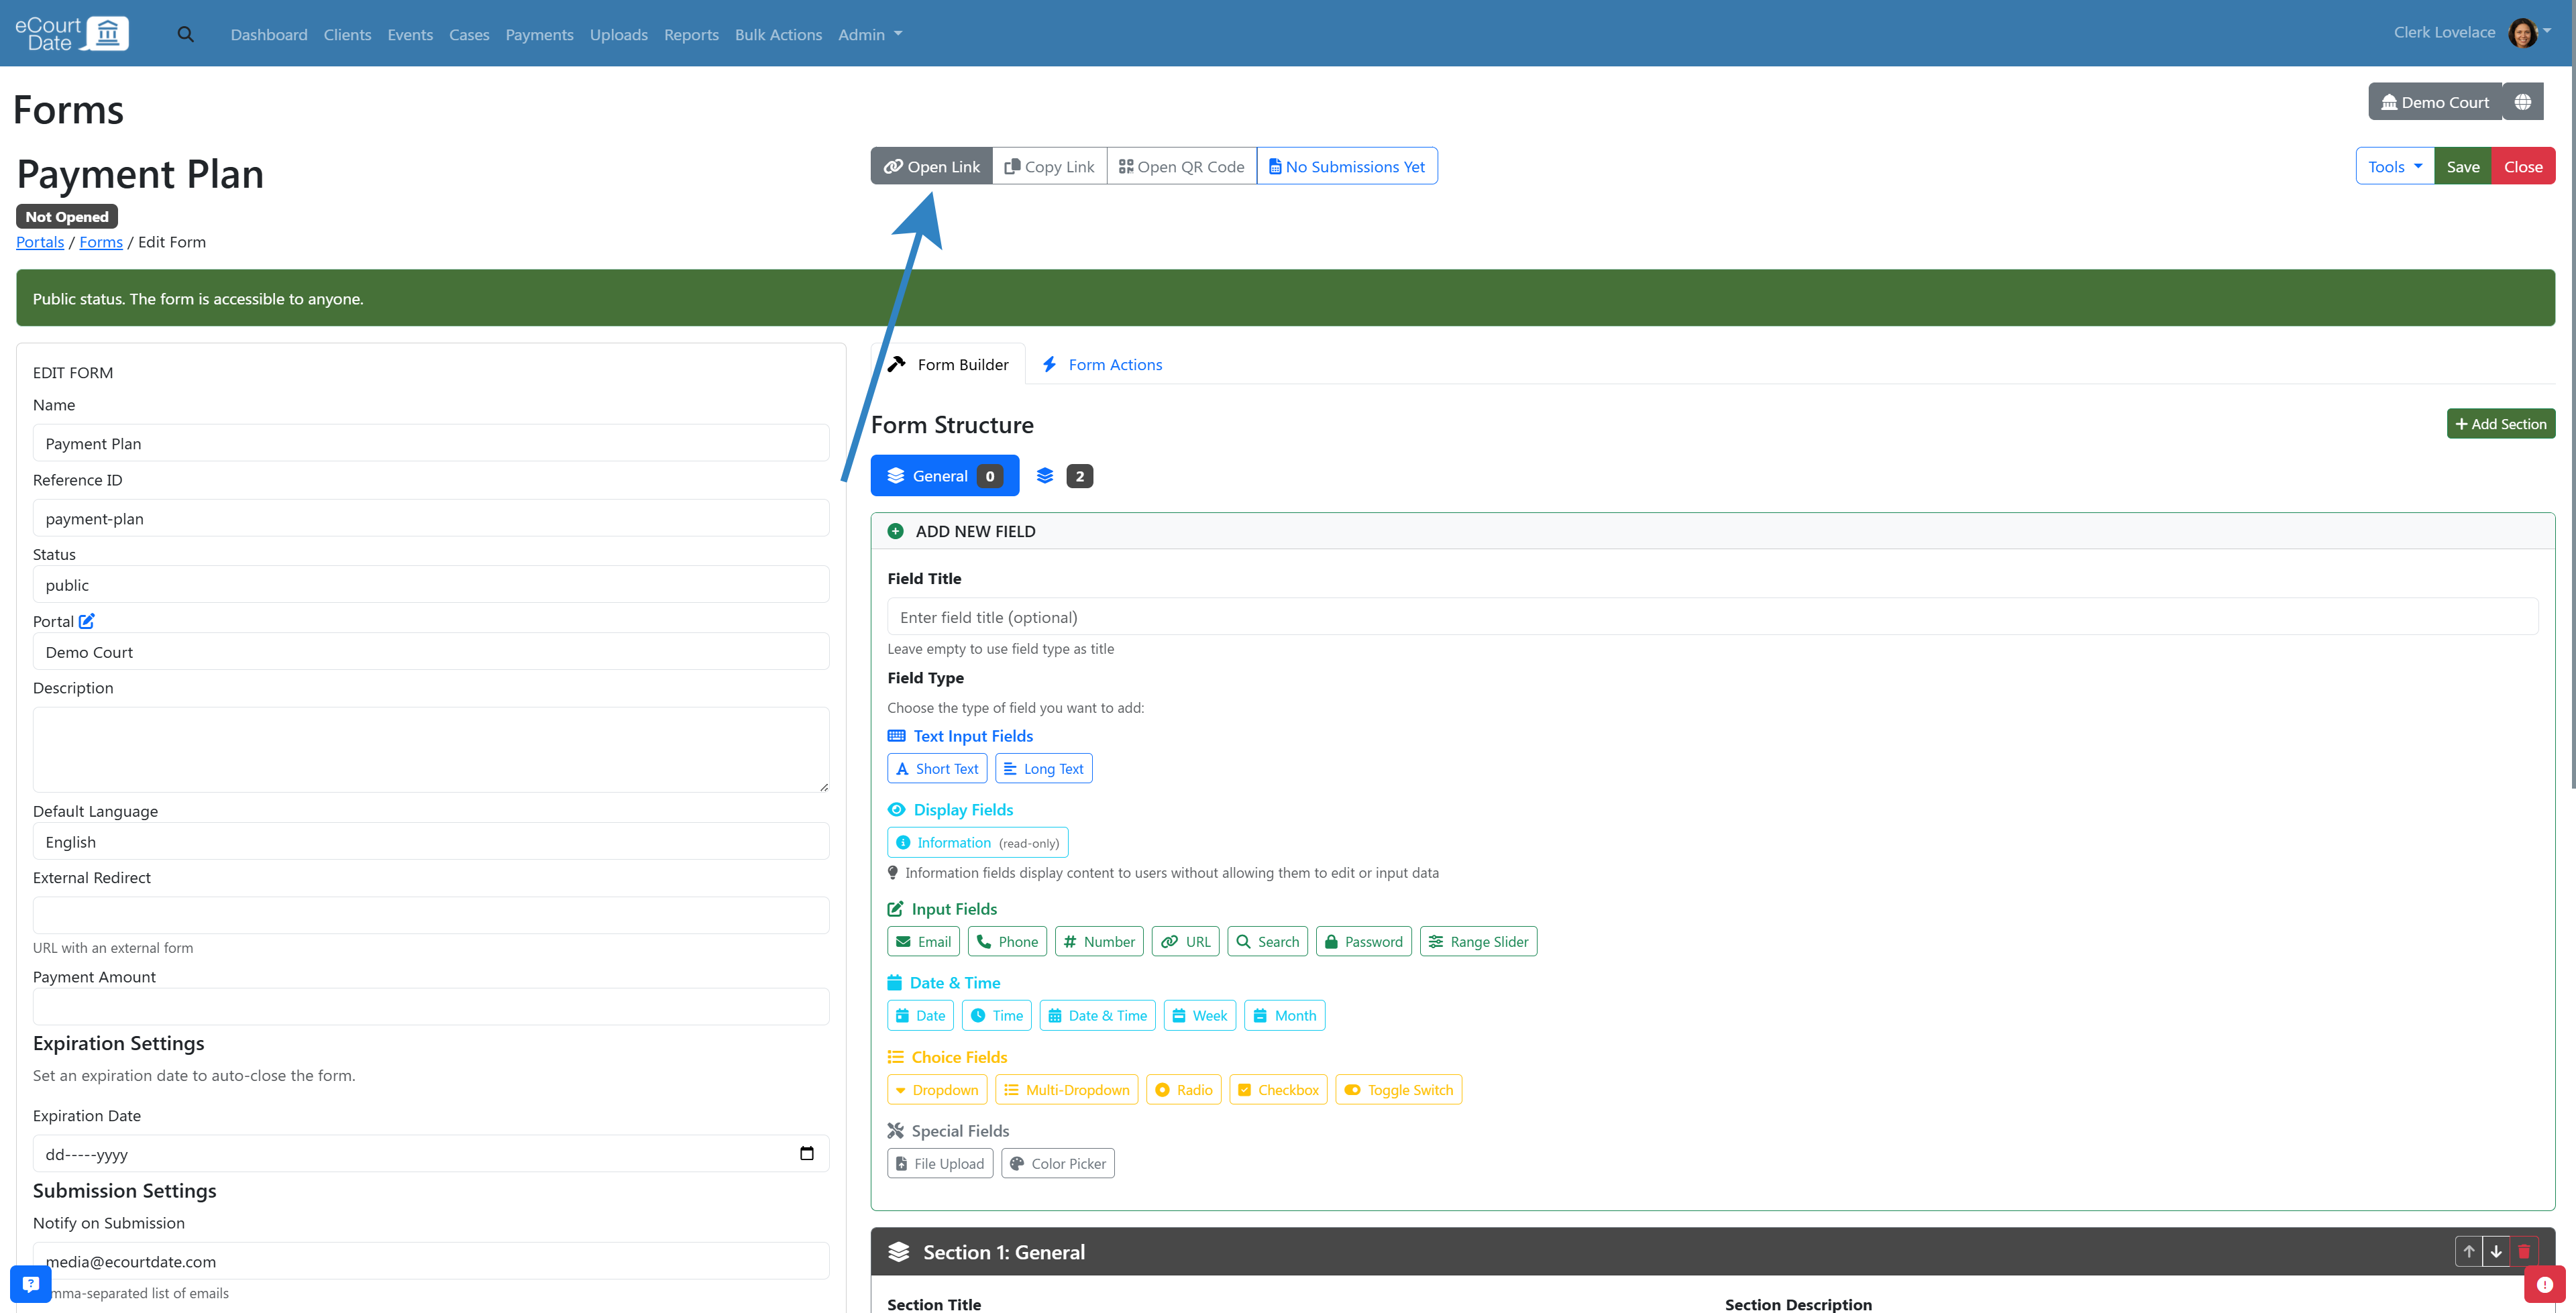
Step 4: Build the Form
Use the Form Builder to customize your fields. Each form supports any number of sections, and each section supports any number of fields.
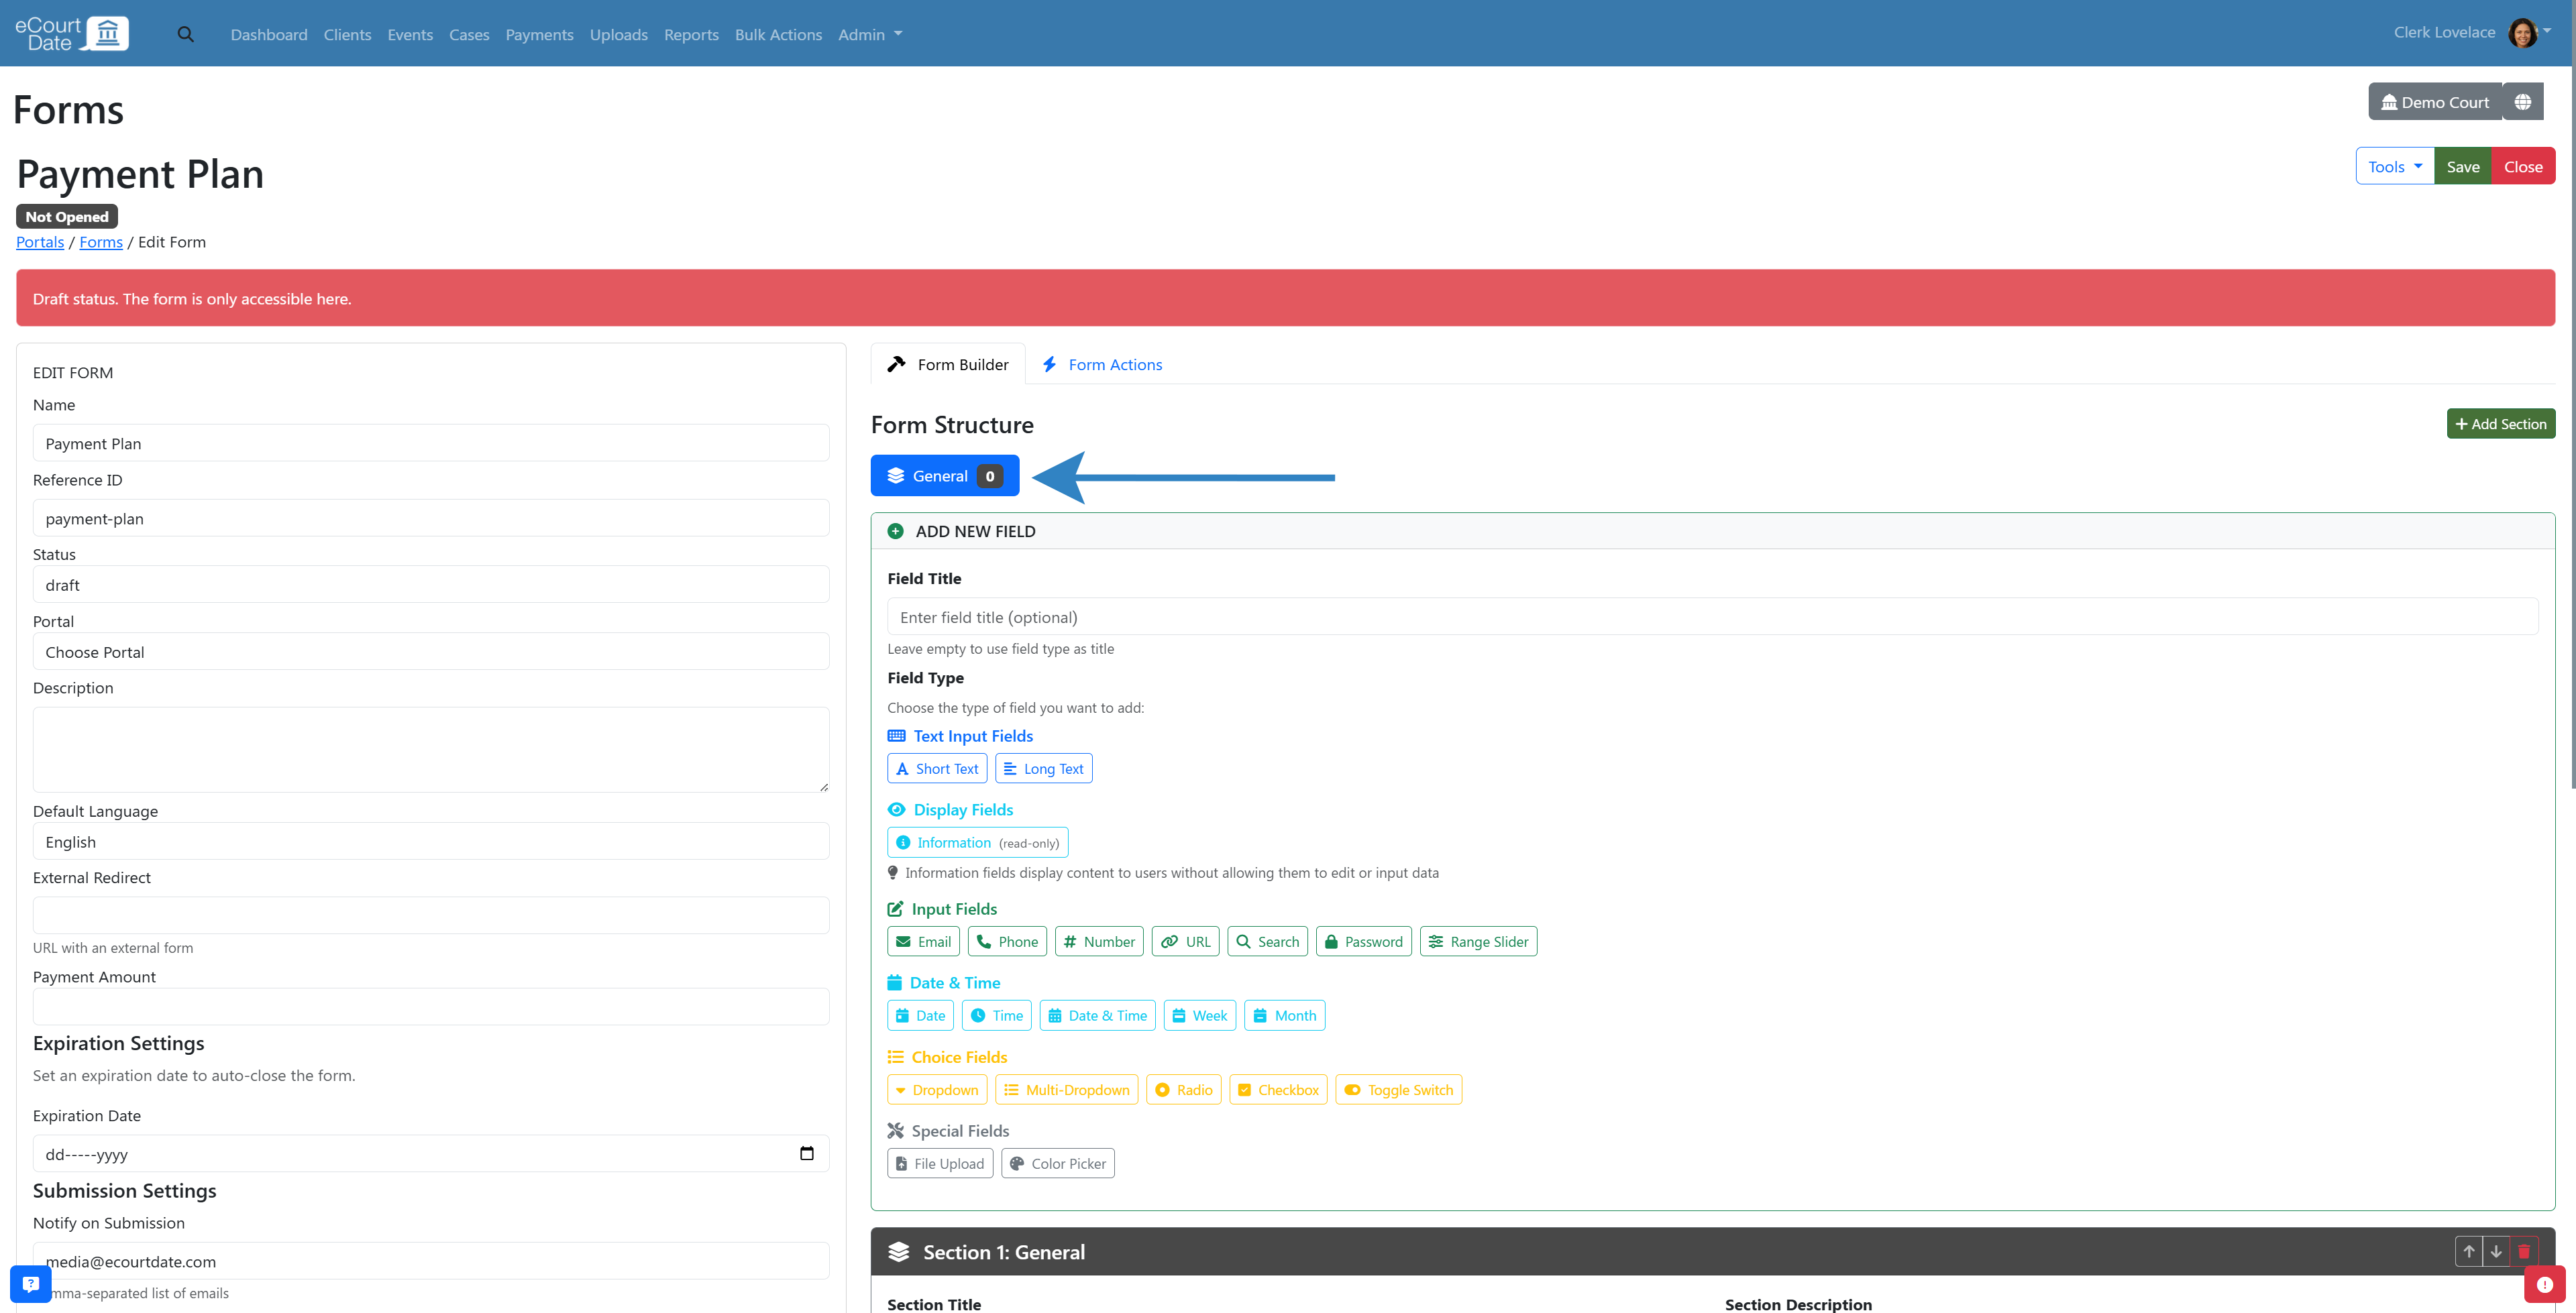
Create Sections
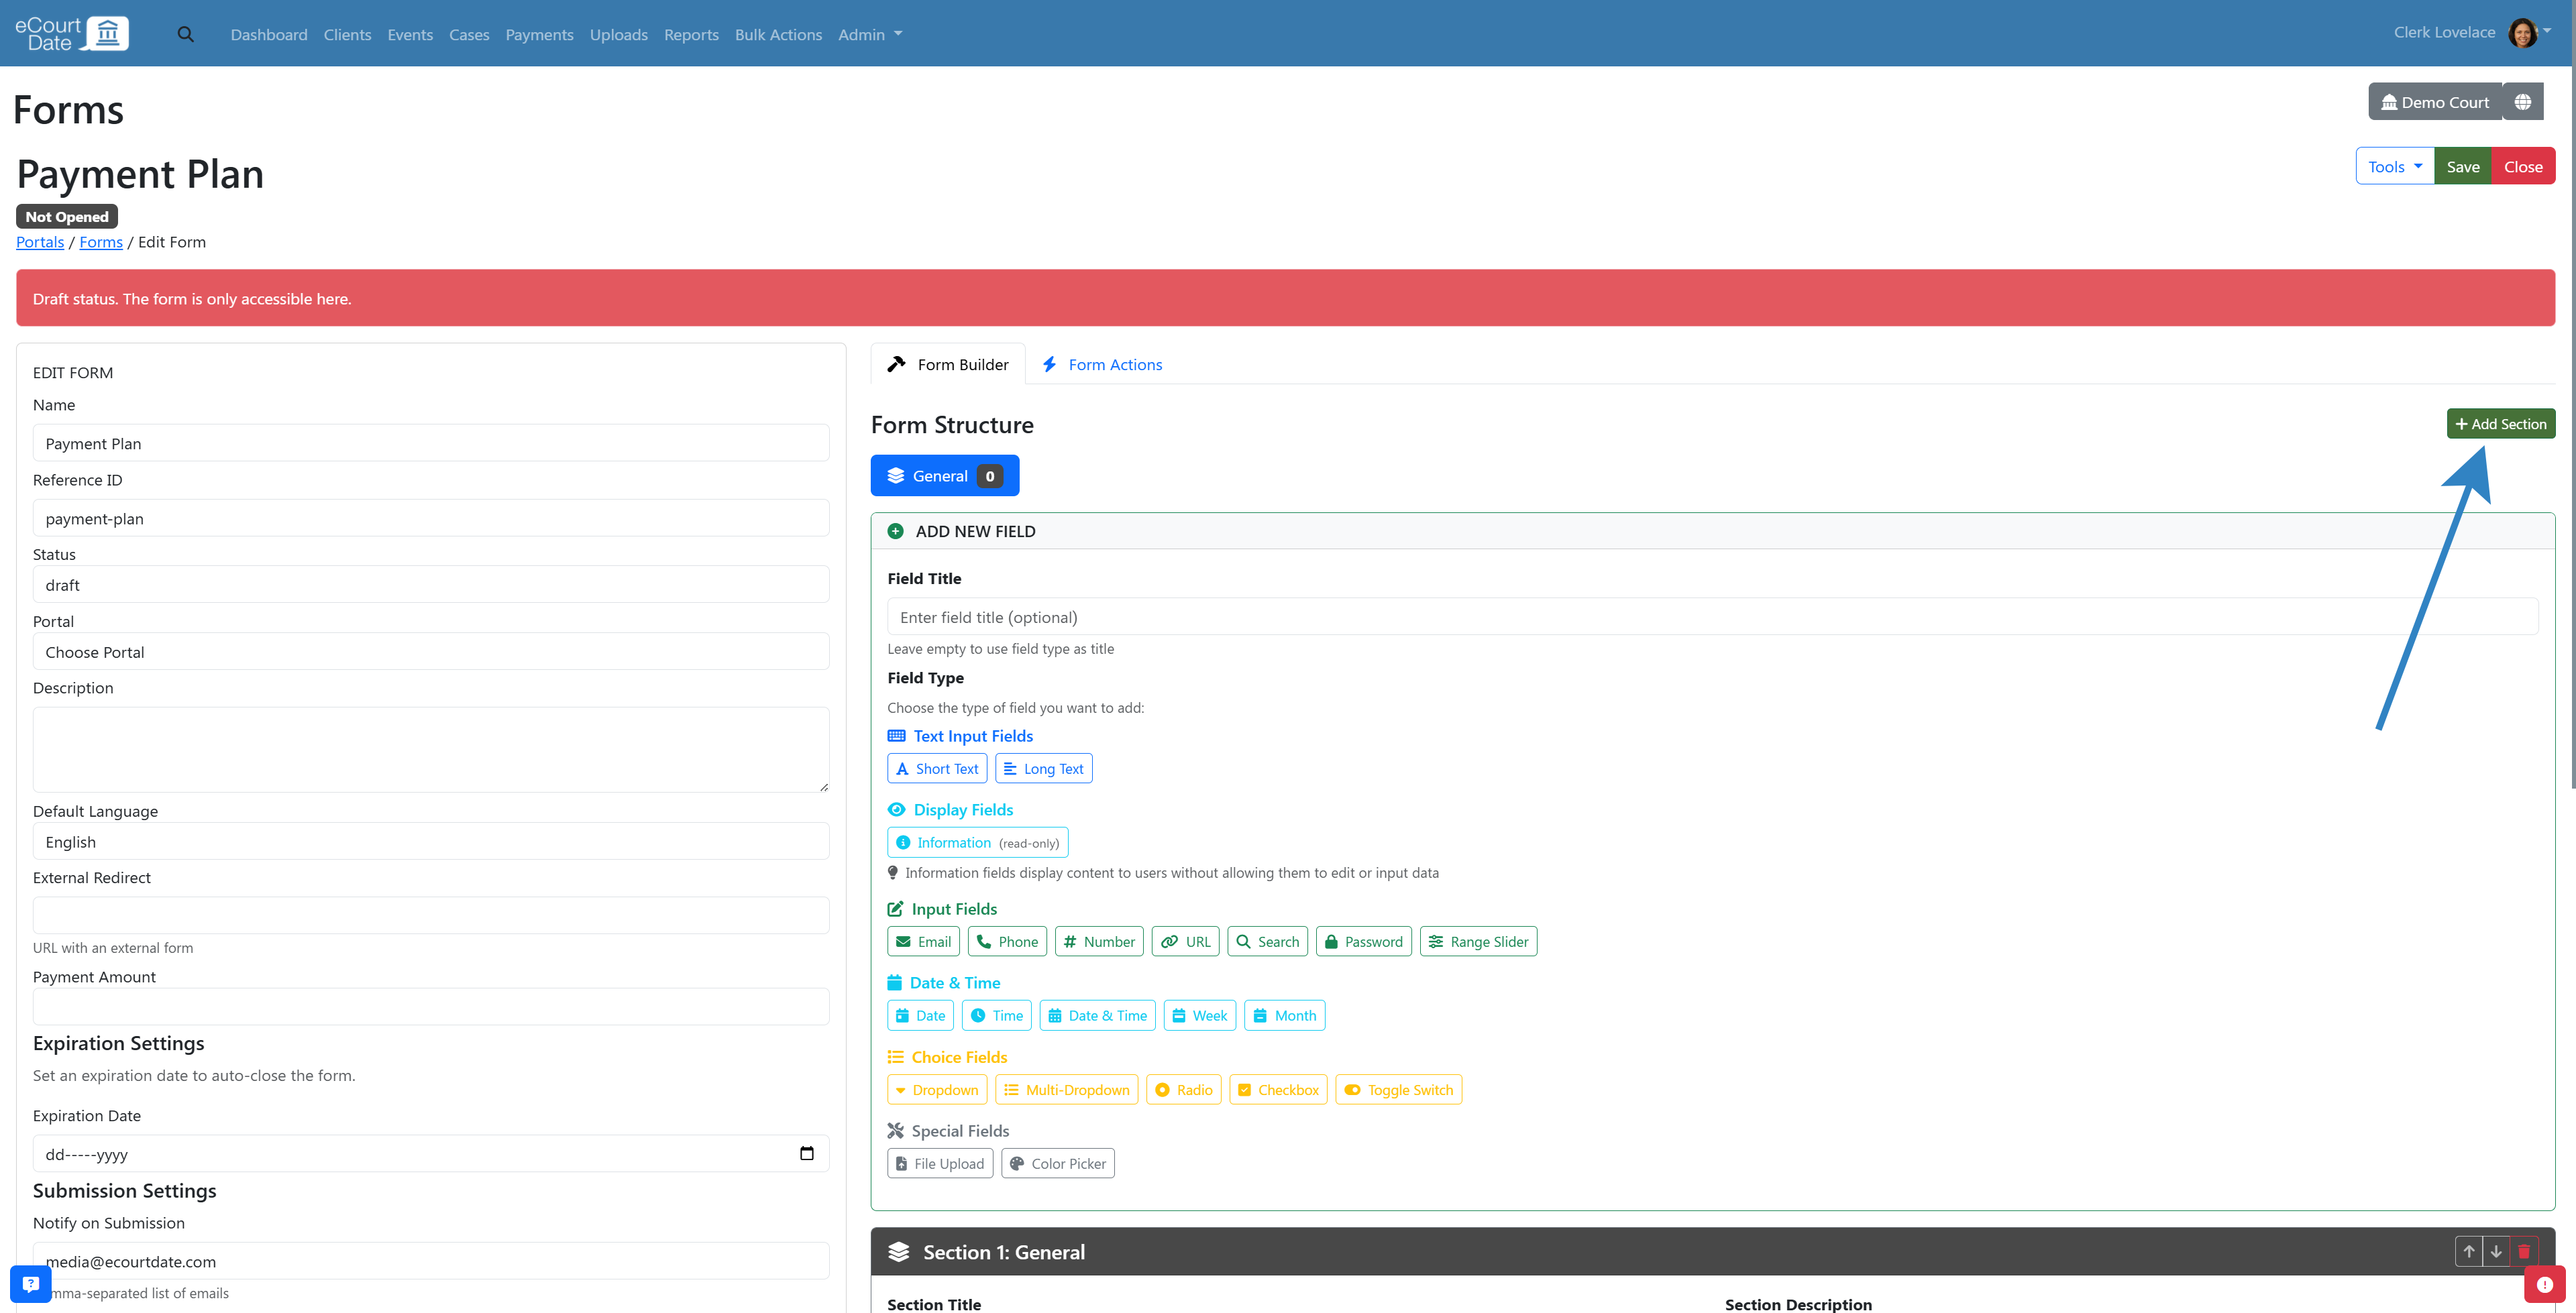
A newly created form includes one section named "General." To add more sections:
- Click the Add Section button.
- Edit the Section Title and Section Description as needed.

Create Fields
- In the Add New Field card, enter a Field Title.
- Click the Field Type you want to use.
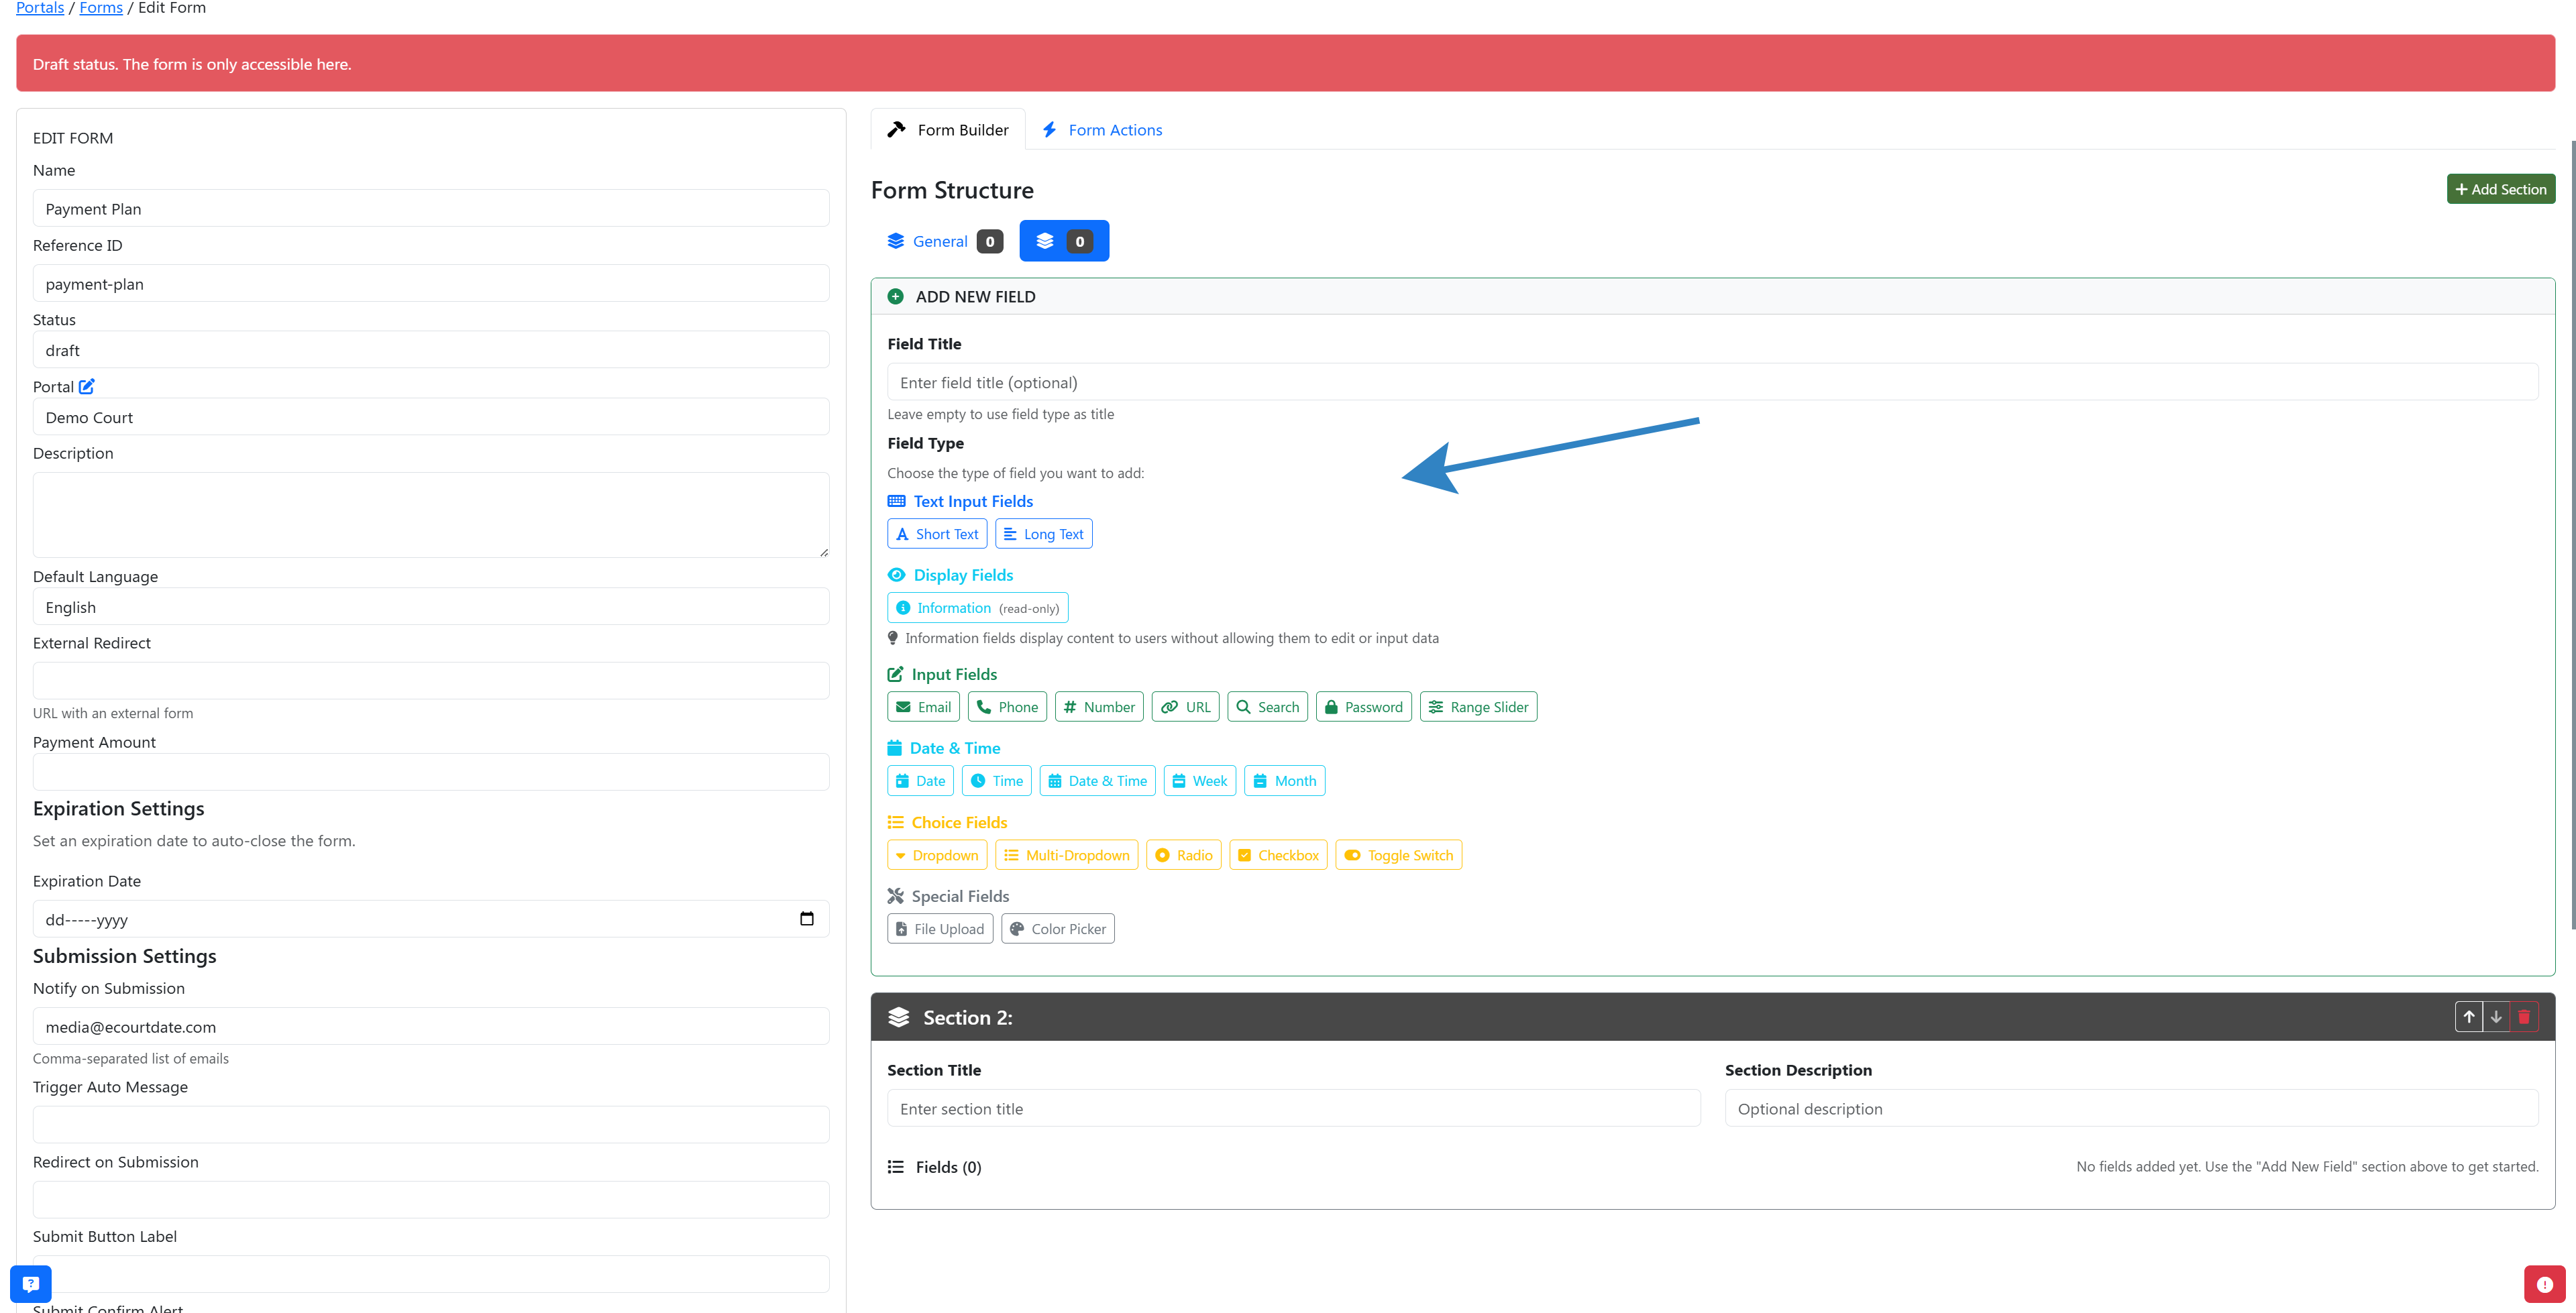
The new field is added after any existing fields in the current section.
Customize Fields
For each field, you can configure the following options:
- Field Title
- Field Type
- Help Text
- Default Value
- Required
- Hidden
Add Conditional Rules
- Click Advanced Options on the field you want to make conditional.
- Set the Condition Field, Operator, Value, and Action.
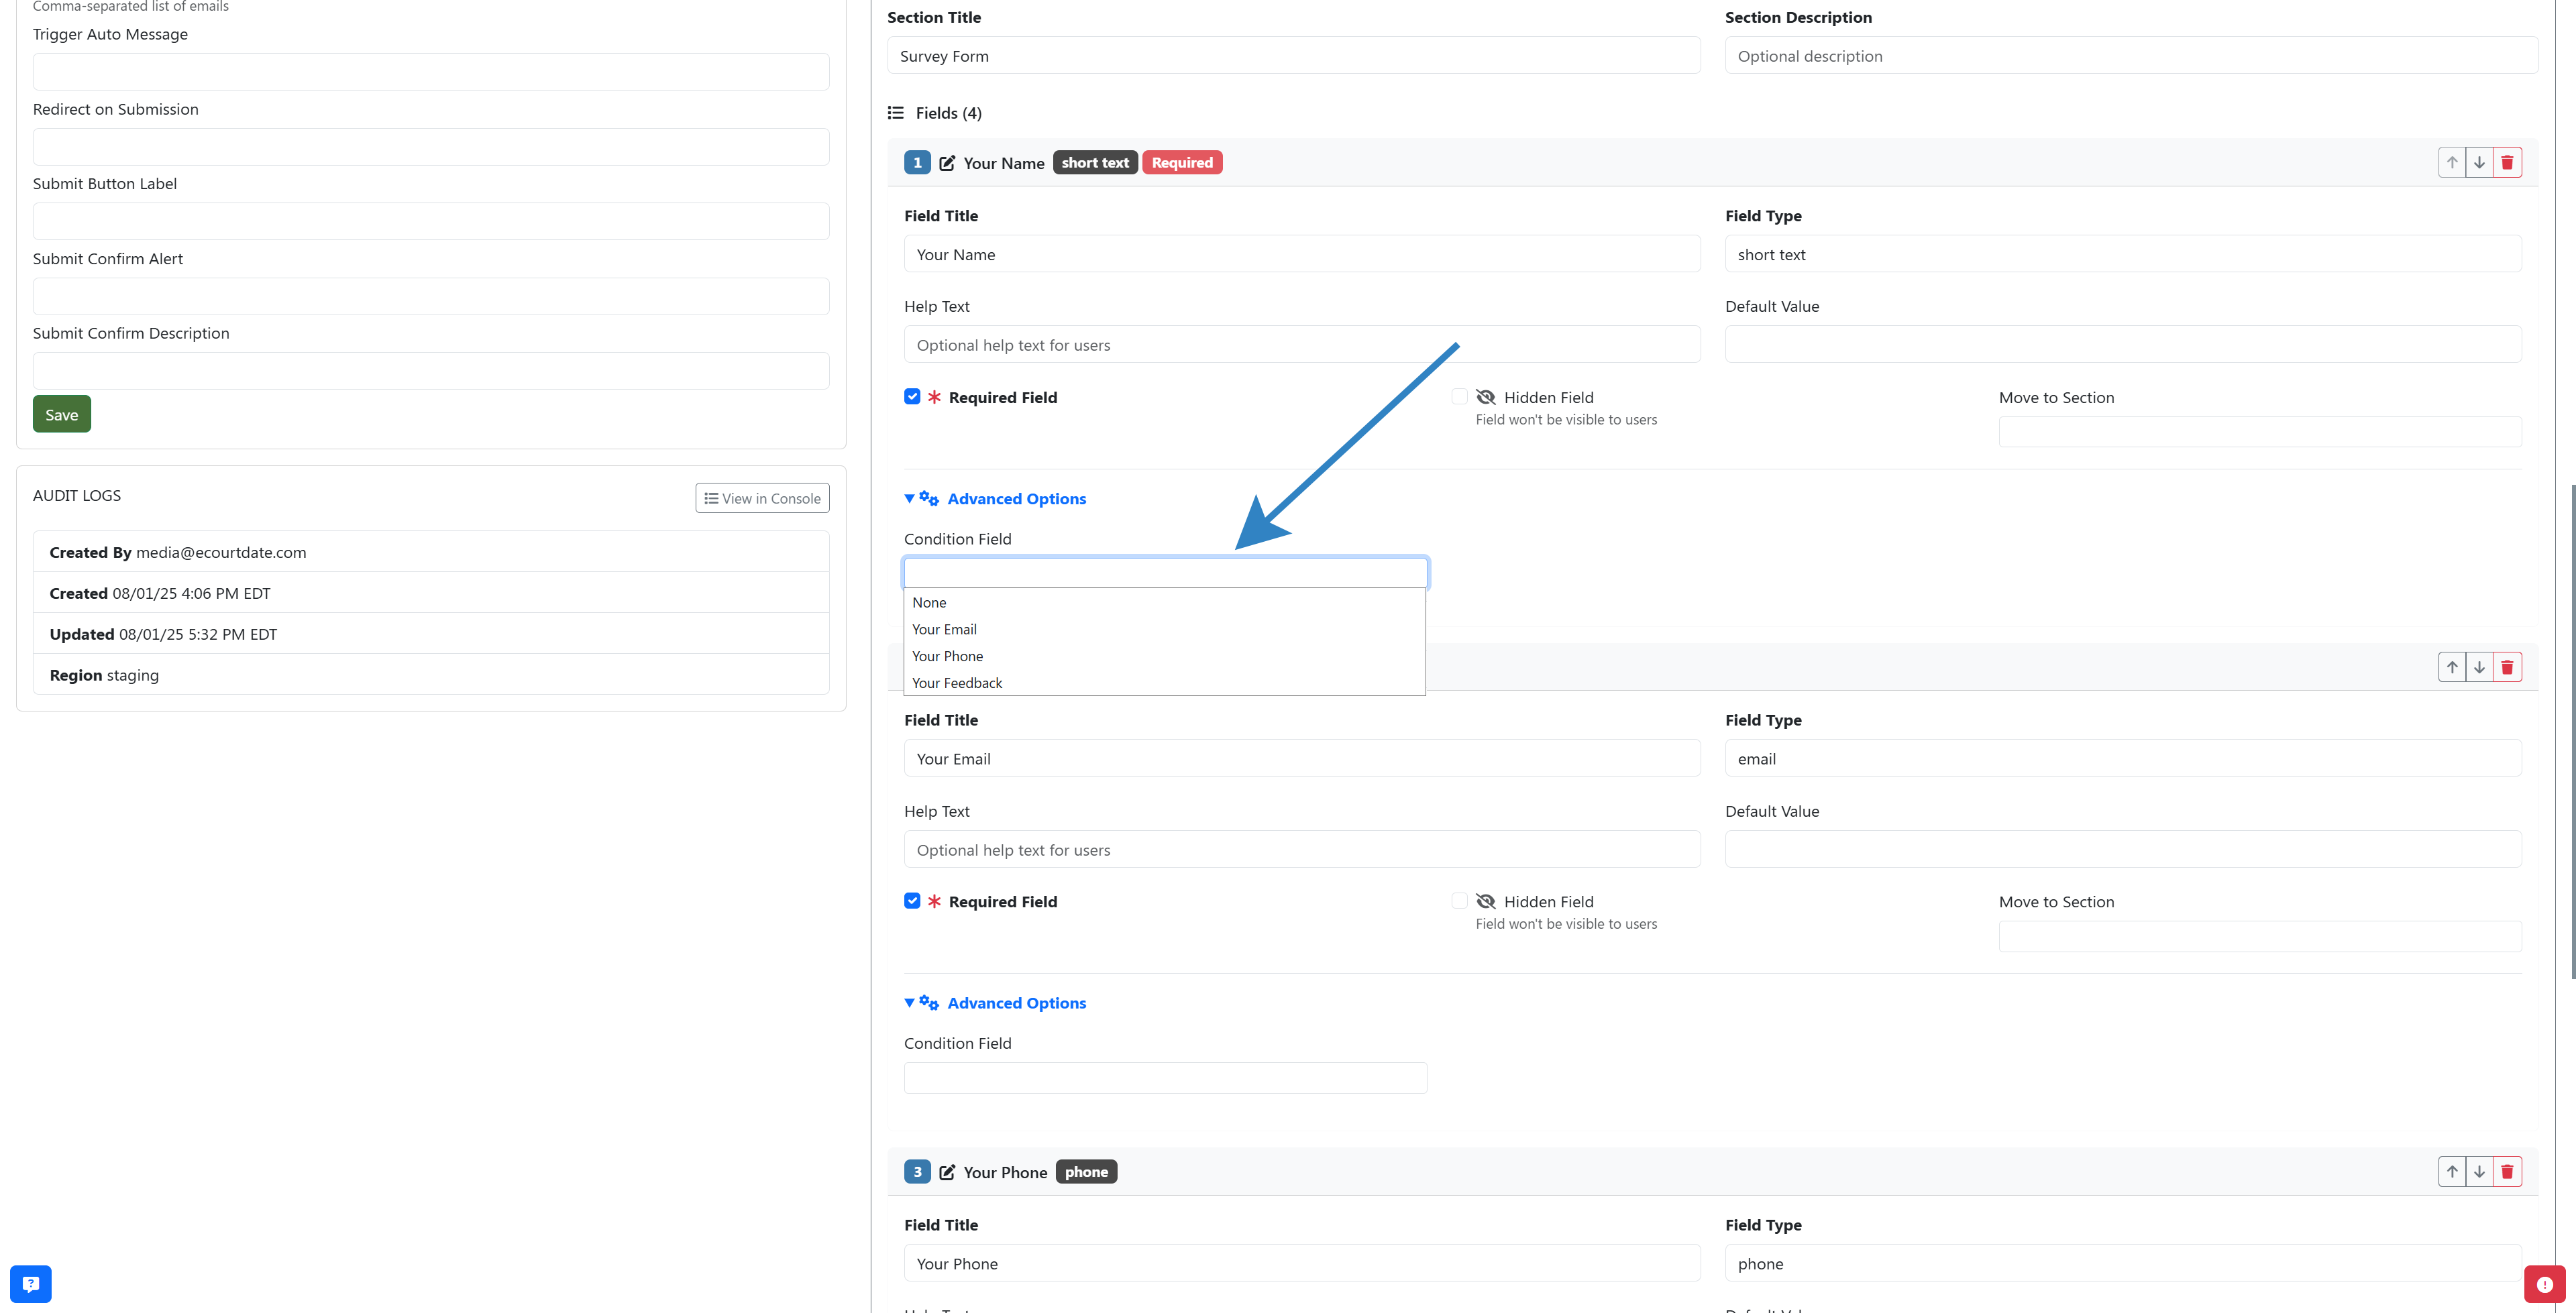
Note: You need at least two fields before creating a conditional rule.
Step 5: Configure Form Actions (Optional)
- Click the Form Actions tab.
- Select the Action Type and Form Field.
- Set the Condition, Value, Logic Rule, Update Field, and New Value.
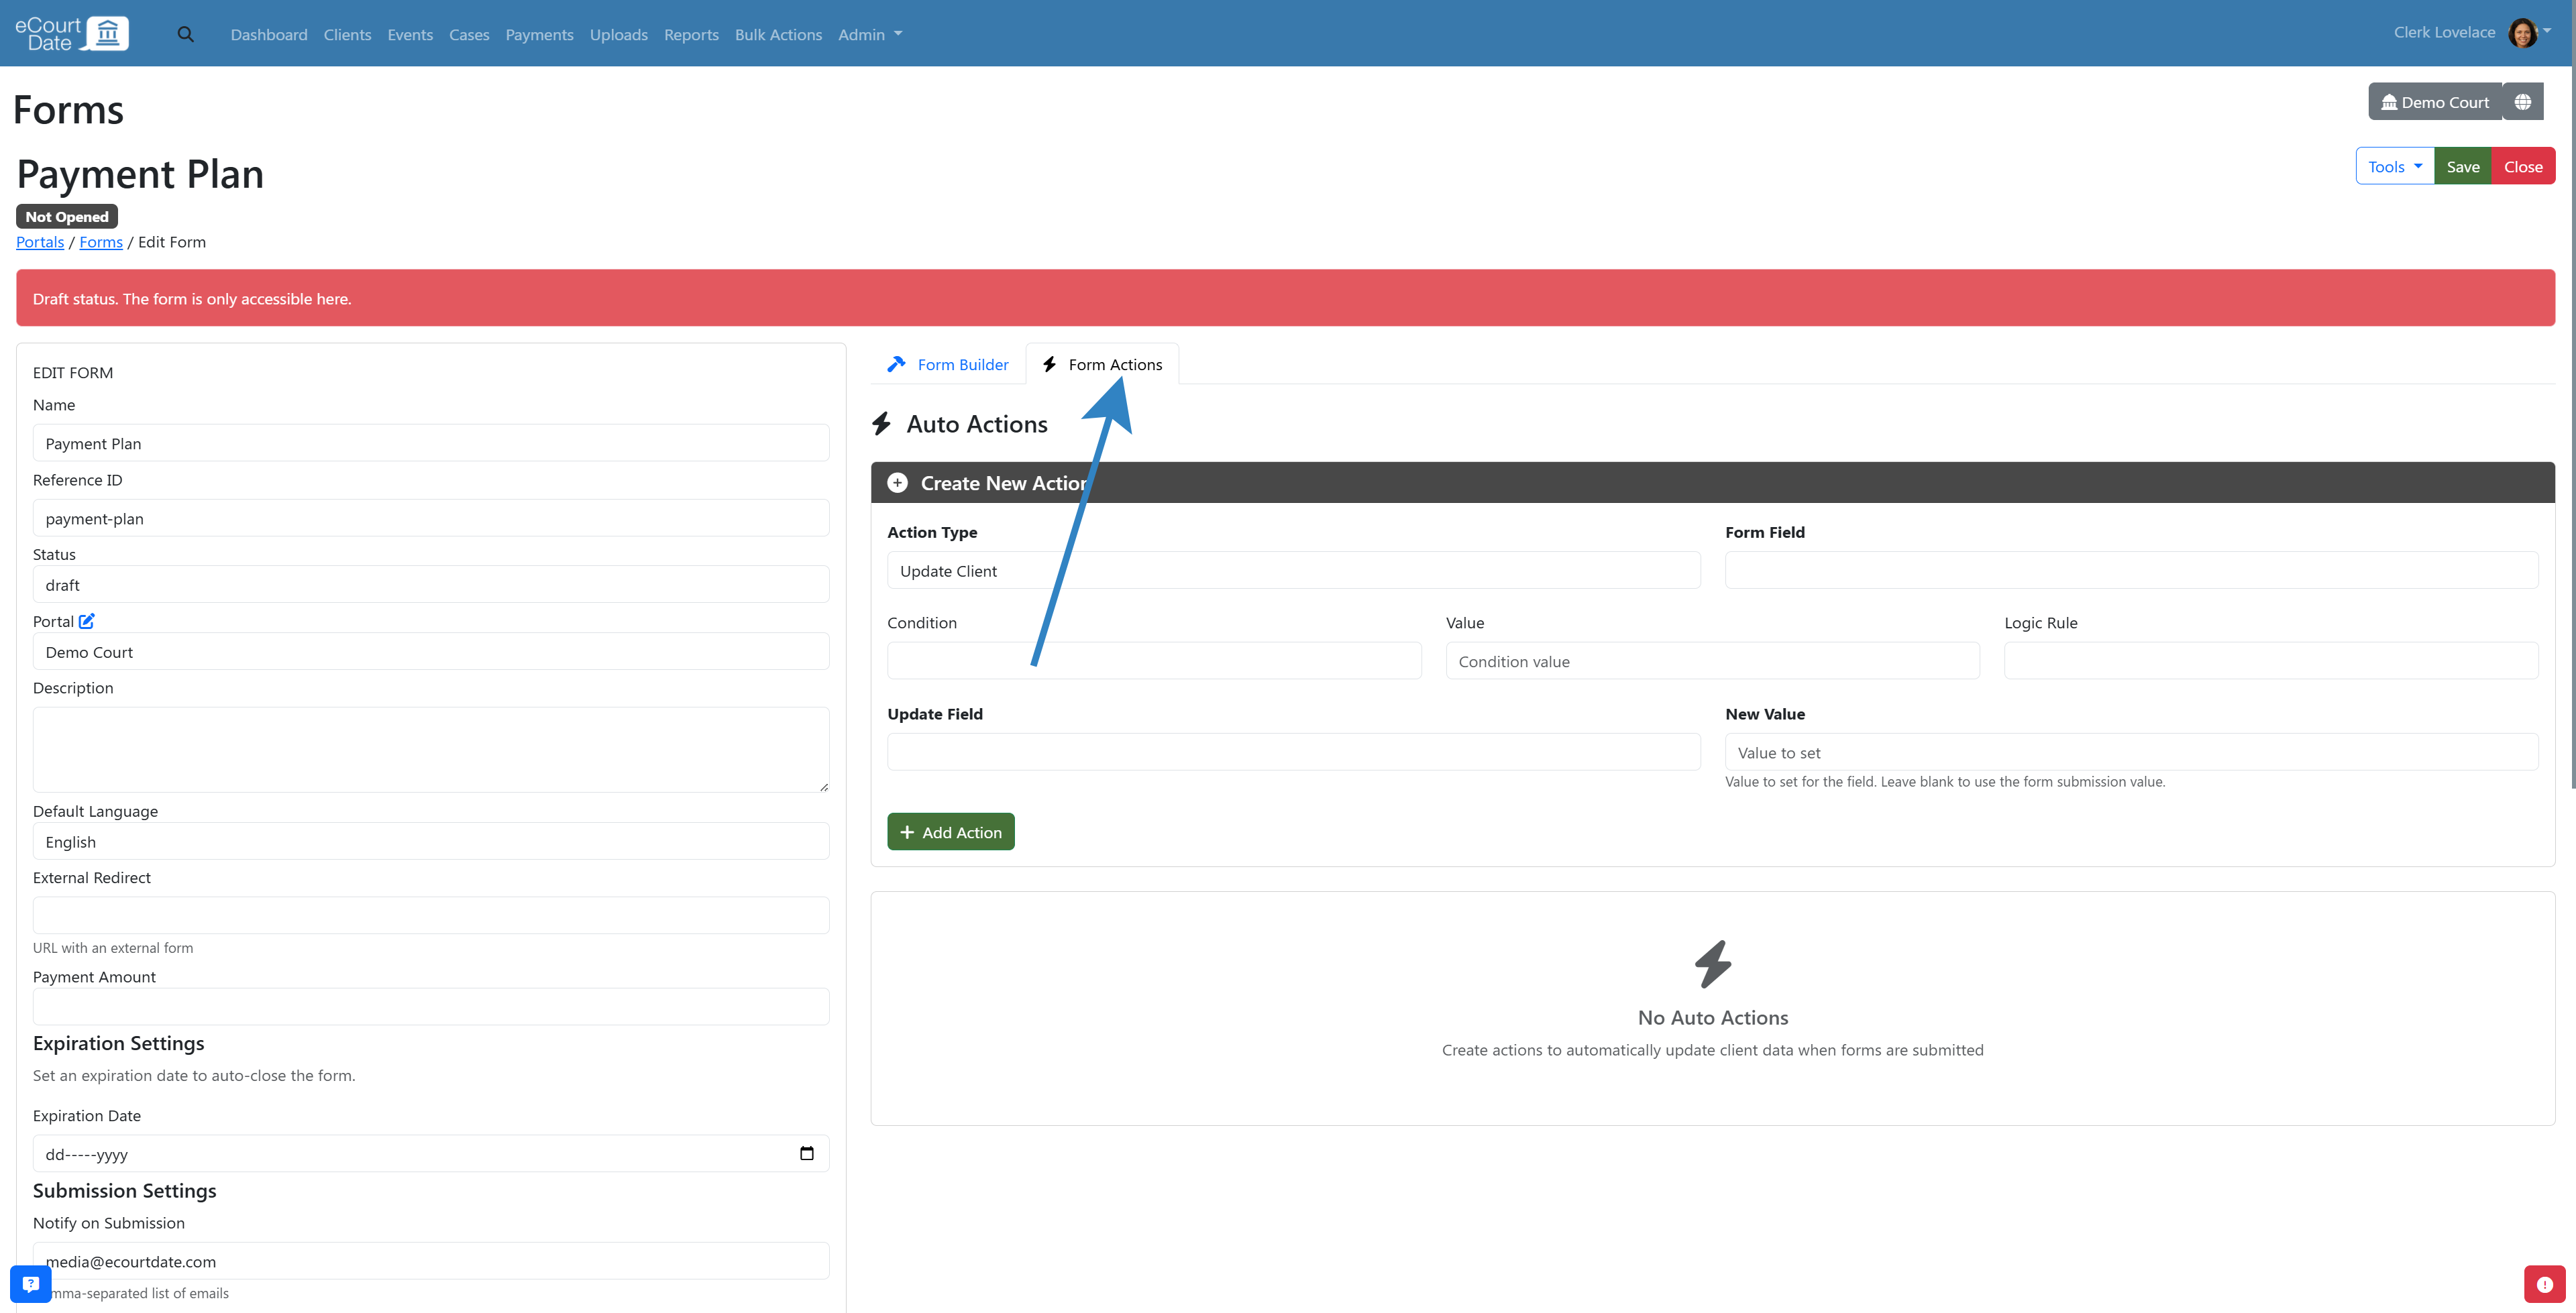
You can create multiple actions per form. Set the Logic Rule to "OR" to make each action independent.
Step 6: Preview and Test the Form
- Set the form Status to Public for testing.
- Click the Open Link button to view the form on the portal.
- Fill in the form as a client would. Click Next to complete each section if there are multiple sections.
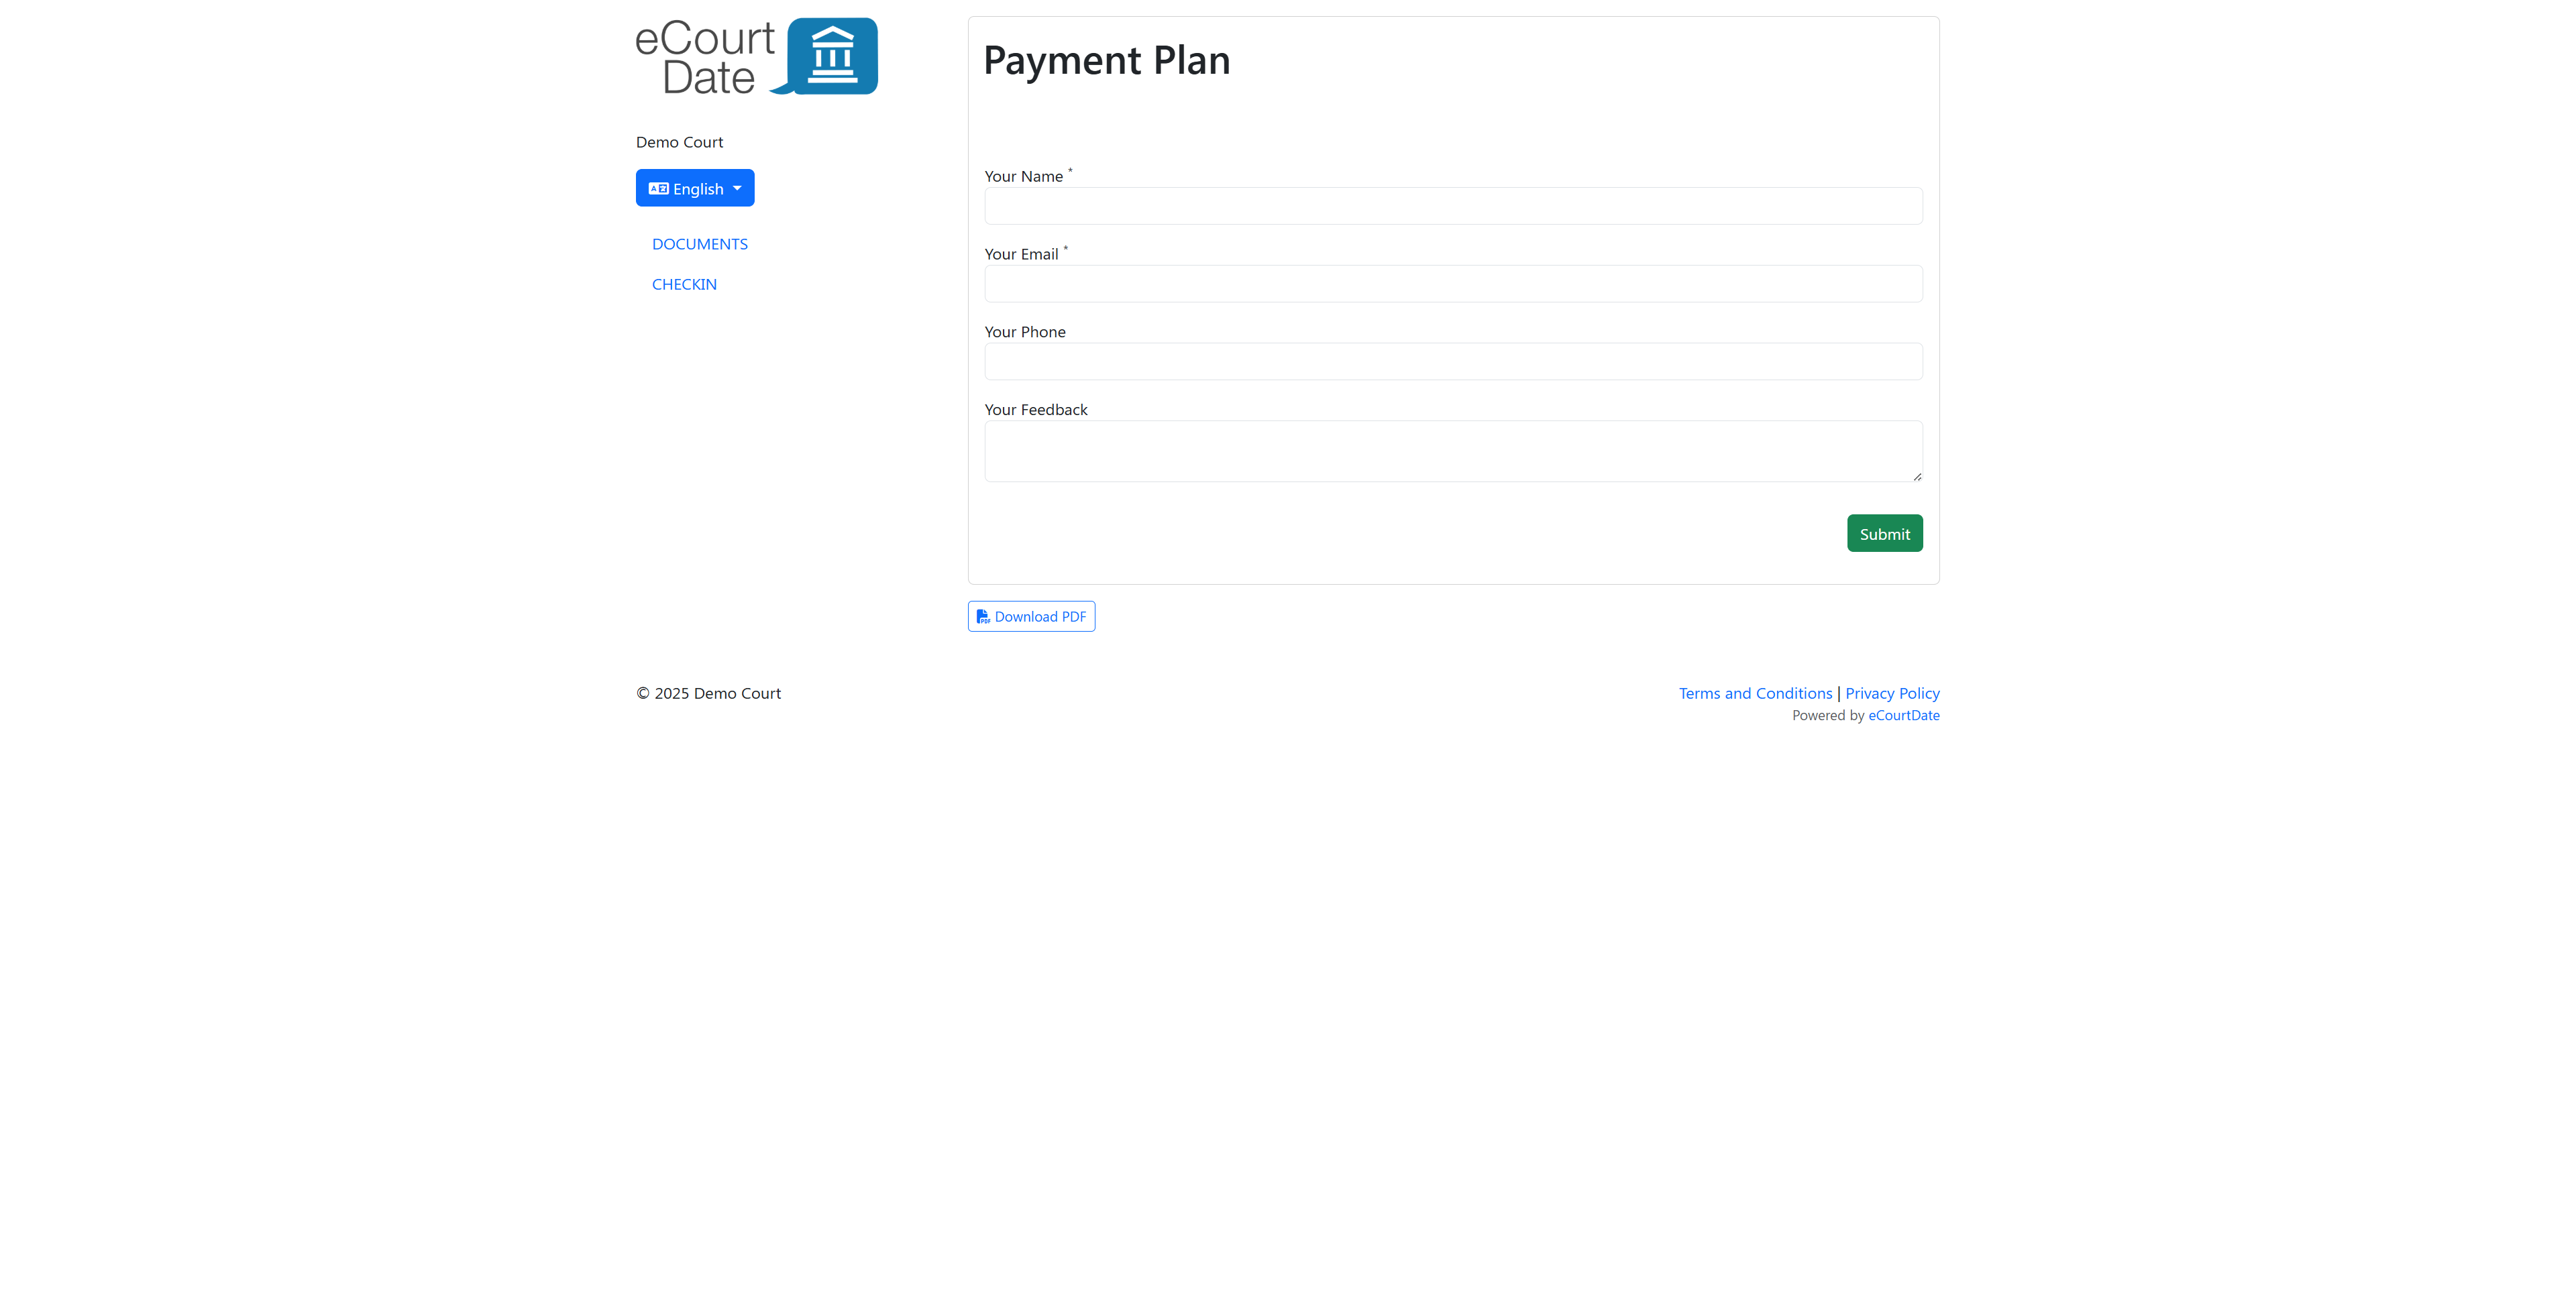
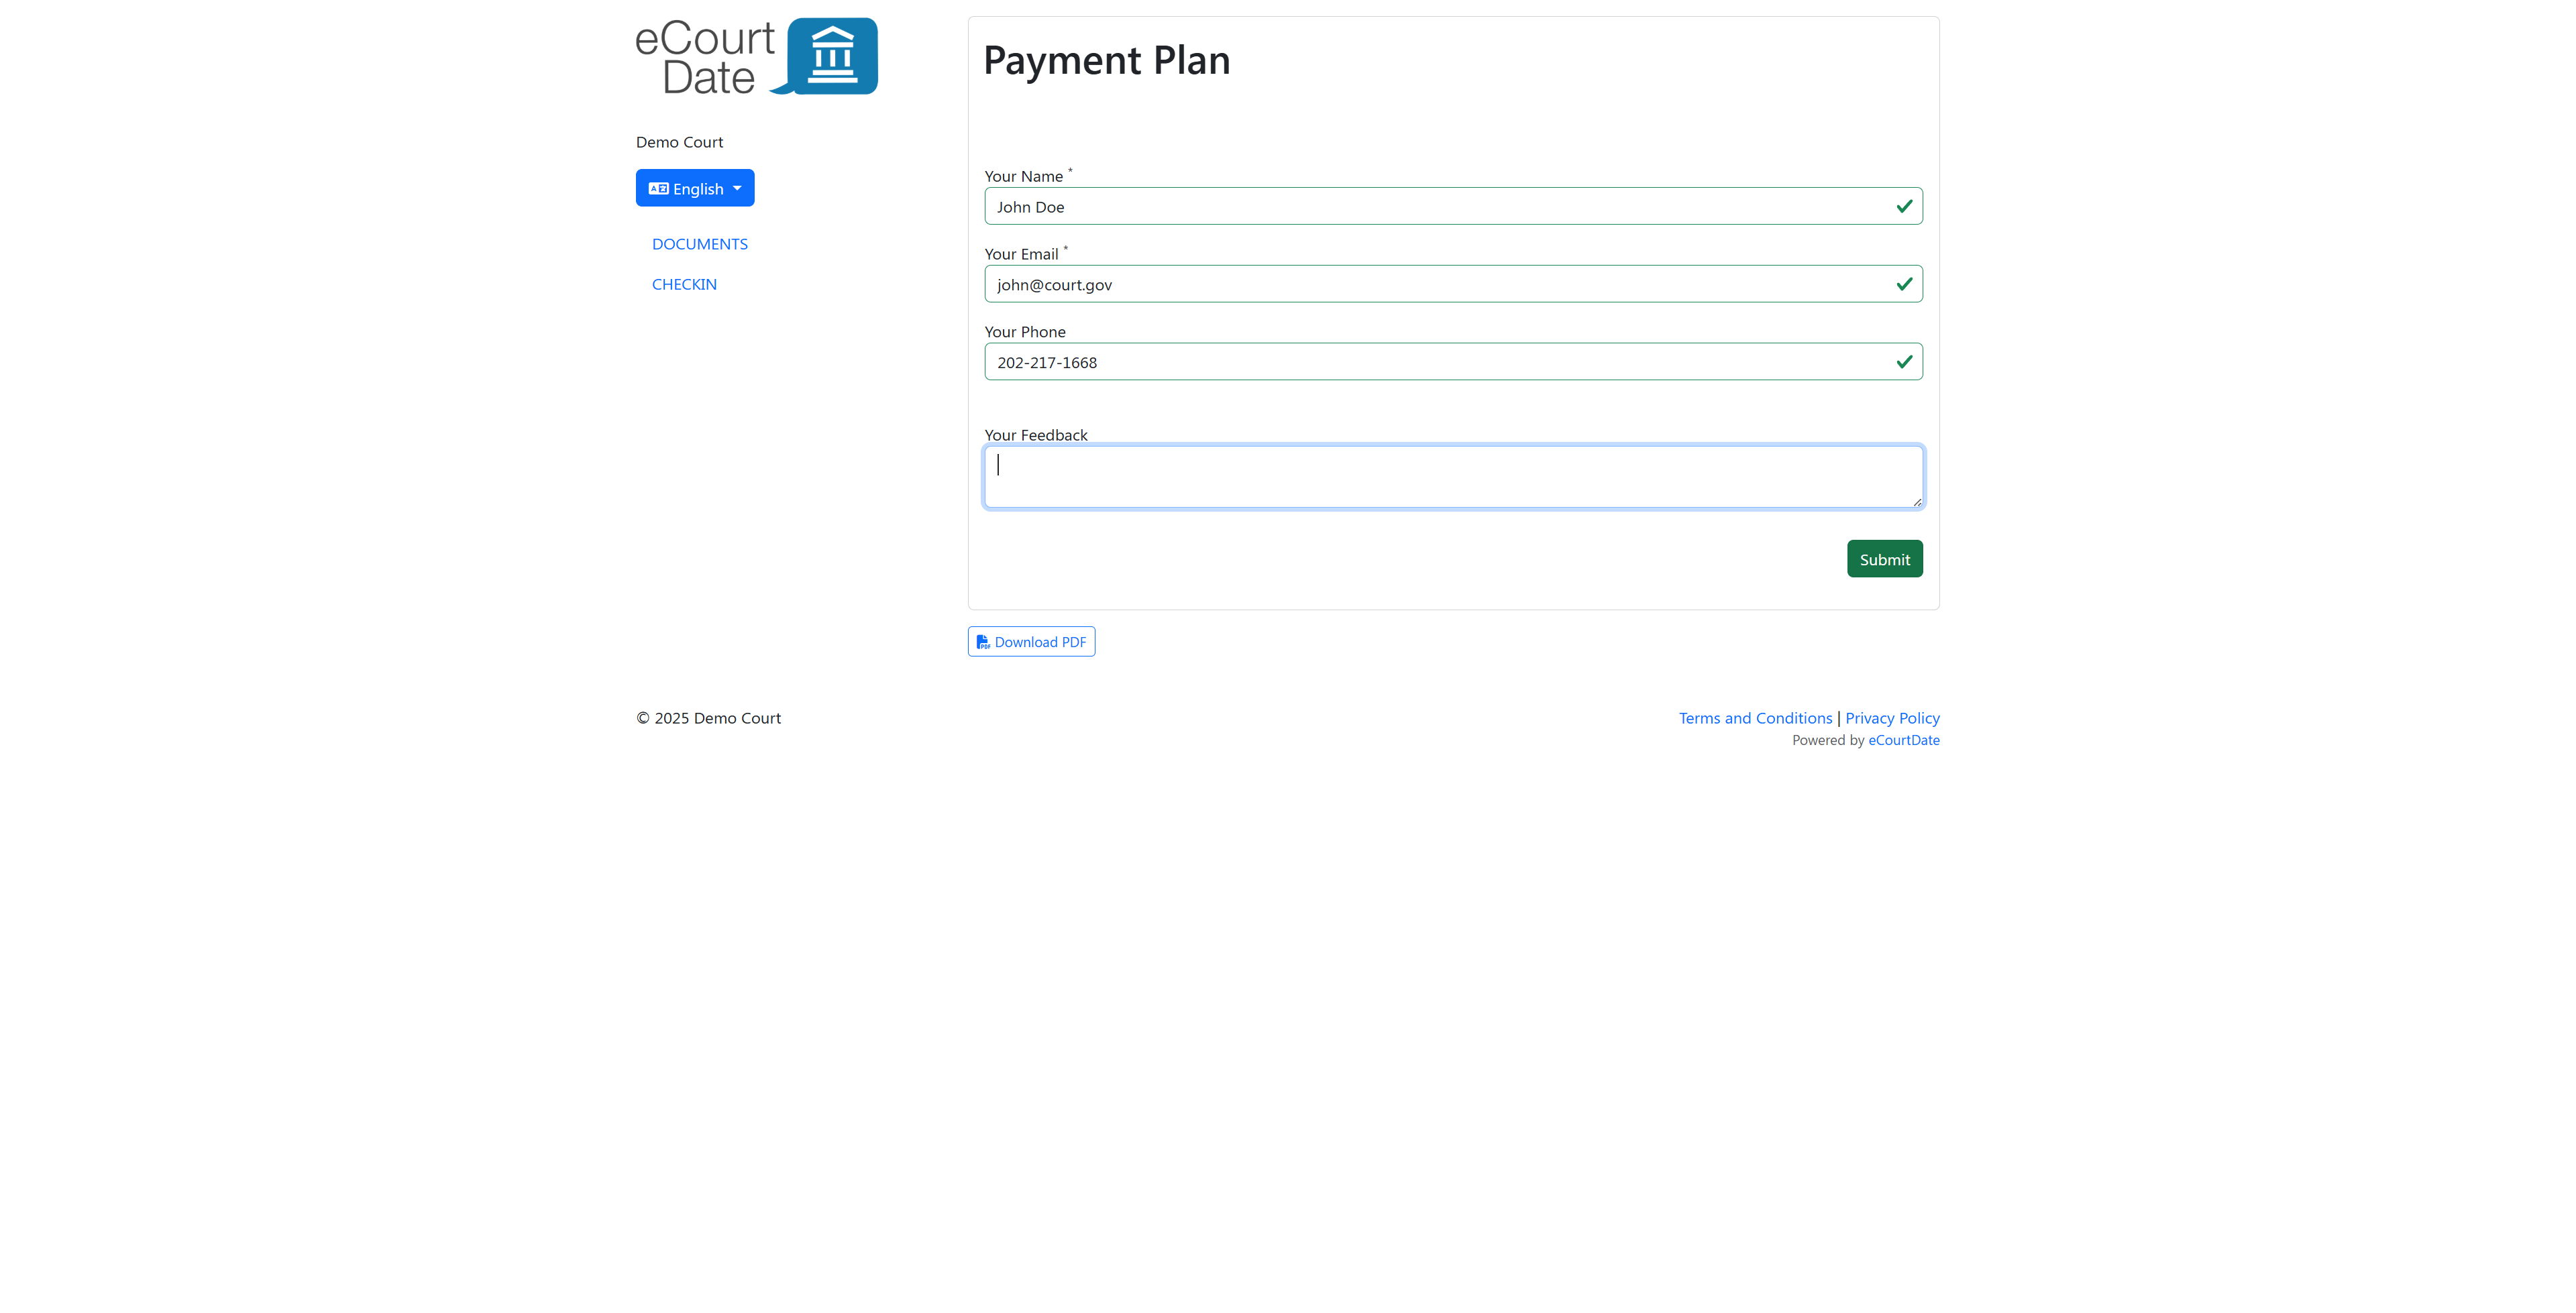
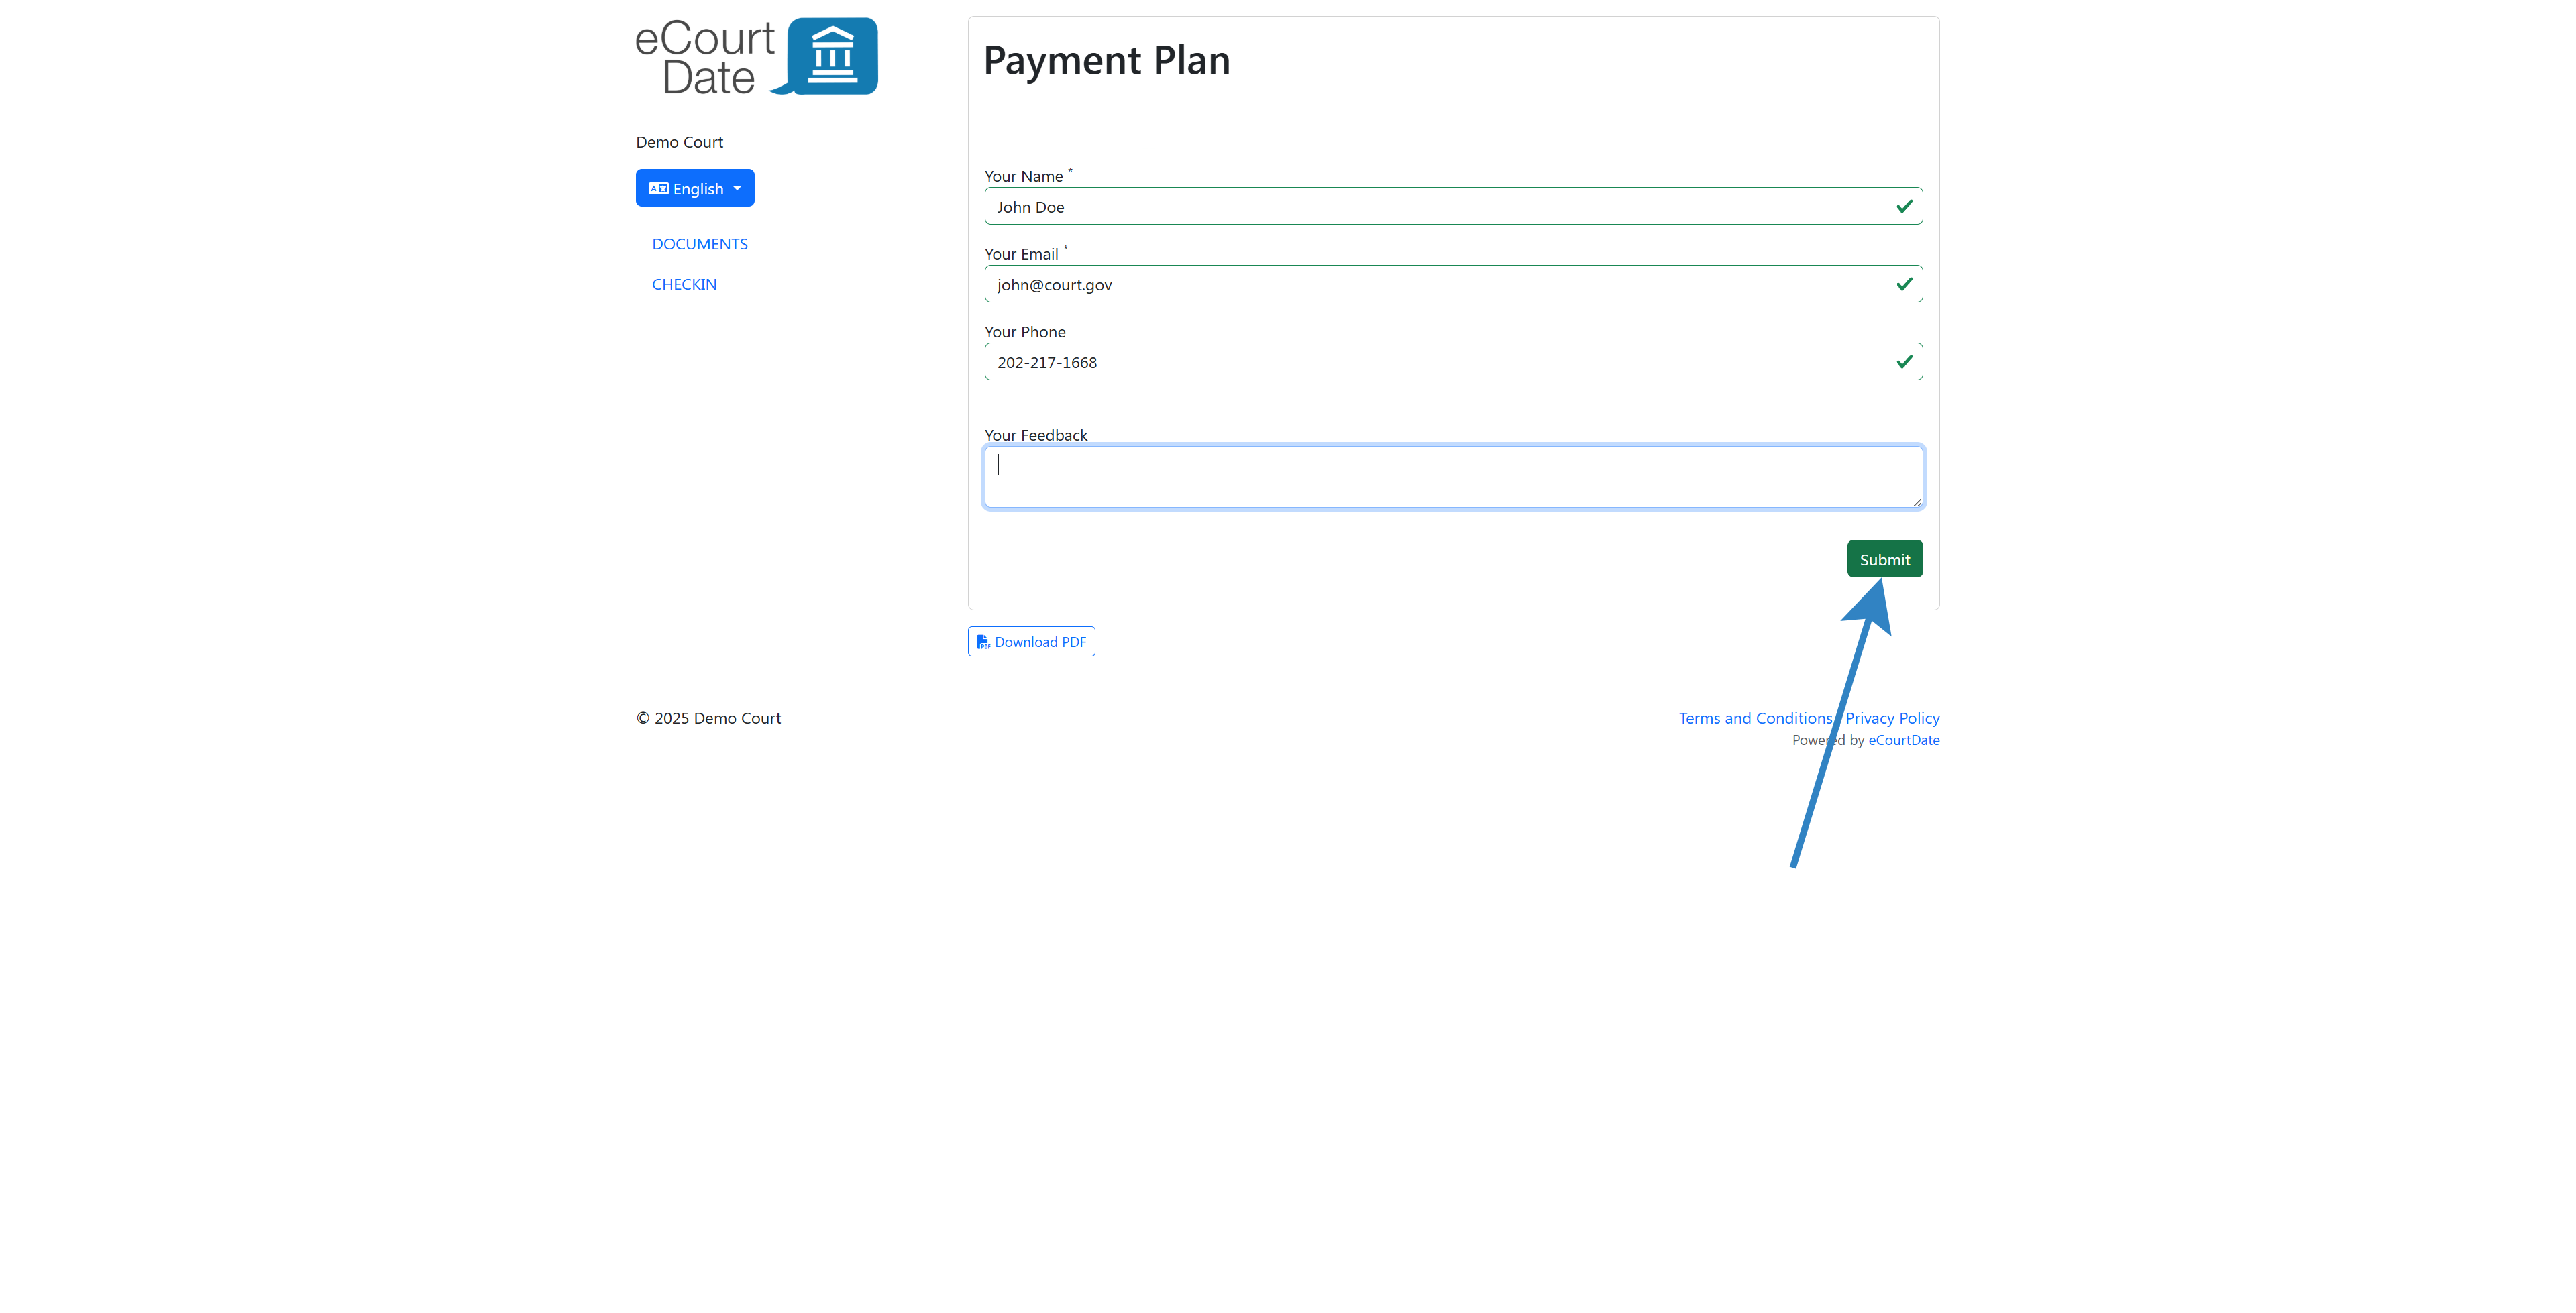
- Click Submit to complete the form. Any required fields that are not completed are highlighted.
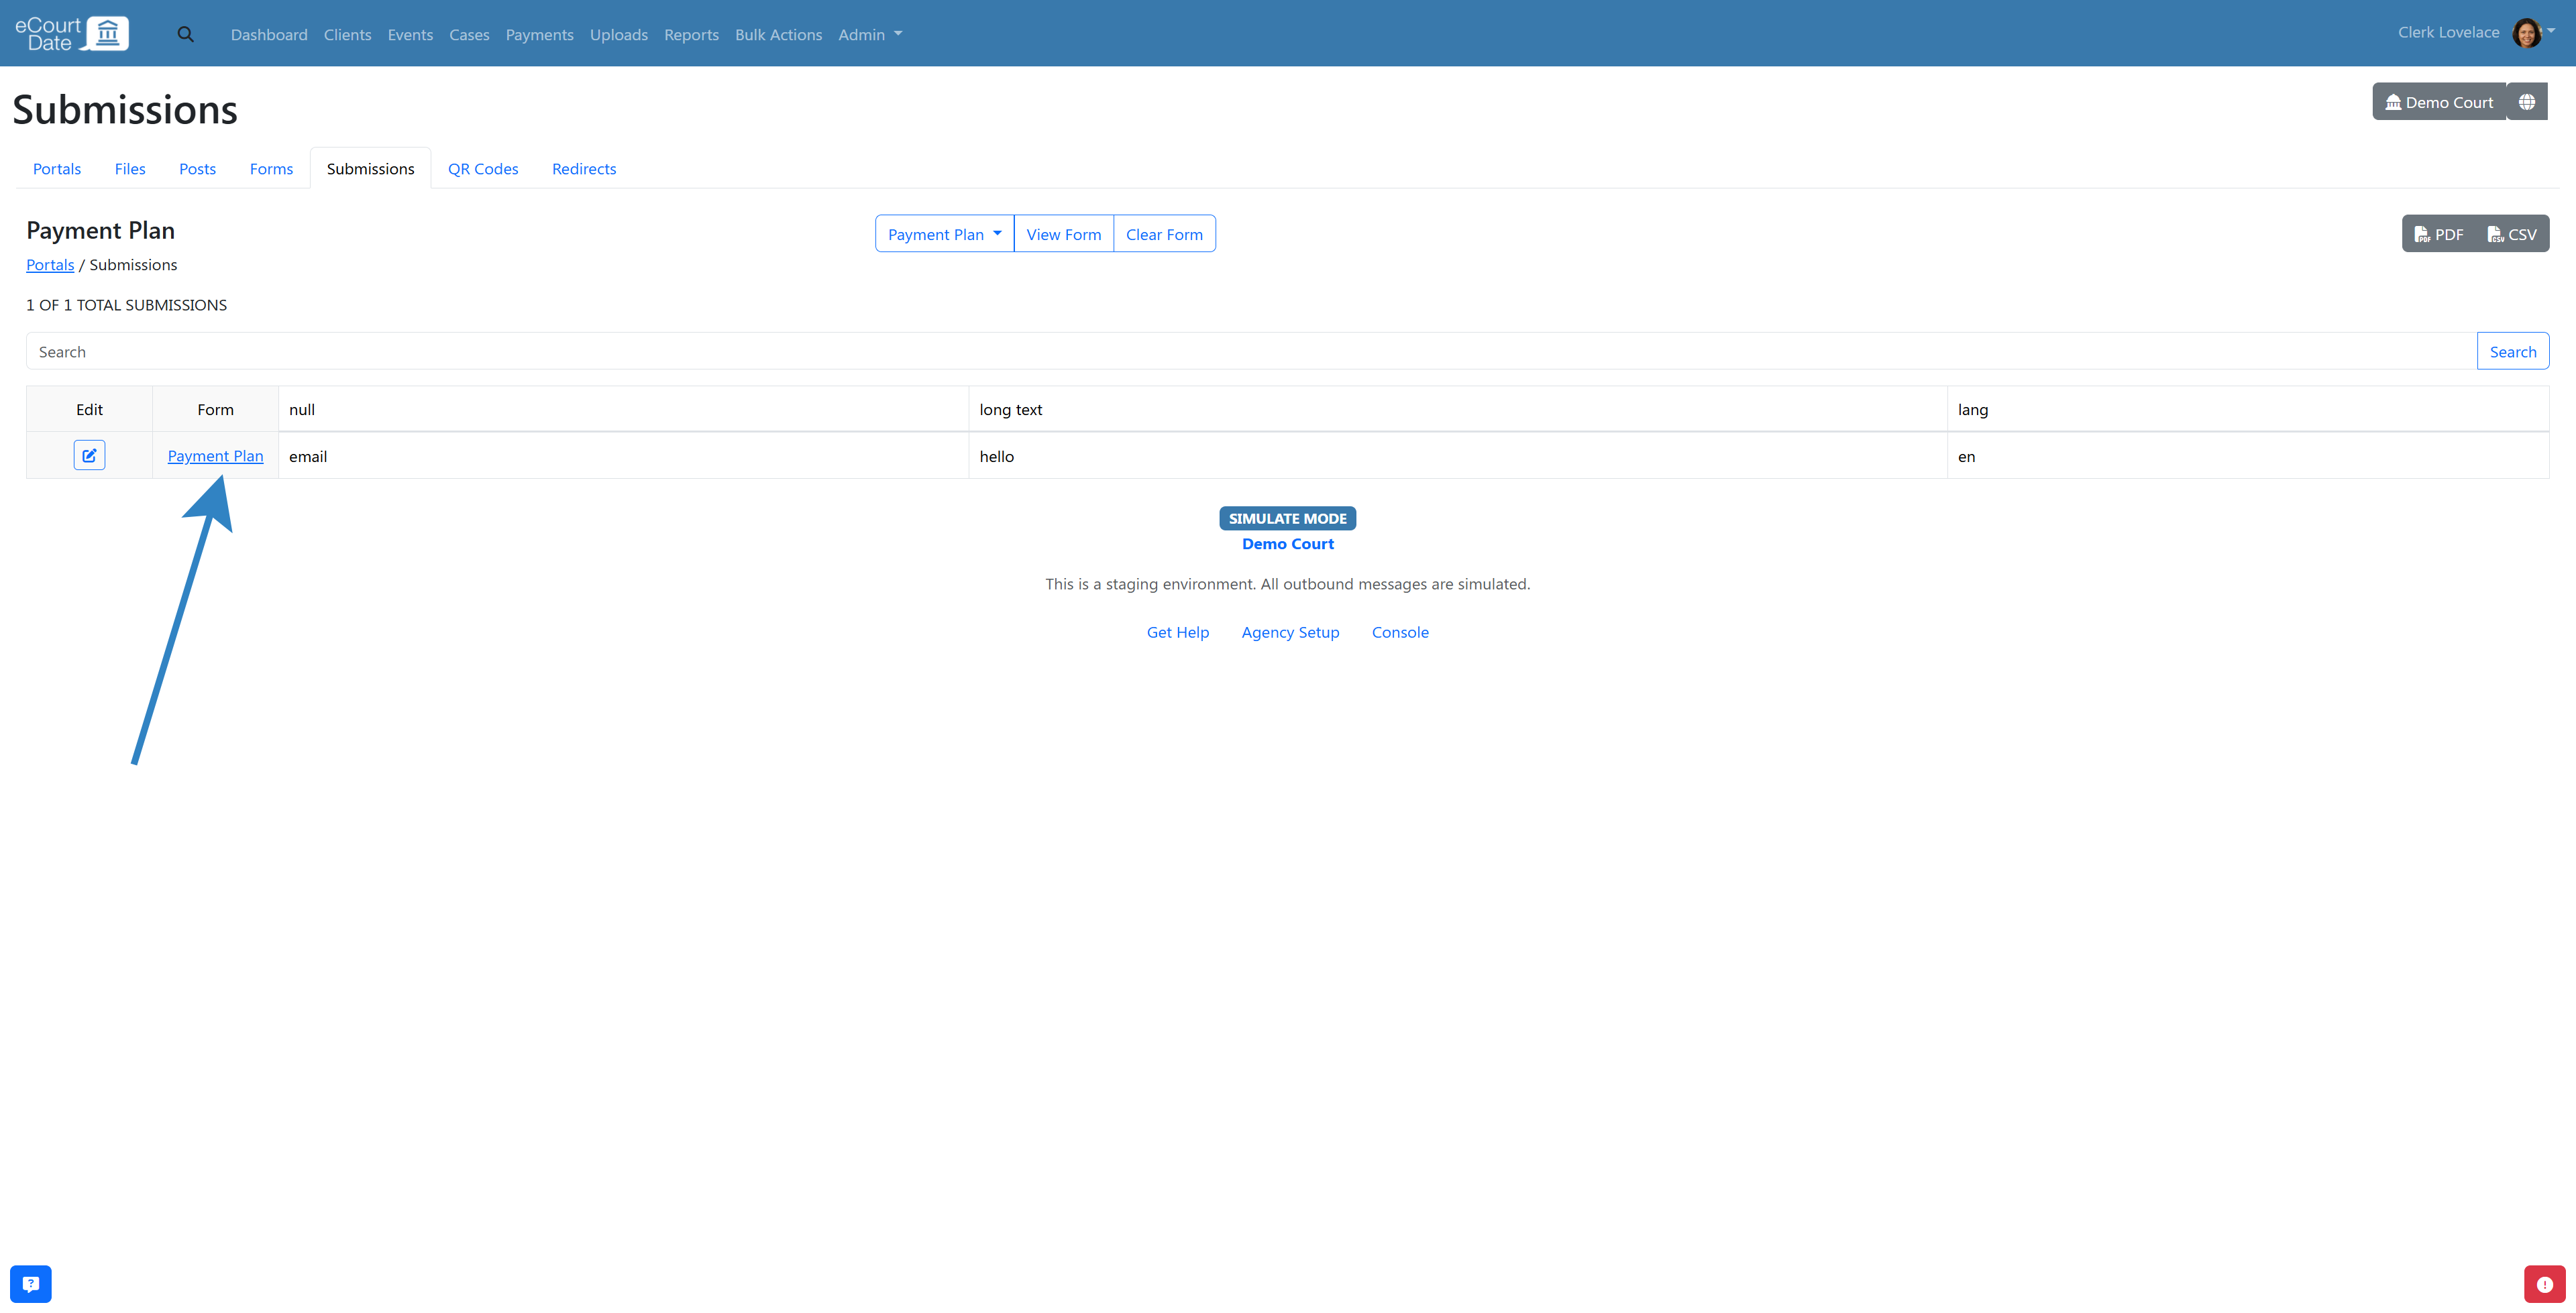
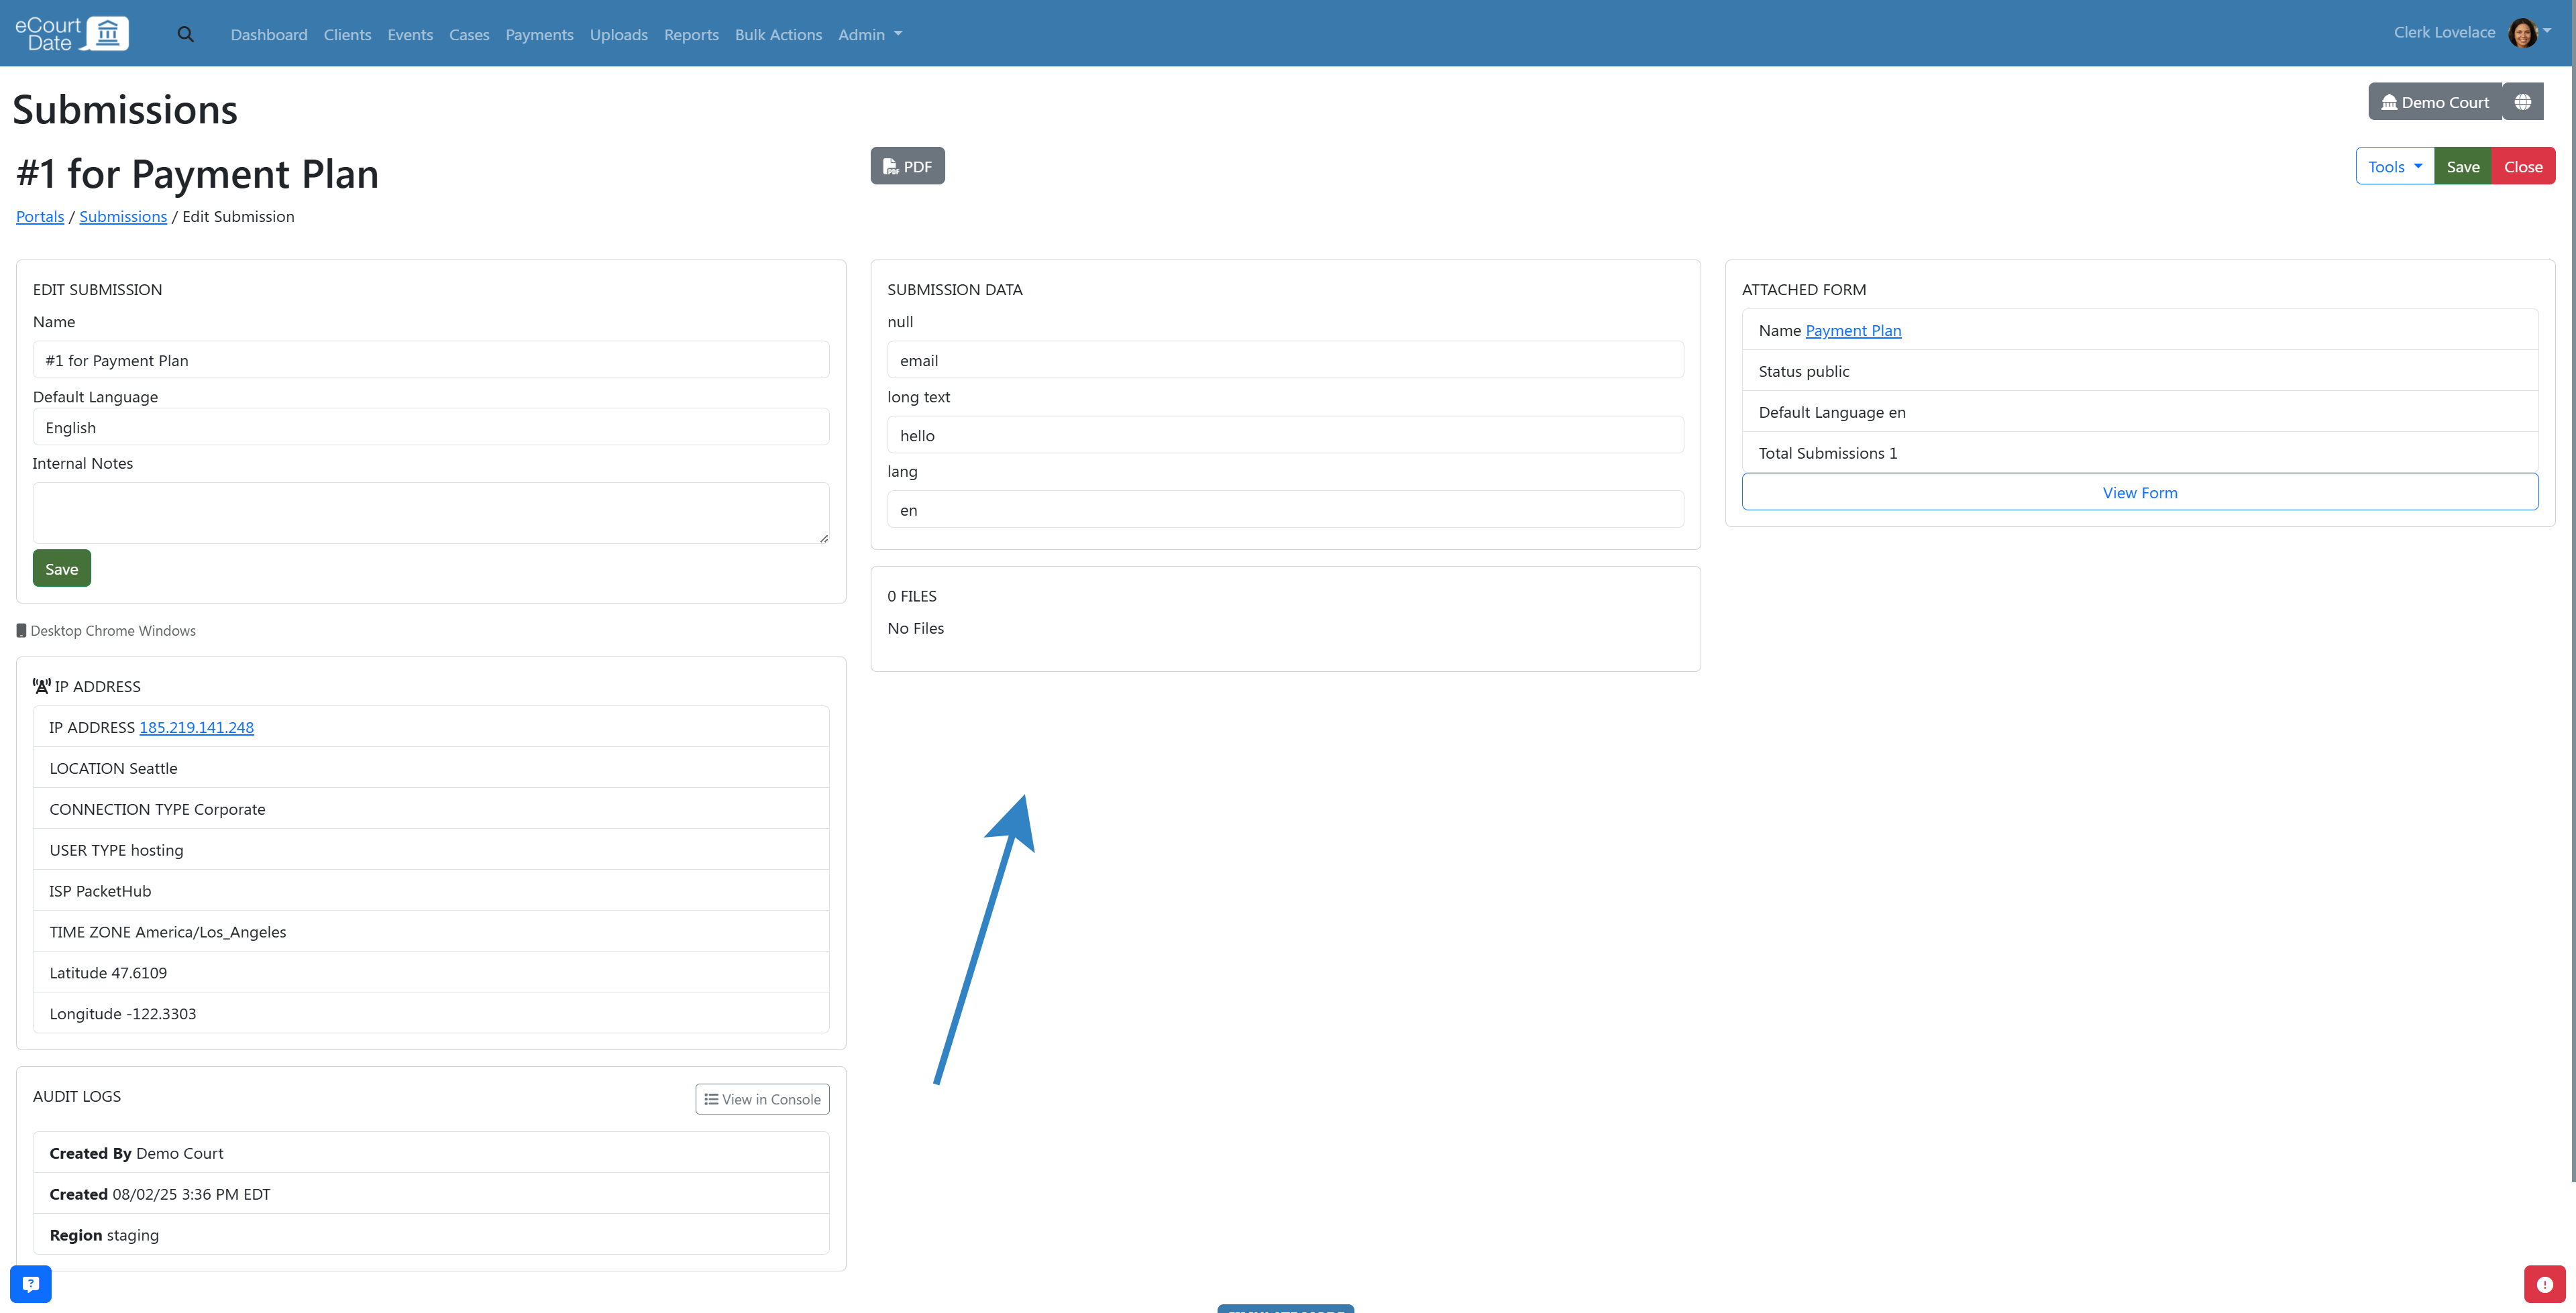
- Return to the form builder and click View Submissions to review the test submission.
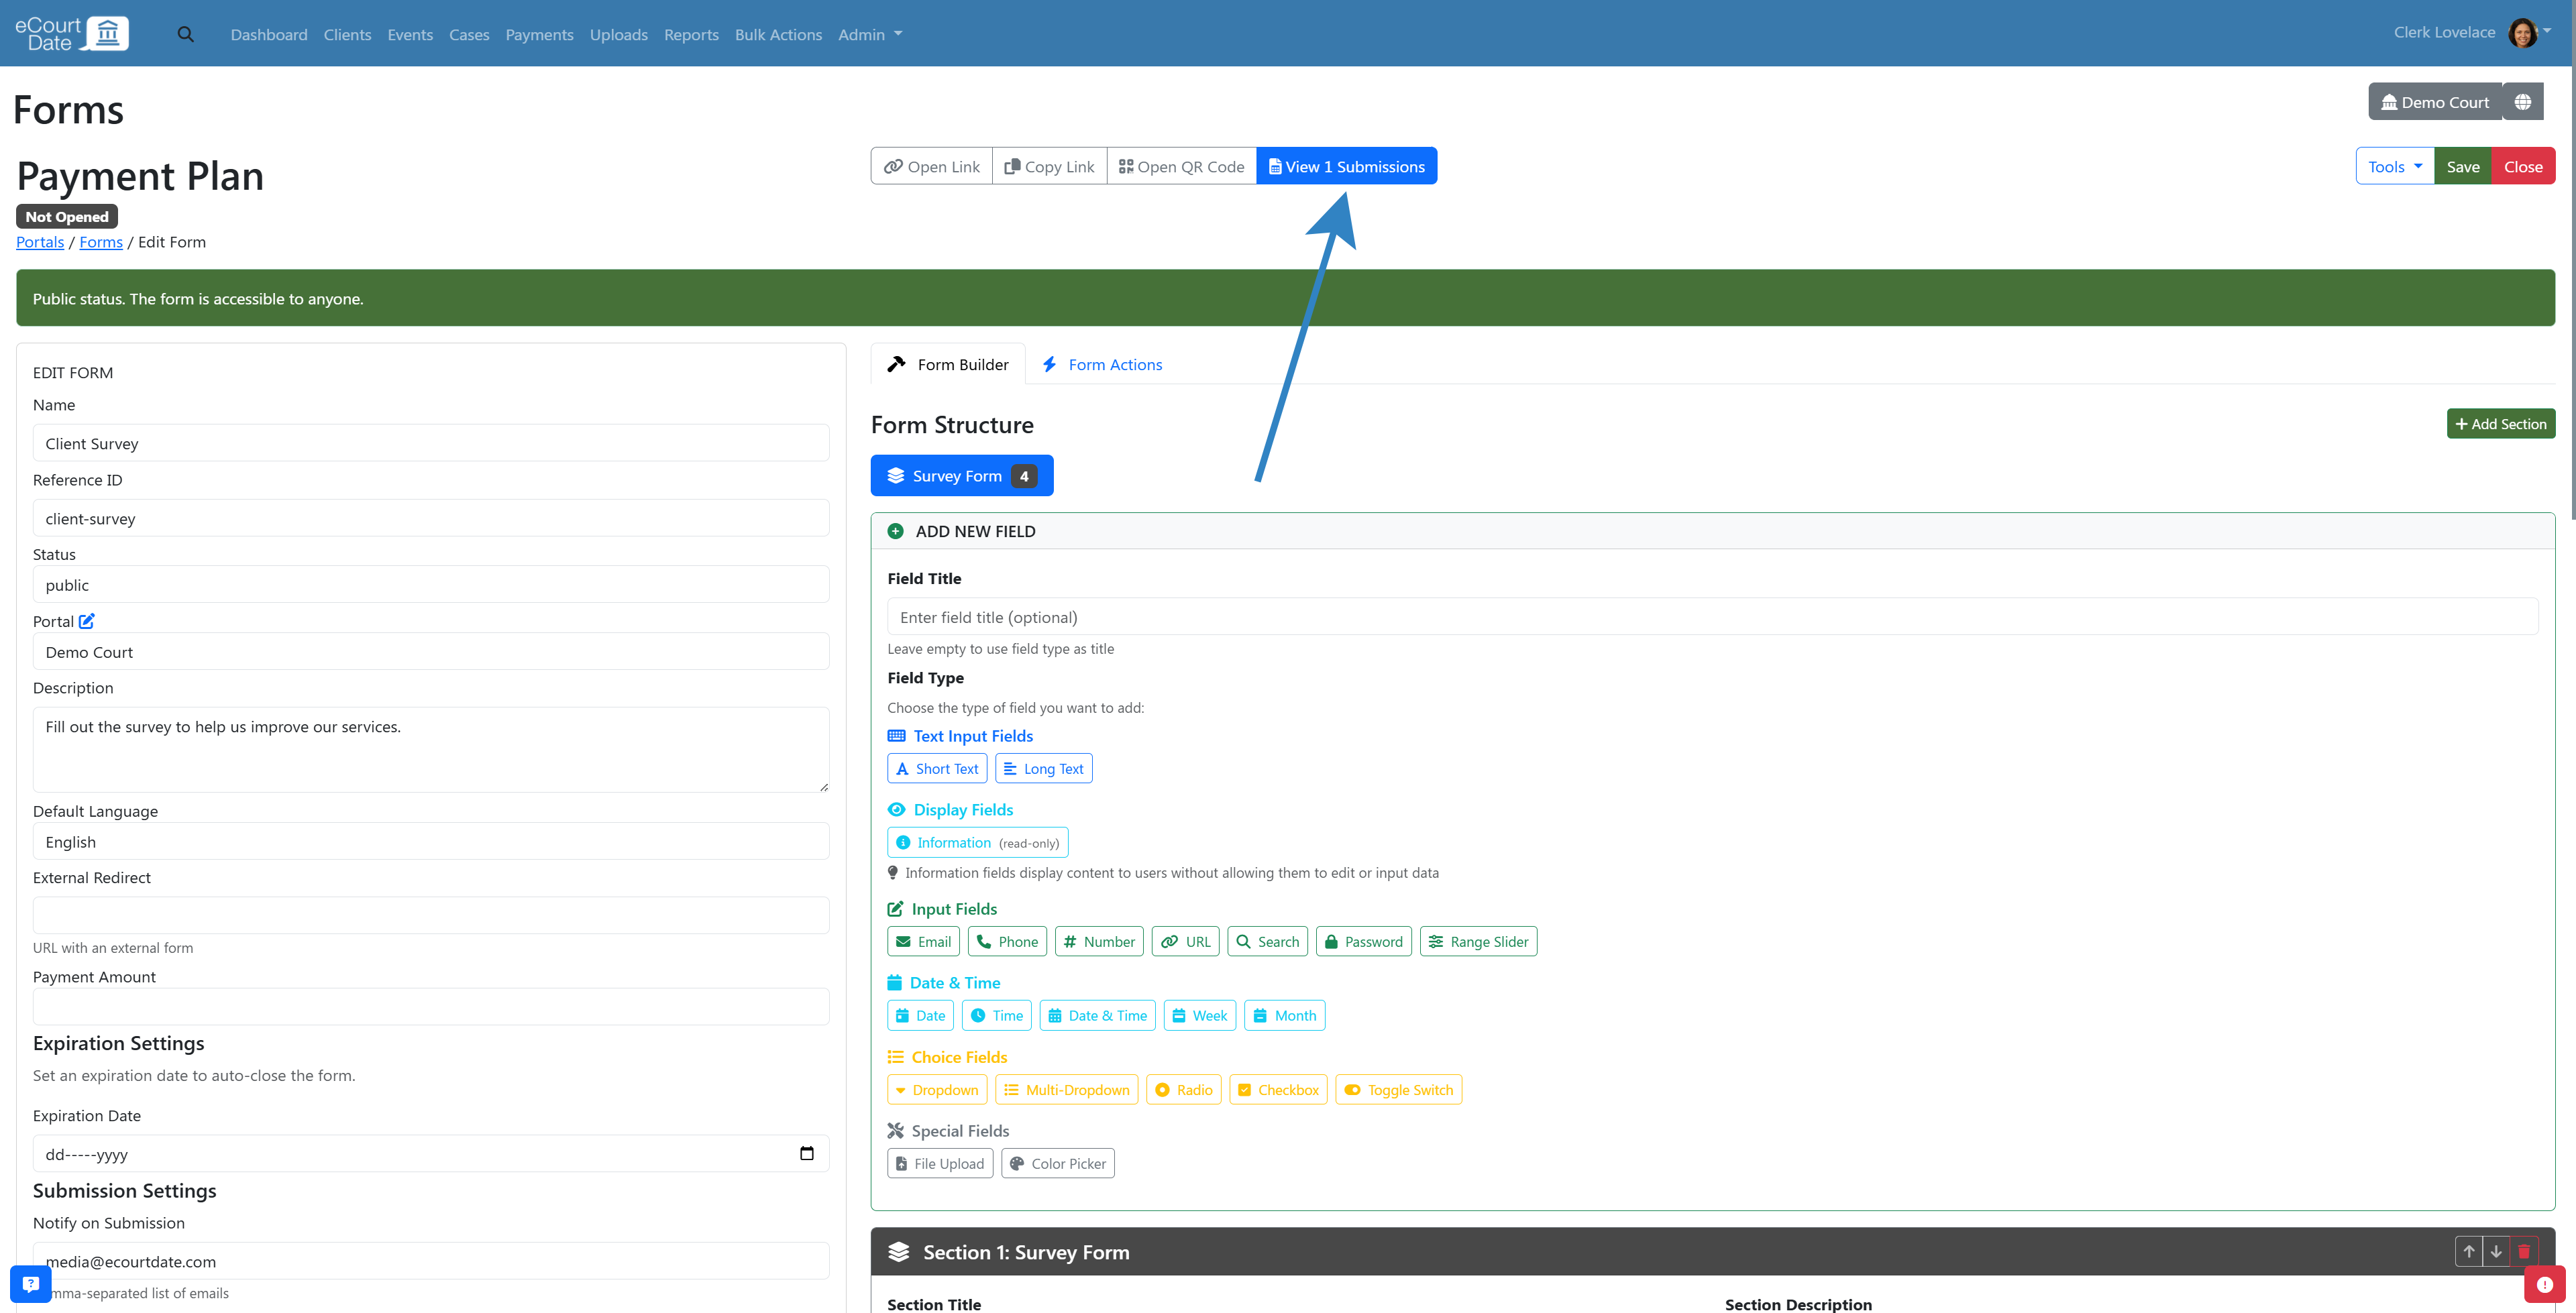
- Review submissions in the spreadsheet-style interface. Click Edit to view or modify details.
Step 7: Share the Form
There are multiple ways to share each form:
Portal Library
Any non-draft forms automatically appear in the Portal Library (if the library is enabled). This is the recommended approach if you have multiple forms and files to share with clients.
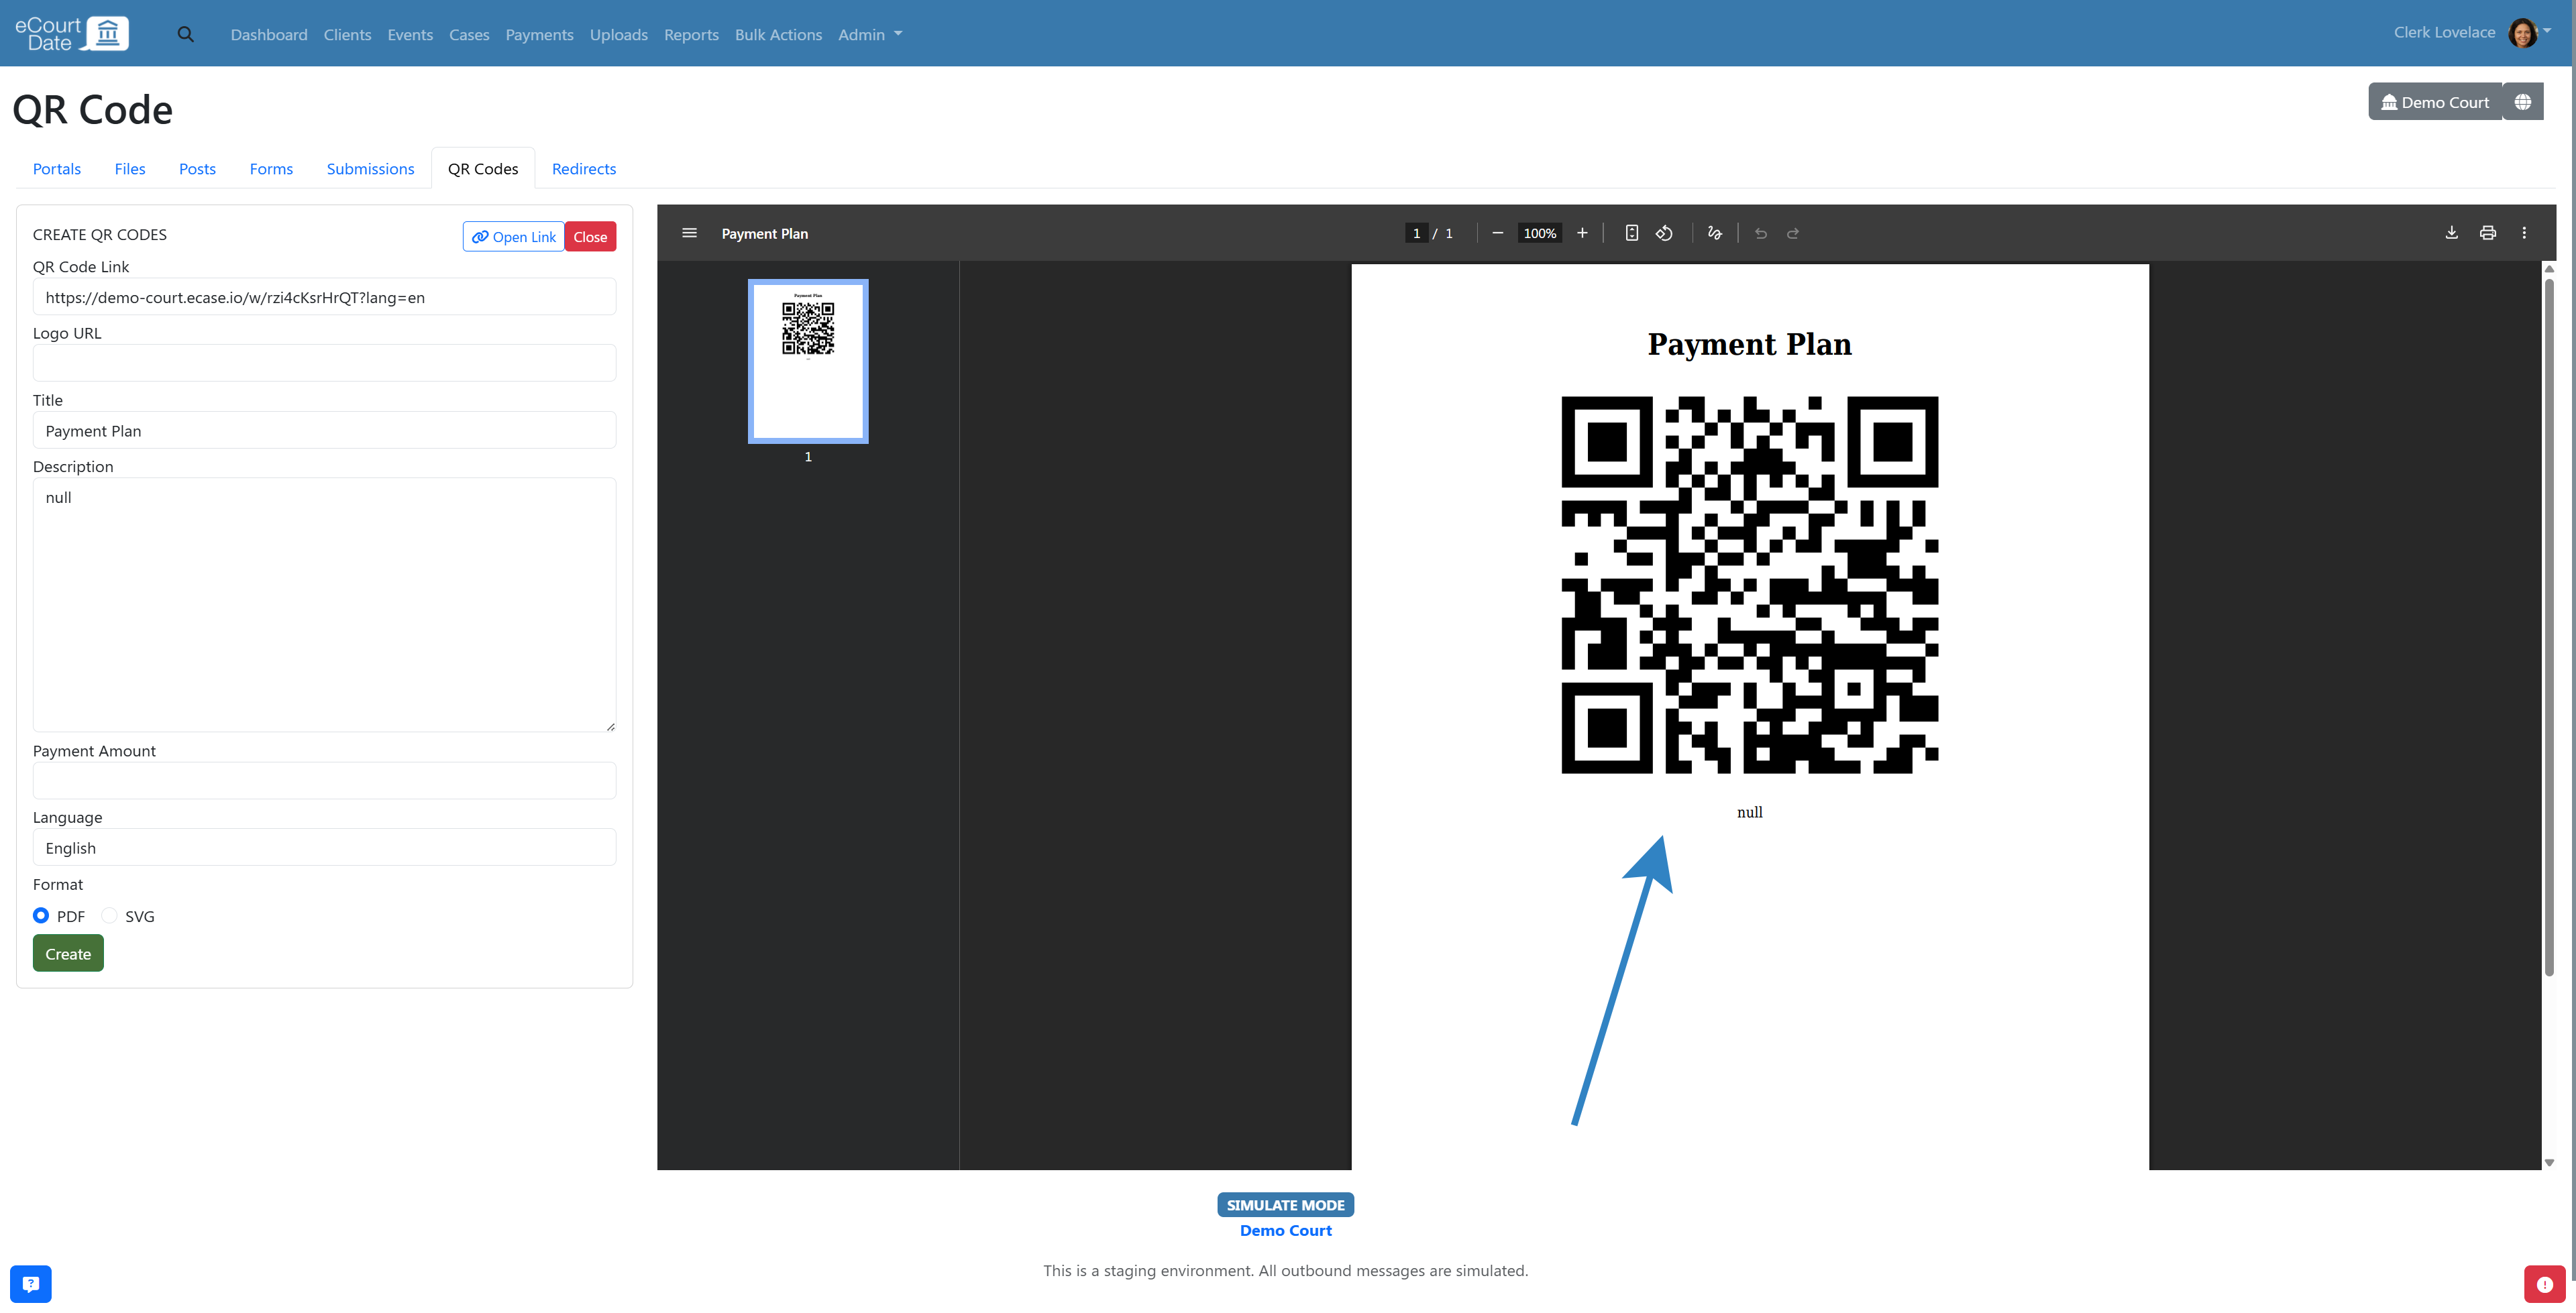
QR Code
- Click the Open QR Code button to generate a shareable QR code.
- Share the QR code on social media, your website, in-person locations, or mailed notifications.
Messaging
- Click the Copy Link button to copy the form URL to your clipboard.
- Include the link in Auto Messages, Flows, one-off messages, or bulk messages.

Embed Form
- Click the Embed button to copy the embed code.
- Share the code with your IT department to add the form directly to your agency's website.
Step 8: Track Form Analytics
Monitor form performance and submission trends.
- Navigate to the form you want to analyze.
- Click the View Submissions tab to review all submissions.
- Review submission counts, completion rates, and response patterns over time.
- Export submissions in CSV format for further analysis or compliance reporting.
Step 9: Embed a Form in an Email Signature
Include a link to your form in your agency's email signature so clients can access it from any email they receive.
- Navigate to Admin > Settings > Agency Emails.
- Click the email address you want to edit.
- In the Signature field, add a link to your form (for example, "Complete your intake form: [form URL]").
- Click Save to apply changes.
The form link is included in the signature of all outbound emails from that Agency Email.
Step 10: Enable Event Self-Scheduling Through Forms
Allow clients to select and schedule their own events directly through a form.
- Create or edit a form and add a Date or Date/Time field for the desired event date.
- Configure a Form Action that creates an event when the form is submitted:
- Set the Action Type to create an event.
- Map form fields to event fields (date, time, location, type).
- Click Save to apply the form action.
When a client submits the form, an event is automatically created with the details they provided, enabling self-service scheduling without staff intervention.
What to Expect
After creating and publishing your form, clients can access it through the portal link, QR code, or embedded location. Submissions appear in the View Submissions section in real time. If you configured notification emails, staff receive an alert for each new submission.
Best Practices
- Start by importing a sample form and customizing it to save time
- Test your form thoroughly before setting the status to Public or Private
- Use conditional rules to show or hide fields based on client responses, keeping forms simple
- Configure email notifications so staff can follow up on submissions promptly
- Set forms to Private when collecting sensitive information that requires client authentication
Frequently Asked Questions
Q: How can I include file uploads in a form?
A: Add a file upload field while designing the form and specify the accepted file types and size limits.
Q: What happens to form submissions?
A: All submissions are tracked in the View Submissions section. You can configure email notifications for staff and set up form actions to trigger automated workflows based on responses.
Q: Can I embed forms on our agency's website?
A: Yes. Click the Embed button on the form to copy the code, then add it to your website. Share the code with your IT department if needed.
Q: Is it possible to export form data?
A: Yes. Form submissions can be exported in CSV format for further analysis or record-keeping.
Q: Can I generate a fillable PDF version of the form?
A: Yes. When viewing the form on the portal, click the Download PDF button to save the file. The PDF can be shared directly with clients who can upload the completed form on the portal.
Troubleshooting
Issue: Form does not appear on the portal.
Symptoms: Clicking the form link shows a blank page or error message.
Solution:
- Verify the form Status is set to Public or Private (not Draft)
- Confirm a portal is assigned to the form
- Check that the portal is active and accessible
Issue: Form submissions are not triggering notifications.
Symptoms: Staff are not receiving email alerts for new submissions.
Solution:
- Verify email addresses are entered in the Notify on Submissions field
- Check spam or junk folders for notification emails
- Confirm the form action configuration if you are using automated workflows
Important: If you continue to experience issues after following these troubleshooting steps, sign in to eCourtDate and create a ticket by clicking the ticket button in the bottom right corner of the screen.
Related Articles
Custom web forms in eCourtDate let your agency collect information from clients through your portal, reducing paperwork and ensuring accurate, secure data submission.
### Overview
- **What it is:** A form builder that allows you to create custom web forms for collecting information from clients through your agency's portal
- **Why it matters:** Streamlines data collection for events, cases, and payments while minimizing manual entry errors and paperwork
- **Who uses it:** Court personnel, administrative staff, and agency administrators who need to gather structured information from clients
- **Expected outcomes:** Clients complete forms on the portal, staff receive notifications, and form actions can trigger automated workflows
### Prerequisites
- You must have admin access or the **Create Portals** and **Update Portals** permissions
- Your agency must have at least one portal configured
- Gather the list of fields and required data you want to collect before building the form
- (Optional) Configure Auto Messages if you want form submissions to trigger automated responses
### How-To Steps
#### Step 1: Access the Forms Section
1. Navigate to the top navigation bar and select the **Admin** dropdown.

2. Click **Forms** from the dropdown menu.

3. Locate the **Create Form** section in the left column.

#### Step 2: Create the Form
> **Tip:** Use the **Import Forms** section to quickly import a sample form. You can skip to Step 3 if you import a form.

1. Enter the desired name, select the language, portal, and status.

2. Click the **Create** button.

3. Review the newly created form page.

#### Step 3: Edit Form Settings
After making any changes, click **Save**. Review the following key settings:
**Form Status**
Select one of the following status options:
- **Draft:** The form is not accessible in the portal
- **Public:** The form is accessible in the portal without requiring sign-in
- **Private:** The form requires clients to sign in before accessing it

**Form Portal**
If you have more than one portal, select which portal to use for the form. A portal is required for the form to work.

**Notify on Submissions**
Enter one or more email addresses to receive a notification whenever a client submits the form.

#### Step 4: Build the Form
Use the **Form Builder** to customize your fields. Each form supports any number of sections, and each section supports any number of fields.
**Create Sections**
A newly created form includes one section named "General." To add more sections:
1. Click the **Add Section** button.


2. Edit the **Section Title** and **Section Description** as needed.

**Create Fields**
1. In the **Add New Field** card, enter a **Field Title**.
2. Click the **Field Type** you want to use.

The new field is added after any existing fields in the current section.
**Customize Fields**
For each field, you can configure the following options:
- **Field Title**
- **Field Type**
- **Help Text**
- **Default Value**
- **Required**
- **Hidden**
**Add Conditional Rules**
1. Click **Advanced Options** on the field you want to make conditional.
2. Set the **Condition Field**, **Operator**, **Value**, and **Action**.

> **Note:** You need at least two fields before creating a conditional rule.
#### Step 5: Configure Form Actions (Optional)
1. Click the **Form Actions** tab.
2. Select the **Action Type** and **Form Field**.
3. Set the **Condition**, **Value**, **Logic Rule**, **Update Field**, and **New Value**.

You can create multiple actions per form. Set the **Logic Rule** to "OR" to make each action independent.
#### Step 6: Preview and Test the Form
1. Set the form **Status** to **Public** for testing.

2. Click the **Open Link** button to view the form on the portal.

3. Fill in the form as a client would. Click **Next** to complete each section if there are multiple sections.


4. Click **Submit** to complete the form. Any required fields that are not completed are highlighted.

5. Return to the form builder and click **View Submissions** to review the test submission.

6. Review submissions in the spreadsheet-style interface. Click **Edit** to view or modify details.


#### Step 7: Share the Form
There are multiple ways to share each form:
**Portal Library**
Any non-draft forms automatically appear in the Portal Library (if the library is enabled). This is the recommended approach if you have multiple forms and files to share with clients.
**QR Code**
1. Click the **Open QR Code** button to generate a shareable QR code.
2. Share the QR code on social media, your website, in-person locations, or mailed notifications.

**Messaging**
1. Click the **Copy Link** button to copy the form URL to your clipboard.
2. Include the link in Auto Messages, Flows, one-off messages, or bulk messages.

**Embed Form**
1. Click the **Embed** button to copy the embed code.
2. Share the code with your IT department to add the form directly to your agency's website.
#### Step 8: Track Form Analytics
Monitor form performance and submission trends.
1. Navigate to the form you want to analyze.
2. Click the **View Submissions** tab to review all submissions.
3. Review submission counts, completion rates, and response patterns over time.
4. Export submissions in CSV format for further analysis or compliance reporting.
#### Step 9: Embed a Form in an Email Signature
Include a link to your form in your agency's email signature so clients can access it from any email they receive.
1. Navigate to **Admin** > **Settings** > **Agency Emails**.
2. Click the email address you want to edit.
3. In the **Signature** field, add a link to your form (for example, "Complete your intake form: [form URL]").
4. Click **Save** to apply changes.
The form link is included in the signature of all outbound emails from that Agency Email.
#### Step 10: Enable Event Self-Scheduling Through Forms
Allow clients to select and schedule their own events directly through a form.
1. Create or edit a form and add a **Date** or **Date/Time** field for the desired event date.
2. Configure a **Form Action** that creates an event when the form is submitted:
- Set the **Action Type** to create an event.
- Map form fields to event fields (date, time, location, type).
3. Click **Save** to apply the form action.
When a client submits the form, an event is automatically created with the details they provided, enabling self-service scheduling without staff intervention.
### What to Expect
After creating and publishing your form, clients can access it through the portal link, QR code, or embedded location. Submissions appear in the **View Submissions** section in real time. If you configured notification emails, staff receive an alert for each new submission.
### Best Practices
- Start by importing a sample form and customizing it to save time
- Test your form thoroughly before setting the status to **Public** or **Private**
- Use conditional rules to show or hide fields based on client responses, keeping forms simple
- Configure email notifications so staff can follow up on submissions promptly
- Set forms to **Private** when collecting sensitive information that requires client authentication
### Frequently Asked Questions
**Q: How can I include file uploads in a form?**
A: Add a file upload field while designing the form and specify the accepted file types and size limits.
**Q: What happens to form submissions?**
A: All submissions are tracked in the **View Submissions** section. You can configure email notifications for staff and set up form actions to trigger automated workflows based on responses.
**Q: Can I embed forms on our agency's website?**
A: Yes. Click the **Embed** button on the form to copy the code, then add it to your website. Share the code with your IT department if needed.
**Q: Is it possible to export form data?**
A: Yes. Form submissions can be exported in CSV format for further analysis or record-keeping.
**Q: Can I generate a fillable PDF version of the form?**
A: Yes. When viewing the form on the portal, click the **Download PDF** button to save the file. The PDF can be shared directly with clients who can upload the completed form on the portal.
### Troubleshooting
**Issue:** Form does not appear on the portal.
**Symptoms:** Clicking the form link shows a blank page or error message.
**Solution:**
1. Verify the form **Status** is set to **Public** or **Private** (not **Draft**)
2. Confirm a portal is assigned to the form
3. Check that the portal is active and accessible
**Issue:** Form submissions are not triggering notifications.
**Symptoms:** Staff are not receiving email alerts for new submissions.
**Solution:**
1. Verify email addresses are entered in the **Notify on Submissions** field
2. Check spam or junk folders for notification emails
3. Confirm the form action configuration if you are using automated workflows
> **Important:** If you continue to experience issues after following these troubleshooting steps, sign in to eCourtDate and create a ticket by clicking the ticket button in the bottom right corner of the screen.
### Related Articles
- [How to Create Web Portals](/how-to-create-web-portals)
- [How to Setup a Self-Enroll Form](/how-to-setup-a-self-enroll-form)
- [How to Create an Auto Message](/how-to-create-an-auto-message)
- [How to Create a Flow](/how-to-create-a-flow)
- [How to Send a One-off Message](/how-to-send-a-one-off-message)
- [How to Use Merge Tags](/how-to-use-merge-tags)