Clients
How to Manage Clients
8 min read
Updated Feb 15, 2026
Clients are the people or organizations who are your agency's primary recipients. This guide walks you through creating, updating, searching, archiving, trashing, and restoring client records in eCour...
Clients are the people or organizations who are your agency's primary recipients. This guide walks you through creating, updating, searching, archiving, trashing, and restoring client records in eCourtDate.
Overview
Managing clients is one of the most fundamental tasks in eCourtDate. Clients can be defendants, jurors, witnesses, staff, or any other recipient of messages from your agency.
- What it is: A set of tools for creating, editing, searching, archiving, trashing, and restoring client records in the eCourtDate admin dashboard.
- Why it matters: Accurate and up-to-date client records ensure your messages reach the right people and your agency's data stays reliable.
- Who uses it: Court clerks, probation officers, administrative staff, and anyone responsible for maintaining client information.
- Expected outcomes: A well-organized client database that supports efficient communication, accurate reporting, and streamlined case management.
Prerequisites
Before managing clients, make sure you have the following:
- A user account with
create_clients and update_clients permissions
- Access to the eCourtDate admin dashboard
- Client information ready to enter (name, contact details, identifiers)
How-To Steps
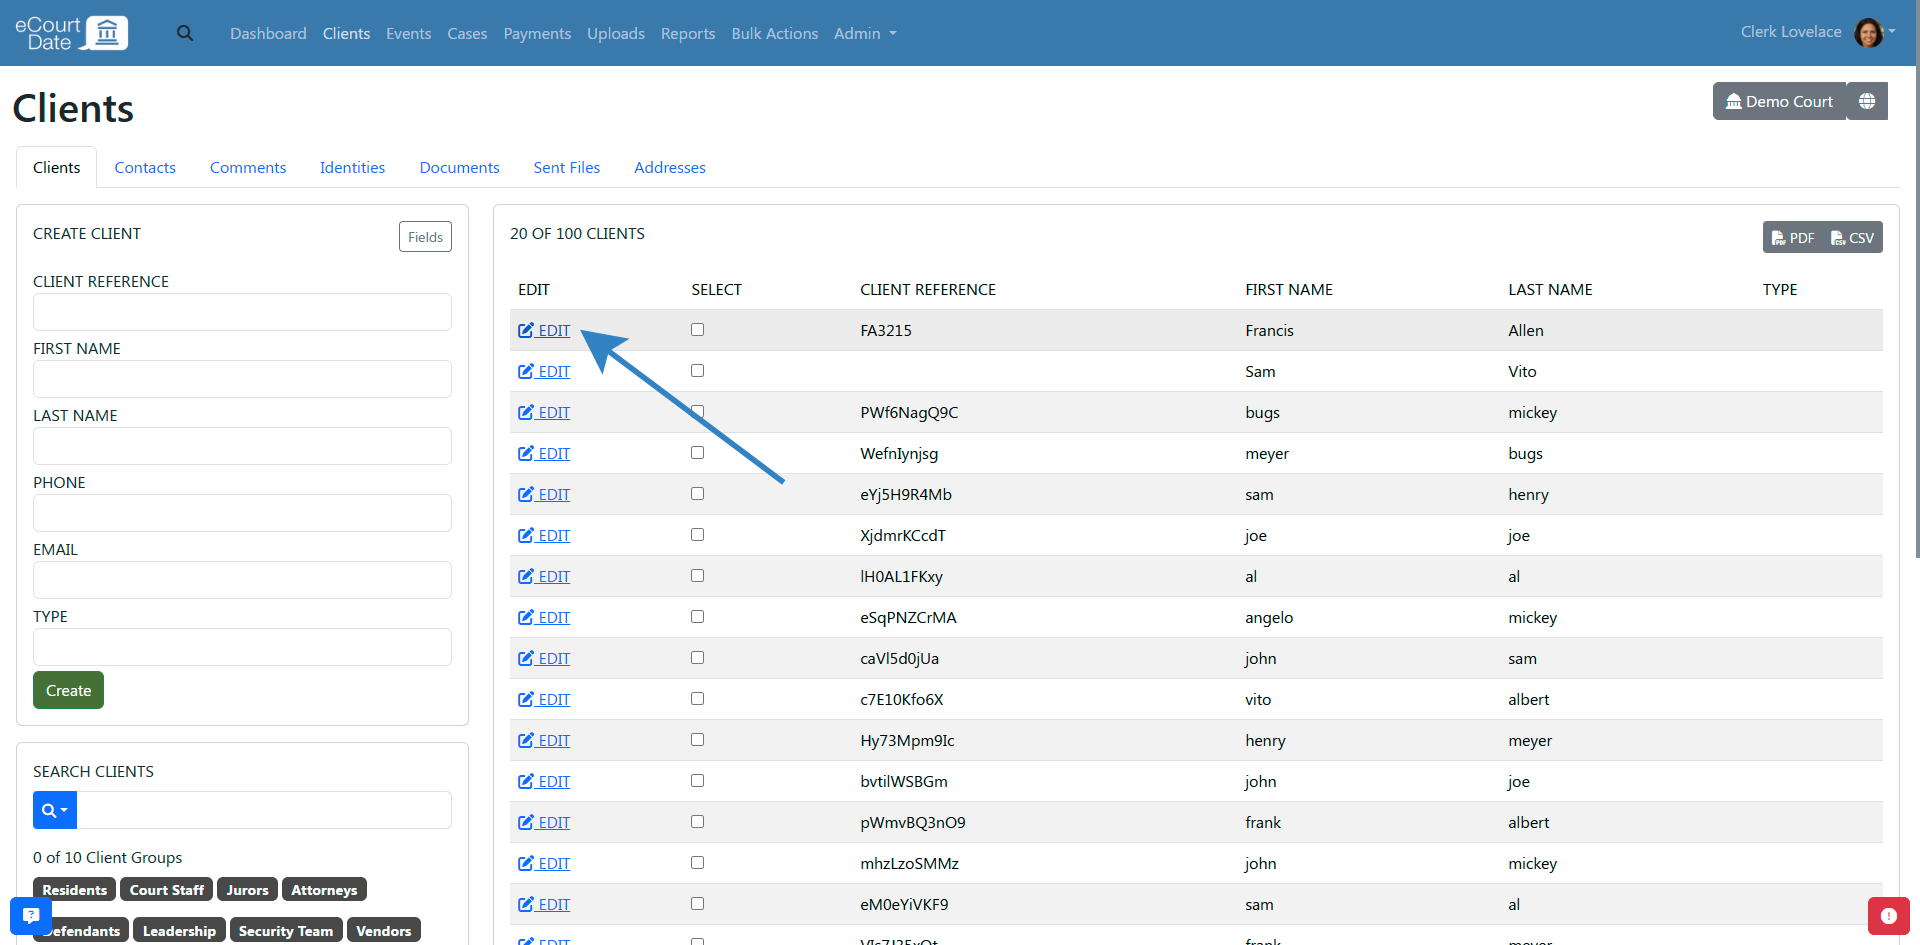
Create a Client
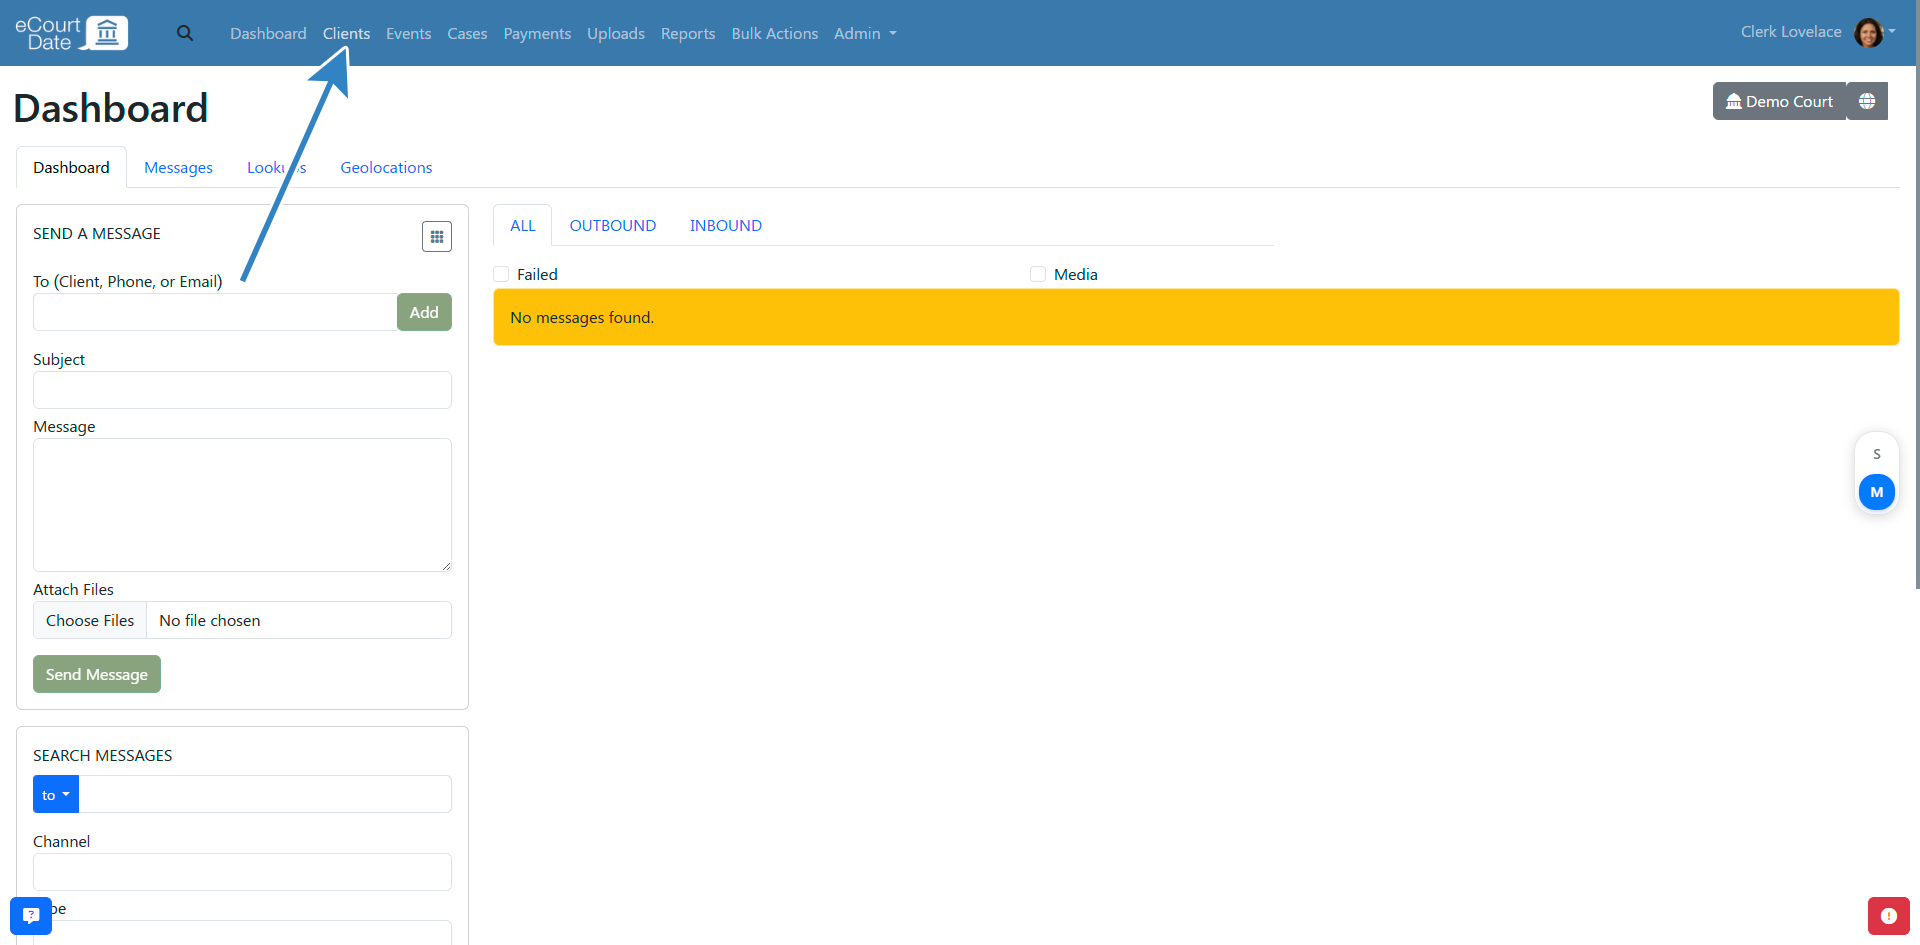
- Click Clients in the top navigation bar.
- Fill in the Create Client form with the client's information.
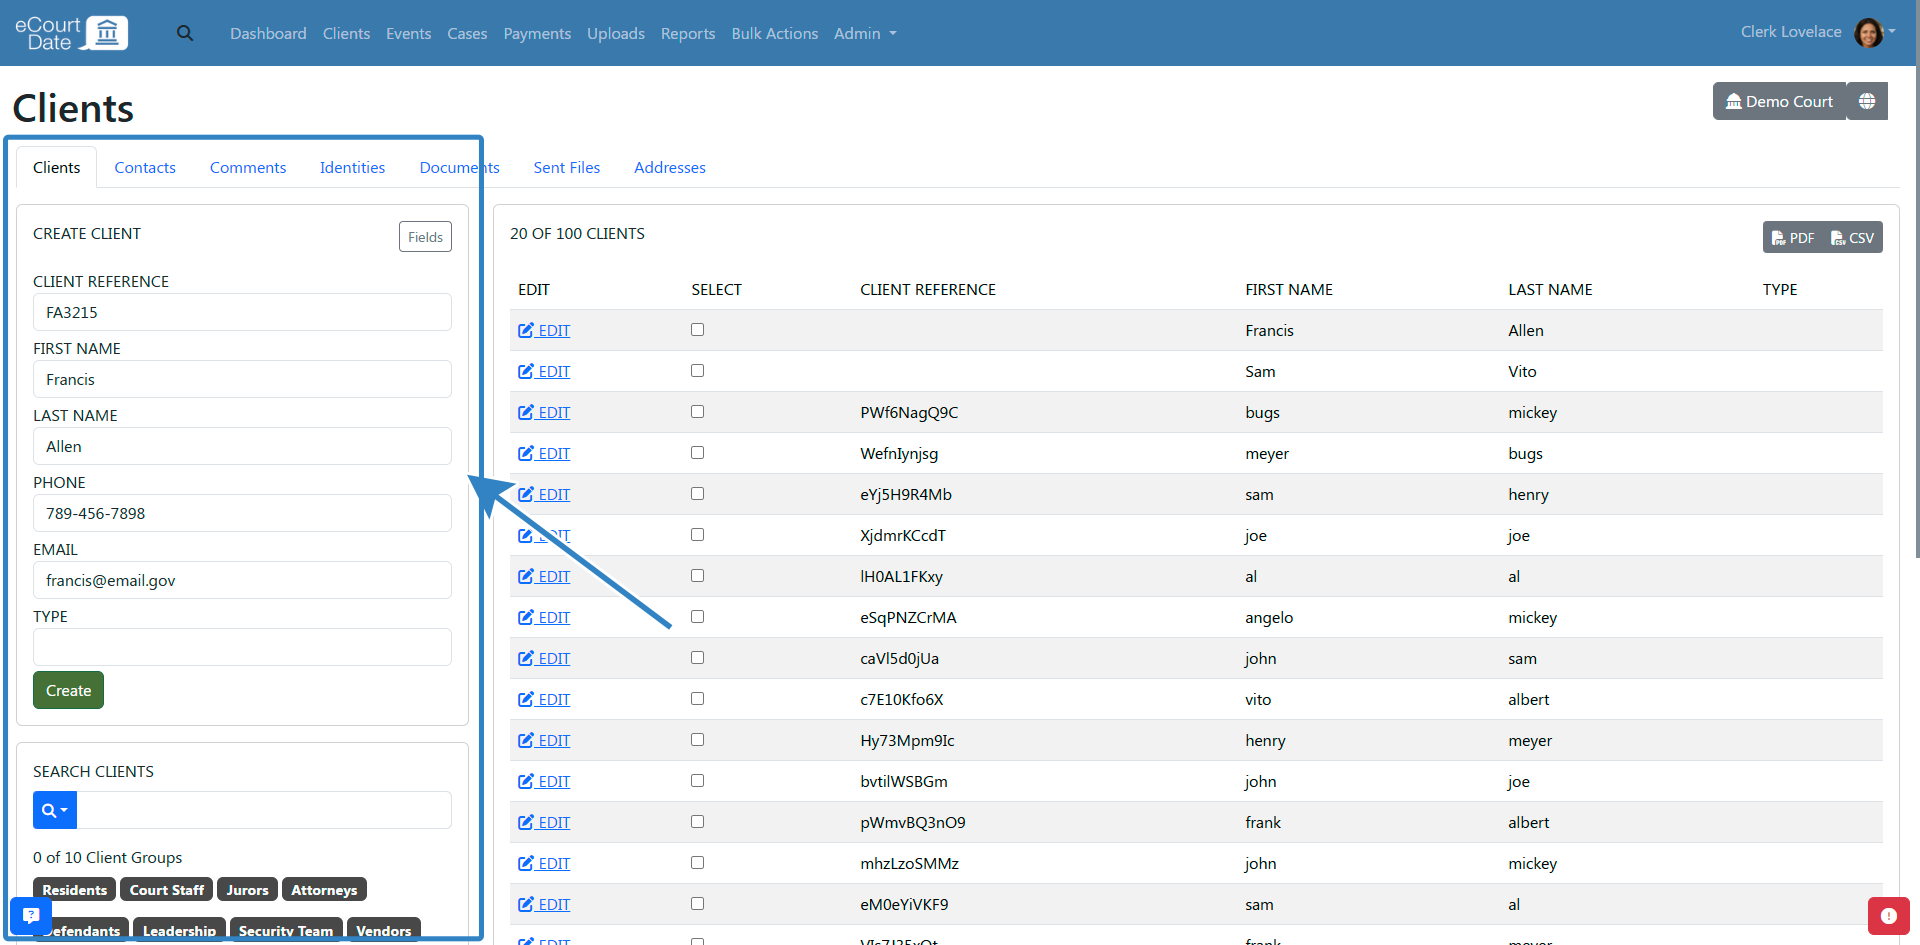
- Click the Create button.
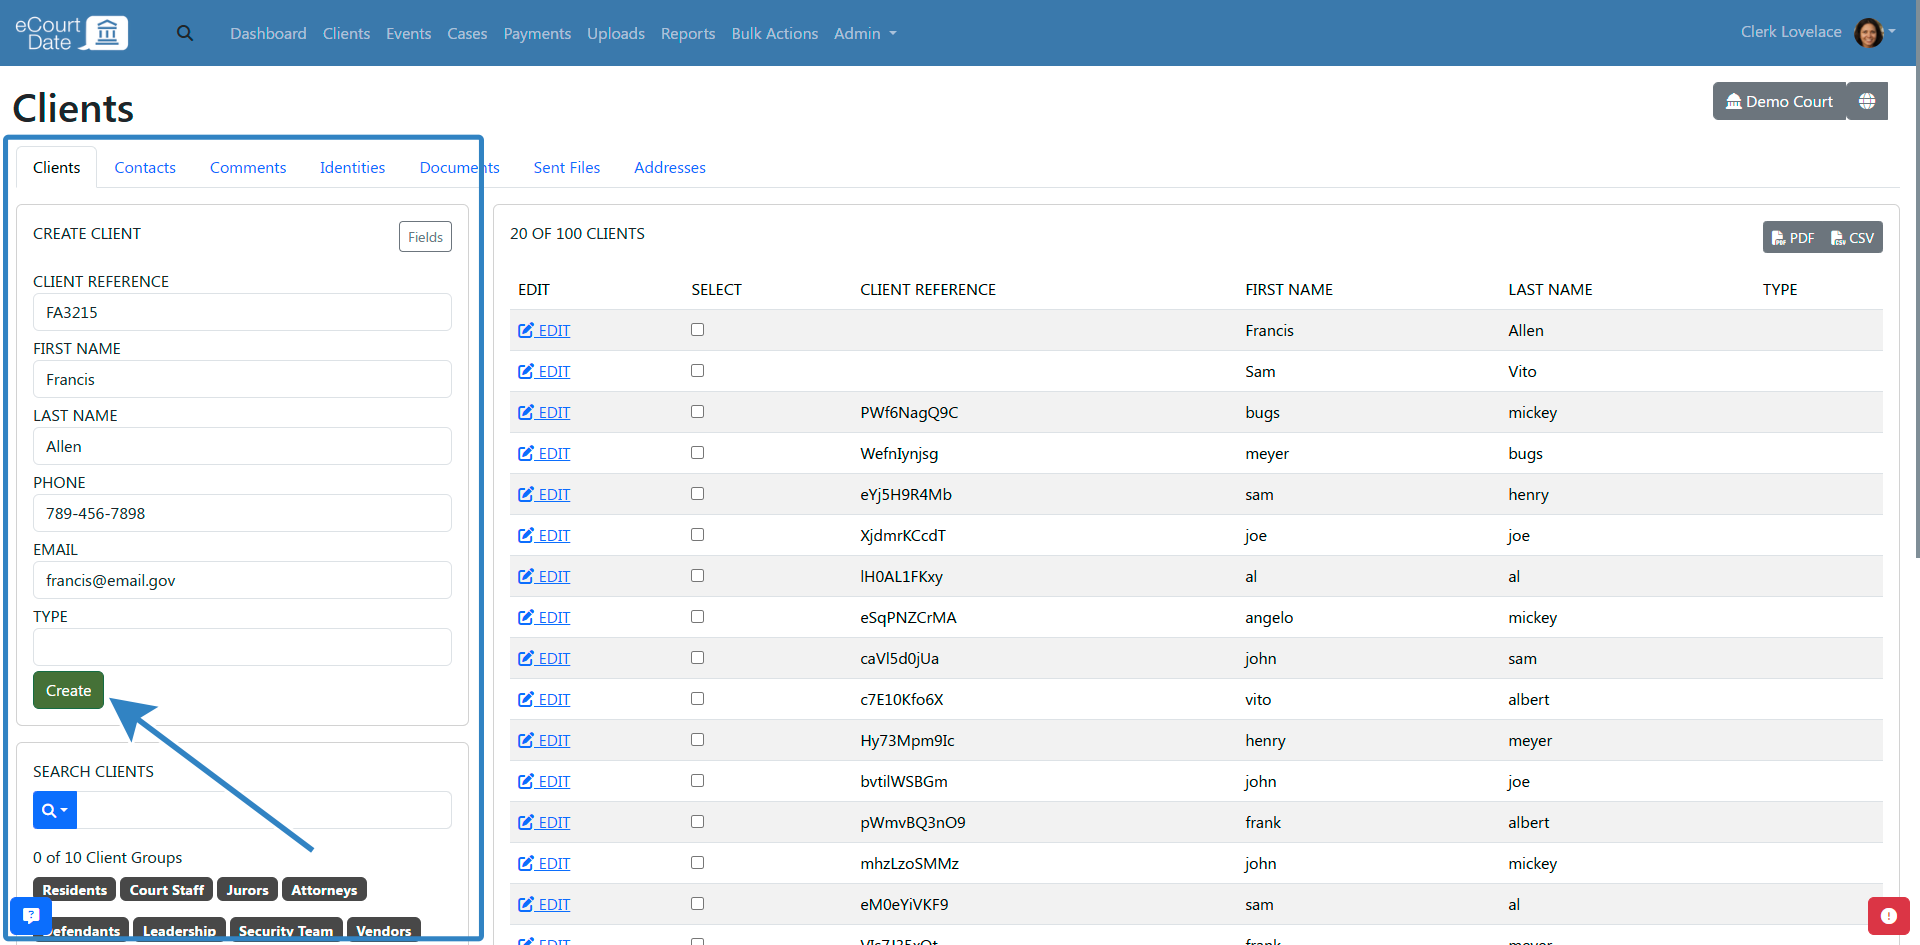
- Click Edit to view the new client's profile, or fill in the form again to create another client.
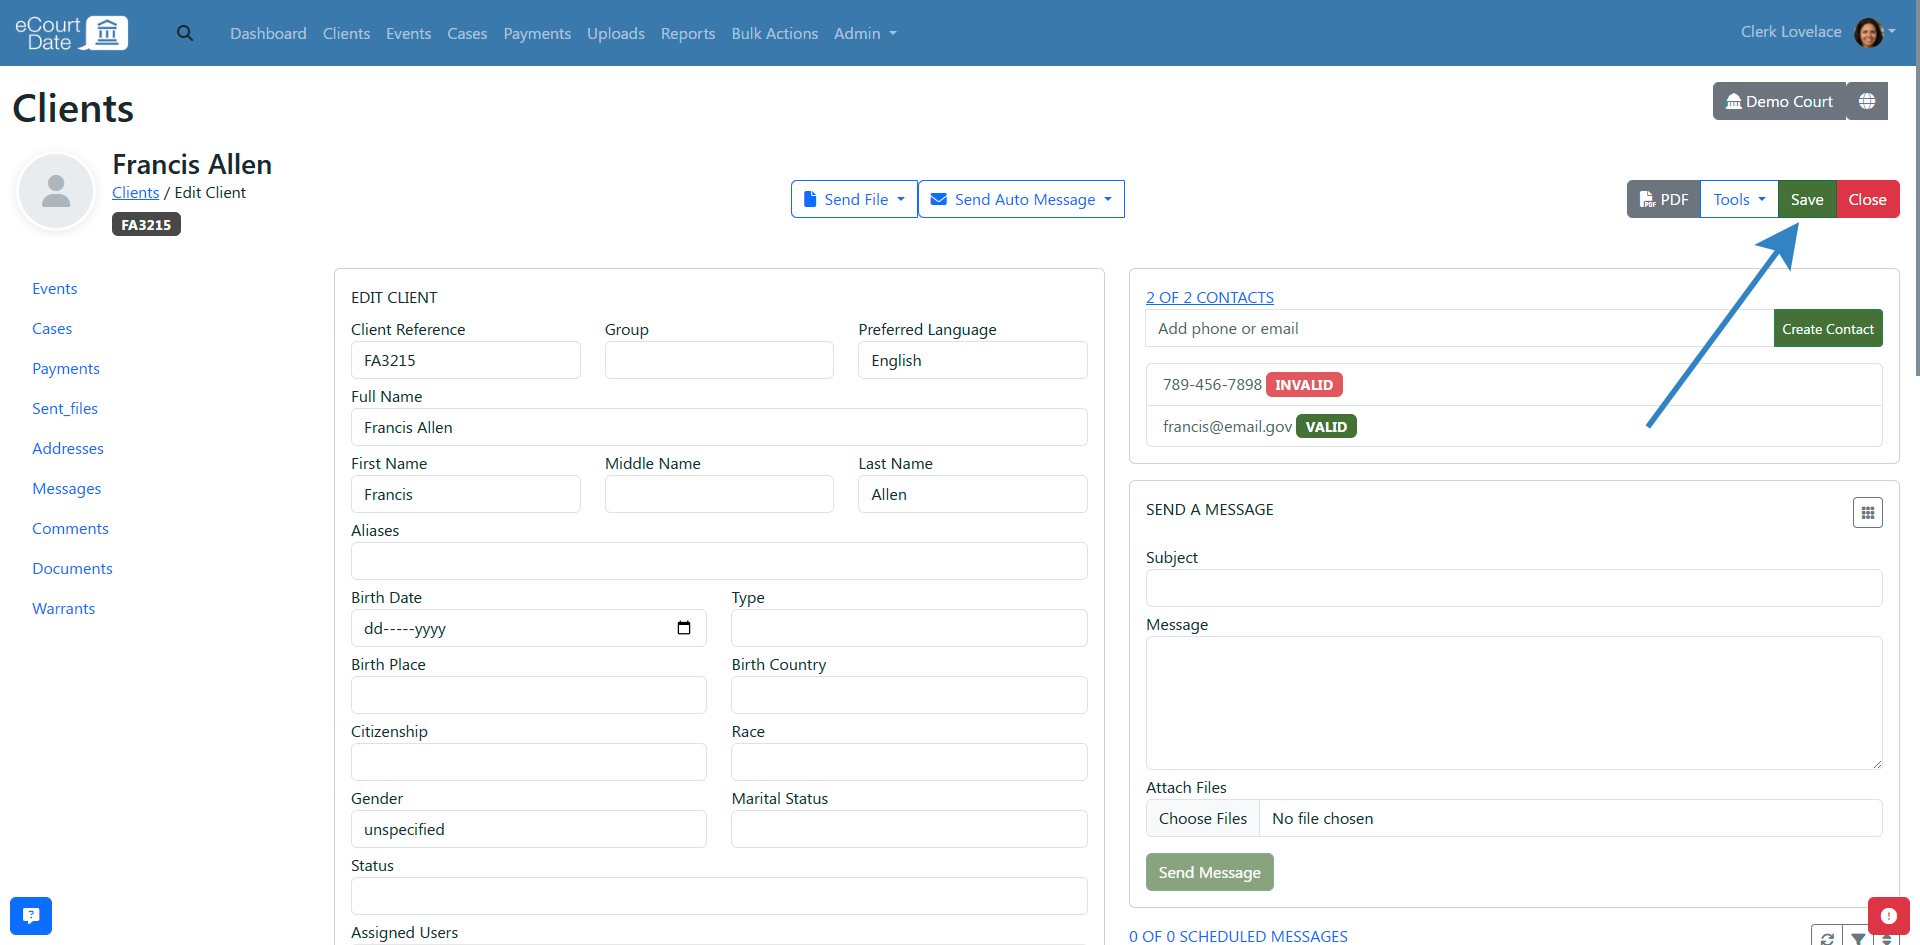
Update a Client
- Search for the client you want to update (see the search instructions below).
- Edit the client's information on their profile page.
- Click Save to save your changes.
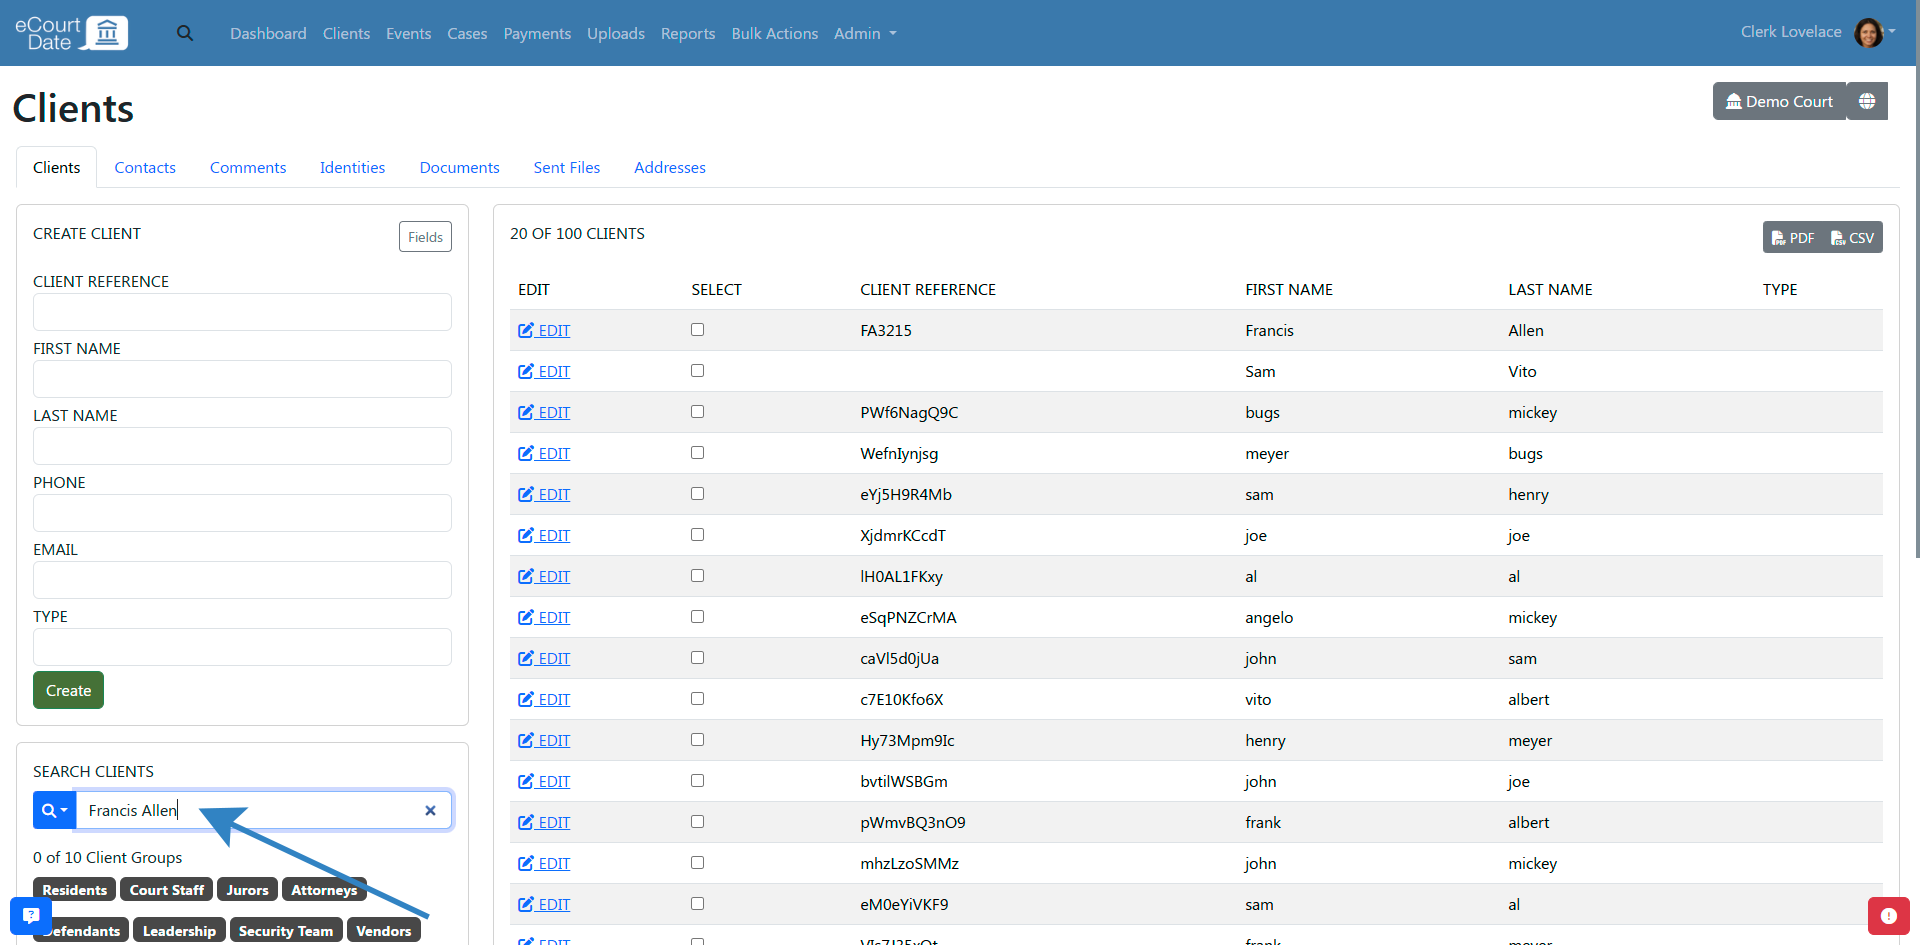
Search for a Client
There are two ways to find a client in eCourtDate.
Quick Search
- Click the search icon in the top navigation bar.
- Enter a partial or full value for any of the following fields:
- Full Name
- First Name
- Last Name
- Client Reference/ID
- Phone Number
- Email Address
- Case Number
- Event Reference/ID
- Click on the client's name in the results to view their profile.
Advanced Search
- Click Clients in the top navigation bar.
- Scroll down to the Search Clients section on the left side of the page.

- Select any combination of search fields to narrow your results:
- General Search (partial or full value)
- First Name
- Last Name
- Client Reference/ID
- Phone Number
- Email Address
- Case Number
- Event Reference/ID
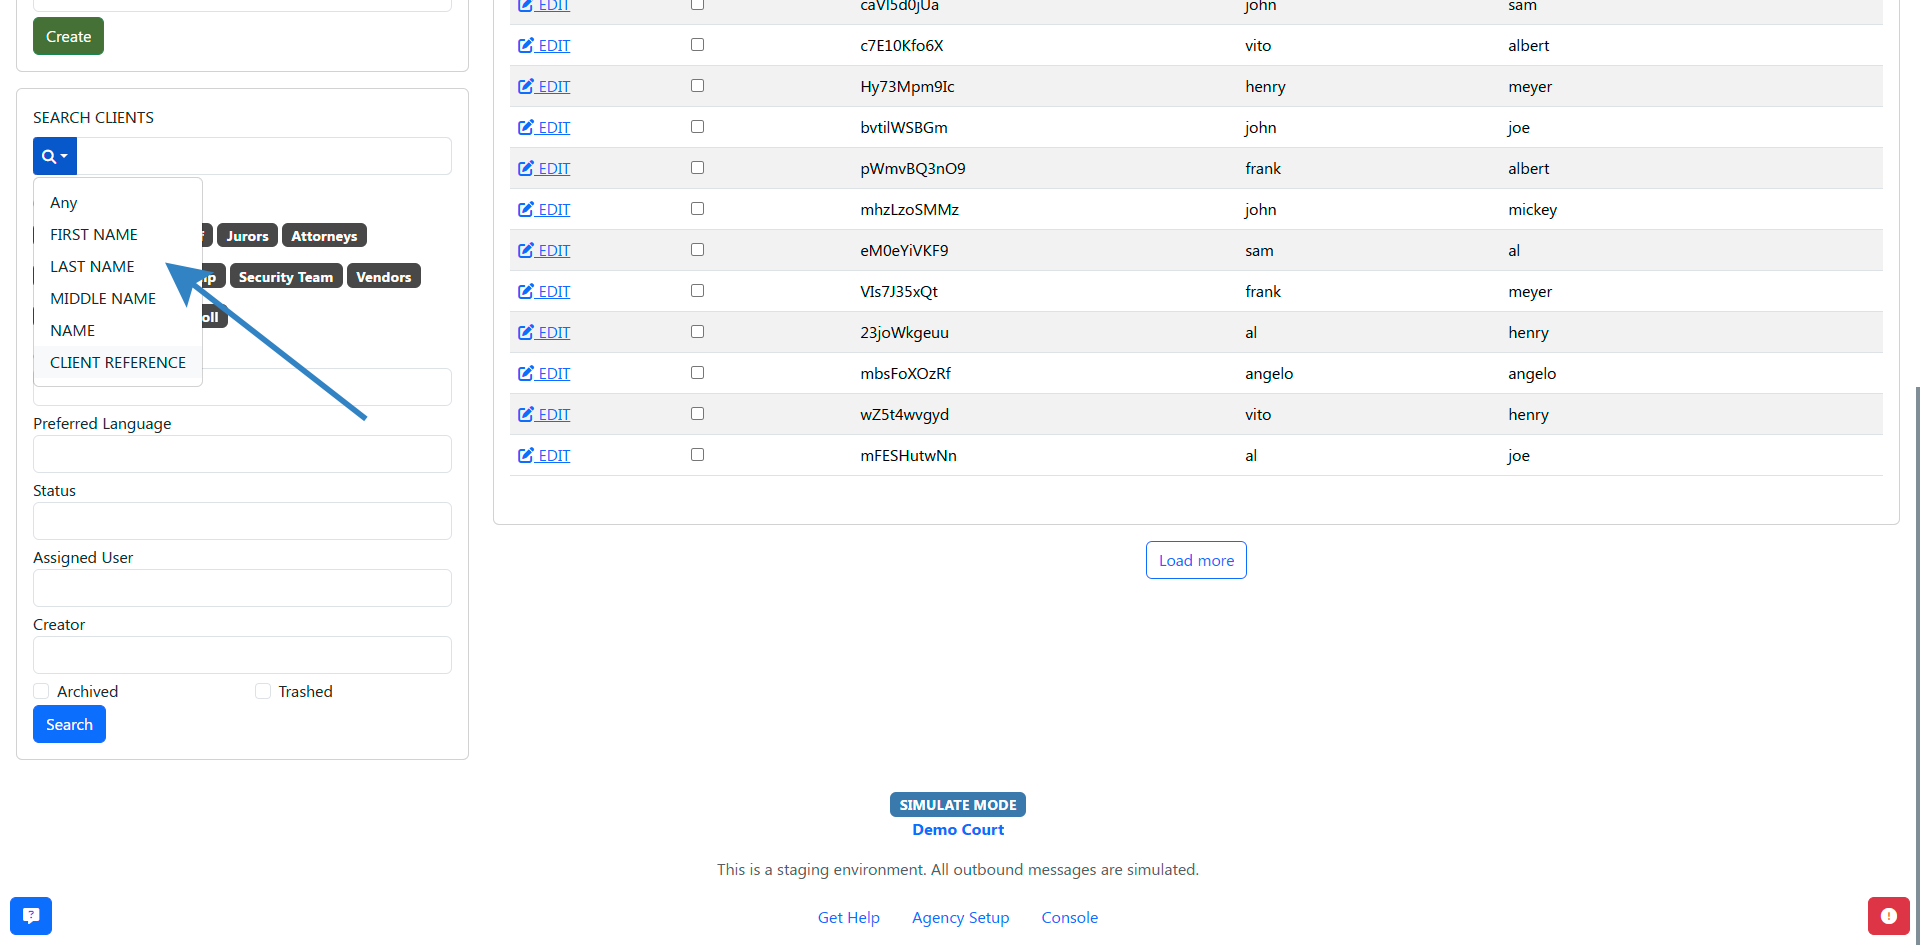
- Click Search to view matching results.
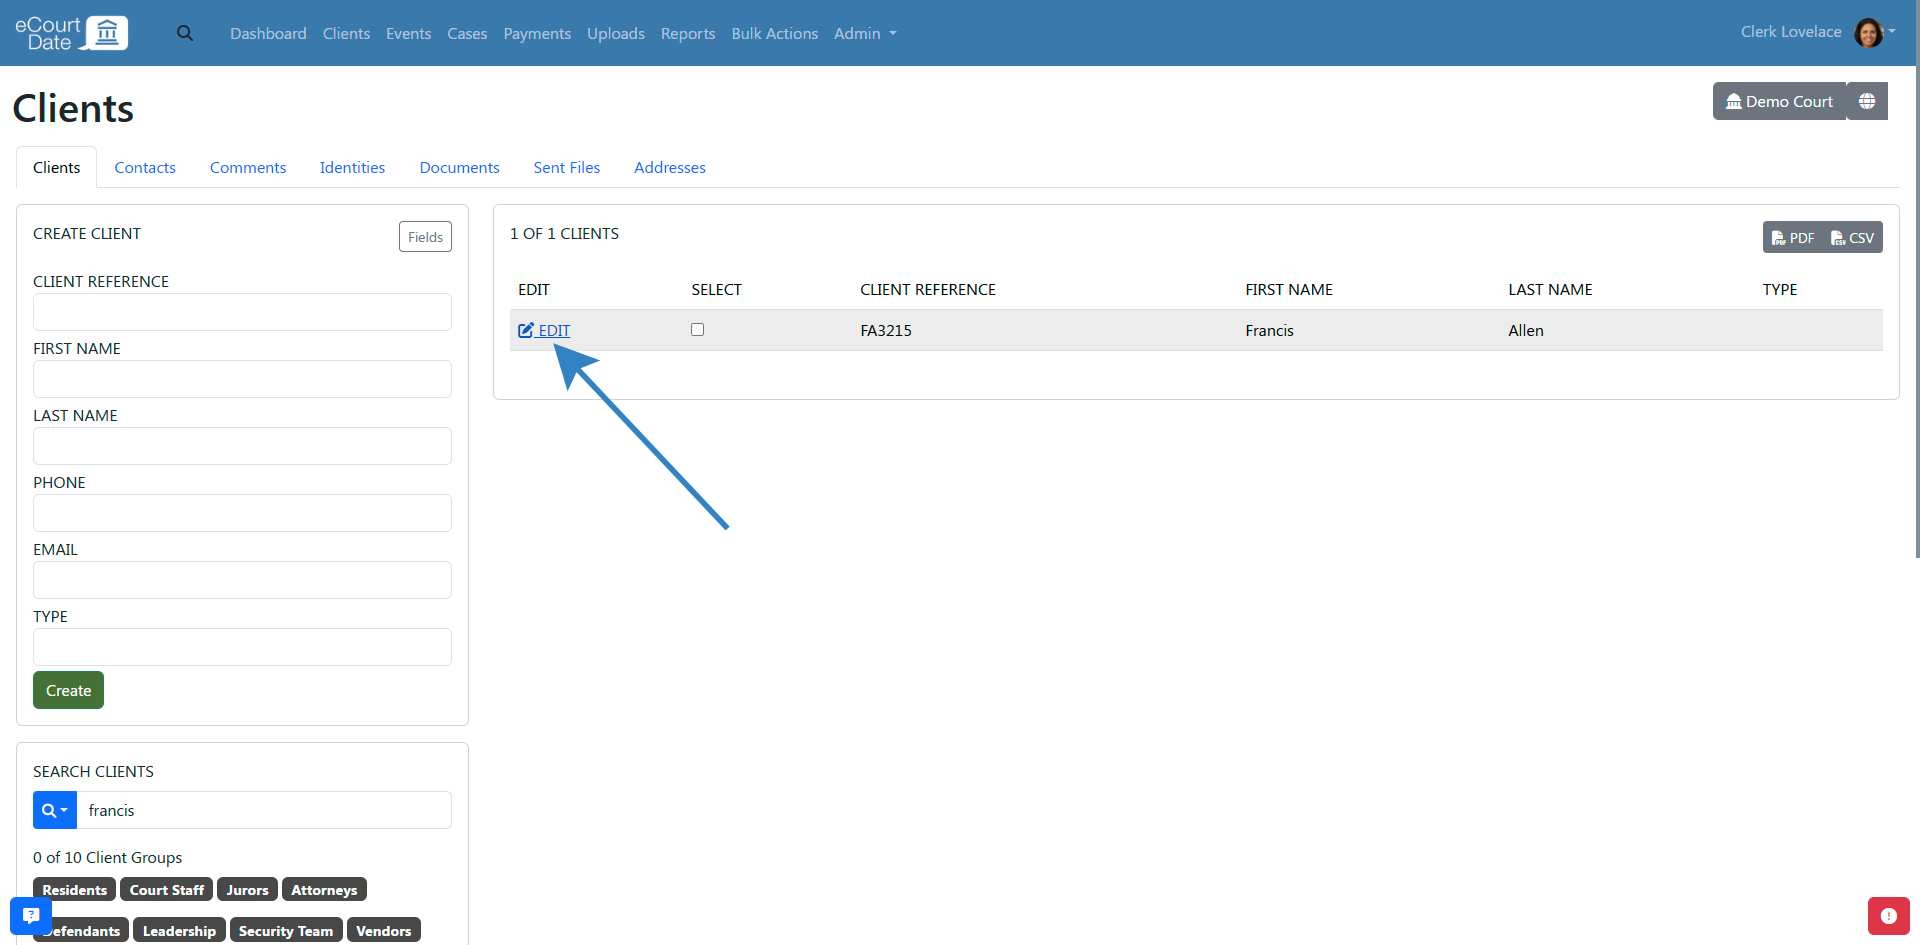
Trash a Client
- Click Clients in the top navigation bar.
- Search for the client you want to trash.
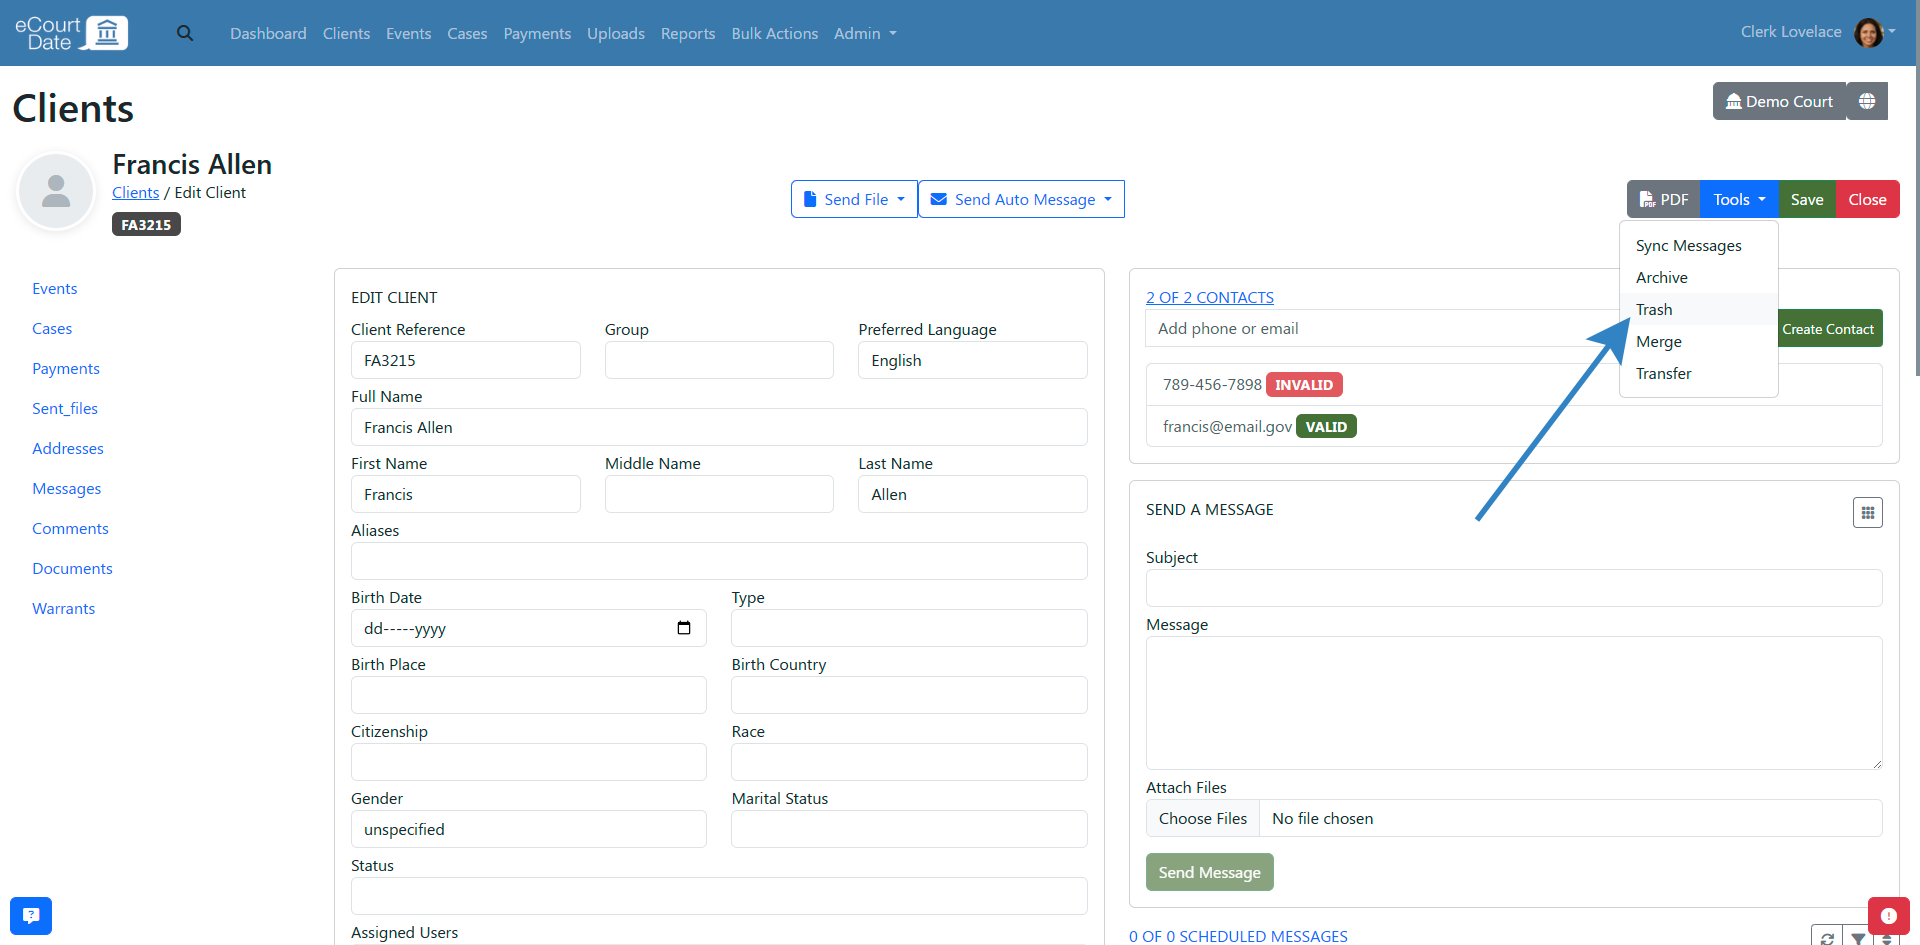
- Click Edit to open the client's profile.
- Click Tools > Trash to trash the client.
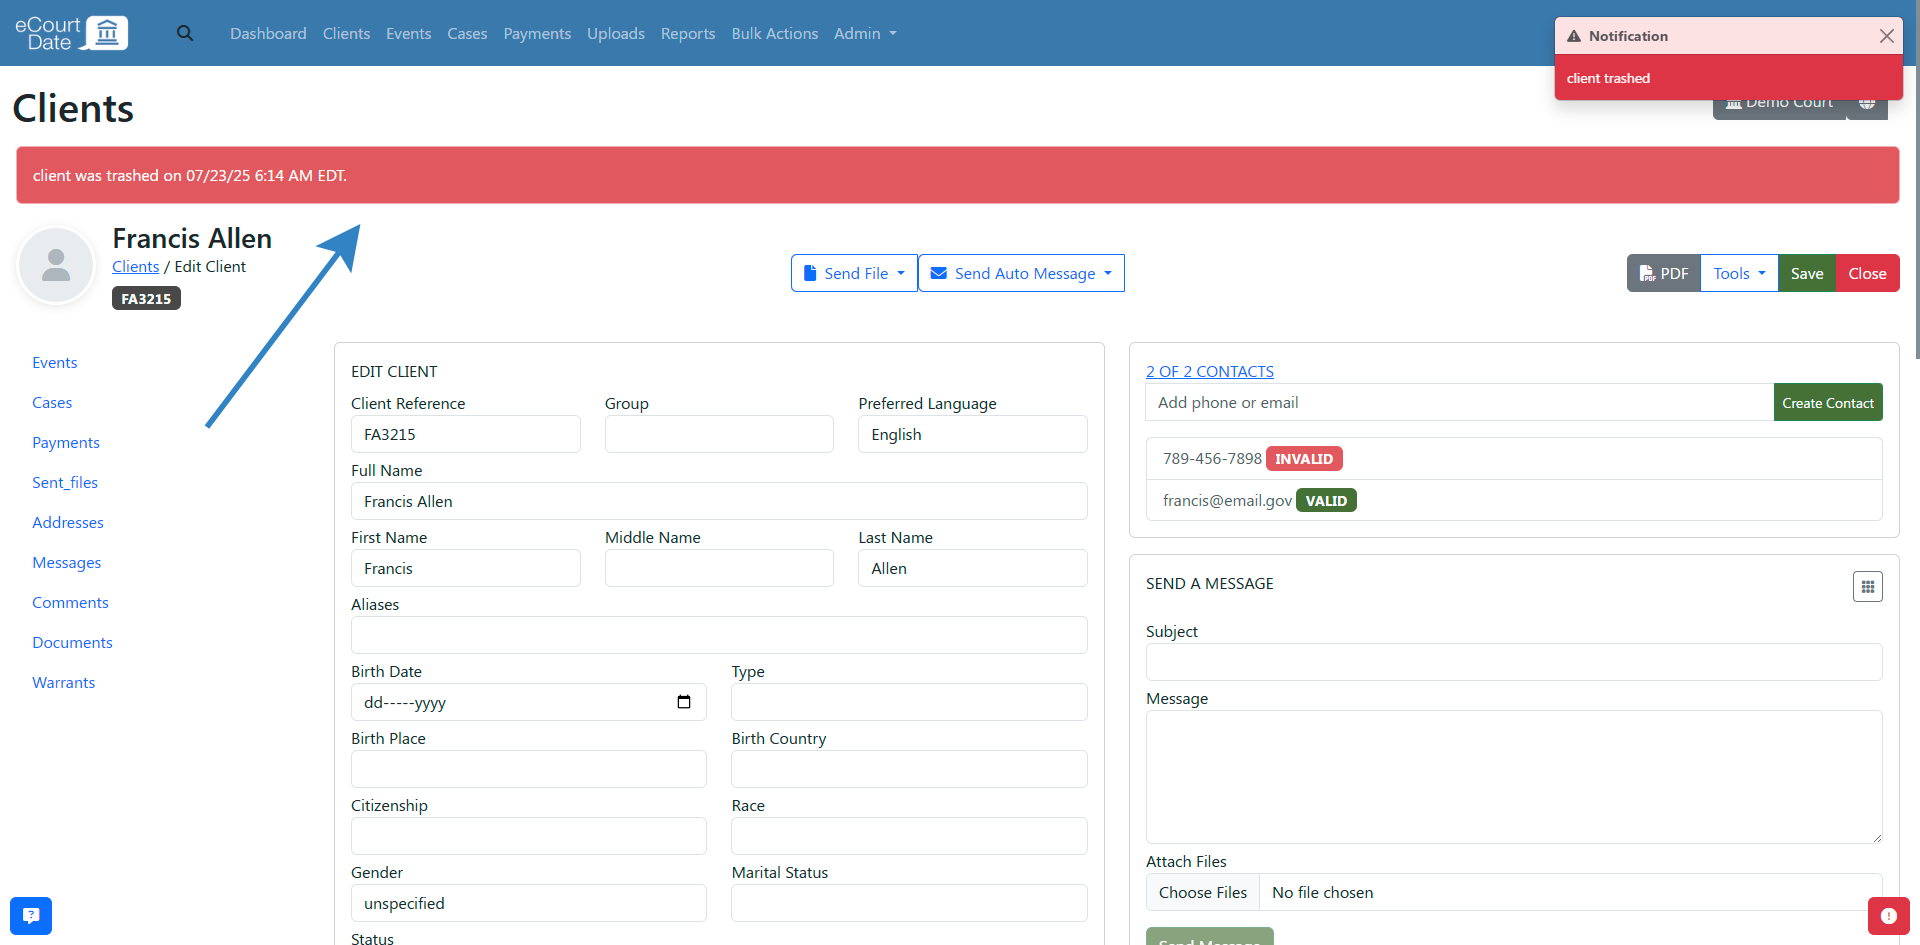
After trashing a client:
- A confirmation alert appears indicating the client has been trashed.
- The client is hidden from quick search and can only be found using advanced search.
- All related records (events, cases, contacts, etc.) are also trashed.
- Any scheduled messages for the client are deleted.
- Unless restored, the client and all related records are permanently deleted after 30 days.
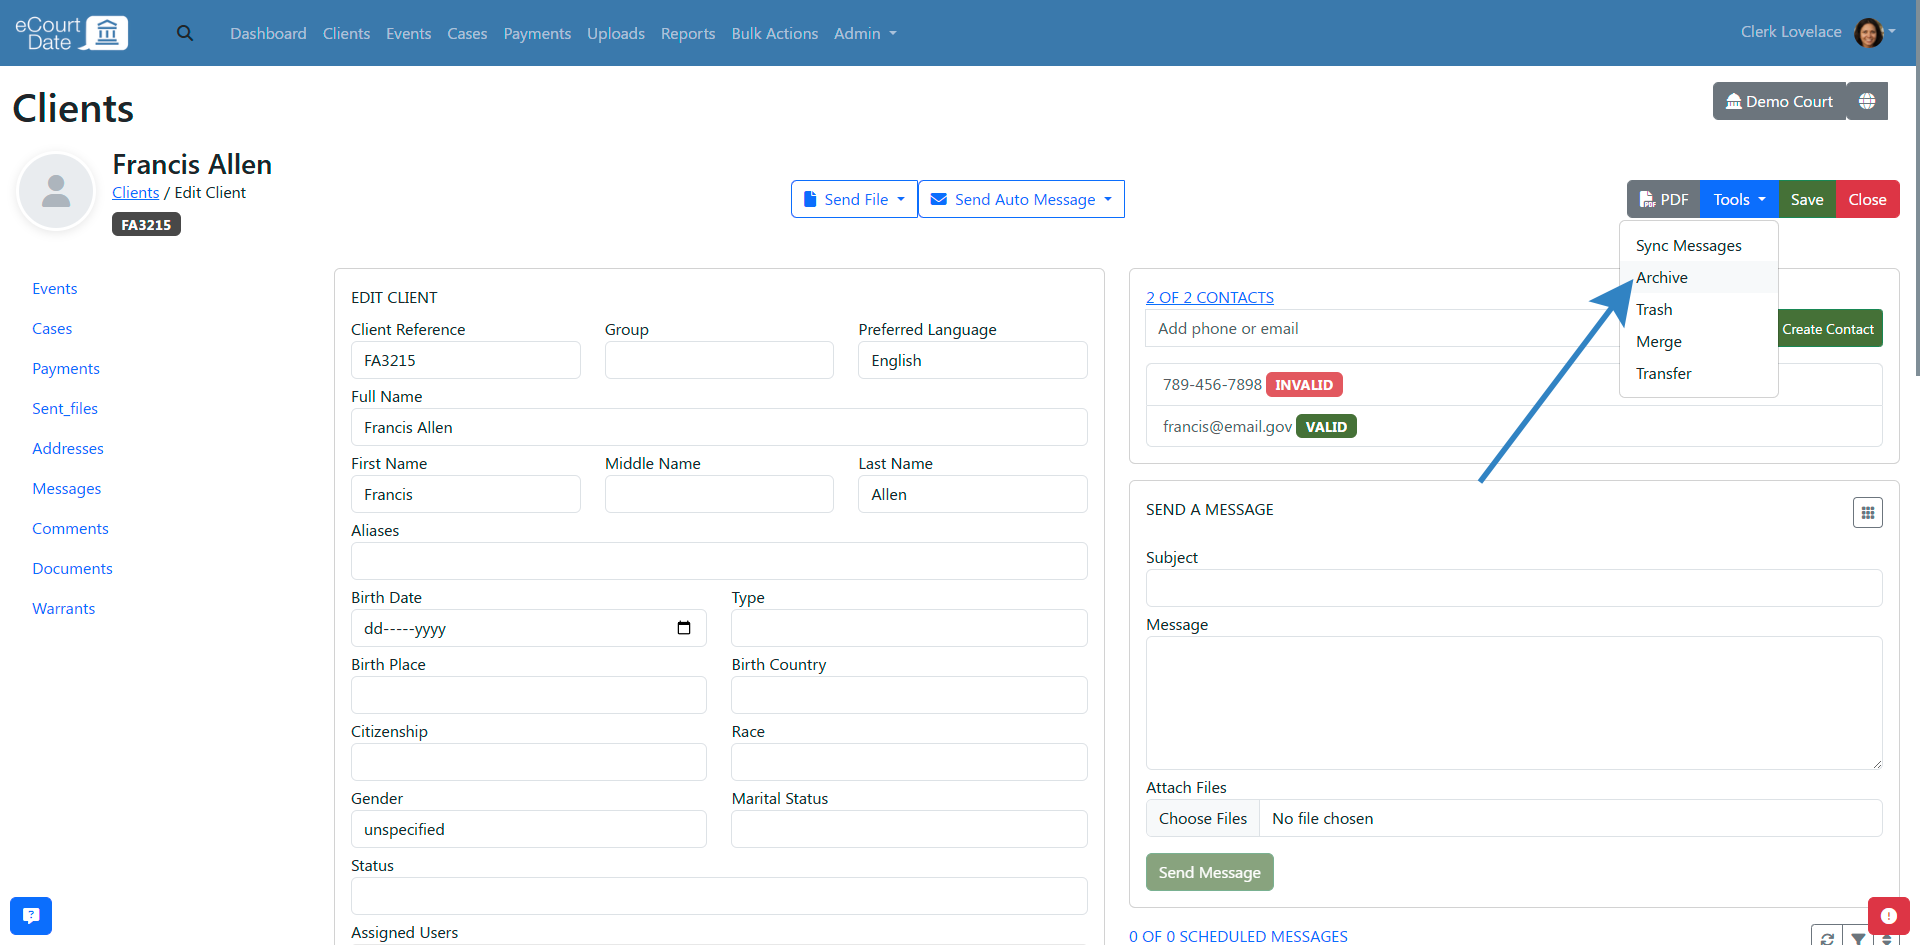
Archive a Client
- Click Clients in the top navigation bar.
- Search for the client you want to archive.
- Click Edit to open the client's profile.
- Click Tools > Archive to archive the client.
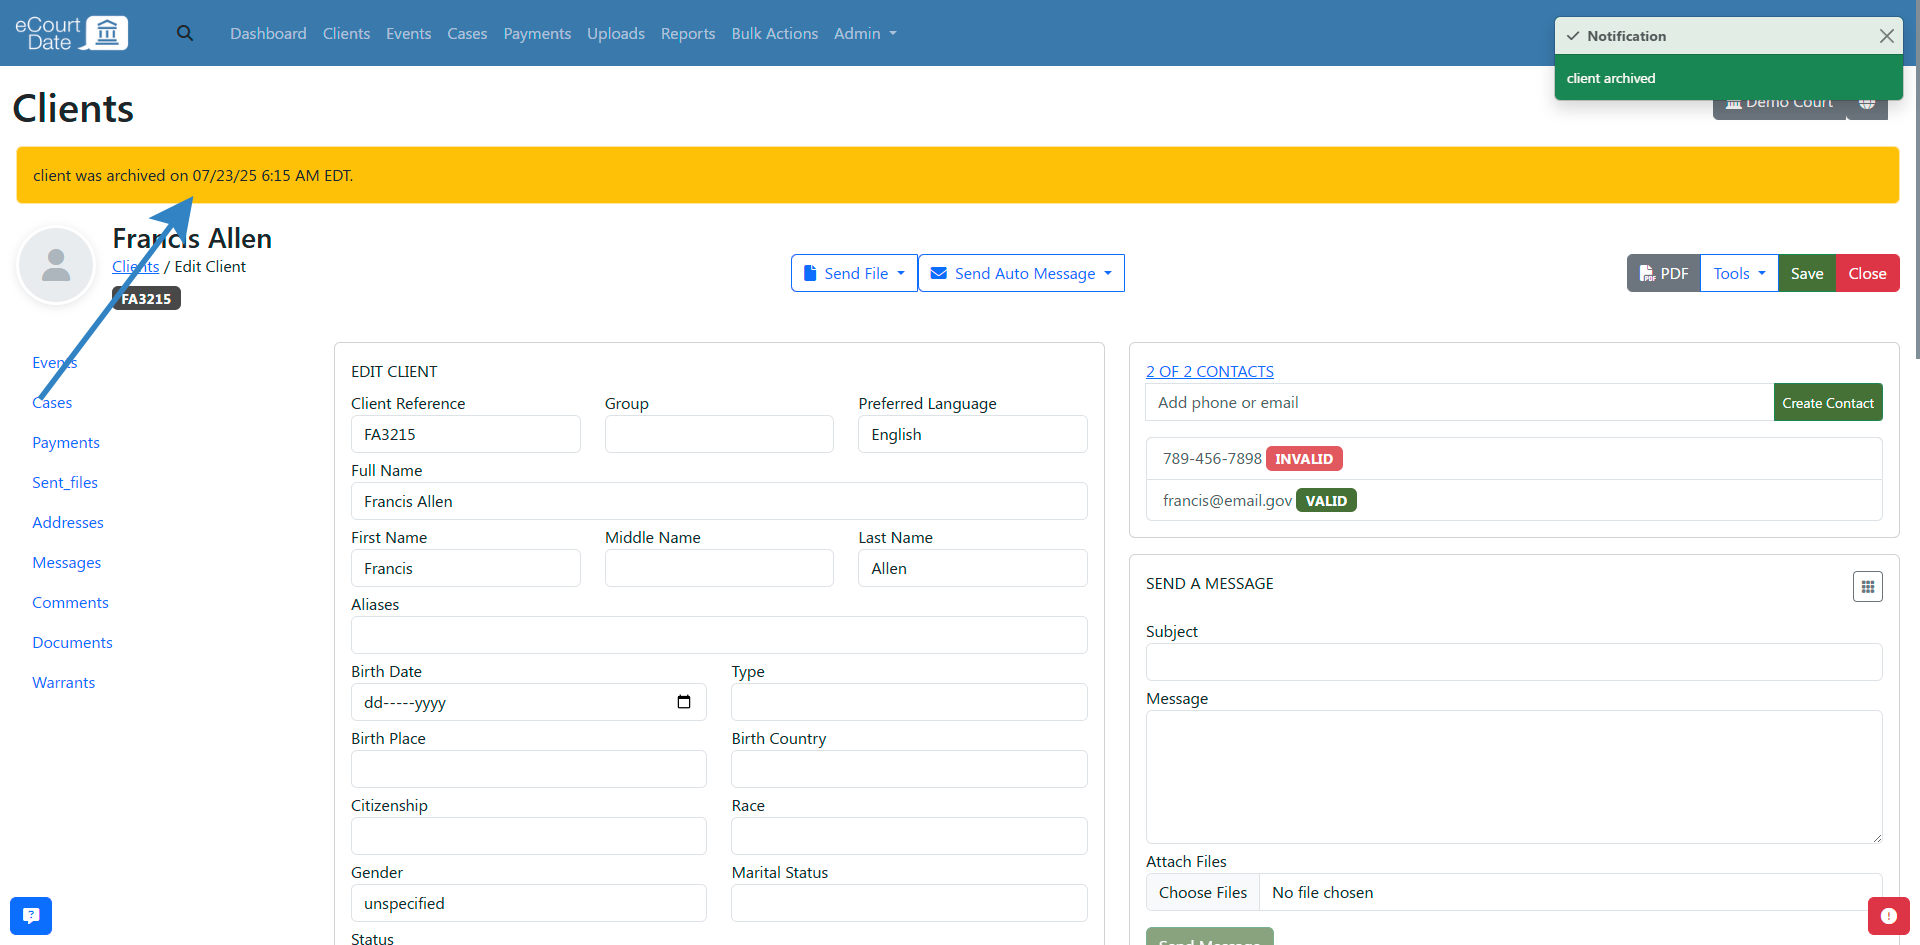
After archiving a client:
- A confirmation alert appears indicating the client has been archived.
- The client is hidden from quick search and can only be found using advanced search.
- All related records (events, cases, contacts, etc.) are also archived.
- Any scheduled messages for the client are deleted.
- Archived data remains indefinitely. You can restore the client and related records at any time.
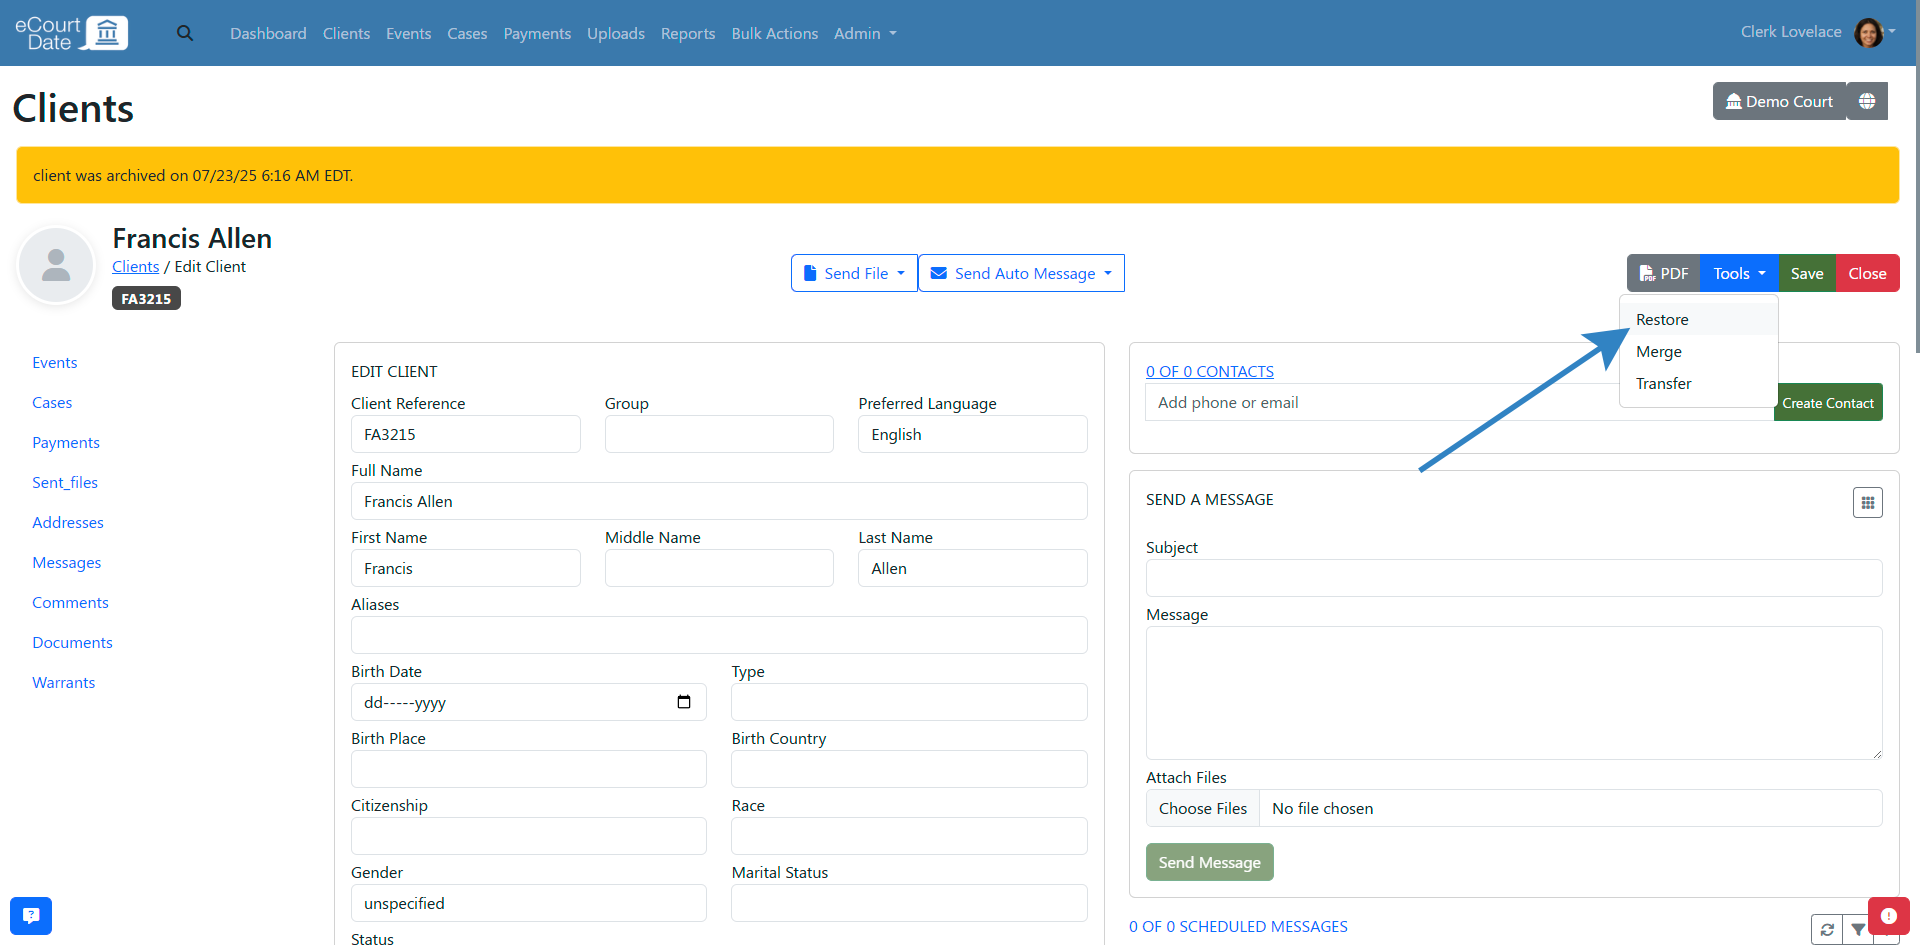
Restore a Client
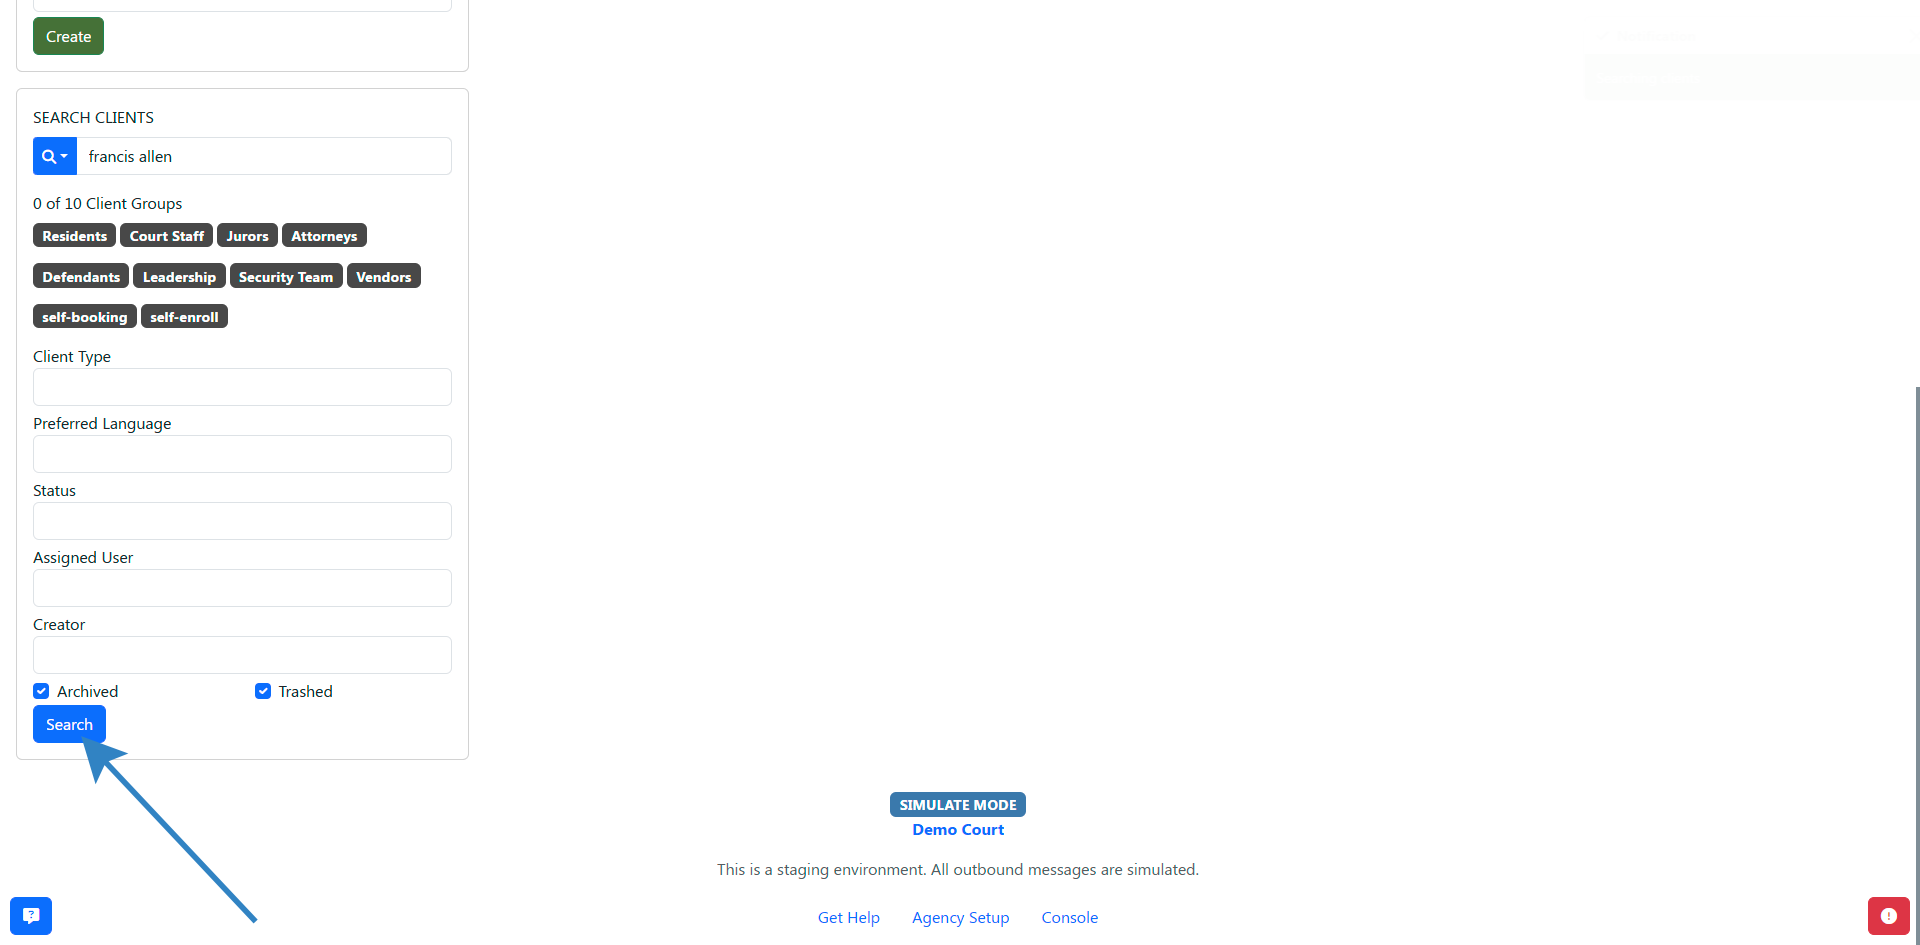
- Click Clients in the top navigation bar.
- In the Search Clients section, check the Archived checkbox (for archived clients) or the Trashed checkbox (for trashed clients).
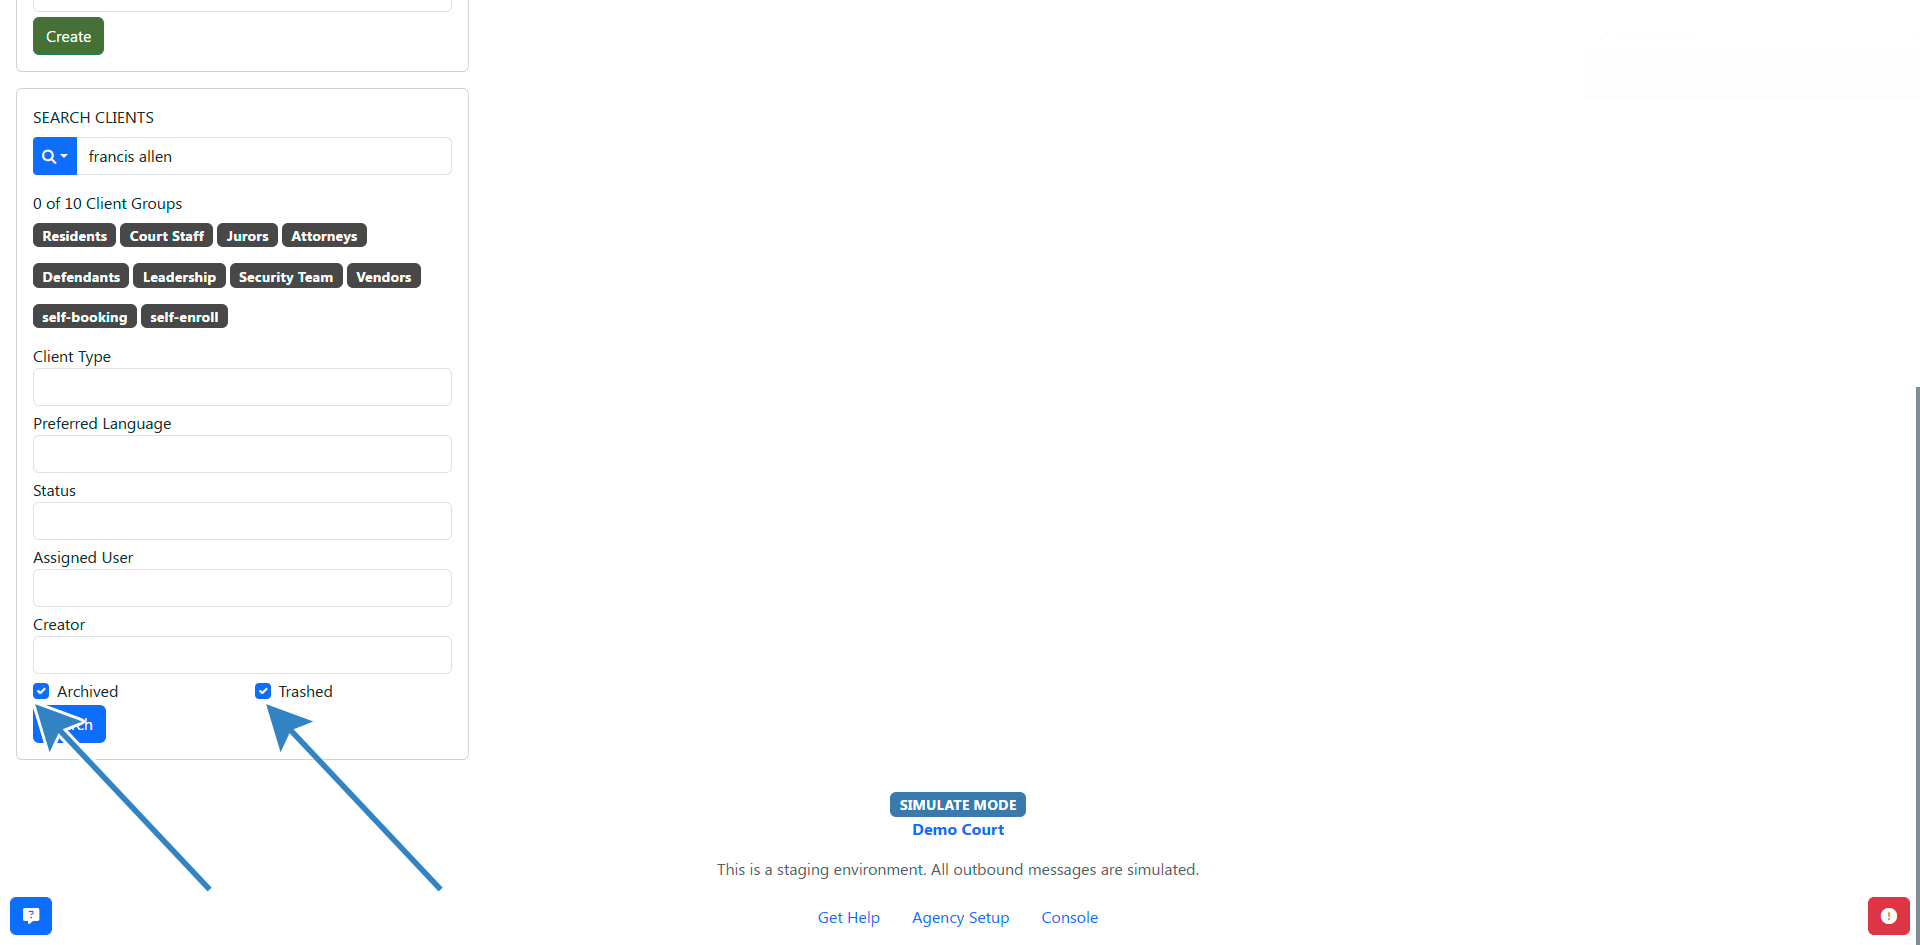
- Click the Search button to find the client.
- Click Edit to open the client's profile.
- Click Tools > Restore to restore the client.
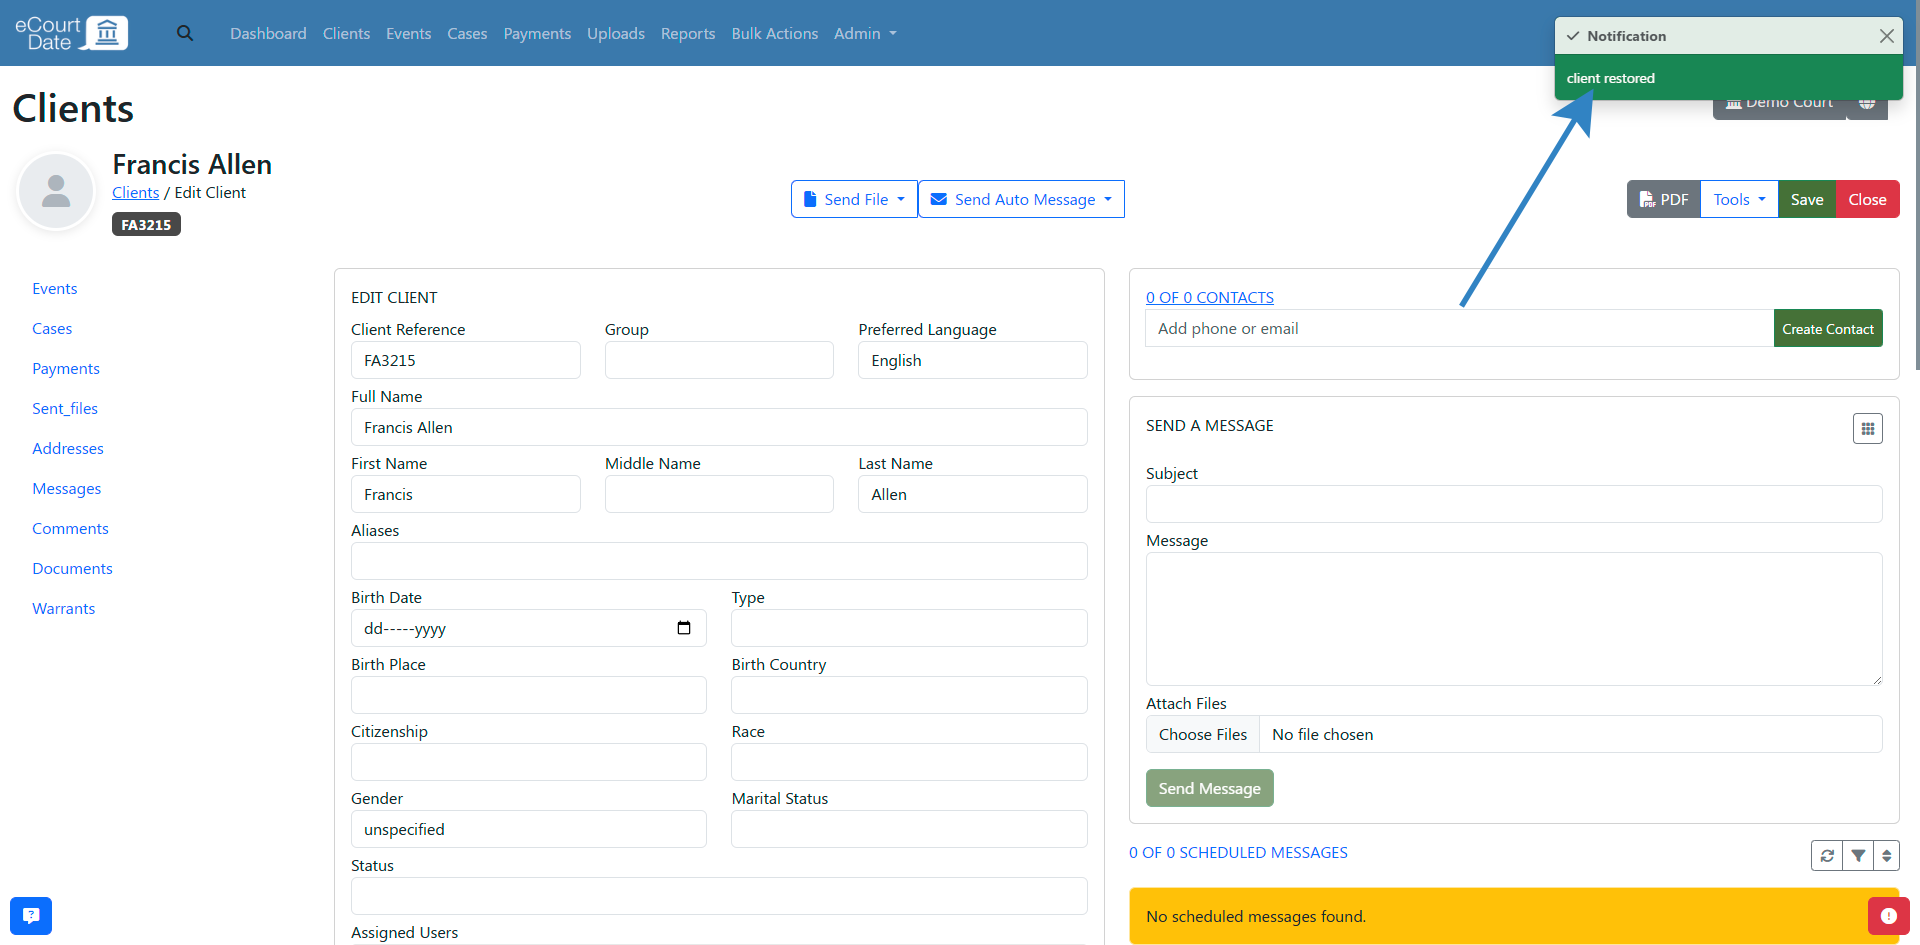
After restoring a client:
- The archived or trashed alert is removed from the client's profile.
- The client becomes visible in quick search again.
- All related records (events, cases, contacts, etc.) are also restored.
- Related records are resynced based on current flows. Automated messages for existing records are not re-triggered.
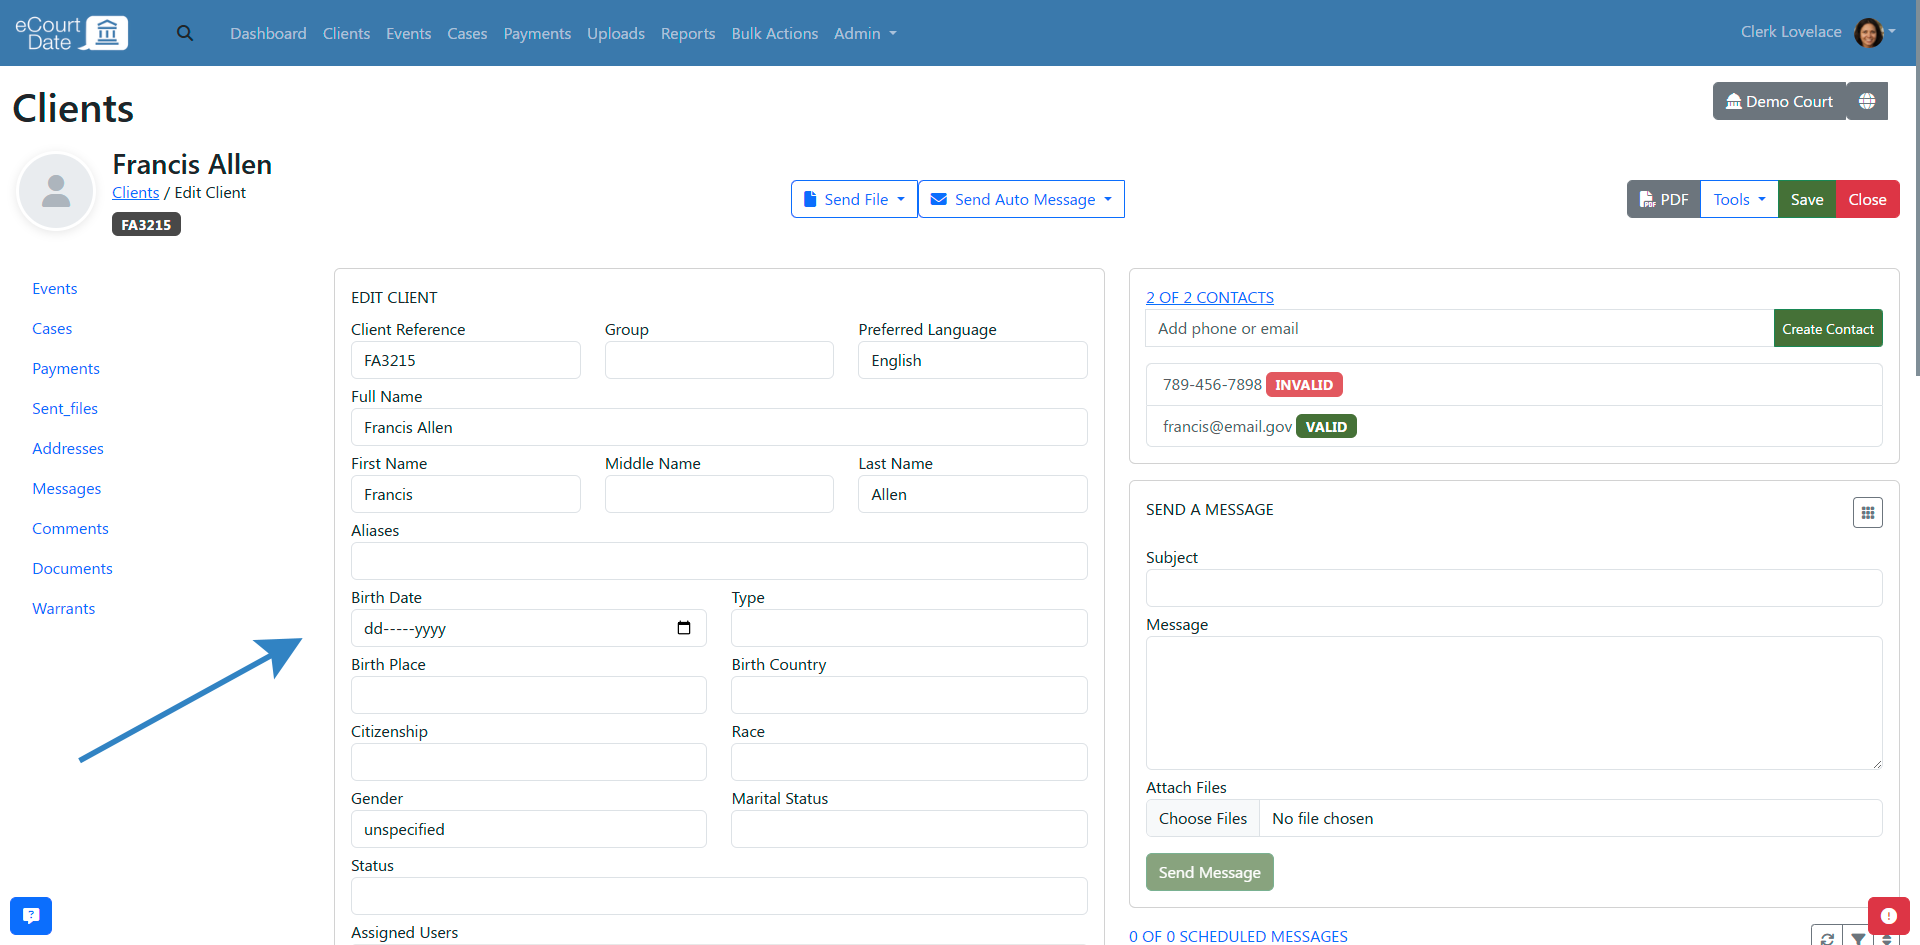
Manage Client Profile Details
Each client profile includes sections for managing additional information beyond basic contact details.
- Contacts: Add phone numbers, email addresses, and social media profiles to a client. Navigate to the client's profile and scroll to the Contacts section. Click Create Contact to add a new phone, email, or social profile.
- Addresses: Add home, work, school, and other address types. Scroll to the Addresses section and click Create Address. See How to Manage Client Addresses for details.
- Notes and Comments: Add internal notes to track important client information. Scroll to the Comments section and click Create Comment. See How to Add Notes and Comments to Records for details.
- Documents and Photos: Upload client documents and photos. Scroll to the Documents or Photos section to add files. See How to Upload and Manage Client Documents for details.
Organize Clients into Groups
Groups help you categorize and filter clients for bulk operations and reporting.
- Open a client's profile.
- Scroll to the Group field.
- Select an existing group or enter a new group name.
- Click Save.
You can filter clients by group on the Clients page using the Group search filter.
Assign Tasks, Organizations, and Users to Clients
- Tasks: Assign actionable tasks to clients from the Tasks section on their profile. See How to Assign and Track Tasks for details.
- Organizations: Link clients to organizations from the Organization field on the client profile. See How to Manage Organizations for details.
- Users: Assign staff members to clients from the Assigned Users section on the client profile. Assigned users receive notifications about their clients' activity.
Notification Triggers for Client Changes
When a client record is created or updated, eCourtDate can automatically trigger notifications and workflows.
- Auto Messages: Configure auto messages with the "Client Created" or "Client Updated" trigger to send automatic notifications when client records change.
- Flows: Assign flows to clients to send sequential messages based on client activity.
- Workflows: Use the workflows engine to trigger custom actions when client data changes. See How to Build Automated Workflows for details.
What to Expect
After creating or updating a client, the changes take effect immediately. New clients appear in search results right away, and any associated events, cases, or contacts are linked automatically. Trashed clients are permanently deleted after 30 days unless restored, while archived clients remain stored indefinitely.
Best Practices
- Keep contact information current. Regularly review and update client phone numbers and email addresses to ensure your messages are delivered successfully.
- Use advanced search for complex lookups. When quick search does not return the expected results, use the advanced search filters to narrow down by multiple criteria.
- Archive instead of trashing when possible. Archiving preserves the client record indefinitely, while trashing permanently deletes it after 30 days. Use archiving for inactive clients you may need to reference later.
- Review related records before trashing. Trashing a client also removes their events, cases, contacts, and scheduled messages. Confirm that no critical data will be lost before proceeding.
- Verify client data after bulk imports. If you upload client data via file import, spot-check several records to ensure accuracy.
Frequently Asked Questions
Q: What happens to a client's related records when I trash them?
A: All related records, including events, cases, contacts, and scheduled messages, are also trashed. Unless restored within 30 days, everything is permanently deleted.
Q: Can I restore a trashed client after the 30-day window?
A: No. After 30 days, trashed clients and their related records are permanently deleted and cannot be recovered. If you are unsure, use the archive option instead.
Q: What is the difference between archiving and trashing a client?
A: Archiving hides the client from quick search but preserves all data indefinitely. Trashing also hides the client, but permanently deletes the record and all related data after 30 days.
Q: Can I search for archived or trashed clients?
A: Yes. Use the advanced search on the Clients page and check the Archived or Trashed checkbox before clicking Search.
Q: Are automated messages re-sent when I restore a client?
A: No. When a client is restored, their related records are resynced based on current flows, but automated messages for existing records are not re-triggered.
Troubleshooting
Issue: A client does not appear in search results.
Symptoms: You search for a client by name or identifier, but the search returns no results.
Solution:
- Check whether the client was archived or trashed by using advanced search with the Archived or Trashed checkbox selected.
- Verify that you are searching with the correct spelling or identifier.
- Try using a partial value or a different search field (such as phone number or case number).
Issue: Changes to a client's profile are not saving.
Symptoms: You update a field and click Save, but the old information reappears.
Solution:
- Verify that you have the
update_clients permission by checking with your administrator.
- Ensure all required fields are filled in before saving.
- Clear your browser cache and try again. If the issue persists, sign in to eCourtDate and create a support ticket by clicking the ticket button in the bottom right corner of the screen.
Related Articles
Clients are the people or organizations who are your agency's primary recipients. This guide walks you through creating, updating, searching, archiving, trashing, and restoring client records in eCourtDate.
### Overview
Managing clients is one of the most fundamental tasks in eCourtDate. Clients can be defendants, jurors, witnesses, staff, or any other recipient of messages from your agency.
- **What it is:** A set of tools for creating, editing, searching, archiving, trashing, and restoring client records in the eCourtDate admin dashboard.
- **Why it matters:** Accurate and up-to-date client records ensure your messages reach the right people and your agency's data stays reliable.
- **Who uses it:** Court clerks, probation officers, administrative staff, and anyone responsible for maintaining client information.
- **Expected outcomes:** A well-organized client database that supports efficient communication, accurate reporting, and streamlined case management.
### Prerequisites
Before managing clients, make sure you have the following:
- A user account with `create_clients` and `update_clients` permissions
- Access to the eCourtDate admin dashboard
- Client information ready to enter (name, contact details, identifiers)
### How-To Steps
#### Create a Client
1. Click **Clients** in the top navigation bar.

2. Fill in the **Create Client** form with the client's information.

3. Click the **Create** button.

4. Click **Edit** to view the new client's profile, or fill in the form again to create another client.


#### Update a Client
1. Search for the client you want to update (see the search instructions below).

2. Edit the client's information on their profile page.

3. Click **Save** to save your changes.

#### Search for a Client
There are two ways to find a client in eCourtDate.
**Quick Search**
1. Click the search icon in the top navigation bar.
2. Enter a partial or full value for any of the following fields:

- Full Name
- First Name
- Last Name
- Client Reference/ID
- Phone Number
- Email Address
- Case Number
- Event Reference/ID
3. Click on the client's name in the results to view their profile.
**Advanced Search**
1. Click **Clients** in the top navigation bar.
2. Scroll down to the **Search Clients** section on the left side of the page.

3. Select any combination of search fields to narrow your results:
- General Search (partial or full value)
- First Name
- Last Name
- Client Reference/ID
- Phone Number
- Email Address
- Case Number
- Event Reference/ID

4. Click **Search** to view matching results.
#### Trash a Client
1. Click **Clients** in the top navigation bar.

2. Search for the client you want to trash.

3. Click **Edit** to open the client's profile.

4. Click **Tools** > **Trash** to trash the client.


After trashing a client:
- A confirmation alert appears indicating the client has been trashed.
- The client is hidden from quick search and can only be found using advanced search.
- All related records (events, cases, contacts, etc.) are also trashed.
- Any scheduled messages for the client are deleted.
- Unless restored, the client and all related records are permanently deleted after 30 days.
#### Archive a Client
1. Click **Clients** in the top navigation bar.

2. Search for the client you want to archive.

3. Click **Edit** to open the client's profile.

4. Click **Tools** > **Archive** to archive the client.


After archiving a client:
- A confirmation alert appears indicating the client has been archived.
- The client is hidden from quick search and can only be found using advanced search.
- All related records (events, cases, contacts, etc.) are also archived.
- Any scheduled messages for the client are deleted.
- Archived data remains indefinitely. You can restore the client and related records at any time.
#### Restore a Client
1. Click **Clients** in the top navigation bar.

2. In the **Search Clients** section, check the **Archived** checkbox (for archived clients) or the **Trashed** checkbox (for trashed clients).

3. Click the **Search** button to find the client.

4. Click **Edit** to open the client's profile.

5. Click **Tools** > **Restore** to restore the client.


After restoring a client:
- The archived or trashed alert is removed from the client's profile.
- The client becomes visible in quick search again.
- All related records (events, cases, contacts, etc.) are also restored.
- Related records are resynced based on current flows. Automated messages for existing records are not re-triggered.
#### Manage Client Profile Details
Each client profile includes sections for managing additional information beyond basic contact details.
- **Contacts:** Add phone numbers, email addresses, and social media profiles to a client. Navigate to the client's profile and scroll to the **Contacts** section. Click **Create Contact** to add a new phone, email, or social profile.
- **Addresses:** Add home, work, school, and other address types. Scroll to the **Addresses** section and click **Create Address**. See [How to Manage Client Addresses](/how-to-manage-client-addresses) for details.
- **Notes and Comments:** Add internal notes to track important client information. Scroll to the **Comments** section and click **Create Comment**. See [How to Add Notes and Comments to Records](/how-to-add-notes-and-comments-to-records) for details.
- **Documents and Photos:** Upload client documents and photos. Scroll to the **Documents** or **Photos** section to add files. See [How to Upload and Manage Client Documents](/how-to-upload-and-manage-client-documents) for details.
#### Organize Clients into Groups
Groups help you categorize and filter clients for bulk operations and reporting.
1. Open a client's profile.
2. Scroll to the **Group** field.
3. Select an existing group or enter a new group name.
4. Click **Save**.
You can filter clients by group on the **Clients** page using the **Group** search filter.
#### Assign Tasks, Organizations, and Users to Clients
- **Tasks:** Assign actionable tasks to clients from the **Tasks** section on their profile. See [How to Assign and Track Tasks](/how-to-assign-and-track-tasks) for details.
- **Organizations:** Link clients to organizations from the **Organization** field on the client profile. See [How to Manage Organizations](/how-to-manage-organizations) for details.
- **Users:** Assign staff members to clients from the **Assigned Users** section on the client profile. Assigned users receive notifications about their clients' activity.
#### Notification Triggers for Client Changes
When a client record is created or updated, eCourtDate can automatically trigger notifications and workflows.
- **Auto Messages:** Configure auto messages with the "Client Created" or "Client Updated" trigger to send automatic notifications when client records change.
- **Flows:** Assign flows to clients to send sequential messages based on client activity.
- **Workflows:** Use the workflows engine to trigger custom actions when client data changes. See [How to Build Automated Workflows](/how-to-build-automated-workflows) for details.
### What to Expect
After creating or updating a client, the changes take effect immediately. New clients appear in search results right away, and any associated events, cases, or contacts are linked automatically. Trashed clients are permanently deleted after 30 days unless restored, while archived clients remain stored indefinitely.
### Best Practices
- **Keep contact information current.** Regularly review and update client phone numbers and email addresses to ensure your messages are delivered successfully.
- **Use advanced search for complex lookups.** When quick search does not return the expected results, use the advanced search filters to narrow down by multiple criteria.
- **Archive instead of trashing when possible.** Archiving preserves the client record indefinitely, while trashing permanently deletes it after 30 days. Use archiving for inactive clients you may need to reference later.
- **Review related records before trashing.** Trashing a client also removes their events, cases, contacts, and scheduled messages. Confirm that no critical data will be lost before proceeding.
- **Verify client data after bulk imports.** If you upload client data via file import, spot-check several records to ensure accuracy.
### Frequently Asked Questions
**Q: What happens to a client's related records when I trash them?**
A: All related records, including events, cases, contacts, and scheduled messages, are also trashed. Unless restored within 30 days, everything is permanently deleted.
**Q: Can I restore a trashed client after the 30-day window?**
A: No. After 30 days, trashed clients and their related records are permanently deleted and cannot be recovered. If you are unsure, use the archive option instead.
**Q: What is the difference between archiving and trashing a client?**
A: Archiving hides the client from quick search but preserves all data indefinitely. Trashing also hides the client, but permanently deletes the record and all related data after 30 days.
**Q: Can I search for archived or trashed clients?**
A: Yes. Use the advanced search on the **Clients** page and check the **Archived** or **Trashed** checkbox before clicking **Search**.
**Q: Are automated messages re-sent when I restore a client?**
A: No. When a client is restored, their related records are resynced based on current flows, but automated messages for existing records are not re-triggered.
### Troubleshooting
**Issue:** A client does not appear in search results.
**Symptoms:** You search for a client by name or identifier, but the search returns no results.
**Solution:**
1. Check whether the client was archived or trashed by using advanced search with the **Archived** or **Trashed** checkbox selected.
2. Verify that you are searching with the correct spelling or identifier.
3. Try using a partial value or a different search field (such as phone number or case number).
**Issue:** Changes to a client's profile are not saving.
**Symptoms:** You update a field and click **Save**, but the old information reappears.
**Solution:**
1. Verify that you have the `update_clients` permission by checking with your administrator.
2. Ensure all required fields are filled in before saving.
3. Clear your browser cache and try again. If the issue persists, sign in to eCourtDate and create a support ticket by clicking the ticket button in the bottom right corner of the screen.
### Related Articles
- [How to Manage Cases](/how-to-manage-cases)
- [How to Setup a Self-Enroll Form](/how-to-setup-a-self-enroll-form)
- [How to Create Reports](/how-to-create-reports)
- [How to Create Forms](/how-to-create-forms)