Clients
How to Manage Client Groups
6 min read
Updated Feb 14, 2026
Client groups allow you to organize clients for easy tracking, automated messaging, bulk communications, and reporting within eCourtDate.
Client groups allow you to organize clients for easy tracking, automated messaging, bulk communications, and reporting within eCourtDate.
Overview
Client groups in eCourtDate provide a flexible way to categorize and organize your clients. By assigning clients to groups, your agency can streamline messaging, simplify bulk operations, and generate targeted reports. Groups are useful for segmenting clients by case type, program enrollment, geographic area, or any other criteria relevant to your agency.
- Groups can be configured globally in your agency settings and assigned to individual clients.
- You can filter, search, and perform bulk actions on clients based on their group assignment.
- Groups integrate with uploads, portals, and self-enrollment workflows.
- Court personnel, probation officers, case managers, and administrators benefit from organizing clients into groups.
Prerequisites
Before managing client groups, ensure you have the following:
- Administrator access to an eCourtDate staging or production agency
- A plan for your group naming structure (e.g., by case type, program, or location)
How-To Steps
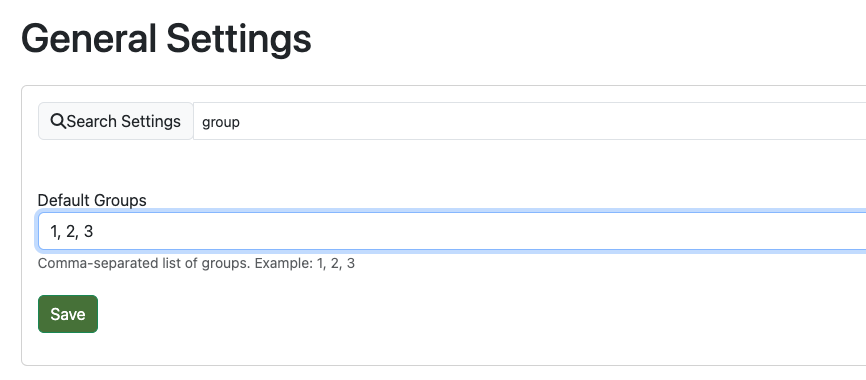
Step 1: Configure Default Groups
- Sign in to your eCourtDate staging or production agency.
- Go to Admin > Settings in the top navigation.
- Enter "Groups" in the Search Settings field.
- Locate the Default Groups setting.
- Enter your group names as a comma-separated list.
- Click the Save button to apply your changes.
Step 2: Add a Client to a Group
- Click Clients in the top navigation.
- Find the client you want to assign to a group and click Edit.
- In the Client Profile form, select the desired group.
- Click the Save button to apply your change.

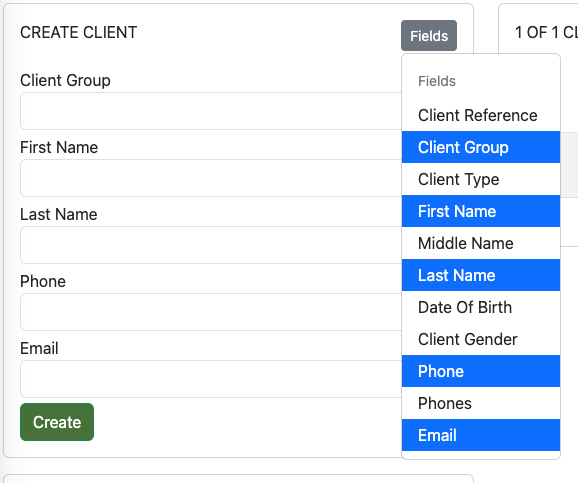
Step 3: Choose a Group When Manually Adding Clients
- Click Clients in the top navigation.
- In the Create Client form, click the Fields button.
- Click the Client Group field.
- The group field will display in the form, allowing you to assign a group during client creation.
Step 4: Require a Group When Manually Adding Clients
- Go to Admin > Settings in the top navigation.
- Enter "Required" in the Search Settings field.
- Locate the Create Client Required Fields setting.
- Click the Client Group field to add it as a required field.
- Click the Save button to apply your changes.

Step 5: Search for Clients in a Group
- Click Clients in the top navigation.
- In the Search Clients form, locate the Client Groups filter.
- Select the desired group name to filter clients.
- Select multiple groups to further refine your search results.

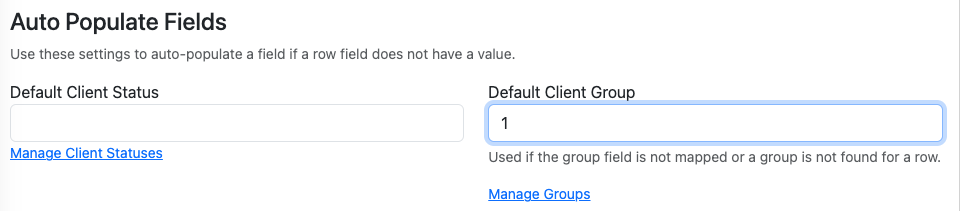
Step 6: Set a Default Group for Bulk Uploads
- Click Uploads in the top navigation.
- Click the Upload Templates tab.
- Click Edit on the upload template you want to change.
- In the Auto Populate Fields section, select the Default Client Group setting.
- Click the Save button to apply your change.
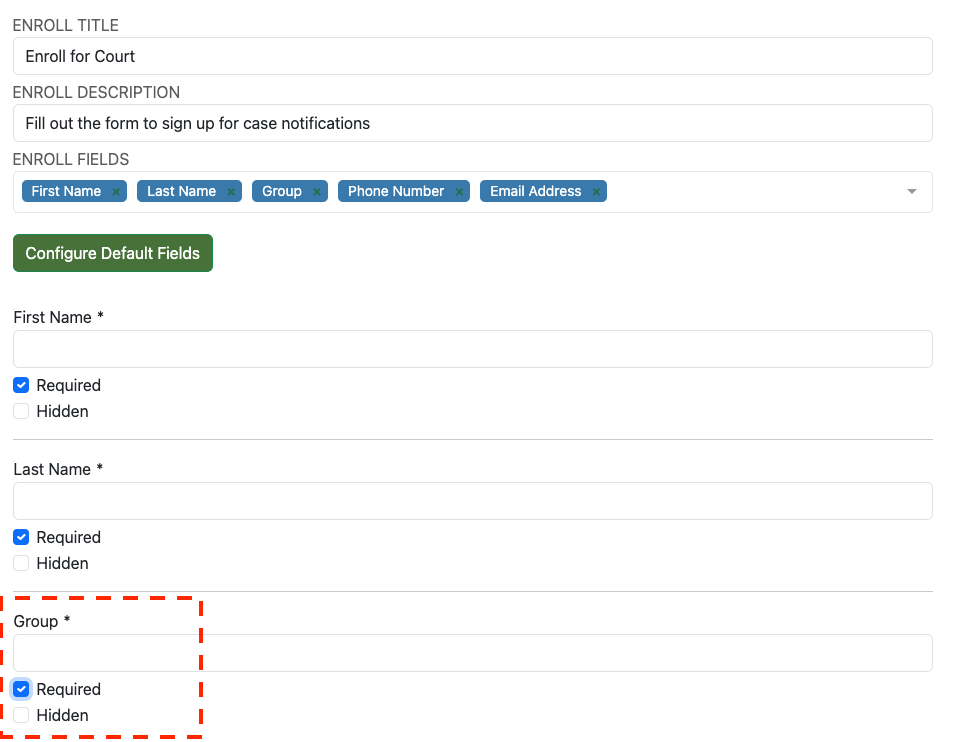
Step 7: Set a Default Group for Self-Enrolling Clients
- Go to Admin > Portals in the top navigation.
- Click Edit on the portal you want to change.
- Click the Enroll tab.
- Search for the Group field (or add the field by clicking the Add Enroll Field button).
- To auto-populate the group field, enter the name of the group you want to use as the default.
- To allow clients to choose a group, leave the Group field blank.
- Click the Save button to apply your changes.
Step 8: Archive or Trash Multiple Clients in a Group
- Click Clients in the top navigation.
- In the Search Clients form, select the group you want to filter for.
- In the search results, click the Select checkbox on one of the clients.
- Repeat to select more, or click Select All.
- Click the Archive or Trash button when ready.
What to Expect
After configuring client groups, you can immediately assign clients to groups during creation, editing, bulk uploads, or self-enrollment. Group filters are available throughout the platform, including the client search, bulk actions, and reports. Changes to the Default Groups setting may take a few minutes to appear across the platform.
Best Practices
- Use clear, consistent group names that reflect your agency's organizational structure (e.g., "Pretrial", "Probation", "Jury Duty").
- Review and update your group list periodically to remove outdated groups and add new ones.
- Combine groups with auto messages and flows to send targeted communications to specific client segments.
- Require the group field when creating clients to ensure every client is properly categorized.
- Use groups in reports to track metrics by client segment.
Frequently Asked Questions
Q: Why do I see group names that are not in my configured list?
A: Group names auto-generate based on client data provided through uploads or integrations. Verify that your uploads or integration are sending the correct group values.
Q: I changed a group name, but it is not showing up in the list. What should I do?
A: The list of groups may take a few minutes to update. Try refreshing the page or waiting a few minutes before checking again.
Q: Can a client belong to more than one group?
A: Each client is assigned to one group at a time. If you need to track clients across multiple categories, consider using a naming convention that combines categories (e.g., "Pretrial-DUI") or use tags and statuses for additional segmentation.
Q: How do I remove a group from a client?
A: Edit the client profile by clicking Clients in the top navigation, then click Edit on the client. Clear the group field and click Save.
Troubleshooting
Issue: The group field is not visible when creating a client.
Symptoms: You do not see a group dropdown in the Create Client form.
Solution:
- Click Clients in the top navigation.
- In the Create Client form, click the Fields button.
- Click the Client Group field to add it to the form.
Issue: Clients uploaded via bulk upload are not assigned to a group.
Symptoms: After a bulk upload, clients appear without a group assignment.
Solution:
- Click Uploads in the top navigation and then the Upload Templates tab.
- Click Edit on the upload template used for the upload.
- Verify that the Default Client Group is set in the Auto Populate Fields section.
- Click Save and re-upload the file if needed.
Related Articles
Client groups allow you to organize clients for easy tracking, automated messaging, bulk communications, and reporting within eCourtDate.
### Overview
Client groups in eCourtDate provide a flexible way to categorize and organize your clients. By assigning clients to groups, your agency can streamline messaging, simplify bulk operations, and generate targeted reports. Groups are useful for segmenting clients by case type, program enrollment, geographic area, or any other criteria relevant to your agency.
- Groups can be configured globally in your agency settings and assigned to individual clients.
- You can filter, search, and perform bulk actions on clients based on their group assignment.
- Groups integrate with uploads, portals, and self-enrollment workflows.
- Court personnel, probation officers, case managers, and administrators benefit from organizing clients into groups.
### Prerequisites
Before managing client groups, ensure you have the following:
- Administrator access to an eCourtDate staging or production agency
- A plan for your group naming structure (e.g., by case type, program, or location)
### How-To Steps
#### Step 1: Configure Default Groups
1. Sign in to your eCourtDate [staging](https://staging.ecourtdate.com) or [production](https://ecourtdate.com) agency.
2. Go to **Admin** > **Settings** in the top navigation.
3. Enter "Groups" in the **Search Settings** field.
4. Locate the **Default Groups** setting.
5. Enter your group names as a comma-separated list.
6. Click the **Save** button to apply your changes.

#### Step 2: Add a Client to a Group
1. Click **Clients** in the top navigation.
2. Find the client you want to assign to a group and click **Edit**.
3. In the **Client Profile** form, select the desired group.
4. Click the **Save** button to apply your change.

#### Step 3: Choose a Group When Manually Adding Clients
1. Click **Clients** in the top navigation.
2. In the **Create Client** form, click the **Fields** button.
3. Click the **Client Group** field.
4. The group field will display in the form, allowing you to assign a group during client creation.

#### Step 4: Require a Group When Manually Adding Clients
1. Go to **Admin** > **Settings** in the top navigation.
2. Enter "Required" in the **Search Settings** field.
3. Locate the **Create Client Required Fields** setting.
4. Click the **Client Group** field to add it as a required field.
5. Click the **Save** button to apply your changes.

#### Step 5: Search for Clients in a Group
1. Click **Clients** in the top navigation.
2. In the **Search Clients** form, locate the **Client Groups** filter.
3. Select the desired group name to filter clients.
4. Select multiple groups to further refine your search results.

#### Step 6: Set a Default Group for Bulk Uploads
1. Click **Uploads** in the top navigation.
2. Click the **Upload Templates** tab.
3. Click **Edit** on the upload template you want to change.
4. In the **Auto Populate Fields** section, select the **Default Client Group** setting.
5. Click the **Save** button to apply your change.

#### Step 7: Set a Default Group for Self-Enrolling Clients
1. Go to **Admin** > **Portals** in the top navigation.
2. Click **Edit** on the portal you want to change.
3. Click the **Enroll** tab.
4. Search for the **Group** field (or add the field by clicking the **Add Enroll Field** button).
5. To auto-populate the group field, enter the name of the group you want to use as the default.
6. To allow clients to choose a group, leave the **Group** field blank.
7. Click the **Save** button to apply your changes.

#### Step 8: Archive or Trash Multiple Clients in a Group
1. Click **Clients** in the top navigation.
2. In the **Search Clients** form, select the group you want to filter for.
3. In the search results, click the **Select** checkbox on one of the clients.
4. Repeat to select more, or click **Select All**.
5. Click the **Archive** or **Trash** button when ready.
### What to Expect
After configuring client groups, you can immediately assign clients to groups during creation, editing, bulk uploads, or self-enrollment. Group filters are available throughout the platform, including the client search, bulk actions, and reports. Changes to the **Default Groups** setting may take a few minutes to appear across the platform.
### Best Practices
- Use clear, consistent group names that reflect your agency's organizational structure (e.g., "Pretrial", "Probation", "Jury Duty").
- Review and update your group list periodically to remove outdated groups and add new ones.
- Combine groups with auto messages and flows to send targeted communications to specific client segments.
- Require the group field when creating clients to ensure every client is properly categorized.
- Use groups in reports to track metrics by client segment.
### Frequently Asked Questions
**Q: Why do I see group names that are not in my configured list?**
A: Group names auto-generate based on client data provided through uploads or integrations. Verify that your uploads or integration are sending the correct group values.
**Q: I changed a group name, but it is not showing up in the list. What should I do?**
A: The list of groups may take a few minutes to update. Try refreshing the page or waiting a few minutes before checking again.
**Q: Can a client belong to more than one group?**
A: Each client is assigned to one group at a time. If you need to track clients across multiple categories, consider using a naming convention that combines categories (e.g., "Pretrial-DUI") or use tags and statuses for additional segmentation.
**Q: How do I remove a group from a client?**
A: Edit the client profile by clicking **Clients** in the top navigation, then click **Edit** on the client. Clear the group field and click **Save**.
### Troubleshooting
**Issue:** The group field is not visible when creating a client.
**Symptoms:** You do not see a group dropdown in the **Create Client** form.
**Solution:**
1. Click **Clients** in the top navigation.
2. In the **Create Client** form, click the **Fields** button.
3. Click the **Client Group** field to add it to the form.
**Issue:** Clients uploaded via bulk upload are not assigned to a group.
**Symptoms:** After a bulk upload, clients appear without a group assignment.
**Solution:**
1. Click **Uploads** in the top navigation and then the **Upload Templates** tab.
2. Click **Edit** on the upload template used for the upload.
3. Verify that the **Default Client Group** is set in the **Auto Populate Fields** section.
4. Click **Save** and re-upload the file if needed.
### Related Articles
- [How to Manage Clients](/how-to-manage-clients)
- [How to Create an Auto Message](/how-to-create-an-auto-message)
- [How to Create Reports](/how-to-create-reports)
- [How to Send a One-off Message](/how-to-send-a-one-off-message)
- [How to Create a Flow](/how-to-create-a-flow)