The File Management feature in eCourtDate allows you to organize, store, and share important documents with your team and clients. Managing files effectively ensures that essential documents are alway...
The File Management feature in eCourtDate allows you to organize, store, and share important documents with your team and clients. Managing files effectively ensures that essential documents are always accessible when you need them.
Overview
File Management in eCourtDate provides a centralized location for uploading, searching, and organizing your agency's documents. You can upload files, organize them using folders and breadcrumb navigation, search by file name or creator, and remove files you no longer need. Files can be viewed in either grid or list format depending on your preference. This feature is accessible through the Admin dropdown in the top navigation.
Prerequisites
- You must have Super Admin privileges to access the File Management feature
- Supported file formats include PDF, DOC, DOCX, and common image formats
- Large files may be subject to size restrictions to maintain system performance
How-To Steps
How to Access File Management
- Click Admin in the top navigation bar.
- Select Files from the dropdown menu.

How to Upload Files
- Navigate to the Files page by clicking Admin > Files.
- Click the Choose File button to select a file from your computer.
- Click Start Upload to begin uploading the file.

You can upload multiple files by repeating these steps. Uploaded files appear in the file list immediately after the upload completes.
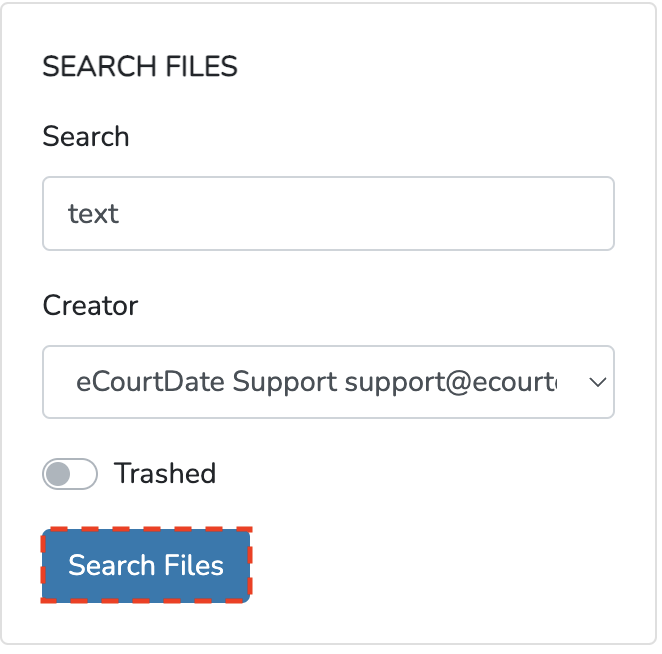
How to Search for Files
- Navigate to the Files page.
- Use the search form to find files by:
- File name: Enter the name of the file you are looking for.
- Creator: Select the user who uploaded the file.
- Trashed: Enable this option to search for files that have been moved to the trash.
- Click the Search button to view results.
How to Switch Between Grid and List View
- Navigate to the Files page.
- Locate the view toggle options at the top of the file list.
- Click the grid icon to view files as thumbnails or the list icon to view files in a detailed list format.
How to Create and Navigate Folders
- Navigate to the Files page.
- Click the Create Folder button to add a new folder.
- Enter a name for the folder and confirm.
- Use the breadcrumb navigation at the top of the file list to move between folders and return to parent directories.
How to Trash a File
- Navigate to the Files page and locate the file you want to remove.
- Select the file you wish to delete.
- Click the Tools button.
- Select the option to move the file to the trash.

How to Upload Multilingual Files
You can upload files in multiple languages to serve clients with different language preferences.
- Navigate to the Files page.
- Upload the file using the standard upload process.
- Click Edit next to the uploaded file.
- Set the Language field to indicate the file's language.
- Upload additional versions of the same file in other languages as needed.
When files are shared through portals or messages, the system can deliver the appropriate language version based on the client's language preference.
How to Track File Downloads
Monitor when files are accessed and downloaded.
- Navigate to the Files page and click Edit next to a file.
- Review the file's download and access history in the file detail view.
- Use the Opens section under Admin > Portals to track when portal visitors access shared files.
How to Manage File Versions
Replace an existing file while preserving the same link and reference.
- Navigate to the Files page and click Edit next to the file you want to update.
- Click Choose File to select the new version.
- Click Start Upload to replace the current file.
The file URL remains the same, so any existing links in messages, portals, or cases continue to point to the updated version.
How to Set File Expiration and Access Restrictions
Control when and how files are accessible.
- Navigate to the Files page and click Edit next to a file.
- Set an Expiration Date to automatically restrict access after a specific date.
- Configure access settings to limit who can view or download the file (e.g., only signed-in portal users).
- Click Save to apply the restrictions.
Expired files are no longer accessible through portals or shared links.
How to Share Files Publicly
Make files available to clients and the public through portals and shared links.
- Navigate to the Files page and click Edit next to the file you want to share.
- Enable the Public toggle to make the file accessible without requiring sign-in.
- Copy the generated Public URL to share the file via email, messages, or your website.
- To share files through a portal, attach the file to a case or assign it to a portal's resource section.
- Click Save to apply the sharing settings.
Public files are accessible to anyone with the link. Use the Expiration Date setting to limit how long the file remains available.
How to Create Resource Libraries
Organize files into resource libraries that clients can browse through your portal.
- Navigate to the Files page.
- Create a folder structure for your resource library (for example, "Forms," "Guides," "Policies").
- Upload files to the appropriate folders.
- Go to Admin > Portals and edit the portal where you want to display the library.
- Enable the Resources section on the portal.
- Select the folders or files to include in the portal's resource library.
- Click Save to publish the resource library on your portal.
Clients can browse, view, and download files from the resource library through their portal. Use descriptive file names and organize content into clear categories so clients can find what they need quickly.
What to Expect
After following these steps, you have a well-organized collection of files in eCourtDate that is accessible anytime. Uploaded files can be attached to cases, shared through portals, and referenced across your agency's communication workflows. Trashed files can be recovered through the search function by enabling the Trashed filter.
Best Practices
- Use descriptive file names so documents are easy to find through the search function.
- Organize files into folders using a consistent naming convention that matches your agency's filing structure.
- Regularly review and trash files that are no longer needed to keep your file library manageable.
- Use the list view when you need to see file details such as upload date and creator, and grid view for a visual overview of image files.
- Attach relevant files directly to cases so they are accessible to clients and subscribers through the web portal.
Frequently Asked Questions
Q: Are there limitations on file size or types for uploads?
A: eCourtDate supports common file formats including PDF, DOC, DOCX, and standard image formats. File size may be restricted to maintain system performance. If you encounter an upload error, try reducing the file size or converting to a supported format.
Q: Can clients access files I upload?
A: Files attached to cases can be accessed by clients and case subscribers through the web portal, if cases are enabled on the portal. Files stored only in the Admin > Files section are not directly accessible to clients.
Q: Can I recover a file after trashing it?
A: Yes. Navigate to the Files page, enable the Trashed filter in the search form, and locate the file. You can then restore it from the trash.
Q: Who can see the files I upload?
A: Files in the Admin > Files section are visible to users with appropriate permissions. Files attached to cases follow the case's access rules, including portal visibility for clients and subscribers.
Q: Can I upload multiple files at once?
A: You can upload files one at a time using the Choose File and Start Upload process. Repeat for each additional file.
Troubleshooting
Issue: File upload fails or does not complete.
Symptoms: Clicking Start Upload does not add the file to the file list, or an error message appears.
Solution: Check that the file format is supported (PDF, DOC, DOCX, or common image formats). Verify that the file size does not exceed the system limit. Try uploading a smaller file to confirm the feature is working, then contact help@ecourtdate.com if the issue persists.
Issue: Cannot find a previously uploaded file.
Symptoms: Searching by file name returns no results.
Solution: The file may have been moved to the trash. Enable the Trashed filter in the search form and search again. Also verify that you are searching in the correct folder by using breadcrumb navigation to return to the root directory.
Issue: Cannot access the Files page.
Symptoms: The Files option is not visible under the Admin dropdown.
Solution: Confirm that your account has Super Admin privileges. Contact your agency administrator to verify your role and permissions under Admin > Users > Roles.
Related Articles
The File Management feature in eCourtDate allows you to organize, store, and share important documents with your team and clients. Managing files effectively ensures that essential documents are always accessible when you need them.
### Overview
File Management in eCourtDate provides a centralized location for uploading, searching, and organizing your agency's documents. You can upload files, organize them using folders and breadcrumb navigation, search by file name or creator, and remove files you no longer need. Files can be viewed in either grid or list format depending on your preference. This feature is accessible through the **Admin** dropdown in the top navigation.
### Prerequisites
- You must have Super Admin privileges to access the File Management feature
- Supported file formats include PDF, DOC, DOCX, and common image formats
- Large files may be subject to size restrictions to maintain system performance
### How-To Steps
#### How to Access File Management
1. Click **Admin** in the top navigation bar.
2. Select **Files** from the dropdown menu.

#### How to Upload Files
1. Navigate to the **Files** page by clicking **Admin** > **Files**.
2. Click the **Choose File** button to select a file from your computer.
3. Click **Start Upload** to begin uploading the file.

You can upload multiple files by repeating these steps. Uploaded files appear in the file list immediately after the upload completes.
#### How to Search for Files
1. Navigate to the **Files** page.
2. Use the search form to find files by:
- **File name**: Enter the name of the file you are looking for.
- **Creator**: Select the user who uploaded the file.
- **Trashed**: Enable this option to search for files that have been moved to the trash.
3. Click the **Search** button to view results.

#### How to Switch Between Grid and List View
1. Navigate to the **Files** page.
2. Locate the view toggle options at the top of the file list.
3. Click the grid icon to view files as thumbnails or the list icon to view files in a detailed list format.
#### How to Create and Navigate Folders
1. Navigate to the **Files** page.
2. Click the **Create Folder** button to add a new folder.
3. Enter a name for the folder and confirm.
4. Use the breadcrumb navigation at the top of the file list to move between folders and return to parent directories.
#### How to Trash a File
1. Navigate to the **Files** page and locate the file you want to remove.
2. Select the file you wish to delete.
3. Click the **Tools** button.
4. Select the option to move the file to the trash.

#### How to Upload Multilingual Files
You can upload files in multiple languages to serve clients with different language preferences.
1. Navigate to the **Files** page.
2. Upload the file using the standard upload process.
3. Click **Edit** next to the uploaded file.
4. Set the **Language** field to indicate the file's language.
5. Upload additional versions of the same file in other languages as needed.
When files are shared through portals or messages, the system can deliver the appropriate language version based on the client's language preference.
#### How to Track File Downloads
Monitor when files are accessed and downloaded.
1. Navigate to the **Files** page and click **Edit** next to a file.
2. Review the file's download and access history in the file detail view.
3. Use the **Opens** section under **Admin** > **Portals** to track when portal visitors access shared files.
#### How to Manage File Versions
Replace an existing file while preserving the same link and reference.
1. Navigate to the **Files** page and click **Edit** next to the file you want to update.
2. Click **Choose File** to select the new version.
3. Click **Start Upload** to replace the current file.
The file URL remains the same, so any existing links in messages, portals, or cases continue to point to the updated version.
#### How to Set File Expiration and Access Restrictions
Control when and how files are accessible.
1. Navigate to the **Files** page and click **Edit** next to a file.
2. Set an **Expiration Date** to automatically restrict access after a specific date.
3. Configure access settings to limit who can view or download the file (e.g., only signed-in portal users).
4. Click **Save** to apply the restrictions.
Expired files are no longer accessible through portals or shared links.
#### How to Share Files Publicly
Make files available to clients and the public through portals and shared links.
1. Navigate to the **Files** page and click **Edit** next to the file you want to share.
2. Enable the **Public** toggle to make the file accessible without requiring sign-in.
3. Copy the generated **Public URL** to share the file via email, messages, or your website.
4. To share files through a portal, attach the file to a case or assign it to a portal's resource section.
5. Click **Save** to apply the sharing settings.
Public files are accessible to anyone with the link. Use the **Expiration Date** setting to limit how long the file remains available.
#### How to Create Resource Libraries
Organize files into resource libraries that clients can browse through your portal.
1. Navigate to the **Files** page.
2. Create a folder structure for your resource library (for example, "Forms," "Guides," "Policies").
3. Upload files to the appropriate folders.
4. Go to **Admin** > **Portals** and edit the portal where you want to display the library.
5. Enable the **Resources** section on the portal.
6. Select the folders or files to include in the portal's resource library.
7. Click **Save** to publish the resource library on your portal.
Clients can browse, view, and download files from the resource library through their portal. Use descriptive file names and organize content into clear categories so clients can find what they need quickly.
### What to Expect
After following these steps, you have a well-organized collection of files in eCourtDate that is accessible anytime. Uploaded files can be attached to cases, shared through portals, and referenced across your agency's communication workflows. Trashed files can be recovered through the search function by enabling the **Trashed** filter.
### Best Practices
- Use descriptive file names so documents are easy to find through the search function.
- Organize files into folders using a consistent naming convention that matches your agency's filing structure.
- Regularly review and trash files that are no longer needed to keep your file library manageable.
- Use the list view when you need to see file details such as upload date and creator, and grid view for a visual overview of image files.
- Attach relevant files directly to cases so they are accessible to clients and subscribers through the web portal.
### Frequently Asked Questions
**Q: Are there limitations on file size or types for uploads?**
A: eCourtDate supports common file formats including PDF, DOC, DOCX, and standard image formats. File size may be restricted to maintain system performance. If you encounter an upload error, try reducing the file size or converting to a supported format.
**Q: Can clients access files I upload?**
A: Files attached to cases can be accessed by clients and case subscribers through the web portal, if cases are enabled on the portal. Files stored only in the **Admin** > **Files** section are not directly accessible to clients.
**Q: Can I recover a file after trashing it?**
A: Yes. Navigate to the **Files** page, enable the **Trashed** filter in the search form, and locate the file. You can then restore it from the trash.
**Q: Who can see the files I upload?**
A: Files in the **Admin** > **Files** section are visible to users with appropriate permissions. Files attached to cases follow the case's access rules, including portal visibility for clients and subscribers.
**Q: Can I upload multiple files at once?**
A: You can upload files one at a time using the **Choose File** and **Start Upload** process. Repeat for each additional file.
### Troubleshooting
**Issue:** File upload fails or does not complete.
**Symptoms:** Clicking **Start Upload** does not add the file to the file list, or an error message appears.
**Solution:** Check that the file format is supported (PDF, DOC, DOCX, or common image formats). Verify that the file size does not exceed the system limit. Try uploading a smaller file to confirm the feature is working, then contact help@ecourtdate.com if the issue persists.
**Issue:** Cannot find a previously uploaded file.
**Symptoms:** Searching by file name returns no results.
**Solution:** The file may have been moved to the trash. Enable the **Trashed** filter in the search form and search again. Also verify that you are searching in the correct folder by using breadcrumb navigation to return to the root directory.
**Issue:** Cannot access the Files page.
**Symptoms:** The **Files** option is not visible under the **Admin** dropdown.
**Solution:** Confirm that your account has Super Admin privileges. Contact your agency administrator to verify your role and permissions under **Admin** > **Users** > **Roles**.
### Related Articles
- [How to Manage Cases](/how-to-manage-cases)
- [How to Upload a Flat File](/how-to-upload-a-flat-file)
- [How to Manage Clients](/how-to-manage-clients)
- [How to Search for Outbound Messages Using Filters](/how-to-search-for-outbound-messages-using-filters)