Use eCourtDate as your texting service in Avenu Insight's Clearview Jury. Quickly integrate Clearview Jury and eCourtDate to send text messages to your jurors from Clearview's ad-hoc form.
Prerequisites
You will need the following before using this article:
- A Clearview Jury instance with the ability to modify configuration properties.
- You must be a Super Admin user in eCourtDate.
- Your eCourtDate agency must have at least one Agency Phone Number marked as the Primary.
Configuration Steps
We recommend starting with a staging agency to test integrating initially.
1) Login to the eCourtDate Console.
2) Click on APIs.
3) Choose your customer profile in the top left.
4) Click Add API.
5) Enter a name for the API client.
6) Choose the default agency.
7) Choose the default region.
8) Click Add API. You will be redirected to the newly created API client.

Note: we recommend setting an email address for the Alert Contacts setting. This is used to send notifications of any potential issues related to the API client.
9) Login to your Avenue Admin > Configuration > Config Properties. You will need to update the following configuration properties:
eCourtDate-clientId
Copy and paste the Client ID from eCourtDate.
eCourtDate-clientSecret
Copy and paste the Client Secret from eCourtDate.
If the Client Secret is hidden, click the unlock icon to view.
eCourtDate-server
If in staging, use: staging.api.ecourtdate.com
If in production, use your region name. One of the following:
us-east.api.ecourtdate.com
us-south.api.ecourtdate.com
us-west.api.ecourtdate.com
eCourtDate-courtId
Set this property to be FALSE
textingService
Set this property to be ECOURTDATE


What to Expect
Once the configuration is complete, you can send ad-hoc messages from Clearview. After sending a message, you should expect:
- Clearview Jury delivery report should not show any errors or issues.
- The eCourtDate API client shows the last active date and time instead of Not Active. If active, you can click the Logs button to view any requests.
- A new outbound message should show in the eCourtDate agency dashboard.
- If you upload an attachment in the ad-hoc form, you should see the file linked to the message in eCourtDate.
Troubleshooting
If the API client is still inactive after sending a message, ensure the configuration properties are set appropriately. The eCourtDate-server property should not have https://, any trailing slashes, or spaces.
Outdated configuration properties may be cached; wait a few minutes and try sending a message again. If the configuration is set properly and you've waited over 15 minutes, try restarting the Clearview server.
If you cannot send a message, contact the eCourtDate Help team for assistance via help@ecourtdate.com
Best Practices
To optimize message delivery, we recommend a few optional settings in eCourtDate.
General Settings
In your eCourtDate agency, click Admin > Settings and update the below settings:
Default Message Delay
Set this setting to 0 so that outbound messages are not delayed.
Send Immediately
Enable this setting so that outbound messages are immediately dispatched.
Auto Run Lookups
Enable this setting so that phone numbers from Clearview are automatically validated.
Auto Replace Links
Enable this setting so links in outbound messages will be automatically replaced with a trackable portal link.
For this setting to work, you must configure a Portal in Admin > Portals. Once enabled, you should expect links in outbound messages to use the portal. When clicked, the user will be automatically redirected to the original link. This helps minimize spam filters by ensuring carriers do not flag links as suspicious. When a portal link is clicked, you should see an OPEN status on the message with details of the device that clicked the link. To manage previously created redirects, go to Admin > Portals > Redirects.
We recommend using your own domain for portal links. Read our guide here on how to configure a custom domain.
Auto Create Contacts
Enable this setting to track jurors who opt out by replying with a STOP message.
Default Message Subject
Configure a subject to be prepended to outgoing text messages. This setting supports merge tags.
Agency Phone Settings
Under Admin > Settings, click Agency Phones, then click edit on your primary phone number.
Inbound Calls Auto Response
Set a message that will be played as audio when a juror calls the agency phone number.
Inbound Texts Auto Response
Set a reply message that will be sent automatically when a juror texts the agency phone number.
Auto-Forward Inbound Calls
Set a phone number to receive inbound calls automatically.
Auto-Forward Inbound Texts
Set multiple emails or phones to forward inbound texts to. If a phone number, the phone must be able to receive text messages.
You can test inbound agency phone settings in staging. Auto responses and forwarded messages are simulated in the dashboard.
Learn more about how to manage agency phone numbers here.
How to Configure Multi-Agency
Clearview Jury will send ad-hoc messages to the default agency set in the eCourtDate API client. With multi-agency, each court location can use its own separate agency. This provides a unique phone number to each agency, with its own inbound auto-
To use separate agencies per court location:
In the eCourtDate API client, under Enabled Agencies, click to enable your desired agencies. Click Save to apply your changes.
In the Clearview Jury configuration, set eCourtDate-courtId to TRUE
Log in to each eCourtDate agency, click Admin > Settings, and set the Agency Reference to match your Clearview Court ID. Click Save to apply your changes.
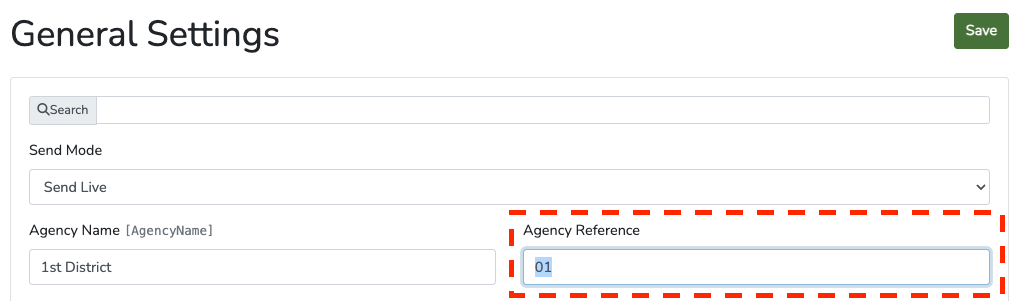
Ensure the Agency Reference is also set in the default agency.
Once configured, you should expect outbound messages to use the agency based on the Court ID. The default agency will be used if the agency is not found.
How to Configure a Data Dashboard
Create a data dashboard to track message performance in real-time.
Steps:
1) Click Admin > Dashboards
2) In the Add Data Dashboard form:
- Choose a Name
- Set the Status to Private
- Keep the Data Source as Messages
- Click Add
You'll be redirected to the newly created dashboard.
3) (Optional) If you are using multi-agencies, click the Agencies button, then choose additional agencies to include in the dashboard.
After making any changes, click Save.
4) Click Dashboard Link then click Messages below the map. You should see any messages for each enabled agency automatically.
Note: staging agencies do not sync data with the dashboards. To simulate what a dashboard could look like, enable the Simulate Data option when editing a dashboard.
Supported Merge Tags
When sending outbound messages, the following merge tags are supported if configured in the Agency General Settings page.
- [AgencyName]
- [AgencyReference]
- [AgencyPhone]
- [AgencyEmail]
- [AgencyWebsite]
- [AgencyAddress]
- [AgencyCity]
- [AgencyState]
- [AgencyZip]
The following merge tags are based on when the message is created:
- [DateToday]
- [DateNow]
- [TimeNow]
- [DateTomorrow]
- [DateYesterday]
- [Date12Hours]
- [DateNextWeek]
- [TimeNow]
- [BusinessHours]
- [BusinessFromTime]
- [BusinessToTime]
- [BusinessDays]
- [NextBusinessDay]
Tip: [RandomTag] can be used when testing to ensure messages are considered duplicates.
The following merge tags can be used if the message is linked to a location:
- [Location]
- [LocationName]
- [LocationFullAddress]
- [LocationAddress]
- [LocationAddress2]
- [LocationCity]
- [LocationCounty]
- [LocationState]
- [LocationZip]
- [LocationLink]
- [LocationInstructions]
- [LocationPasscode]
- [LocationNotes]
- [LocationPhone]
- [LocationEmail]
- [LocationWebsite]
- [LocationDescription]
- [LocationBusinessHours]