This guide explains how to integrate Tyler Tech Odyssey with eCourtDate, enabling automated uni-directional synchronization of data.
Prerequisites
Before starting, ensure the following:
-
Access and Licenses:
- You must have access to the Tyler Tech Odyssey API toolkit and your system is deployed in a SaaS environment.
- You must use a supported Odyssey version: 2014 and below, 2017, 2018, 2019.2
- Admin user access to an eCourtDate agency account.
-
Environment Setup:
- Utilize staging environments for both Odyssey and eCourtDate to test the integration before moving to production.
-
Network Access:
- Ensure the eCourtDate batch servers are whitelisted in your network.
Scope
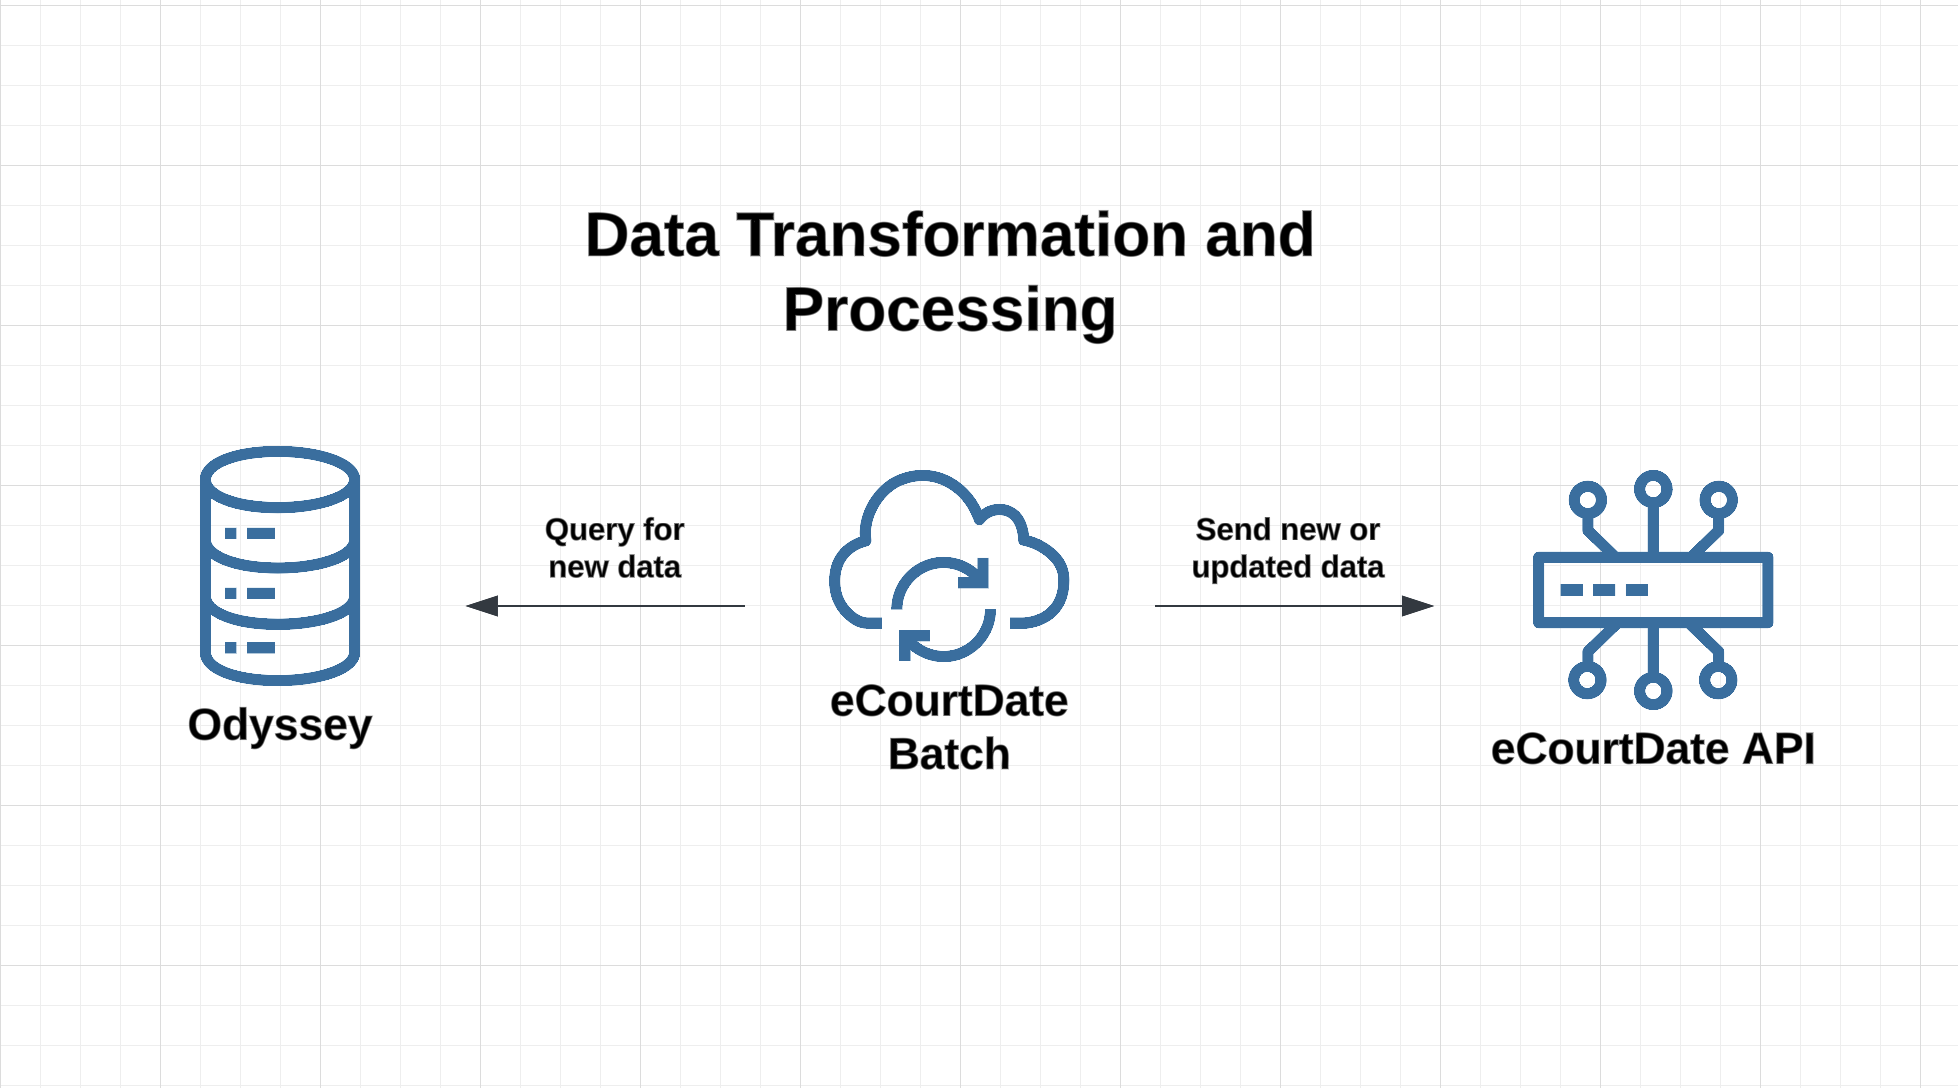
The integration is uni-directional, where eCourtDate retrieves data from Odyssey on a scheduled basis using a cron-triggered batch process. Options for data retrieval frequency include daily, weekly, monthly, or one-time sync.
Objective
The integration handles data transformation and syncing in the target eCourtDate agency.
- Parties: Sync parties to clients with their identifiers, name, phone number, and email address.
- Cases: Sync case metadata for association with events and clients.
- Events: Sync scheduled case events based on party and case number
- Attorneys: Sync registered attorneys to associate with cases
- Fees: Sync case fees and associate with clients.
- Warrants: warrants with their current status and number.
Data Mapping
The integration automatically maps Odyssey fields to their eCourtDate equivalent. We recommend customizing the labels in your eCourtDate Agency to match the Odyssey naming convention.
PARTIES
- Person ID*
- Nickname
- Business
- Current Known
- Title
- First
- Middle
- Last
- Suffix
- Business Name
- Party Nickname
- Phone*
- Email*
CASES
- Node ID
- Case ID
- Case Number*
- Case Style
- Case Status*
- Case Type*
- Case Security Group
- Case Consolidation
EVENTS
- Result
- Sessions
- Total Results
- Session
- Session ID*
- Node ID
- Type
- Calendar
- Start Time*
- End Time
- Date*
- Status*
- Open*
- Closed*
- Full
- AdHoc
WARRANTS
- Warrant ID
- Warrant Number*
- Node ID
- Status*
* Required
How to Get Started
Step 1: Get API License and Credentials from Odyssey/Enterprise Justice
- Login to your Odyssey environment.
- Click the gear icon in the top right corner and choose About Justice Portfolio.
- Verify that you have the API license and a compatible version.
How to Add an API User and Provide Rights to Enterprise Justice APIs
- Create a new Enterprise Justice User specifically for eCourtDate. This is the user the integration will rely on. No rights/roles should be defined, as this user only exists for API calls.
- Configuration Path: Configure>System>Security>Users>Odyssey Users
- Adjust the API Message Security configuration to allow the eCourtDate API user access to the following message type:
- GetOdysseyReleaseLevel
- Configuration Path: Configure>Integrations>Codes>TranslationBridge>APIMessageSecurityConfigurations>System
Notes:
- All configuration and testing should be done in a test environment before configuring and deploying to a production environment.
- The client should have an externally facing web endpoint for both Test and Prod environments (one for each – https://[ClientExternalServer] /ExternalWebService/TranslationBridgeExternalService.asmx)
- Verify the API user by issuing a GetOdysseyReleaseLevel message to the relevant Externally-Facing endpoint URL.
- Assign the API user for each Odyssey API that needs to access to support the business process.
Step 2: Login to eCourtDate Console and Configure Odyssey Integration
- Log in to your eCourtDate Console.
- Navigate to the Integrations section.
- In the ADD INTEGRATION form, enter a name for the Odyssey integration (e.g., “Staging Odyssey”), choose Tyler Tech Odyssey as the integration, and click ADD.
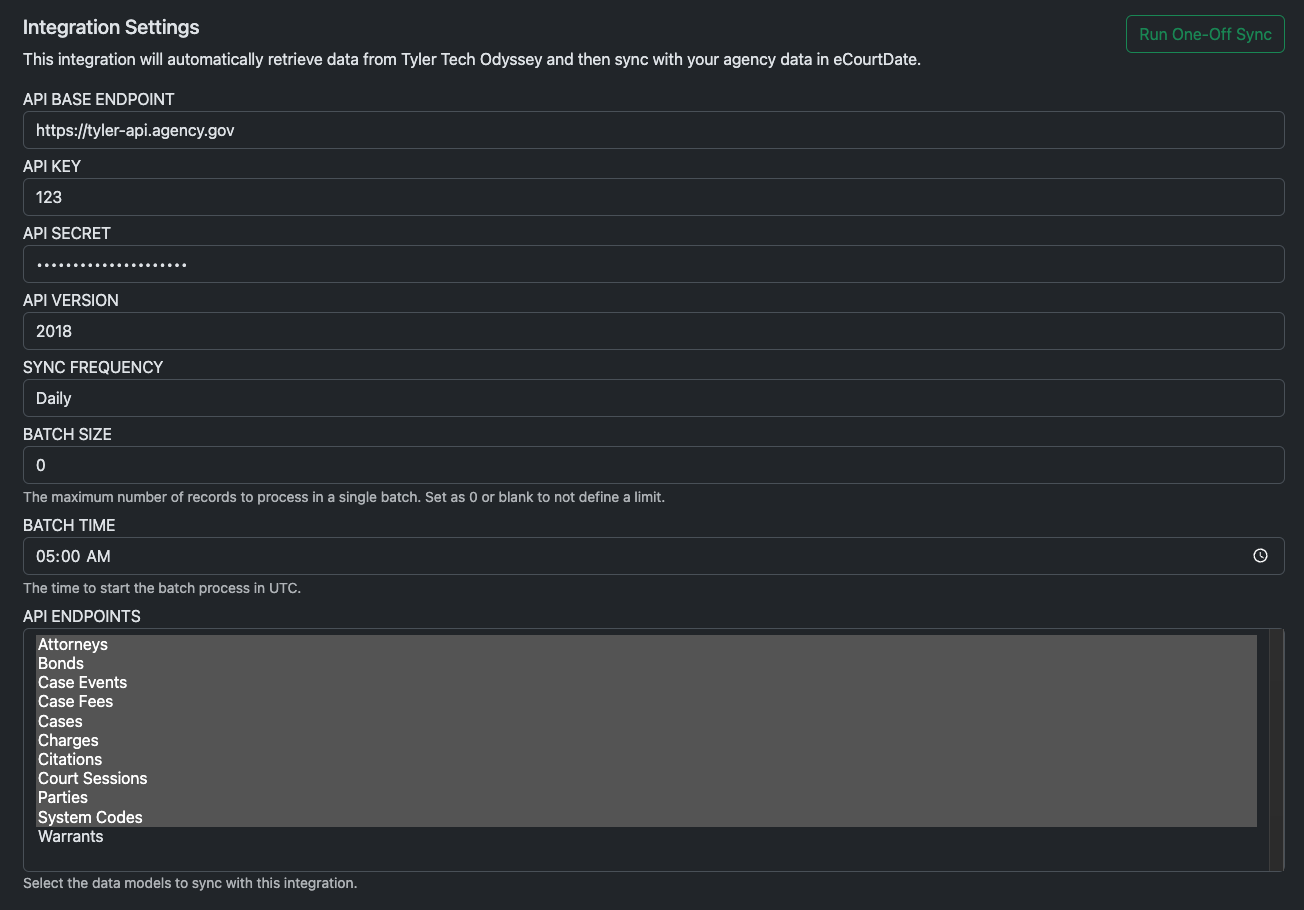
- Configure the integration:
- API Version: 2014 and below, 2017, 2018, 2019.2
- API Base URL: paste value from step 1
- API Key: paste value from step 1
- API Secret: paste value step 1
- Batch Size: max number of records to process per batch
- Batch Time: start time per patch (defaults to 05:00 am UTC)
Step 3: Test One-Off Sync
- Run a one-off data sync from Odyssey to eCourtDate to verify data flow.
- Once the integration is configured, click the Run One-Off Sync button.
- Login to the agency to see any data that has been created or updated.
You will receive an email with the sync status and batch results once the sync is complete.
Allow for up to one hour for a one-off sync to process.
Step 4: Enable Recurring Sync
- After successful testing, enable the recurring sync process in the eCourtDate console.
- Set the sync frequency (e.g., daily or weekly) based on your agency’s requirements.
- Monitor initial syncs to ensure data consistency.
What to Expect
Once integrated, eCourtDate will:
-
Automate Message Creation:
- Messages are generated based on data from Odyssey and the configured message templates in eCourtDate.
-
If Messages Are Not Created:
- Confirm that initial agency set up in eCourtDate is complete.
- Verify that parties in Odyssey have valid phone numbers and email addresses.
- Ensure events and payments data auto-assign a Flows in eCourtDate.
Troubleshooting
If you encounter issues during integration:
-
Connection Issues:
- Verify API credentials and URL settings in the eCourtDate console.
- Confirm that the integration status does not show any errors.
- Confirm that the eCourtDate servers are whitelisted in Odyssey.
-
Data Sync Problems:
- Check that the necessary API endpoints in Odyssey are active and accessible.
- Ensure that all required fields (e.g., contact information) are populated in Odyssey.
-
Message Generation Errors:
- Verify message template configurations in eCourtDate.
- Check agency settings to ensure proper mapping of events and payments.
-
Logs and Support:
- Review logs in the eCourtDate Console Logs page for specific error details.
- Contact eCourtDate support at help@ecourtdate.com for further assistance if issues persist.