Updating Flows Is Essential for Efficient Communication. It Allows Quick Changes to Pre-set Message Templates.
Why Update Flows?
Flows allow automation, consistency, improved communication, efficiency, and cost savings.
Prerequisites
To edit flows, you must first create them. Click here to learn How to Create Flows.
How to Update an Existing Flow Message
Step 1) Click Admin and Flows from the top navigation
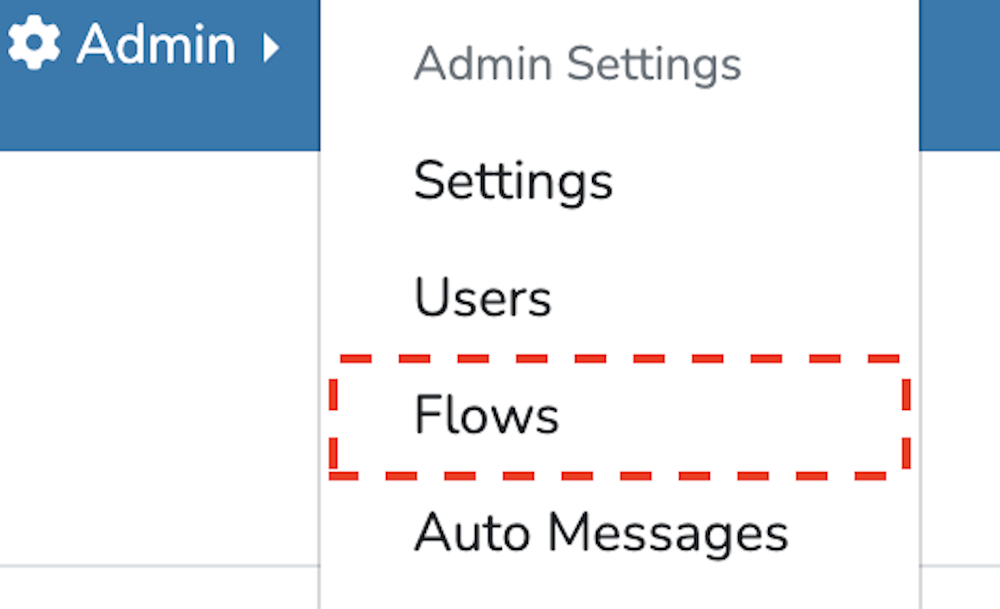
Step 2) Select the flow you want to modify.

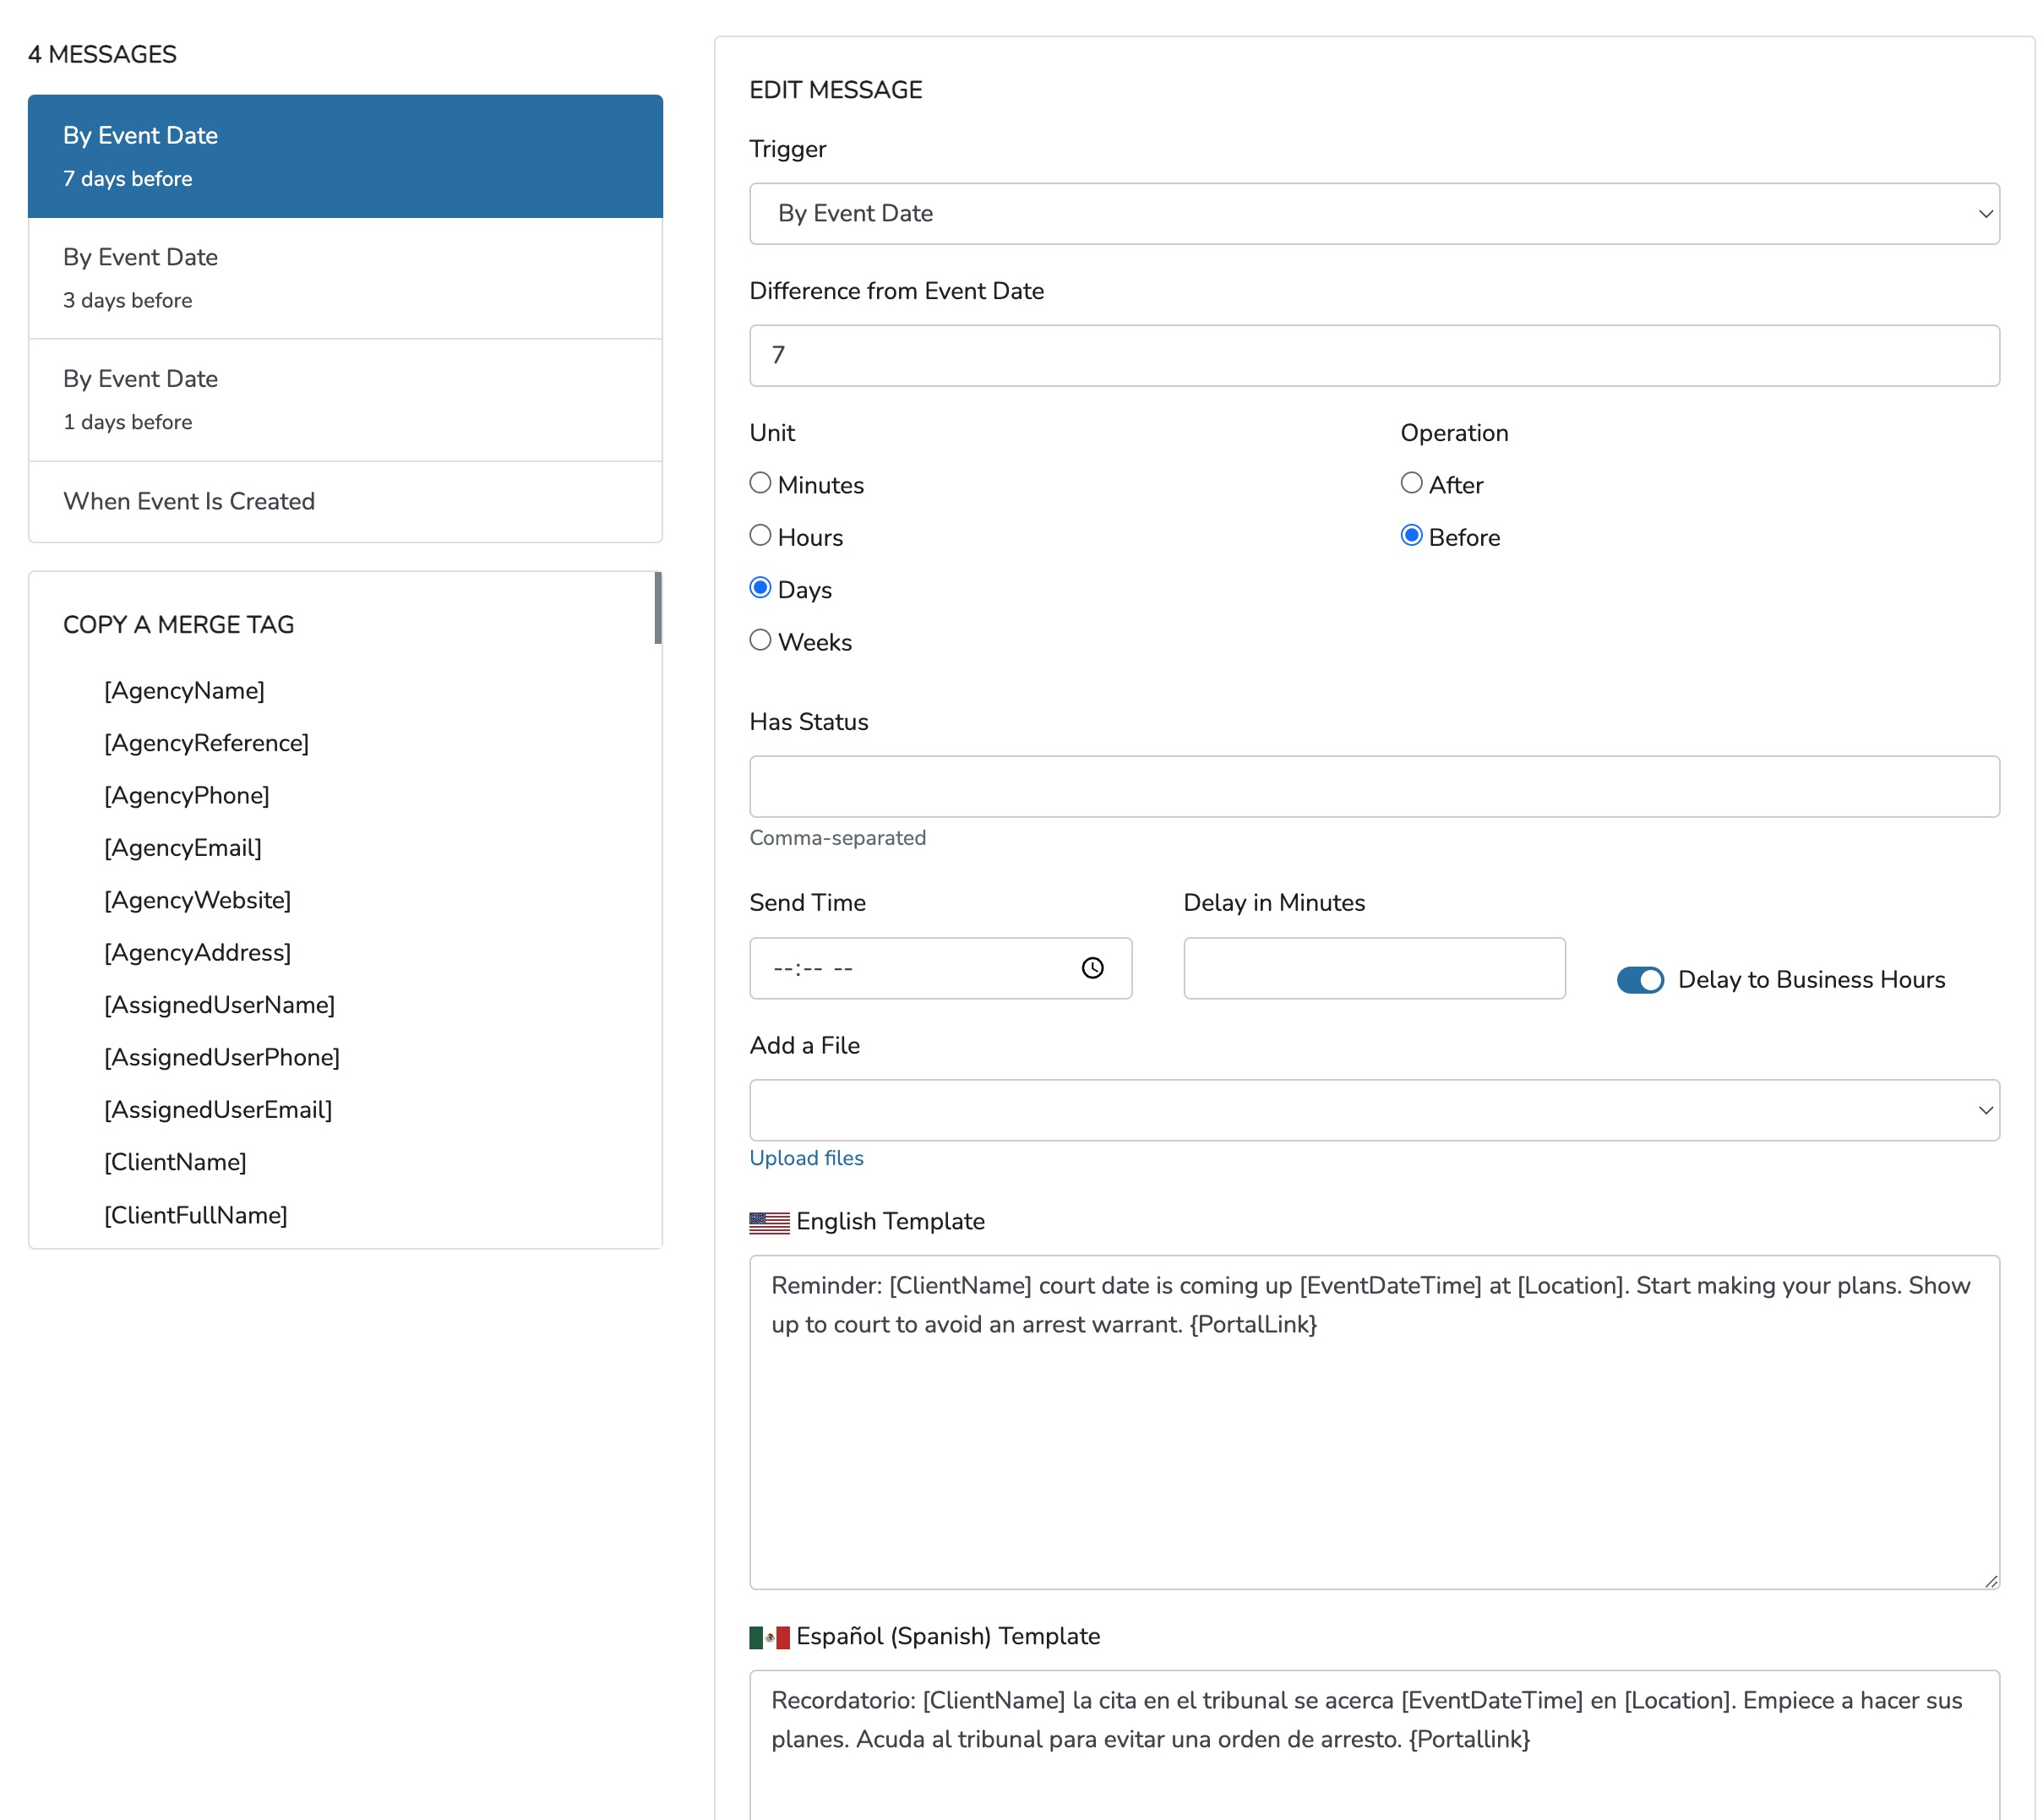
Step 3) To modify a flow message, click on the message you wish to change. Once you have made your desired modifications, click the "Save" button to implement these changes.
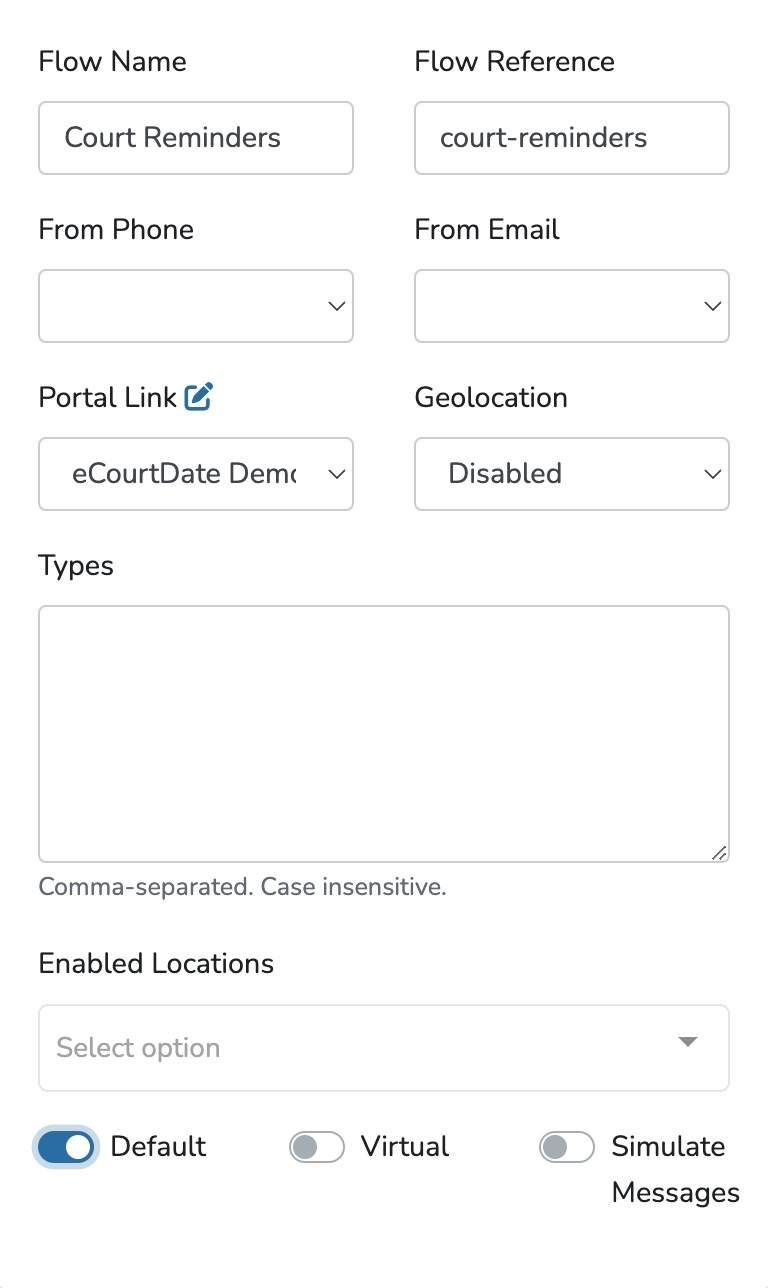
The following settings apply to every message in a Flow. Click on Save after making any changes:
| Settings | Action |
| Flow Name | Internal display name |
| Flow Reference | Name used when auto-assigning Flows through uploads and API. |
| From Phone | The From Phone number is used when sending texts and voice calls. Leave blank to use the default Agency Phone. |
| From Email | The From Email address when sending email messages. Leave blank to use the default Agency Email. |
| Portal Link | Choose a Portal to auto-add a Portal Link at the end of each message. |
| Geolocation | Choose a Geolocation option for the Flow. This setting overrides the same setting in the Portal. |
| Types | Enter any types you wish to restrict this Flow. |
| Enabled Locations | You can choose any locations you want to restrict this Flow. |
| Default | Make the Flow the default when creating new Events or Payments. |
| Virtual | Auto-assign any Events to be Virtual when using the Flow. |
| Simulate Messages | create simulated messages regardless if the agency is in Live mode. |
How to Use the Edit Flow Message Form Settings:
Trigger: Choose the event or action that will trigger the flow message. Common triggers include "When Event Is Created," "By Event Date," "When Payment Is Created," etc.
Status: Define the case status or process when this message is sent. For instance, you can set it to send when the case status changes to "Open," "Closed," or any custom status you have defined.
Delay: The Delay option allows you to control when the message will be sent after the trigger event and/or status conditions are met. There are three Delay options available:
a. No Delay: The message will be sent immediately after the trigger event and status conditions are met based on the Default Message Delay settings.
b. Delay: Select a specific time duration after which the message will be sent. For example, you can set it to send the message 1 hour after the trigger event.
c. Business Hours and Business Days: This is where the Delay options work in tandem with the General Settings Business Hours and Business Days settings. When you choose this option, you can define specific business hours and days during which the message should be delayed. For instance, you may want to avoid sending messages during non-working hours or on weekends.
File: Attach relevant files or documents to the message. This could include court documents, reminders, or any other essential information.
Subject: Craft a concise and informative subject line for your message. It should convey the purpose of the message.
Template: Select a pre-defined template for the message. Templates save time and ensure consistency in your communication.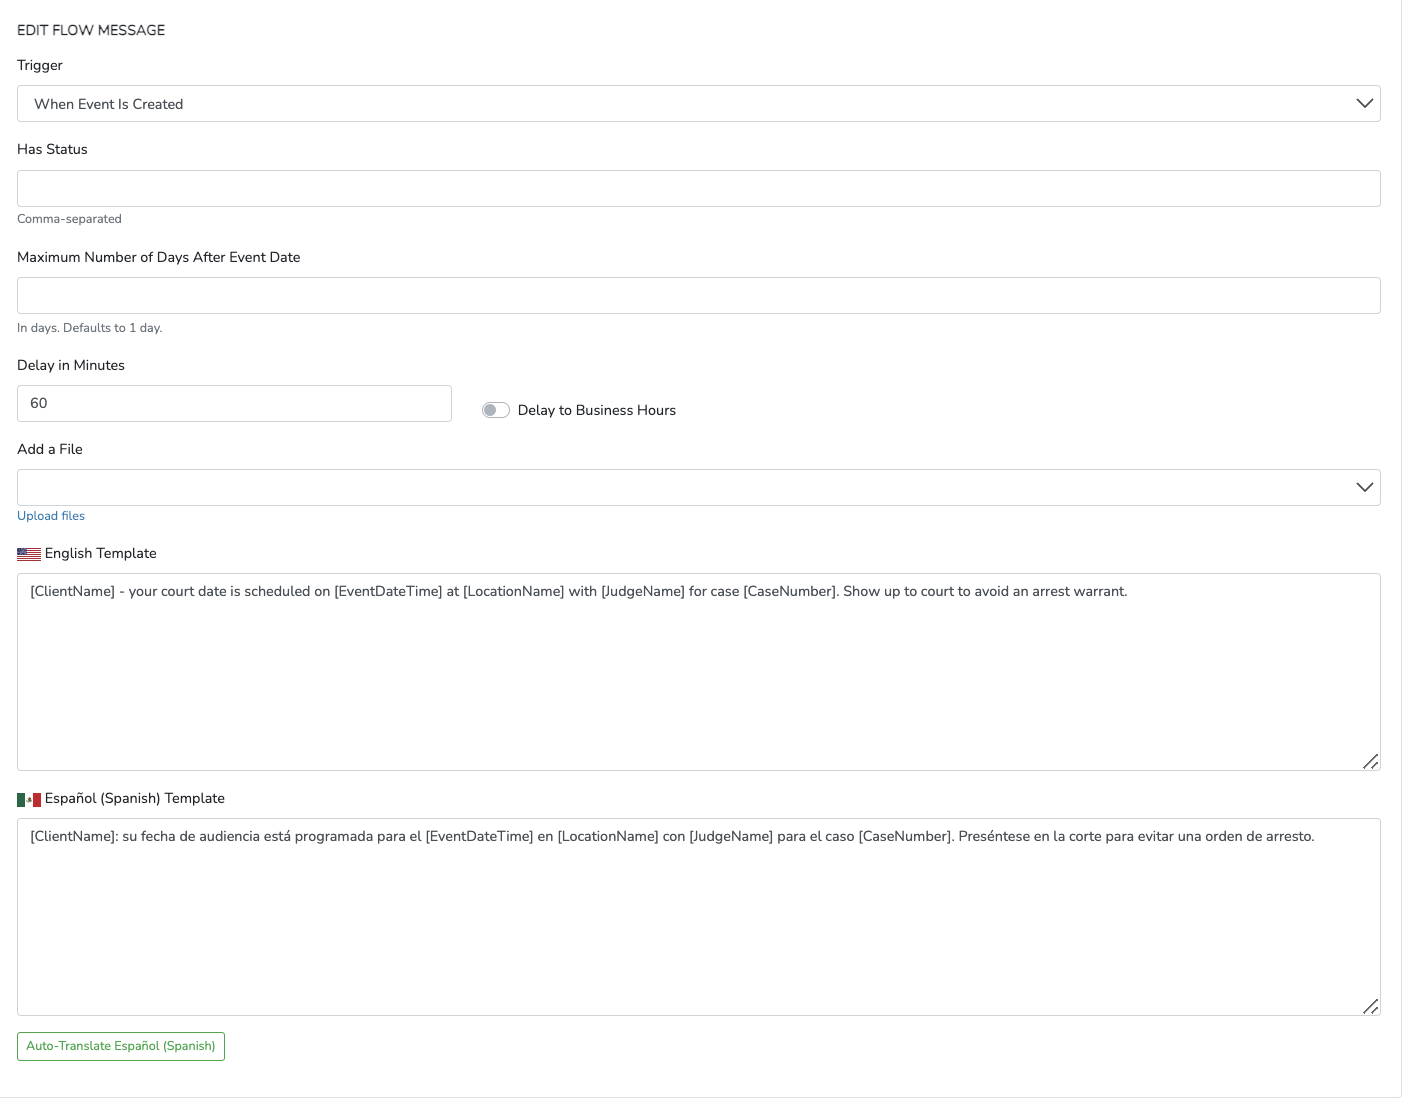
How to Delete an Existing Flow Message
Step 1) Click on a Flow Message in an existing Flow.
Step 2) Click the Trash Message at the end of the page.

How to Sync Scheduled Messages After Making a Change to Flows
Related Records are Events or Payments assigned to the Flow.
Any scheduled messages for a related record will not use the latest version of the Flow unless:
- The Record is updated manually or through an automated integration (API, Uploads).
- The Record is synced due to a client request, such as a language preference change.
- The Record is synced manually by a user.
Newly created records will automatically use the latest version of the Flow. To resync messages for existing Records:
Step 1) Click on the Flow that you want to resync.
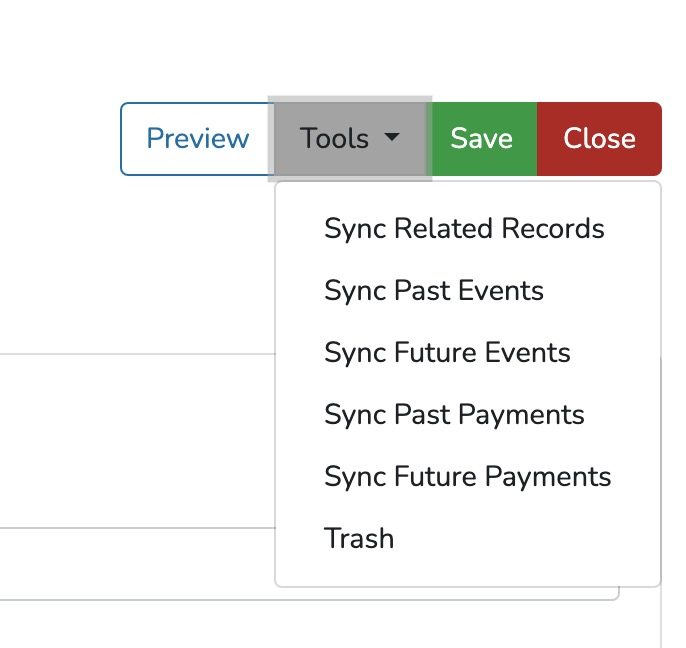
Step 2) Click on the Tools button.
Step 3) Choose a Sync option:
- Sync Related Records - applies the latest Flow to any Record assigned to the Flow (excludes archived or trashed records).
- Sync Past Events - applies the latest Flow to Events that are in the past based on the Event Date.
- Sync Future Events - applies the latest Flow to Events that are in the future based on the Event Date.
- Sync Past Payments - applies the latest Flow to Payments that are in the past based on the Due Date.
- Sync Future Payments - applies the latest Flow to Payments that are in the future based on the Due Date.
What to Expect
After saving your updated flows, you should expect to see the changes take effect immediately. The modifications you made to the flow message settings, including trigger events, status conditions, delays, file attachments, subject lines, and templates, will now be in place. Your communication workflow will be optimized, and messages will be sent out according to your new settings.
Frequently Asked Questions
Question: How can I test the updated flow before it goes live?
Answer: Using the "Preview" feature within the flow management interface to test your updated flow without sending real messages. This allows you to simulate the flow's behavior and ensure everything works as expected before sending it live.